Hướng dẫn sử dụng trình soạn thảo CKEditor
2. CKEditor là gì?
CKEditor là một trình soạn thảo văn bản HTML sẵn sàng cho sử dụng được thiết kế để đơn giản hóa việc tạo ra nội dung web. Đó là một trình soạn thảo WYSIWYG mang lại các tính năng xử lý văn bản phổ biến trực tiếp đến trang web của bạn.
CKEditor là một ứng dụng mã nguồn mở, có nghĩa là bạn có thể sửa đổi nó theo bất kỳ cách nào bạn muốn. Lợi ích của nó đến từ một cộng đồng năng động không ngừng phát triển các ứng dụng với các add-ons miễn phí và quá trình phát triển minh bạch (transparent development process).
3. Download CKEditor
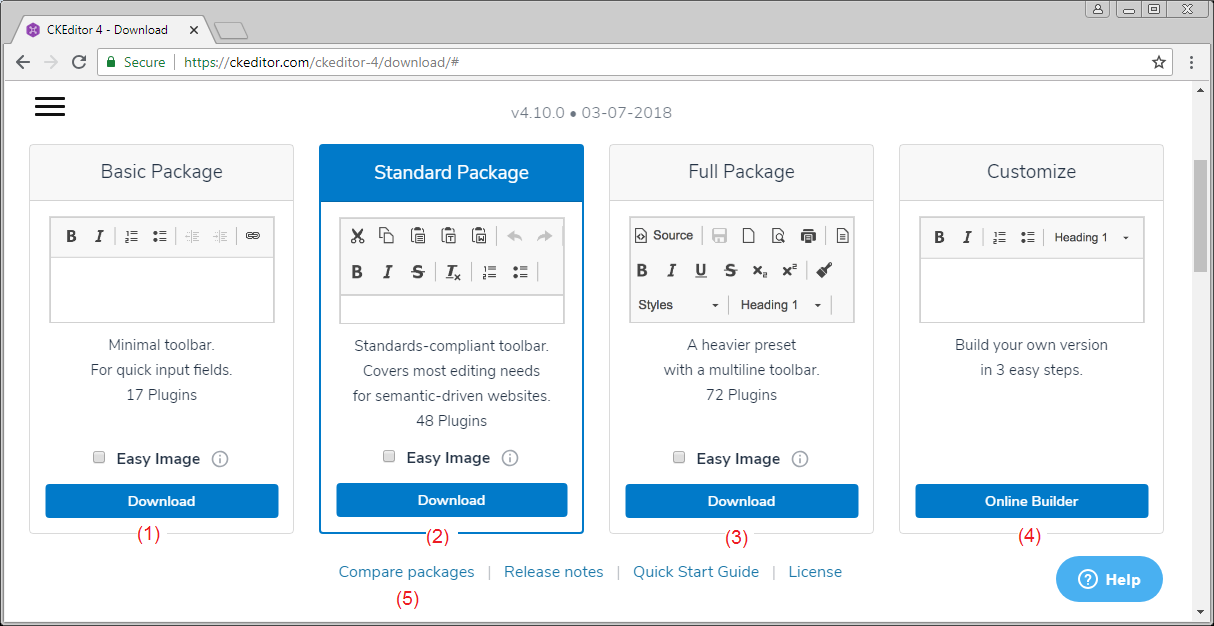
- Basic Package:
- Đây là gói cơ bản, bao gồm các chức năng cơ bản của CKEditor, và là gói nhỏ gọn.
- Standard Package:
- Đây là gói tiêu chuẩn có khoảng 48 plugin.
- Full Package:
- Đây là gói đầy đủ, với tất cả các plugin của CKEditor. Và là gói nặng nhất.
- Customize CKEditor Package:
- Đây là gói tùy biến, bạn có thể lựa chọn các Plugin cần thiết để download về.
Bạn có thể nhấn vào đường link (5) để xem chi tiết sự khác biệt giữa các gói.
Ở đây tôi sẽ download gói đầy đủ các plugin:
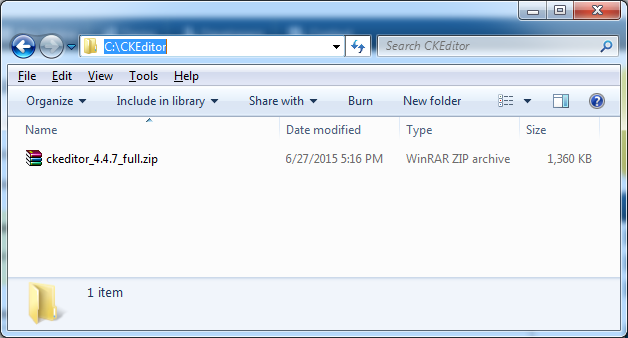
Kết quả download được:
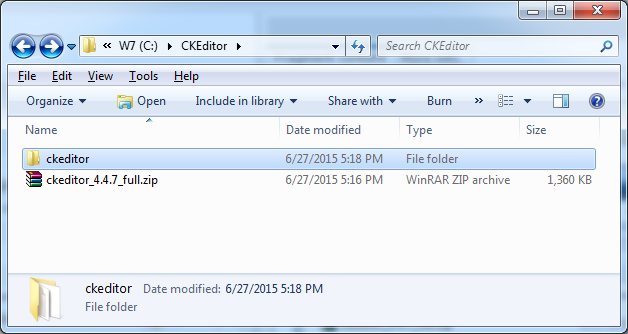
Giải nén:
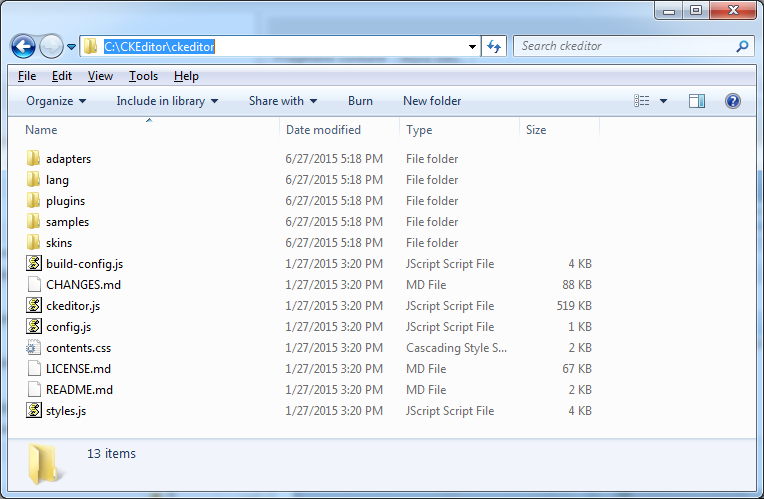
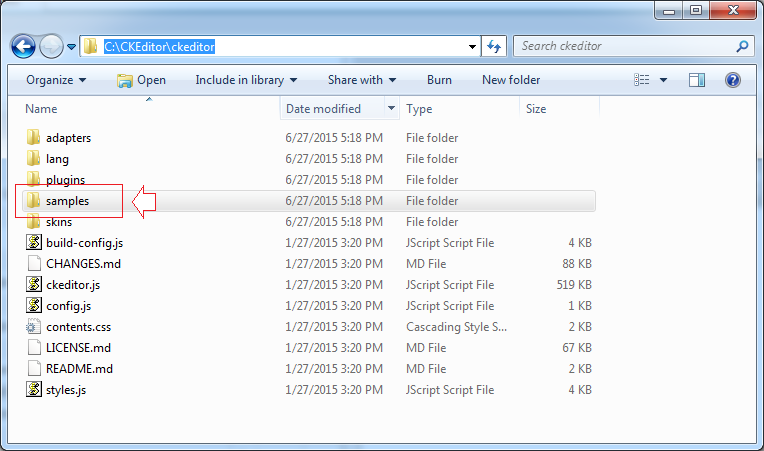
Bạn có thể xem các ví dụ của CKEditor tại thư mục samples:
4. Các ví dụ cơ bản
Tất cả các ví dụ trong tài liệu này đều có trong thư mục samples của CKEditor mà bạn đã download về. Tuy nhiên tôi cố gắng làm nó đơn giản hơn để bạn tiếp cận một cách dễ dàng hơn.
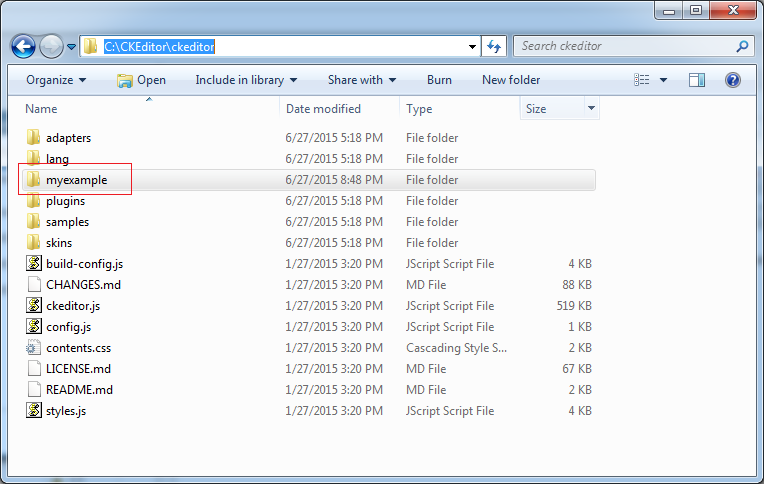
Tạo thư mục myexamples, các ví dụ trong tài liệu này sẽ được đặt trong thư mục đó.
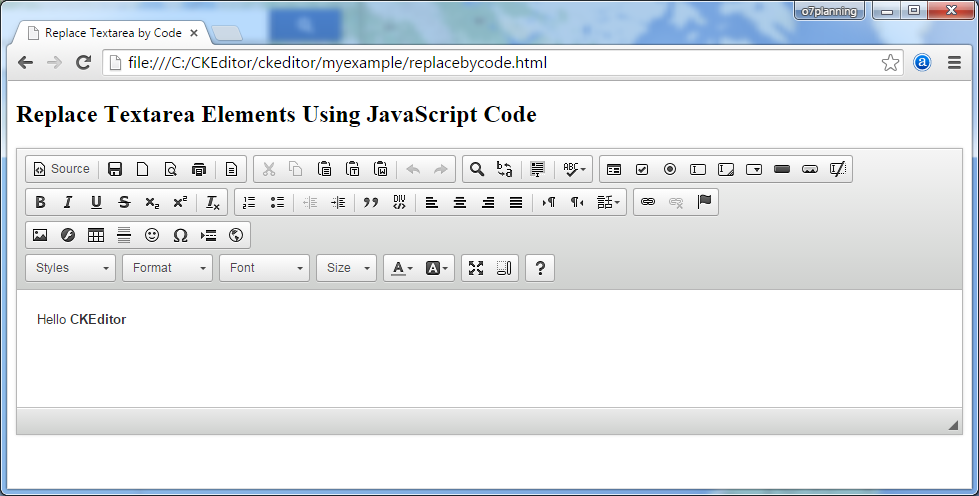
Thay thế các phần tử Textarea sử dụng JavaScript
Ví dụ đơn giản sử dụng CKEditor.replace(..) để thay thế <textarea> bởi CKEditor.
replacebycode.html
<!DOCTYPE html>
<html>
<head>
   <meta charset="utf-8">
   <title>Replace Textarea by Code</title>

   <!-- (1): Khai báo sử dụng thư viện CKEditor -->
   <script src="../ckeditor.js"></script>

</head>
<body>
   <h2>Replace Textarea Elements Using JavaScript Code</h2>

   <form action="" method="post">

       <!-- (2): textarea sẽ được thay thế bởi CKEditor -->
       <textarea id="editor1" name="editor1" cols="80" rows="10">
           <p>Hello <strong>CKEditor</strong></p>
       </textarea>

       <!-- (3): Code Javascript thay thế textarea có id='editor1' bởi CKEditor -->
       <script>

           CKEDITOR.replace( 'editor1' );

       </script>

   </form>
</body>
</html>
Xem ví dụ:
Kết quả chạy ví dụ:
Thay thế các phần tử textarea bởi class name
Với các <textarea> có thuộc tính name, và class ="ckeditor" sẽ tự động được thay thế bởi CKEditor.
<texarea name = "editor1" class="ckeditor"> </texarea>


<textarea name = "editor2" class="ckeditor"> Text </textarea>
replacebyclass.html
<!DOCTYPE html>
<html>
<head>
   <meta charset="utf-8">
   <title>Replace Textareas by Class Name</title>

   <script src="../ckeditor.js"></script>

</head>
<body>

   <h1>Replace Textarea Elements by Class Name</h1>

   <form action="" method="post">

       <textarea class="ckeditor" name="editor1" cols="80" rows="10">

           <p>Hello <strong>CKEditor</strong></p>

       </textarea>

    </form>

</body>
</html>
Chạy ví dụ:
Tạo các CKEditor với jQuery
Ví dụ tạo CKEditor sử dụng JQuery.
jquery.html
<!DOCTYPE html>
<html>
<head>
<meta charset="utf-8">
<title>jQuery Adapter — CKEditor Sample</title>
<script src="http://code.jquery.com/jquery-1.11.0.min.js"></script>
<script src="../ckeditor.js"></script>
<script src="../adapters/jquery.js"></script>
<script>
$( document ).ready( function() {
$( '#editor1' ).ckeditor();
} );
function setValue() {
$( '#editor1' ).val( $( 'input#val' ).val() );
}
</script>
</head>
<body>
<h1 class="samples">Create Editors with jQuery</h1>
<form action="" method="post">
<textarea id="editor1" name="editor1" cols="80" rows="10">
<p>Hello <strong>CKEditor</strong></p>
</textarea>
<input type="text" id="val" value="I'm using jQuery val()!" size="30">
<input onclick="setValue();" type="button" value="Set value">
</form>
</body>
</html>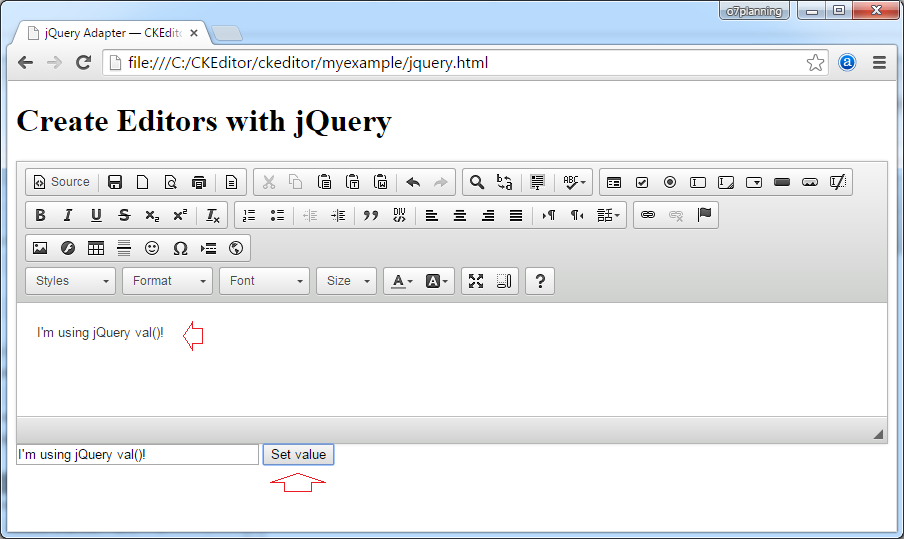
Chạy ví dụ:
5. Tùy biến cơ bản
Thay đổi màu giao diện
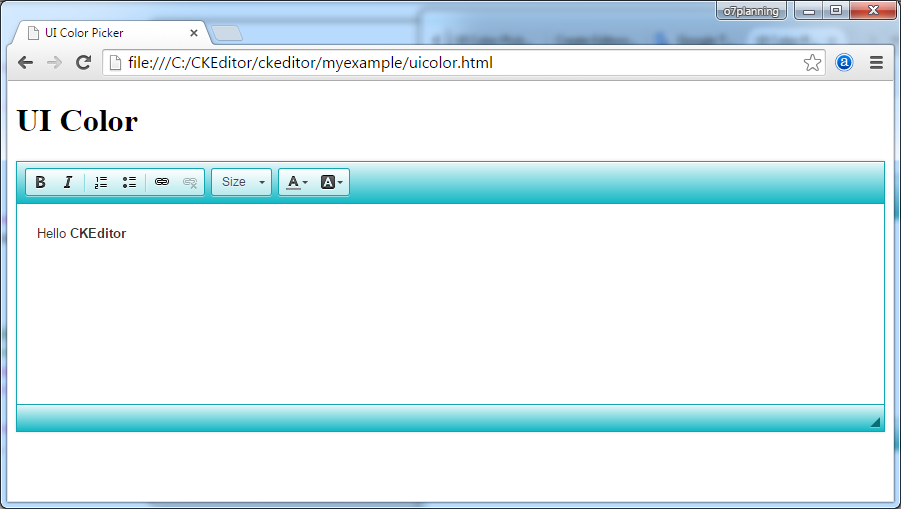
CKEDITOR.replace( 'textarea_id', {
    uiColor: '#14B8C4'
});
uicolor.html
<!DOCTYPE html>
<html>
<head>
   <meta charset="utf-8">
   <title>UI Color Picker</title>

   <script src="../ckeditor.js"></script>

</head>
<body>
   <h1>UI Color</h1>

   <textarea id="editor1" name="editor1" cols="80" rows="10">
       <p>Hello <strong>CKEditor</strong></p>
   </textarea>

   <script>

       // Replace the <textarea id="editor1"> with an CKEditor
       // instance, using default configurations.
       CKEDITOR.replace( 'editor1', {
           uiColor: '#14B8C4',
           toolbar: [
               [ 'Bold', 'Italic', '-', 'NumberedList', 'BulletedList', '-', 'Link', 'Unlink' ],
               [ 'FontSize', 'TextColor', 'BGColor' ]
           ]
       });

   </script>
</body>
</html>
Chạy ví dụ:
Xem thêm:
Thay đổi ngôn ngữ
uilanguages.html
<!DOCTYPE html>
<html>
   <head>
      <meta charset="utf-8">
      <title>User Interface Globalization</title>

      <script src="../ckeditor.js"></script>

   </head>
   <body>

      <h1>User Interface Languages</h1>
      <form action="" method="post">

         <select onchange="createEditor( this.value );" id="languages">
            <option value="en-gb">English (United Kingdom)</option>
            <option value="vi">Vietnamese</option>
            <option value="zh-cn">Chinese Simplified</option>
            <option value="zh">Chinese Traditional</option>
         </select>

         <textarea id="editor1" name="editor1"  cols="80" rows="10">
               <p>Hello <strong>CKEditor</strong></p>
         </textarea>

         <script>
            var editor;

            function createEditor( languageCode ) {
                if ( editor )
                    editor.destroy();

                // Thay thế <textarea id="editor1" với một CKEditor, sử dụng cấu hình mặc định
                editor = CKEDITOR.replace( 'editor1', {
                    language: languageCode,

                    on: {
                        instanceReady: function() {

                            // Chờ cho tới khi editor sẵn sàng để sét language.
                            var languages = document.getElementById( 'languages' );
                            languages.value = this.langCode;
                            languages.disabled = false;
                        }
                    }
                });
            }

            // Tại thời điểm bắt đầu, tải ngôn ngữ mặc định.
            createEditor( '' );

         </script>

      </form>
   </body>
</html>
Chú ý: Danh mục các mã ngôn ngữ và tên ngôn ngữ bạn có thể xem trong:
- <CKEditor_Home>/samples/assets/uilanguages/languages.js
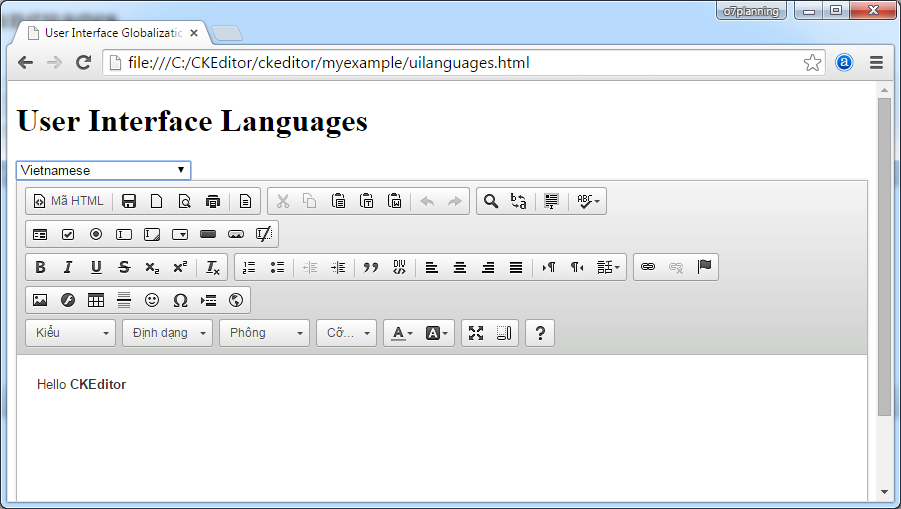
Chạy ví dụ:
6. Chỉnh sửa nội tuyến (Inline Editing)
Tạo một trình soạn thảo nội tuyến phức tạp
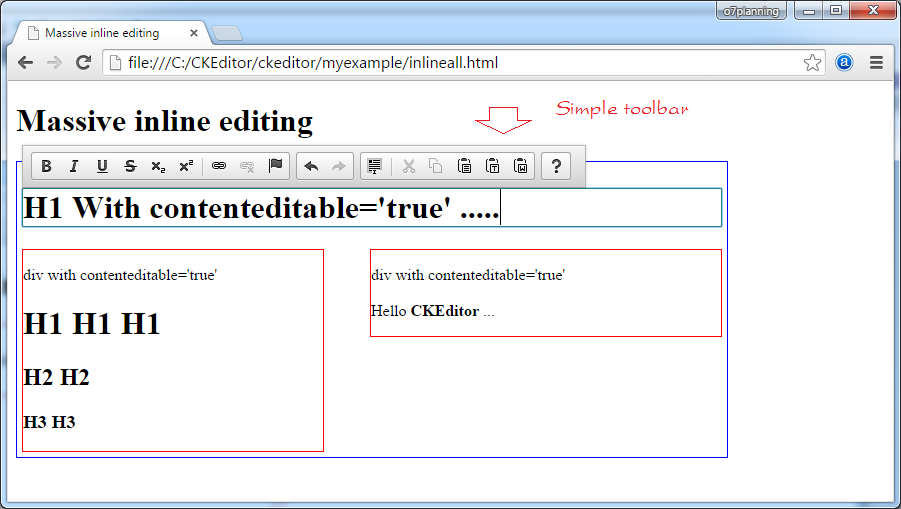
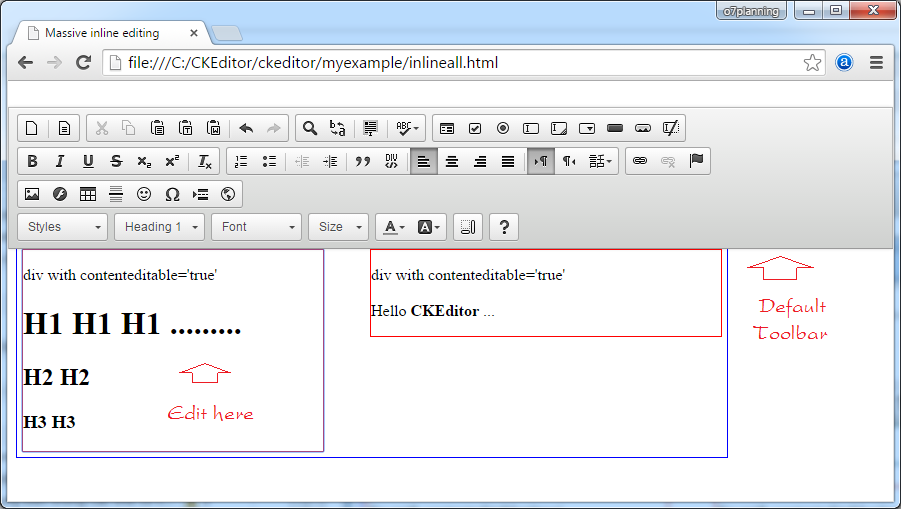
Ví dụ này thể hiện những tính năng chỉnh sửa nội tuyến (inline editing) - đối tượng CKEditor sẽ được tạo ra tự động từ các phần tử (element) có thuộc tính contenteditable = 'true'.
Bạn có thể sửa đổi nội dung HTML bên trong các thẻ có thuộc tính contenteditable='true'. Và thanh công cụ sẽ hiển thị khi bạn hiệu chỉnh:
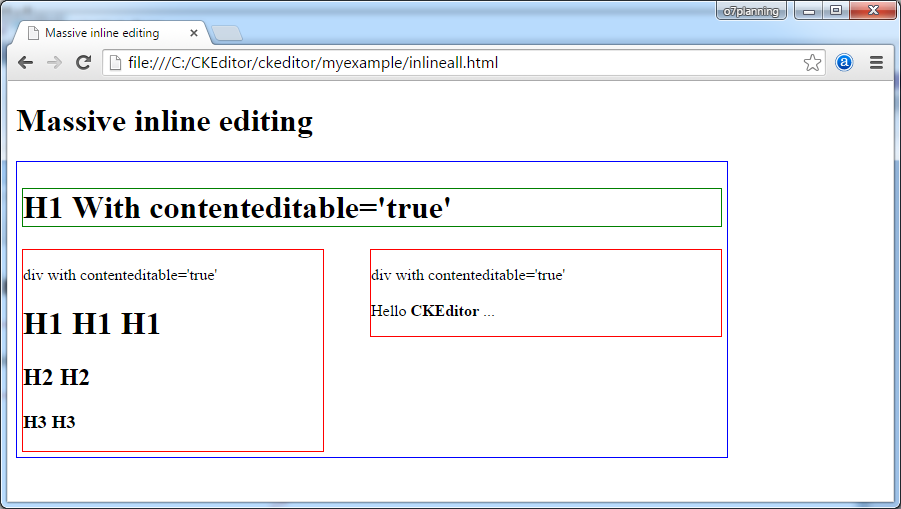
- Nếu h1, h2, h3 hoặc thẻ có id = taglist, và có contenteditable = 'true', thì thanh công cụ đơn giản sẽ hiển thị (Đã loại bỏ các plugin colorbutton, find, flash, fonts,... )
- Ngược lại thanh công cụ sẽ hiển thị mặc định.
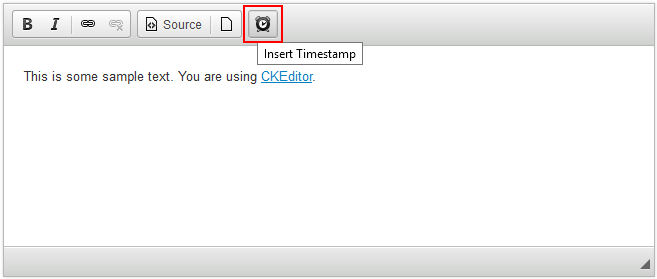
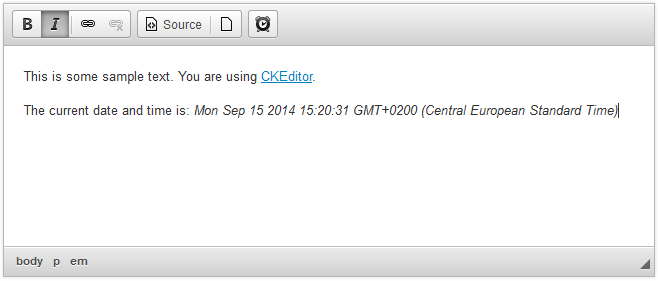
Đây là hình ảnh chạy ví dụ:
inlineall.html
<!DOCTYPE html>
<html>
  <head>
     <meta charset="utf-8">
     <title>Massive inline editing</title>
     <script src="../ckeditor.js"></script>

     <script>

        // Sự kiện "instanceCreated" sẽ được ném ra (fired) mỗi khi đối tượng CKEditor được tạo.
        CKEDITOR.on( 'instanceCreated', function( event ) {
            var editor = event.editor,
                element = editor.element;


            // Nếu các element h1, h2, hoặc h3 hoặc có id = 'taglist' (Và contenteditable="true")
            // CKEditor hiển thị sẽ không có các tính năng (smileys, templates, iframes ....)
            if ( element.is( 'h1', 'h2', 'h3' ) || element.getAttribute( 'id' ) == 'taglist' ) {

               // Tùy chỉnh các cấu hình trình soạn thảo theo sự kiện "configLoaded",
               // đó là sự kiện được ném ra (fire) sau khi file cấu hình tải lên và
               // thực thi. Điều này làm cho nó có thể thay đổi
               // cấu hình trước khi Editor khởi tạo vị trí hiển thị.
                editor.on( 'configLoaded', function() {

                    // Loại bỏ các plugin không cần thiết để Editor đơn giản hơn.
                    editor.config.removePlugins = 'colorbutton,find,flash,font,' +
                        'forms,iframe,image,newpage,removeformat,' +
                        'smiley,specialchar,stylescombo,templates';

                    // Sắp xếp lại thứ tự các Item trên toolbar.
                    editor.config.toolbarGroups = [
                        { name: 'editing',        groups: [ 'basicstyles', 'links' ] },
                        { name: 'undo' },
                        { name: 'clipboard',    groups: [ 'selection', 'clipboard' ] },
                        { name: 'about' }
                    ];
                });
            }
        });

     </script>
  </head>
  <body>
     <h1>Massive inline editing</h1>

     <div id="container" style="border: 1px solid blue;width: 700px; display:inline-block;padding:5px;">

          <h1 contenteditable="true" style="border:1px solid green;">
              H1 With contenteditable='true'
          </h1>

          <div style="border: 1px solid red; float: left;width: 300px;" contenteditable="true">
             div with contenteditable='true'
             <h1>H1 H1 H1</h1>
             <h2>H2 H2</h2>
             <h3>H3 H3</h3>
          </div>

          <div style="border: 1px solid red; float: right;width: 350px;" contenteditable="true">
             div with contenteditable='true' <br><br>
             Hello <b>CKEditor</b> ...
          </div>

      </div>

  </body>
</html>
Chạy ví dụ:
Chuyển một phần tử thành một trình soạn thảo nội tuyến bằng code
inlinebycode.html
<!DOCTYPE html>
<html>
<head>
<meta charset="utf-8">
<title>Inline Editing by Code — CKEditor Sample</title>
<script src="../ckeditor.js"></script>
<style>
#editable
{
padding: 10px;
float: left;
}
</style>
</head>
<body>
<h1>Inline Editing by Code</h1>
<div id="editable" contenteditable="true" style="border:1px solid red;">
<p>Hello <strong>CKEditor</strong></p>
</div>
<script>
// Tắt chế độ tự động tạo CKEditor.
CKEDITOR.disableAutoInline = true;
var editor = CKEDITOR.inline( 'editable' );
</script>
</body>
</html>Thay thế textarea bởi một trình soạn thảo nội tuyến
inlinetextarea.html
<!DOCTYPE html>
<html>
   <head>
      <meta charset="utf-8">
      <title>Replace Textarea with Inline Editor</title>

      <script src="../ckeditor.js"></script>

      <style>
         /* Style the CKEditor element to look like a textfield */
         .cke_textarea_inline
         {
         padding: 10px;
         height: 200px;
         overflow: auto;
         border: 1px solid gray;
         -webkit-appearance: textfield;
         }
      </style>

   </head>
   <body>
      <h1>Replace Textarea with Inline Editor</h1>


      <textarea name="article-body" style="height: 200px">
               <p>Hello <strong>CKEditor</strong></p>
      </textarea>

      <script>
         CKEDITOR.inline( 'article-body' );
      </script>

   </body>
</html>
Trình soạn thảo nội tuyến với jQuery
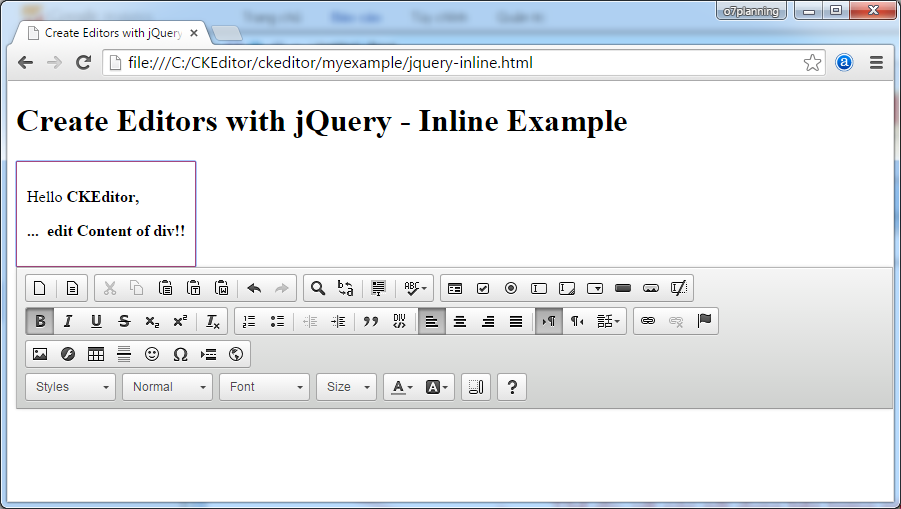
jquery-inline.html
<!DOCTYPE html>
<html>
<head>
  <meta charset="utf-8">
  <title>Create Editors with jQuery - Inline Example</title>
  <script src="http://code.jquery.com/jquery-1.11.0.min.js"></script>

  <script src="../ckeditor.js"></script>
  <script src="../adapters/jquery.js"></script>

  <style>

      #editable
      {
          padding: 10px;
          float: left;
      }

  </style>

  <script>

      CKEDITOR.disableAutoInline = true;

      $( document ).ready( function() {
          $( '#editable' ).ckeditor(); // Use CKEDITOR.inline().
      } );

  </script>
</head>
<body>

  <h1>Create Editors with jQuery - Inline Example</h1>

  <form action="" method="post">

      <div id="editable" contenteditable="true" style="border: 1px solid red;">
          <p>Hello <strong>CKEditor</strong></p>
      </div>

  </form>


</body>
</html>
7. Cấu hình tùy biến CKEditor
- Cấu hình tĩnh:
- Nó sẽ có tác dụng cho mọi CKEditor, những cái không chỉ định rõ cấu hình.
- Cấu hình cho một đối tượng CKEditor cụ thể:
- Nó chỉ có tác dụng cho CKEditor được cấu hình.
Cấu hình tĩnh
Cấu hình tĩnh:
- Nó sẽ có tác dụng cho mọi CKEditor, những cái không chỉ định rõ cấu hình.
Hãy xem ví dụ một cấu hình tĩnh:
// Cấu hình lại toolbar, hiển thị một vài Button.
CKEDITOR.config.toolbar = [  ['Font','FontSize'], ['Bold','Italic']  ];

// Cấu hình lại màu nền giao diện.
CKEDITOR.config.uiColor = '#9AB8F3';

CKEDITOR.config.width = '500px';
CKEDITOR.config.height = '70px';
config-static.html
<!DOCTYPE html>
<html>
<head>
    <meta charset="utf-8">
    <title>Config CKEditor - Static config</title>
    <script src="../ckeditor.js"></script>


    <script>
        // Cấu hình lại toolbar, hiển thị một vài Button.
        CKEDITOR.config.toolbar = [  ['Font','FontSize'], ['Bold','Italic']  ];

        // Cấu hình lại màu nền giao diện.
        CKEDITOR.config.uiColor = '#9AB8F3';
        CKEDITOR.config.resize_enabled = false;
        CKEDITOR.config.width = '500px';
        CKEDITOR.config.height = '70px';
    </script>
</head>
<body>
    <h3>CKEditor Static config</h3>

    <p>CKEditor 1</p>
    <textarea class="ckeditor" name="editor1" >
         <p>This is CKEditor 1</p>
    </textarea>

    <p>CKEditor 2</p>
    <textarea class="ckeditor" name="editor2" >
         <p>This is CKEditor 2</p>
    </textarea>

</body>
</html>
Thử trực tuyến:
Xem thêm cấu hình Toolbar
Cấu hình cho đối tượng CKEditor cụ thể
Mỗi một CKEditor trong trang bạn có thể cấu hình khác nhau cho chúng. Ví dụ một trang web có 2 CKEditor khác nhau với Toolbar khác nhau về số lượng Button.
config-instance.html
<!DOCTYPE html>
<html>
<head>
   <meta charset="utf-8">
   <title>Config CKEditor - instance config</title>
   <script src="../ckeditor.js"></script>


   <script>

       // Mầu nền mặc định
       CKEDITOR.config.uiColor = '#FFE6E6';

       // Không cho phép thay đổi kích thước
       CKEDITOR.config.resize_enabled = false;

   </script>
</head>
<body>
   <h3>CKEditor instance config</h3>

   <p>CKEditor 1</p>
   <textarea id="editor1" name="editor1">
        <p>This is CKEditor 1</p>
   </textarea>

   <p>CKEditor 2</p>
   <textarea id="editor2" name="editor2">
        <p>This is CKEditor 2</p>
   </textarea>

   <script>
      CKEDITOR.replace( 'editor1' , {
         toolbar: [  ['Font','FontSize'], ['Bold','Italic']  ],
         width: '300px',
         height: '80px',
         resize_enabled : true
      } );

      CKEDITOR.replace( 'editor2' , {
         toolbar: [  ['Font'], ['Bold' ]  ],
         width: '500px',
         height: '100px'
      } );
   </script>

</body>
</html>
Thử trực tuyến:
Các thuộc tính cấu hình
Danh sách các thuộc tính cấu hình bạn có thể xem tại:
8. Các cách cấu hình Toolbar
Có một số phương pháp tiếp cận để CKEditor cấu hình thanh công cụ của nó:
- Sử dụng bộ cấu hình Toolbar (Toolbar Configurator)
- ...
- Cấu hình "Item by Item"
- config.toolbar
- Cấu hình nhóm Toolbar (Toolbar Groups)
- config.toolbarGroups
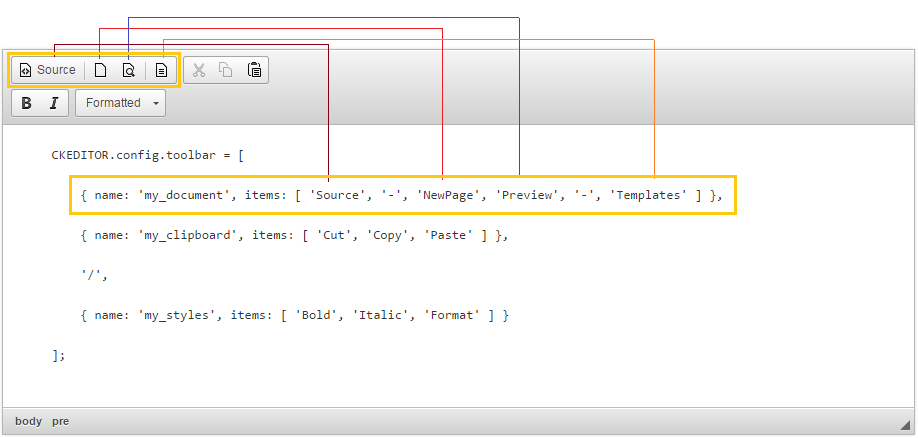
Cấu hình Toolbar "Item by Item"
Bạn có thể cấu hình Toolbar theo kiểu "Item by Item", có nghĩa là bạn khai báo ra các nhóm, mỗi nhóm bao gồm các Button.
Sau đây là một đoạn code cấu hình Toolbar.
// Khai báo các nhóm, mỗi nhóm có các button.

CKEDITOR.config.toolbar = [

   { name: 'my_document', items: [ 'Source', '-', 'NewPage', 'Preview', '-', 'Templates' ] },

   { name: 'my_clipboard', items: [ 'Cut', 'Copy', 'Paste' ] },

   '/',

   { name: 'my_styles', items: [ 'Bold', 'Italic', 'Format' ] }

];
Bạn cũng có thể không cần thiết phải khai báo tên nhóm.
CKEDITOR.config.toolbar = [

   [ 'Source', '-', 'NewPage', 'Preview', '-', 'Templates' ],

   [ 'Cut', 'Copy', 'Paste' ] ,

   '/',

   [ 'Bold', 'Italic', 'Format' ]

];
toolbar-itembyitem.html
<!DOCTYPE html>
<html>
<head>
    <meta charset="utf-8">
    <title>CKEditor Toolbar Configuration - Item by Item</title>
    <script src="../ckeditor.js"></script>


    <script>

    CKEDITOR.config.toolbar = [

        { name: 'my_document', items: [ 'Source', '-', 'NewPage', 'Preview', '-', 'Templates' ] },

        { name: 'my_clipboard', items: [ 'Cut', 'Copy', 'Paste' ] },

        '/',

        { name: 'my_styles', items: [ 'Bold', 'Italic', 'Format' ] }

    ];

    CKEDITOR.config.height = '300px';

    </script>
</head>
<body>

<h3>CKEditor Toolbar Configuration - Item by Item</h3>


<textarea class="ckeditor" name="editor1">
    <pre>
    CKEDITOR.config.toolbar = [

        { name: 'my_document', items: [ 'Source', '-', 'NewPage', 'Preview', '-', 'Templates' ] },

        { name: 'my_clipboard', items: [ 'Cut', 'Copy', 'Paste' ] },

        '/',

        { name: 'my_styles', items: [ 'Bold', 'Italic', 'Format' ] }

    ];
    </pre>
</textarea>

</body>
</html>
Chạy trực tuyến:
Cấu hình nhóm Toolbar (Toolbar Groups)
Lợi ích của việc cấu hình nhóm:
Lợi ích quan trọng nhất của cấu hình thanh công cụ nhóm (Toolbar Groups Configuration) so với cấu hình "Item by item" chính là: sự tự động.
Nó cho phép các nhà phát triển plugin định nghĩa ra một nhóm, mà button của họ có thể được thêm vào.
Nó cho phép các nhà phát triển plugin định nghĩa ra một nhóm, mà button của họ có thể được thêm vào.
Trong khi không bắt buộc, có tất cả các nhóm và các nhóm nhóm con đã cấu hình (bao gồm cả những cái mà bạn không sử dụng) được tiến cử (recommended) tại thời điểm trong tương lai, khi một plugin mới được cài đặt, nút đó sẽ tự động xuất hiện trên thanh công cụ không cần yêu cầu cấu hình thêm.
Ví dụ:
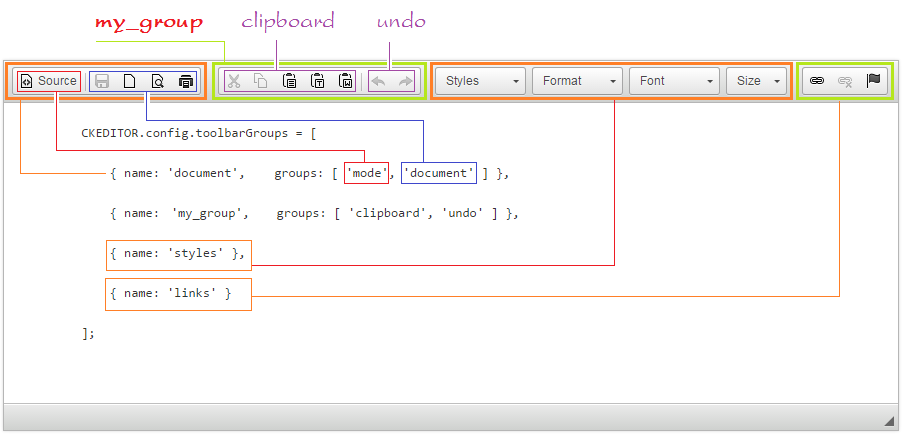
// CKEditor đã xây dựng sẵn các group cơ bản có tên "mode", "document", "clipboard", "undo", "styles", "links" .....
// Bạn có thể định nghĩa một group của mình với tên nào đó, và chứa các group con cơ bản của CKEditor.
// Group của bạn có thể trùng tên với group có sẵn của CKEditor.
// Group của bạn có thể không cần liệt kê các group con, khi đó mặc định nó sẽ chứa 1 group con cùng tên với tên group của bạn.

CKEDITOR.config.toolbarGroups = [

   { name: 'document',    groups: [ 'mode', 'document' ] },

   { name: 'my_group',   groups: [ 'clipboard', 'undo' ] },

   { name: 'styles' },

   { name: 'links' }

];
Lợi ích của cấu hình Toolbar Groups đó là khi bạn thay đổi thư viện CKEditor lên phiên bản mới hơn, nếu trong group nào đó ở phiên bản mới có thêm một Button mới, nó sẽ tự động được hiển thị trên thanh Toolbar, bạn không cần phải sửa đổi code của trang web của mình.
Bạn cũng có thể sử dụng "/" trong cấu hình Toolbar để ngắt dòng (Đẩy các button phía sau xuống dòng mới).
CKEDITOR.config.toolbarGroups = [

   { name: 'document',    groups: [ 'mode', 'document' ] },

   { name: 'my_clipboard',   groups: [ 'clipboard', 'undo' ] },

   '/',

   { name: 'styles' },

   { name: 'links' }
];
toolbar-group.html
<!DOCTYPE html>
<html>
<head>
    <meta charset="utf-8">
    <title>CKEditor Toolbar Groups Configuration</title>
    <script src="../ckeditor.js"></script>


    <script>

        CKEDITOR.config.toolbarGroups = [

            { name: 'document',    groups: [ 'mode', 'document' ] },

            { name: 'my_clipboard',   groups: [ 'clipboard', 'undo' ] },
            '/',
            { name: 'styles' },

            { name: 'links' }
        ];

        CKEDITOR.config.height = '300px';

    </script>
</head>
<body>

    <h3>CKEditor Toolbar Groups Configuration</h3>


    <textarea class="ckeditor" name="editor1">
        <pre>
        CKEDITOR.config.toolbarGroups = [

            { name: 'document',    groups: [ 'mode', 'document' ] },

            { name: 'my_group',   groups: [ 'clipboard', 'undo' ] },

            { name: 'styles' },

            { name: 'links' }

        ];
        </pre>
    </textarea>

</body>
</html>
Chạy ví dụ:
Danh sách các group và Item xây dựng sẵn của CKEditor
Đây là định nghĩa các nhóm trong CKEditor 3.x:
{ name: 'document', items : [ 'Source','-','Save','NewPage','DocProps','Preview','Print','-','Templates' ] },

{ name: 'clipboard', items : [ 'Cut','Copy','Paste','PasteText','PasteFromWord','-','Undo','Redo' ] },

{ name: 'editing', items : [ 'Find','Replace','-','SelectAll','-','SpellChecker', 'Scayt' ] },

{ name: 'forms', items : [ 'Form', 'Checkbox', 'Radio', 'TextField', 'Textarea', 'Select', 'Button', 'ImageButton', 'HiddenField' ] },

{ name: 'basicstyles', items : [ 'Bold','Italic','Underline','Strike','Subscript','Superscript','-','RemoveFormat' ] },

{ name: 'paragraph', items : [ 'NumberedList','BulletedList','-','Outdent','Indent','-','Blockquote','CreateDiv',
                               '-','JustifyLeft','JustifyCenter','JustifyRight','JustifyBlock','-','BidiLtr','BidiRtl' ] },

{ name: 'links', items : [ 'Link','Unlink','Anchor' ] },

{ name: 'insert', items : [ 'Image','Flash','Table','HorizontalRule','Smiley','SpecialChar','PageBreak','Iframe' ] },

{ name: 'styles', items : [ 'Styles','Format','Font','FontSize' ] },

{ name: 'colors', items : [ 'TextColor','BGColor' ] },

{ name: 'tools', items : [ 'Maximize', 'ShowBlocks','-','About' ] }