Hướng dẫn lập trình Java RESTful Web Service cho người mới bắt đầu
1. Giới thiệu
Tài liệu được viết dựa trên:
- Eclipse 4.6 (NEON).
- Jersey
Nếu bạn là một người mới bắt đầu với RESTful Web Service, bạn cần bỏ qua 10 phút để tìm hiểu RESTful Web service là gì trước khi bắt đầu với môt ứng dụng Java RESTful serivce.
Bạn có thể xem "RESTful web service là gì" tại đây:
Bạn có thể xem "RESTful web service là gì" tại đây:
2. Jersey la gi?
Jersey là một nền tảng Java mã nguồn mở giúp bạn phát triển ứng dụng RESTful Web service và các ứng dụng Client liên quan. Jersey thực thi các đặc tả của JSR 311.
Jersey cung cấp thư viện thi hành Resful web service trong bộ chứa servlet (Servlet Container).
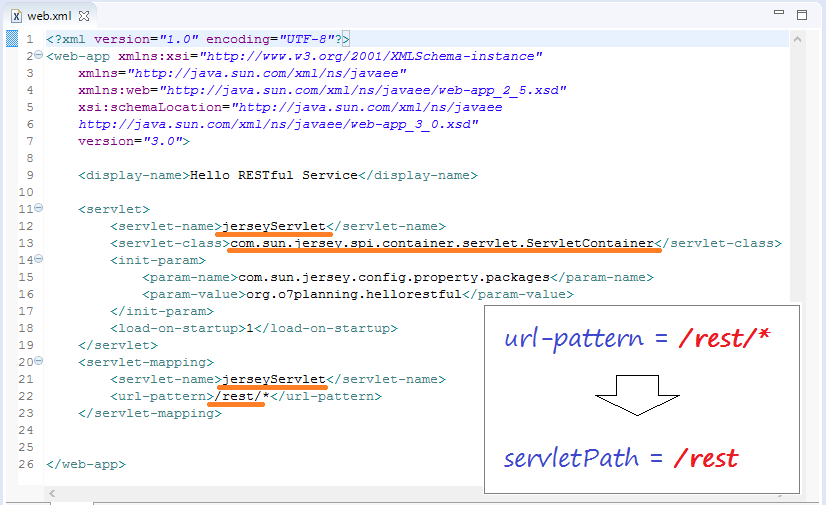
Ở đầu server Jersey cung cấp một servlet, nó được sử dụng để quét các class được định nghĩa trước để phân biệt các nguồn tài nguyên RESTful. Trong web.xml phải đăng ký servlet này với ứng dụng của bạn.
Jersey cũng cung cấp các thư viện client để liên lạc với RESTful web service.
Ở đầu server Jersey cung cấp một servlet, nó được sử dụng để quét các class được định nghĩa trước để phân biệt các nguồn tài nguyên RESTful. Trong web.xml phải đăng ký servlet này với ứng dụng của bạn.
Jersey cũng cung cấp các thư viện client để liên lạc với RESTful web service.
Dưới đây là cấu trúc đường dẫn của các nguồn tài nguyên được đề xuất bởi Jersey.

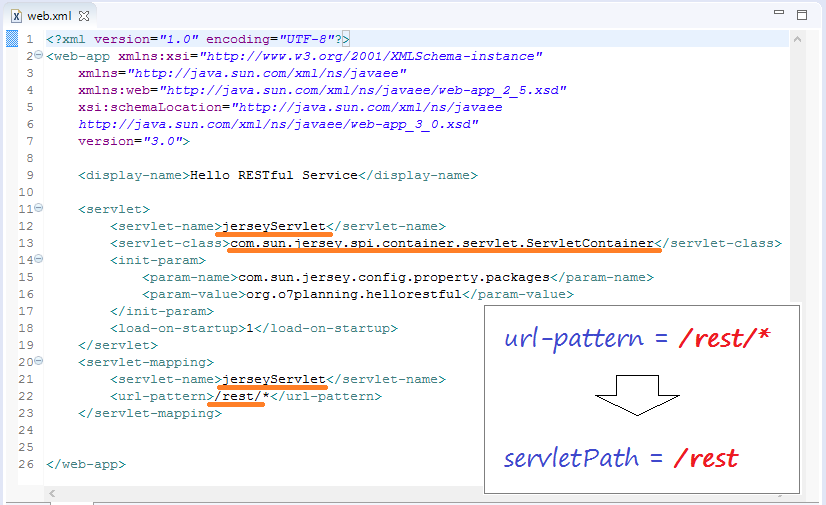
Trong đó com.sun.jersey.spi.container.servlet.ServletContainer, một servlet được cung cấp bởi JERSEY, và cần được khai báo trong web.xml.
3. Tạo ứng dụng Maven
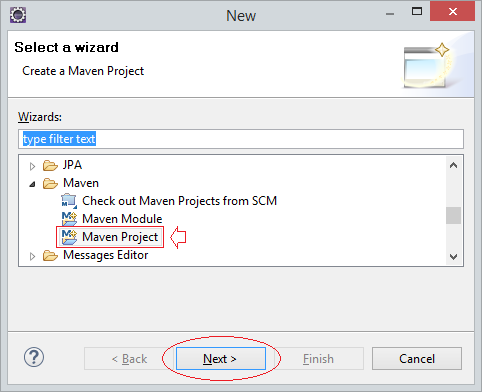
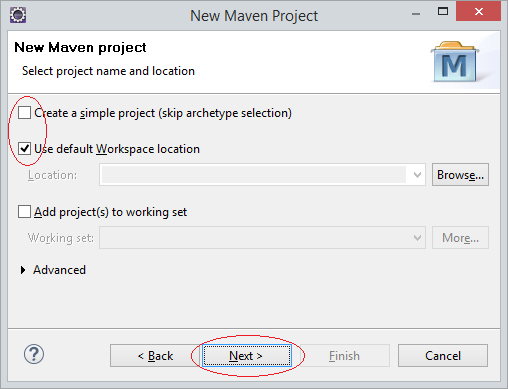
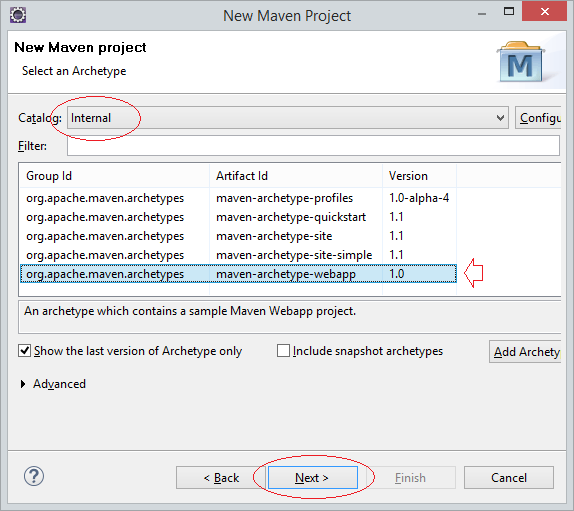
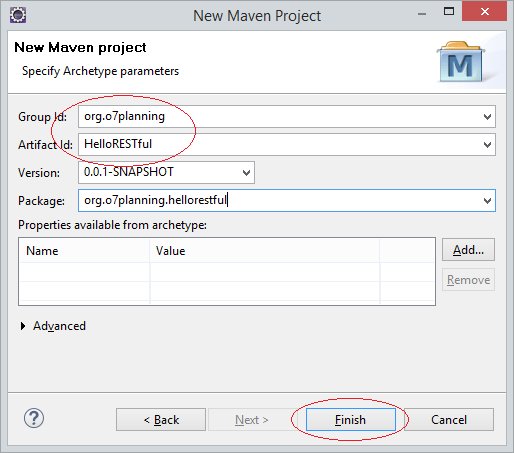
Trên Eclipse chọn:
- File/New/Other..
Nhập vào:
- Group Id: org.o7planning
- Artifact Id: HelloRESTful
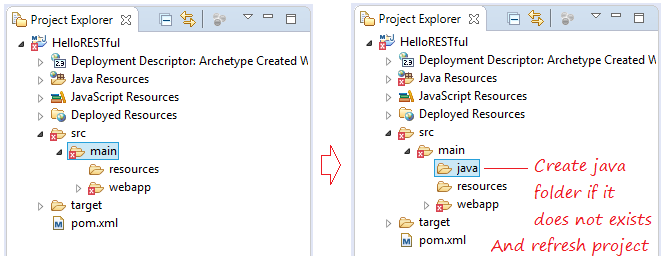
4. Khai báo maven & web.xml
Bạn cần khai báo các thư viện JERSEY, và Servlet trong pom.xml:
pom.xml
<project xmlns="http://maven.apache.org/POM/4.0.0"
    xmlns:xsi="http://www.w3.org/2001/XMLSchema-instance"
    xsi:schemaLocation="http://maven.apache.org/POM/4.0.0
    http://maven.apache.org/maven-v4_0_0.xsd">

    <modelVersion>4.0.0</modelVersion>
    <groupId>org.o7planning</groupId>
    <artifactId>HelloRESTful</artifactId>
    <packaging>war</packaging>
    <version>0.0.1-SNAPSHOT</version>
    <name>HelloRESTful Maven Webapp</name>
    <url>http://maven.apache.org</url>
    <dependencies>

        <dependency>
            <groupId>junit</groupId>
            <artifactId>junit</artifactId>
            <version>3.8.1</version>
            <scope>test</scope>
        </dependency>


        <!-- https://mvnrepository.com/artifact/javax.servlet/javax.servlet-api -->
        <dependency>
            <groupId>javax.servlet</groupId>
            <artifactId>javax.servlet-api</artifactId>
            <version>3.1.0</version>
            <scope>provided</scope>
        </dependency>

        <!-- https://mvnrepository.com/artifact/asm/asm -->
        <dependency>
            <groupId>asm</groupId>
            <artifactId>asm</artifactId>
            <version>3.3.1</version>
        </dependency>

        <!-- https://mvnrepository.com/artifact/com.sun.jersey/jersey-bundle -->
        <dependency>
            <groupId>com.sun.jersey</groupId>
            <artifactId>jersey-bundle</artifactId>
            <version>1.19.2</version>
        </dependency>

        <!-- https://mvnrepository.com/artifact/org.json/json -->
        <dependency>
            <groupId>org.json</groupId>
            <artifactId>json</artifactId>
            <version>20160810</version>
        </dependency>

        <!-- https://mvnrepository.com/artifact/com.sun.jersey/jersey-server -->
        <dependency>
            <groupId>com.sun.jersey</groupId>
            <artifactId>jersey-server</artifactId>
            <version>1.19.2</version>
        </dependency>

        <!-- https://mvnrepository.com/artifact/com.sun.jersey/jersey-core -->
        <dependency>
            <groupId>com.sun.jersey</groupId>
            <artifactId>jersey-core</artifactId>
            <version>1.19.2</version>
        </dependency>

    </dependencies>

    <build>
        <finalName>HelloRESTful</finalName>
        <plugins>
            <plugin>
                <groupId>org.apache.tomcat.maven</groupId>
                <artifactId>tomcat7-maven-plugin</artifactId>
                <version>2.2</version>
                <configuration>
                    <path>/HelloRESTful</path>
                    <port>8080</port>
                </configuration>
            </plugin>

        </plugins>
    </build>

</project>
Khai báo RESTful Servlet - com.sun.jersey.spi.container.servlet.ServletContainer - Một Servlet được cung cấp bởi Jersey REST API.
Bạn cần phải khai báo package chứa các class RESTful của bạn với servlet này thông qua tham số com.sun.jersey.config.property.packages.
(Chú ý sử dụng servlet >= 3.0)
Bạn cần phải khai báo package chứa các class RESTful của bạn với servlet này thông qua tham số com.sun.jersey.config.property.packages.
(Chú ý sử dụng servlet >= 3.0)
web.xml
<?xml version="1.0" encoding="UTF-8"?>
<web-app xmlns:xsi="http://www.w3.org/2001/XMLSchema-instance"
    xmlns="http://java.sun.com/xml/ns/javaee"
    xmlns:web="http://java.sun.com/xml/ns/javaee/web-app_2_5.xsd"
    xsi:schemaLocation="http://java.sun.com/xml/ns/javaee
    http://java.sun.com/xml/ns/javaee/web-app_3_0.xsd"
    version="3.0">

    <display-name>Hello RESTful Service</display-name>

    <servlet>
        <servlet-name>jerseyServlet</servlet-name>
        <servlet-class>com.sun.jersey.spi.container.servlet.ServletContainer</servlet-class>
        <init-param>
            <param-name>com.sun.jersey.config.property.packages</param-name>
            <param-value>org.o7planning.hellorestful</param-value>
        </init-param>
        <load-on-startup>1</load-on-startup>
    </servlet>
    <servlet-mapping>
        <servlet-name>jerseyServlet</servlet-name>
        <url-pattern>/rest/*</url-pattern>
    </servlet-mapping>


</web-app>
5. RESTful Service class
Bước tiếp theo bạn tạo các class RESTful service của bạn. Ví dụ dưới đây class WeatherRESTfulService là một web service cung cấp thông tin dự báo thời tiết
WeatherRESTfulService.java
package org.o7planning.hellorestful;

import java.text.DateFormat;
import java.text.ParseException;
import java.text.SimpleDateFormat;
import java.util.Date;
import java.util.Random;

import javax.ws.rs.GET;
import javax.ws.rs.Path;
import javax.ws.rs.PathParam;
import javax.ws.rs.Produces;

@Path("/weather")
public class WeatherRESTfulService {

   private static final DateFormat df = new SimpleDateFormat("yyyy-MM-dd");

   //
   // http://localhost:8080/contextPath/rest/weather/{location}/{date}
   // Example:
   // http://localhost:8080/contextPath/rest/weather/chicago/2016-09-27
   // http://localhost:8080/contextPath/rest/weather/hanoi/2016-09-27
   //
   @Path("{location}/{date}")
   @GET
   @Produces("application/xml")
   public String getWeather_XML(@PathParam("location") String location,//
            @PathParam("date") String dateStr) {
       Date date = null;
       if (dateStr == null || dateStr.length() == 0) {
           date = new Date();
       } else {
           try {
               date = df.parse(dateStr);
           } catch (ParseException e) {
               date = new Date();
           }
       }
       dateStr = df.format(date);

       String[] weathers = new String[] { "Hot", "Rain", "Cold" };
       int i = new Random().nextInt(3);
       String weather = weathers[i];

       return "<weather>"//
               + "<date>" + dateStr + "</date>"//
               + "<location>" + location + "</location>"//
               + "<info>" + weather + "</info>"//
               + "</weather>";
   }

   //
   // http://localhost:8080/contextPath/rest/weather/{location}
   // Example:
   // http://localhost:8080/contextPath/rest/weather/chicago
   // http://localhost:8080/contextPath/rest/weather/hanoi
   //
   @Path("{location}")
   @GET
   @Produces("application/xml")
   public String getWeather_XML(@PathParam("location") String location) {
       return getWeather_XML(location, null);
   }

   //
   // http://localhost:8080/contextPath/rest/weather/{location}/{date}
   // Example:
   // http://localhost:8080/contextPath/rest/weather/chicago/2016-09-27
   // http://localhost:8080/contextPath/rest/weather/hanoi/2016-09-27
   //
   @Path("{location}/{date}")
   @GET
   @Produces("application/json")
   public String getWeather_JSON(@PathParam("location") String location,//
           @PathParam("date") String dateStr) {

       Date date = null;
       if (dateStr == null || dateStr.length() == 0) {
           date = new Date();
       } else {
           try {
               date = df.parse(dateStr);
           } catch (ParseException e) {
               date = new Date();
           }
       }
       dateStr = df.format(date);

       String[] weathers = new String[] { "Hot", "Rain", "Cold" };
       int i = new Random().nextInt(3);
       String weather = weathers[i];

       return "{" //
               + "'date': '" + dateStr + "'," //
               + "'location': '" + location + "'," //
               + "'info': '" + weather + "'" //
               + "}";
   }

   //
   // http://localhost:8080/contextPath/rest/weather/{location}
   // Example:
   // http://localhost:8080/contextPath/rest/weather/chicago
   // http://localhost:8080/contextPath/rest/weather/hanoi
   //
   @Path("{location}")
   @GET
   @Produces("application/json")
   public String getWeather_JSON(@PathParam("location") String location) {
       return getWeather_JSON(location, null);
   }

}7. Giải thích RESTful
Copy URL dưới đây và chạy trên trình duyệt:
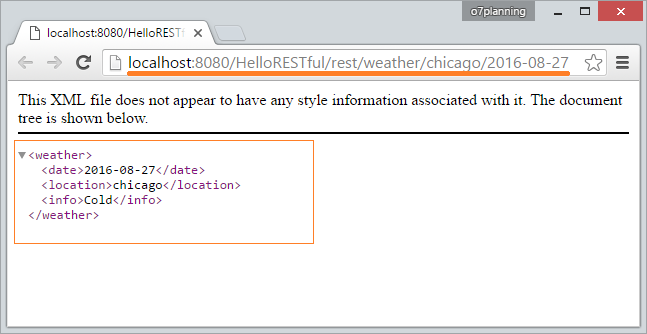
Khi bạn chạy URL ở trên, nó tương đương với việc bạn gửi một yêu cầu tới server:
GET /HelloRESTful/rest/weather/chicago/2016-08-27 HTTP/1.1
Host: localhost:8080
Trong trường hợp Request không chỉ định rõ kiểu dữ liệu trả về (MINE type), kiểu dữ liệu trả về sẽ là mặc định tùy thuộc vào Web service đang phục vụ.
Các request gửi đi có thể chỉ định rõ kiểu dữ liệu trả về.
GET /HelloRESTful/rest/weather/chicago/2016-08-27 HTTP/1.1
Host: localhost:8080
Accept: application/xml
Hoặc:
GET /HelloRESTful/rest/weather/chicago/2016-08-27 HTTP/1.1
Host: localhost:8080
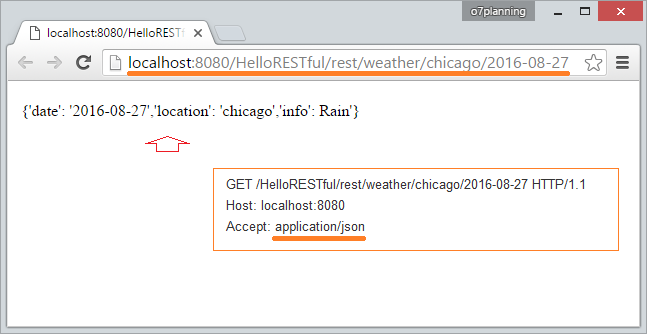
Accept: application/json
Với ví dụ trên, nếu Request chỉ định kiểu trả về là application/json bạn sẽ có kết quả như hình minh họa dưới đây:
Để có thể chỉ định được kiểu trả về bạn cần viết các ứng dụng Client để tạo ra các Request tùy biến và gửi tới Web service. Tuy nhiên bạn cũng có thể sử dụng các AddOns cho trình duyệt để có thể hiệu chỉnh các Request trước khi gửi tới RESTful service.
RESTClient AddOns chính là một plugin như vậy, bạn có thể cài đặt nó vào Firefox hoặc Chrome. Nó giúp bạn test các RESTful web service trong quá trình phát triển ứng dụng.
Jersey RESTful hoạt động thế nào?
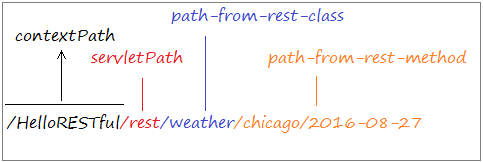
contextPath:
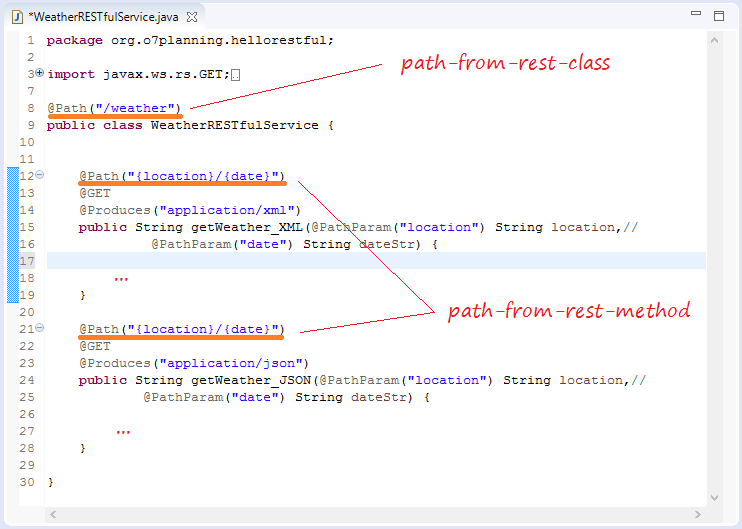
REST Path:
Các hướng dẫn Java Web Services
- RESTful Web Service là gì?
- Hướng dẫn lập trình Java RESTful Web Service cho người mới bắt đầu
- Ví dụ CRUD đơn giản với Java RESTful Web Service
- Tạo ứng dụng Java RESTful Client với Jersey Client
- RESTClient công cụ gỡ rối cho RESTful Web Service
- Ví dụ CRUD đơn giản với Spring MVC RESTful Web Service
- Ví dụ CRUD Restful Web Service với Spring Boot
- Ví dụ Spring Boot Restful Client với RestTemplate
- Bảo mật Spring Boot RESTful Service sử dụng Basic Authentication
Show More
