Hướng dẫn và ví dụ Java SWT FillLayout
1. FillLayout
FillLayout là một class bố trí (layout) đơn giản nhất. Nó đặt các điều khiển (controls) trên một hàng hoặc một cột duy nhất, và buộc chúng có cùng một kích thước.
FillLayout nằm ngang:

FillLayout thẳng đứng:
// Tạo một FillLayout nằm ngang
FillLayout fillLayout= new FillLayout(SWT.HORIZONTAL);

// Set Layout cho component
component.setLayout(fillLayout);

// Tạo một FillLayout thẳng đứng
FillLayout fillLayout= new FillLayout(SWT.VERTICAL);

// Set Layout cho component
component.setLayout(fillLayout);
margin & spacing
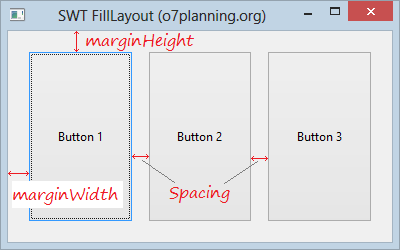
FillLayout fillLayout= new FillLayout(SWT.HORIZONTAL);
fillLayout.marginHeight= 20;
fillLayout.marginWidth= 20;
fillLayout.spacing=15;
2. Ví dụ với FillLayout
Ví dụ FillLayout nằm ngang:
HorizontalFillLayoutDemo.java
package org.o7planning.swt.filllayout;

import org.eclipse.swt.SWT;
import org.eclipse.swt.layout.FillLayout;
import org.eclipse.swt.widgets.Button;
import org.eclipse.swt.widgets.Display;
import org.eclipse.swt.widgets.Shell;

public class HorizontalFillLayoutDemo {

public static void main(String[] args) {
     Display display = new Display();
     Shell shell = new Shell(display);
     shell.setText("SWT FillLayout (o7planning.org)");

     // Tạo một FillLayout nằm ngang
     FillLayout fillLayout= new FillLayout(SWT.HORIZONTAL);
     shell.setLayout(fillLayout);

     Button button1=  new Button(shell, SWT.NONE);
     button1.setText("Button 1");

     Button button2=  new Button(shell, SWT.NONE);
     button2.setText("Button 2");

     Button button3=  new Button(shell, SWT.NONE);
     button3.setText("Button 3");

     shell.setSize(400, 250);
     shell.open();
     while (!shell.isDisposed()) {
         if (!display.readAndDispatch())
             display.sleep();
     }
     display.dispose();
}
}
Ví dụ FillLayout nằm ngang với margin & spacing:

HorizontalFillLayoutDemo2.java
package org.o7planning.swt.filllayout;

import org.eclipse.swt.SWT;
import org.eclipse.swt.layout.FillLayout;
import org.eclipse.swt.widgets.Button;
import org.eclipse.swt.widgets.Display;
import org.eclipse.swt.widgets.Shell;

public class HorizontalFillLayoutDemo2 {

    public static void main(String[] args) {
        Display display = new Display();
        Shell shell = new Shell(display);
        shell.setText("SWT FillLayout (o7planning.org)");

        FillLayout fillLayout= new FillLayout(SWT.HORIZONTAL);
        fillLayout.marginHeight= 20;
        fillLayout.marginWidth= 20;
        fillLayout.spacing=15;
        shell.setLayout(fillLayout);
        Button button1=  new Button(shell, SWT.NONE);
        button1.setText("Button 1");

        Button button2=  new Button(shell, SWT.NONE);
        button2.setText("Button 2");

        Button button3=  new Button(shell, SWT.NONE);
        button3.setText("Button 3");

        shell.setSize(400, 250);
        shell.open();
        while (!shell.isDisposed()) {
            if (!display.readAndDispatch())
                display.sleep();
        }
        display.dispose();
    }
}
Các hướng dẫn lập trình Java SWT
- Hướng dẫn và ví dụ Java SWT FillLayout
- Hướng dẫn và ví dụ Java SWT RowLayout
- Hướng dẫn và ví dụ Java SWT SashForm
- Hướng dẫn và ví dụ Java SWT Label
- Hướng dẫn và ví dụ Java SWT Button
- Hướng dẫn và ví dụ Java SWT Toggle Button
- Hướng dẫn và ví dụ Java SWT Radio Button
- Hướng dẫn và ví dụ Java SWT Text
- Hướng dẫn và ví dụ Java SWT Password Field
- Hướng dẫn và ví dụ Java SWT Link
- Lập trình ứng dụng Java Desktop sử dụng SWT
- Hướng dẫn và ví dụ Java SWT Combo
- Hướng dẫn và ví dụ Java SWT Spinner
- Hướng dẫn và ví dụ Java SWT Slider
- Hướng dẫn và ví dụ Java SWT Scale
- Hướng dẫn và ví dụ Java SWT ProgressBar
- Hướng dẫn và ví dụ Java SWT TabFolder và CTabFolder
- Hướng dẫn và ví dụ Java SWT List
Show More
