Hướng dẫn lập trình Java OSGi cho người mới bắt đầu
1. Giới thiệu
Tài liệu này được viết dựa trên:
- Eclipse 4.4 (LUNA)
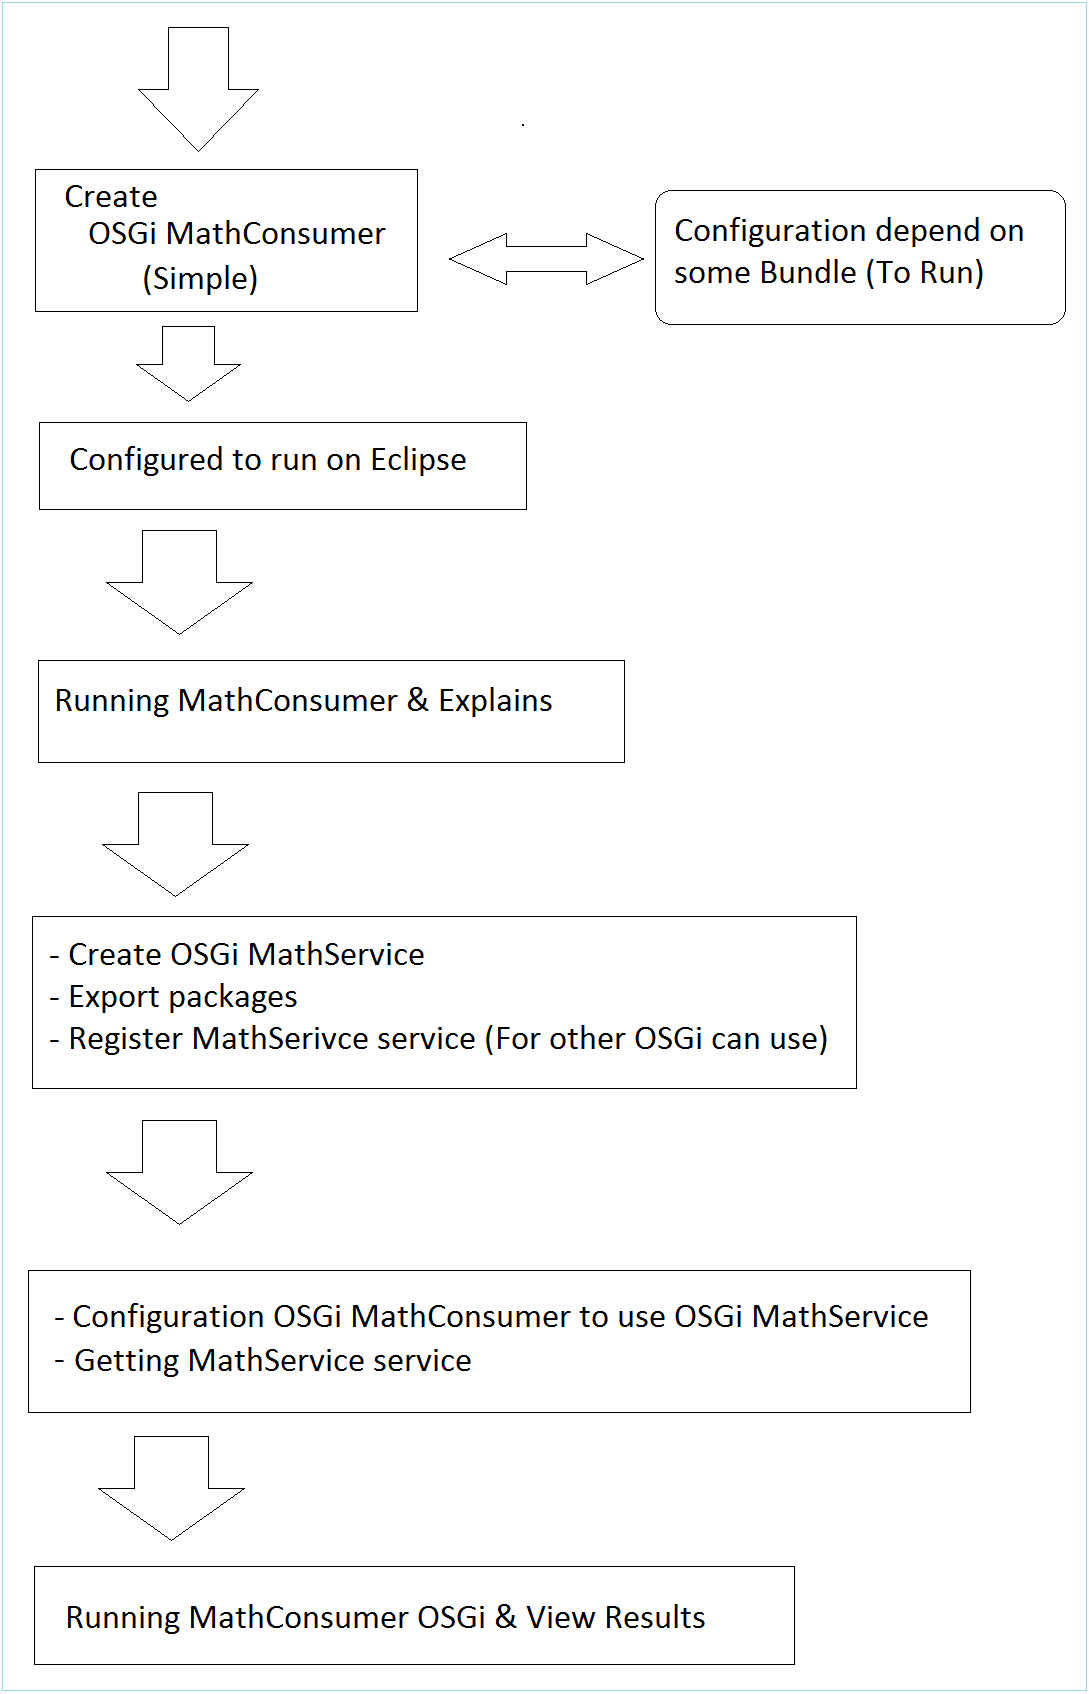
Đây là các bước sẽ làm trong bài hướng dẫn:
2. Tạo OSGi "MathConsumer"
Tạo Project MathConsumer
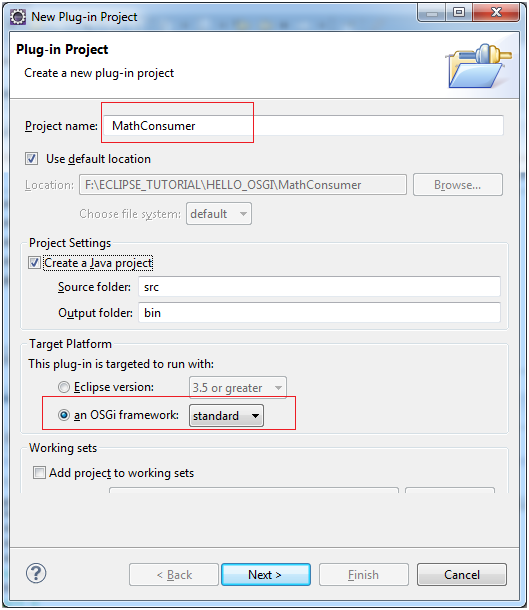
- org.o7planning.tutorial.helloosgi.mathconsumer.Activator
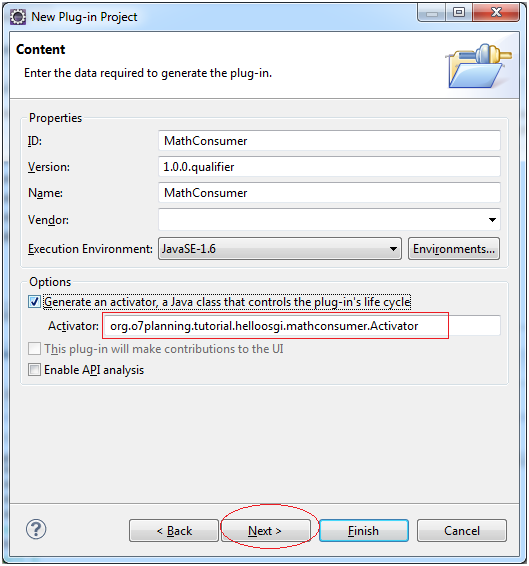
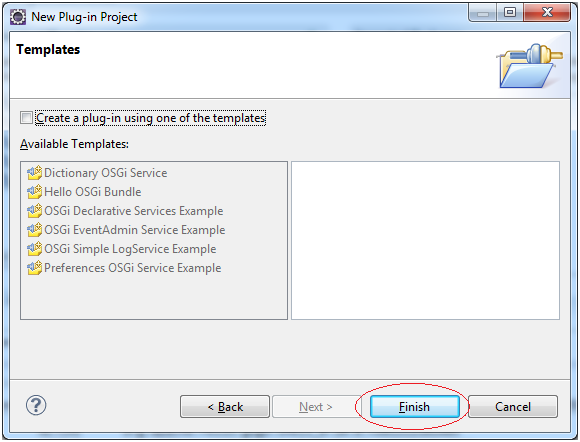
project MathConsumer đã được tạo ra.
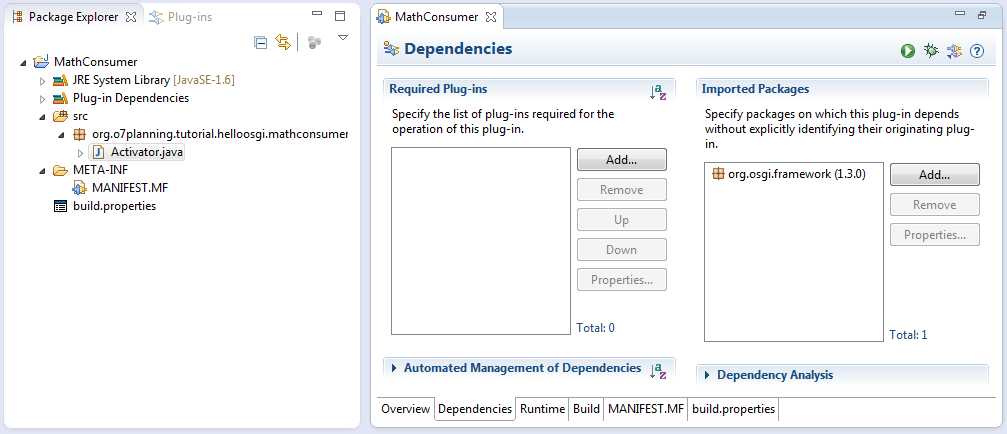
Mở class Activator để sửa code:
Activator.java
package org.o7planning.tutorial.helloosgi.mathconsumer;

import org.osgi.framework.BundleActivator;
import org.osgi.framework.BundleContext;

public class Activator implements BundleActivator {

   private static BundleContext context;

   static BundleContext getContext() {
       return context;
   }

   public void start(BundleContext bundleContext) throws Exception {
       Activator.context = bundleContext;
       System.out.println("MathConsumer Starting...");

       System.out.println("MathConsumer Started");
   }

   public void stop(BundleContext bundleContext) throws Exception {
       Activator.context = null;
       System.out.println("MathConsumer Stopped");
   }

}
Cấu hình các bundle phụ thuộc cho MathConsumer
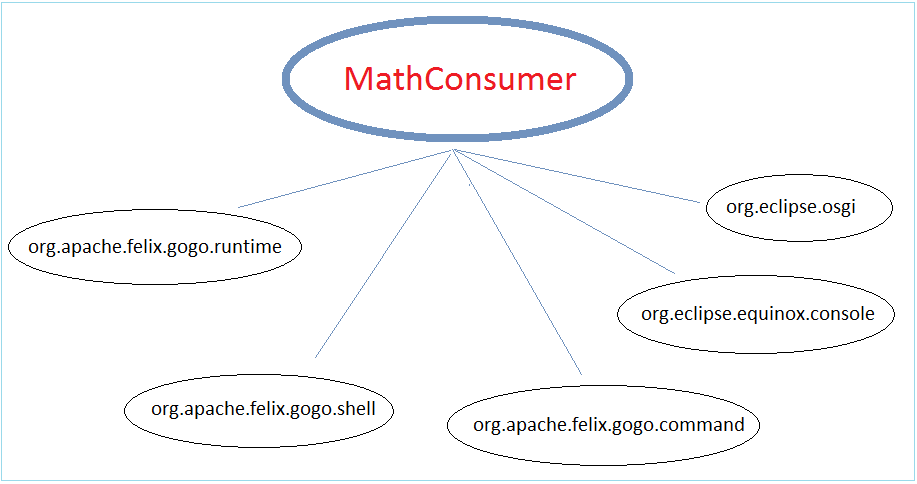
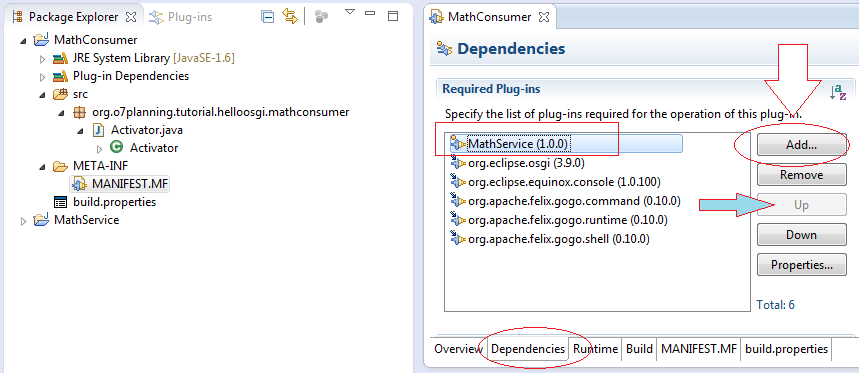
MathConsumer là một OSGi nó cũng được gọi là 1 Bundle. Bây giờ chúng ta sẽ khai báo MathConsumer sử dụng một số Bundle khác mục đích để có thể chạy MathConsumer sau này.
- org.eclipse.osgi
- org.eclipse.equinox.console
- org.apache.felix.gogo.command
- org.apache.felix.gogo.runtime
- org.apache.felix.gogo.shell
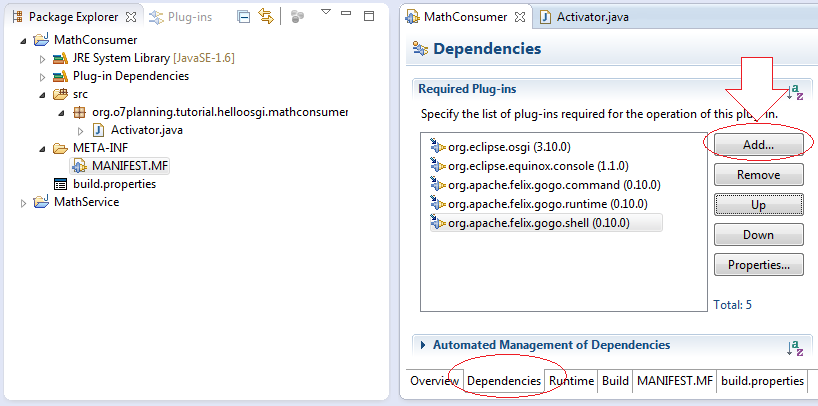
Cấu hình Eclipse để chạy MathConsumer
Sau đây chúng ta sẽ cấu hình để có thể chạy trực tiếp MathConsumer trên Eclipse
Nhấn phải chuột vào project MathService và chọn "Run As/Run Configuration.."

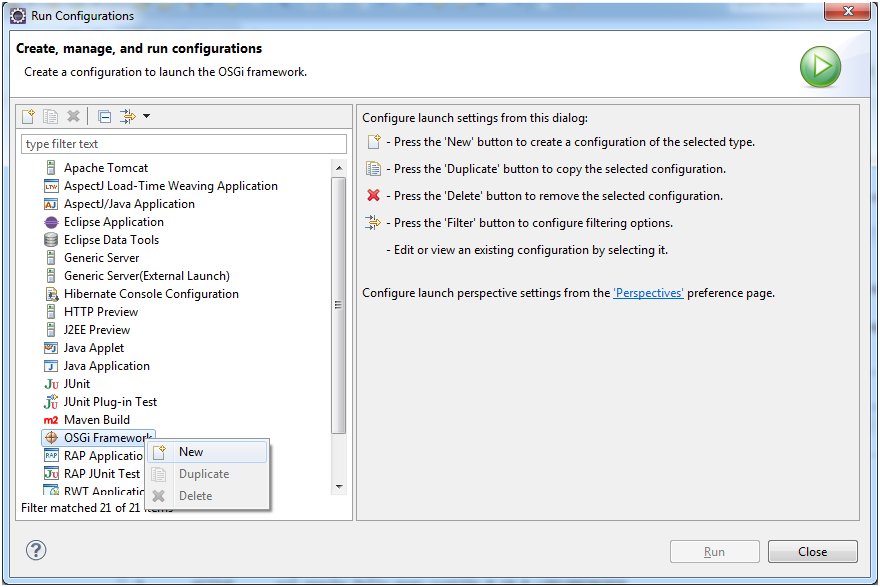
Nhập vào tên:
- Run OSGi MathConsumer
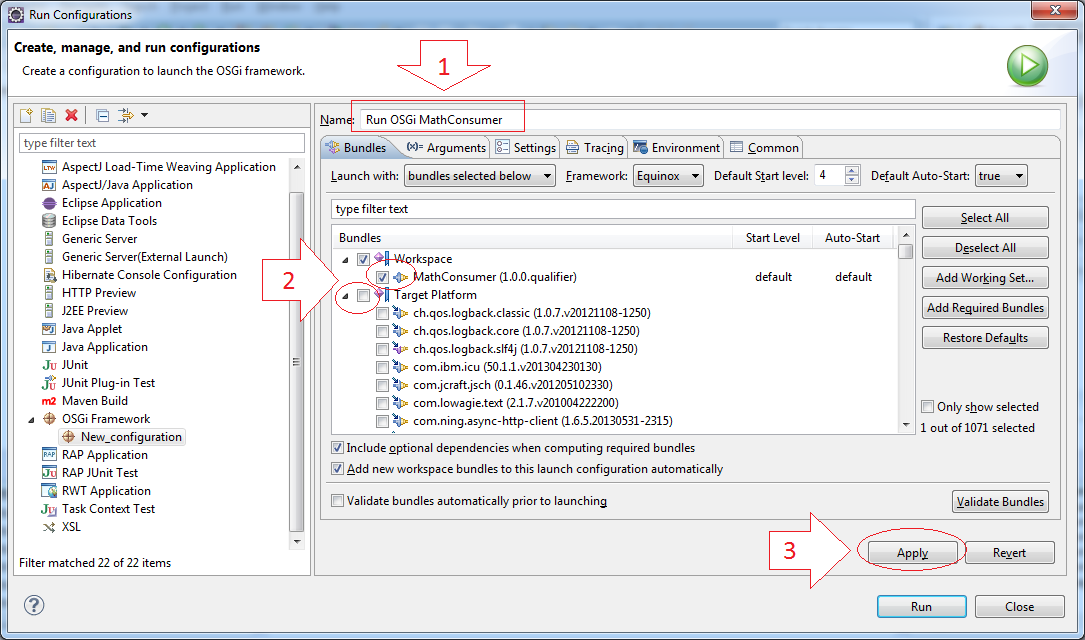
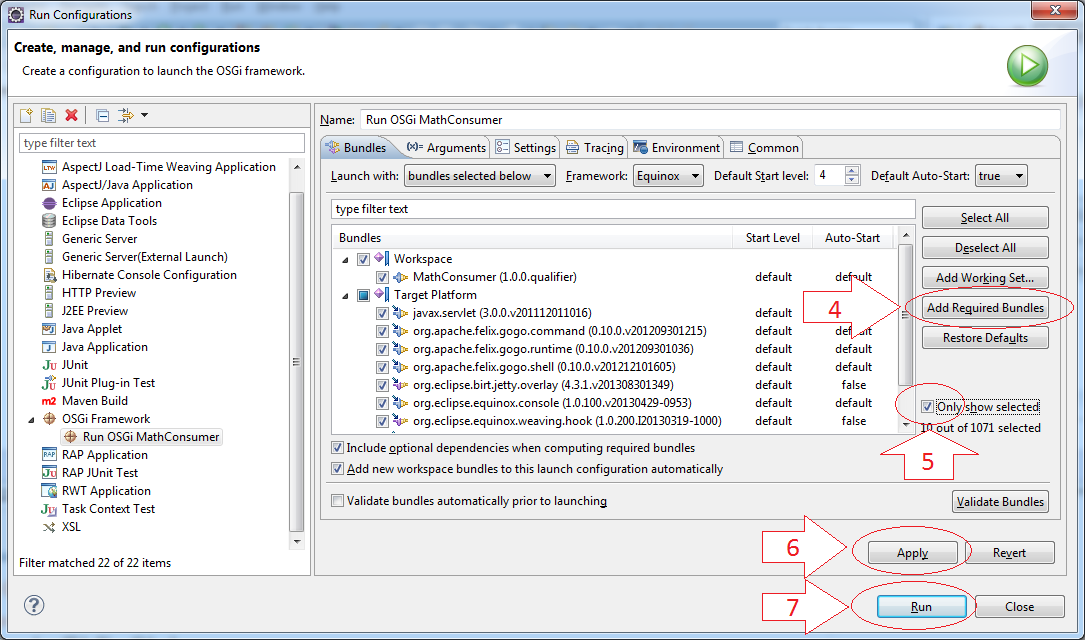
Chạy MathConsumer
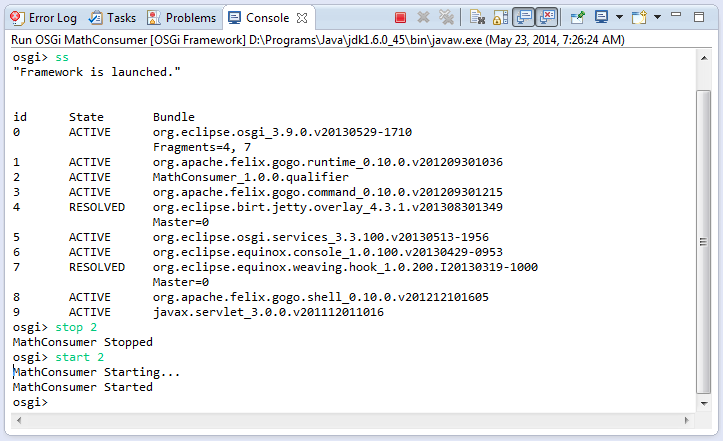
Đây là kết quả chạy OSGi MathConsumer

Sử dụng lệnh ss để xem các OSGi nào đang chạy, và tình trạng của chúng.
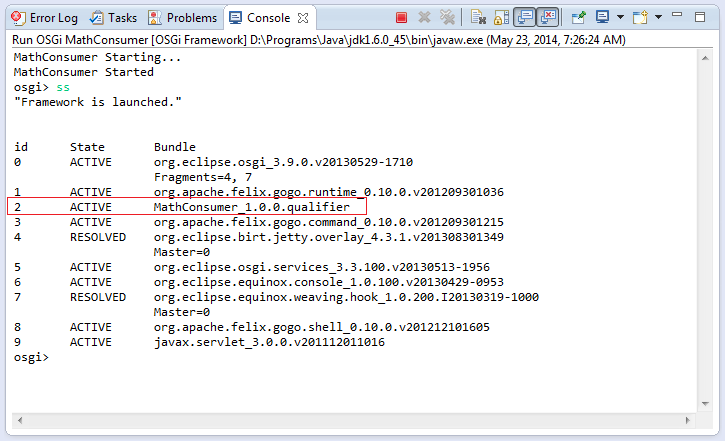
Như hình minh họa chúng ta thấy ID của OSGi MathConsumer là 2, sử dụng lệnh "stop" để dừng Bundle này.
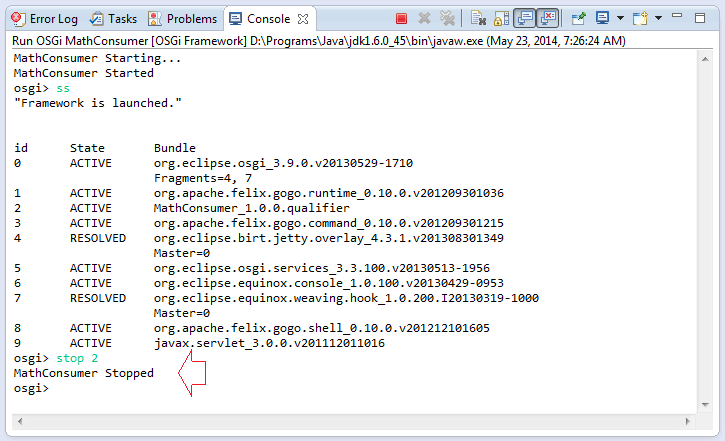
Và sử dụng "start" để chạy lại OSGi này.
3. Tạo OSGi "MathService"
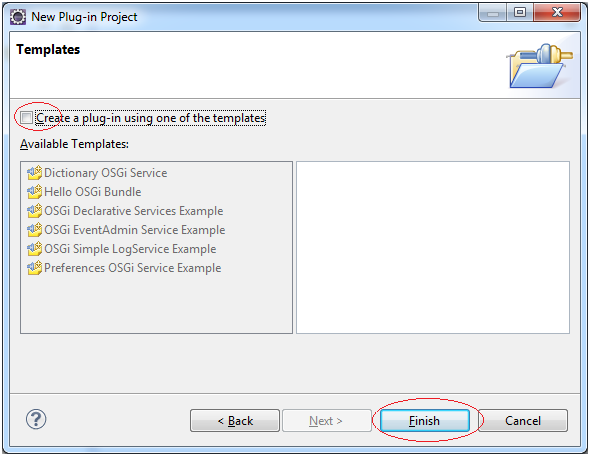
Tạo Project "MathService"
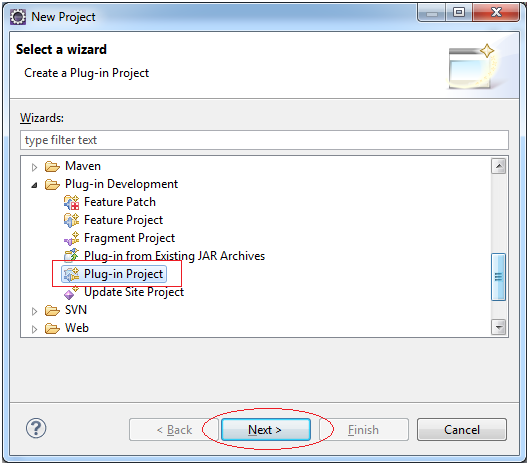
Trên Eclipse chọn:
- File/New/Other
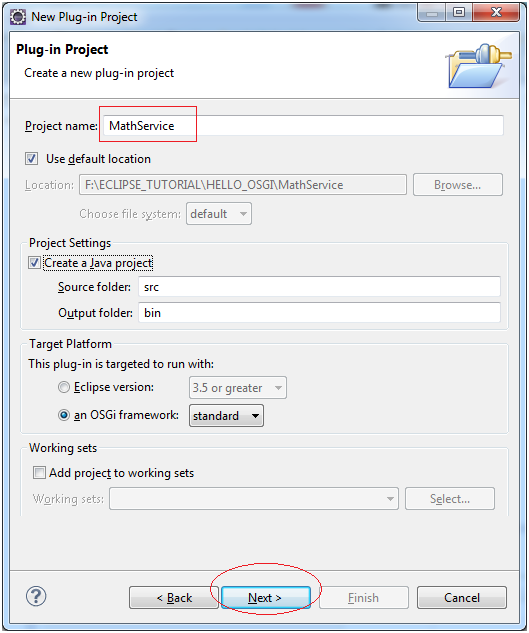
Chọn kiểu OSGi là Standard
- MathService
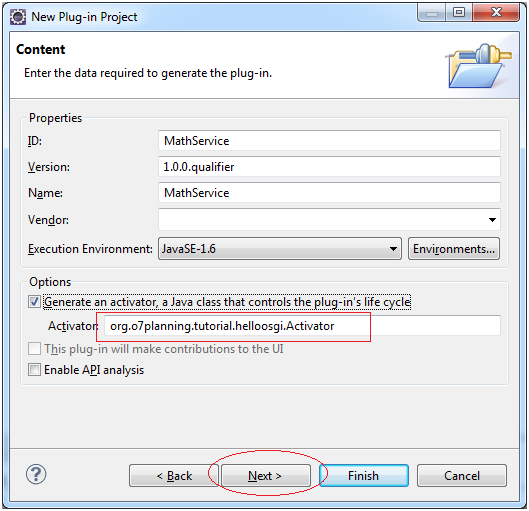
- org.o7planning.tutorial.helloosgi.Activator
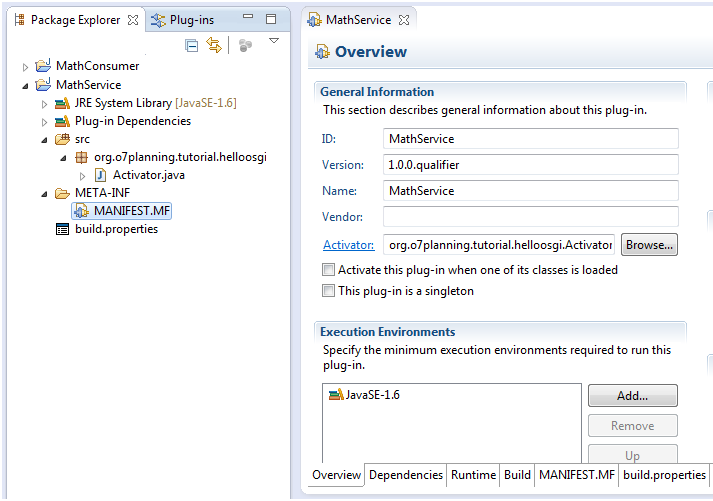
Đây là hình ảnh Project vừa được tạo ra:
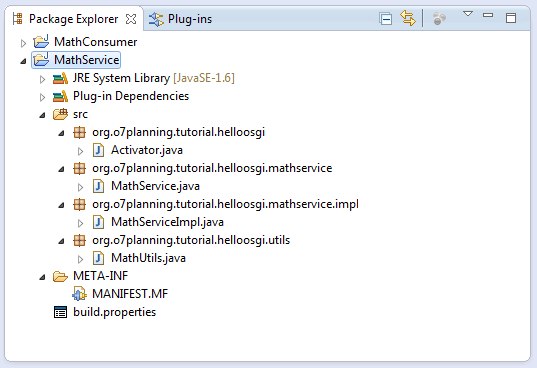
Code Project MathService & đăng ký dịch vụ MathService
Chúng ta sẽ thêm một số class để được một project hoàn chỉnh như sau:
MathService.java
package org.o7planning.tutorial.helloosgi.mathservice;

public interface MathService {

   public int sum(int a, int b);

}
MathServiceImpl.java
package org.o7planning.tutorial.helloosgi.mathservice.impl;

import org.o7planning.tutorial.helloosgi.mathservice.MathService;

public class MathServiceImpl implements MathService {

   @Override
   public int sum(int a, int b) {
       return a+ b;
   }

}
MathUtils.java
package org.o7planning.tutorial.helloosgi.utils;

public class MathUtils {


   public static int minus(int a, int b)  {
       return a- b;
   }
}
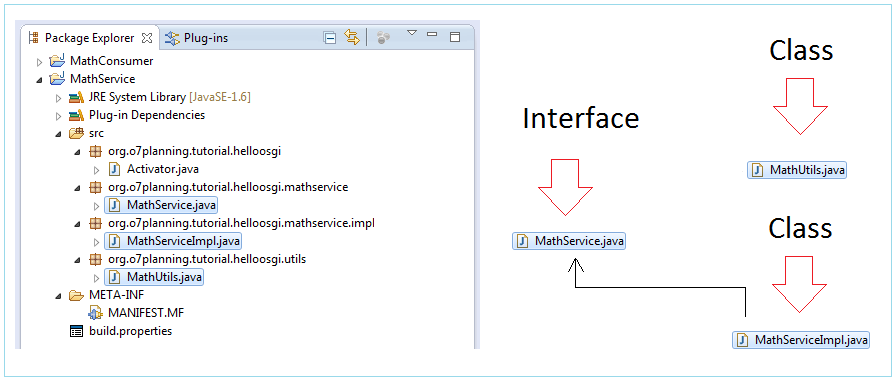
Và đây là hình ảnh tổng quan về quan hệ các class vừa tạo ra.
Đăng ký dịch vụ MathService để các OSGi khác có thể sử dụng. Việc này được thực hiện trong Activator của OSGi MathService.
Activator.java
package org.o7planning.tutorial.helloosgi;

import org.o7planning.tutorial.helloosgi.mathservice.MathService;
import org.o7planning.tutorial.helloosgi.mathservice.impl.MathServiceImpl;
import org.osgi.framework.BundleActivator;
import org.osgi.framework.BundleContext;

public class Activator implements BundleActivator {

   private static BundleContext context;

   static BundleContext getContext() {
       return context;
   }

   public void start(BundleContext bundleContext) throws Exception {
       Activator.context = bundleContext;

       System.out.println("Registry Service MathService...");

       this.registryMathService();

       System.out.println("OSGi MathService Started");
   }

   private void registryMathService() {
       MathService service = new MathServiceImpl();
       context.registerService(MathService.class, service, null);
   }

   public void stop(BundleContext bundleContext) throws Exception {
       Activator.context = null;
       System.out.println("OSGi MathService Stopped!");
   }

}
Cấu hình OSGi MathService và giải thích ý nghĩa
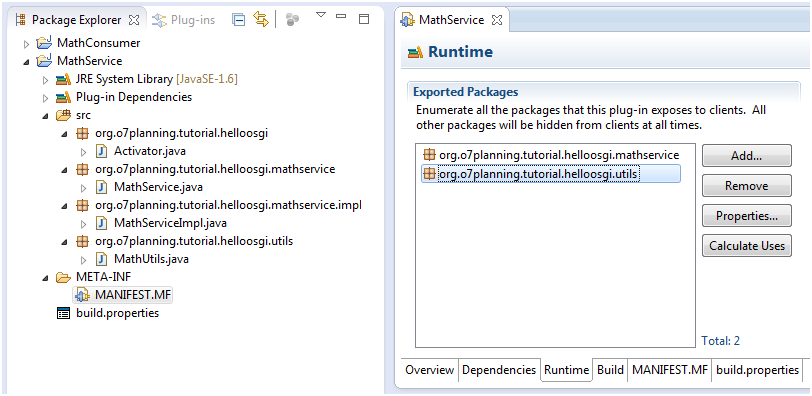
Cấu hình để xuất khẩu (export) 2 packages org.o7planning.tutorial.helloosgi.utils và org.o7planning.tutorial.helloosgi.mathservice.
OSGi giống như một cái hộp đóng, các OSGi khác chỉ có thể sử dụng các class/interface của OSGi này nếu nó nằm trong các package được xuất khẩu ra ngoài.
OSGi giống như một cái hộp đóng, các OSGi khác chỉ có thể sử dụng các class/interface của OSGi này nếu nó nằm trong các package được xuất khẩu ra ngoài.
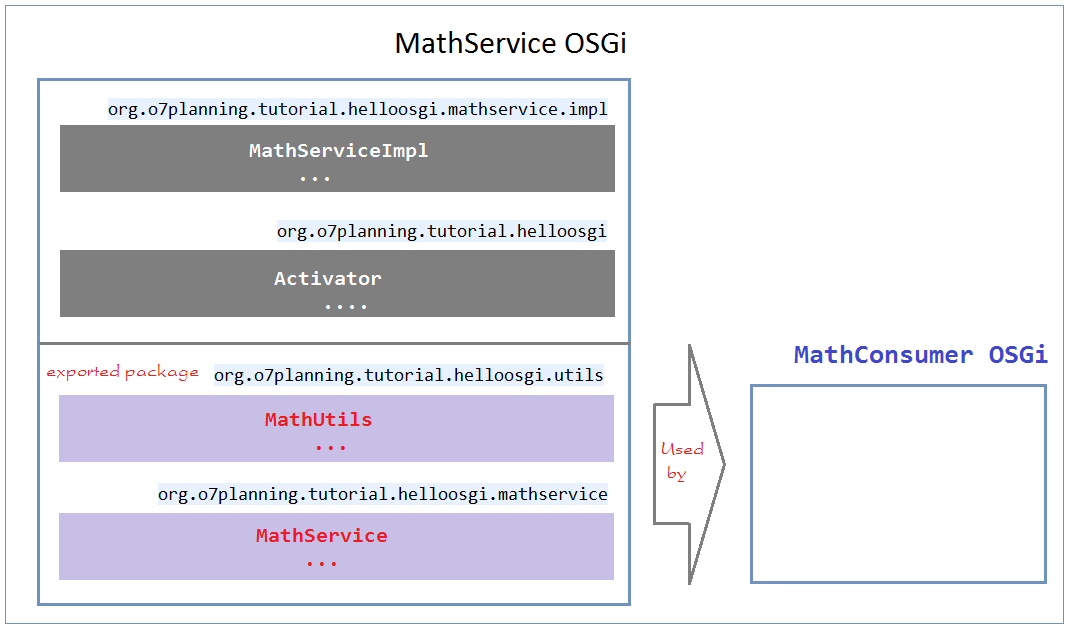
Hình dưới đây minh họa OSGi MathService xuất khẩu 2 package:
- org.o7planning.tutorial.helloosgi.mathservice
- org.o7planning.tutorial.helloosgi.utils
OSGi MathConsumer chỉ có thể sử dụng các class/interface nằm trong các package mà MathService xuất khẩu.
4. Cấu hình MathConsumer sử dụng MathService
Tiếp theo chúng ta sẽ khai báo để MathConsumer có thể sử dụng MathService.
Sửa class Activator:
Activator.java
package org.o7planning.tutorial.helloosgi.mathconsumer;

import org.o7planning.tutorial.helloosgi.mathservice.MathService;
import org.o7planning.tutorial.helloosgi.utils.MathUtils;
import org.osgi.framework.BundleActivator;
import org.osgi.framework.BundleContext;
import org.osgi.framework.ServiceReference;

public class Activator implements BundleActivator {

    private static BundleContext context;

    static BundleContext getContext() {
        return context;
    }

    public void start(BundleContext bundleContext) throws Exception {
        Activator.context = bundleContext;
        System.out.println("MathConsumer Starting...");

        System.out.println("5-3 = " + MathUtils.minus(5, 3));

        //
        ServiceReference<?> serviceReference = context
                .getServiceReference(MathService.class);
        MathService service = (MathService) context
                .getService(serviceReference);

        System.out.println("5+3 = " + service.sum(5, 3));

        System.out.println("MathConsumer Started");
    }

    public void stop(BundleContext bundleContext) throws Exception {
        Activator.context = null;
        System.out.println("MathConsumer Stopped");
    }

}
Cấu hình lại để chạy OSGi MathConsumer
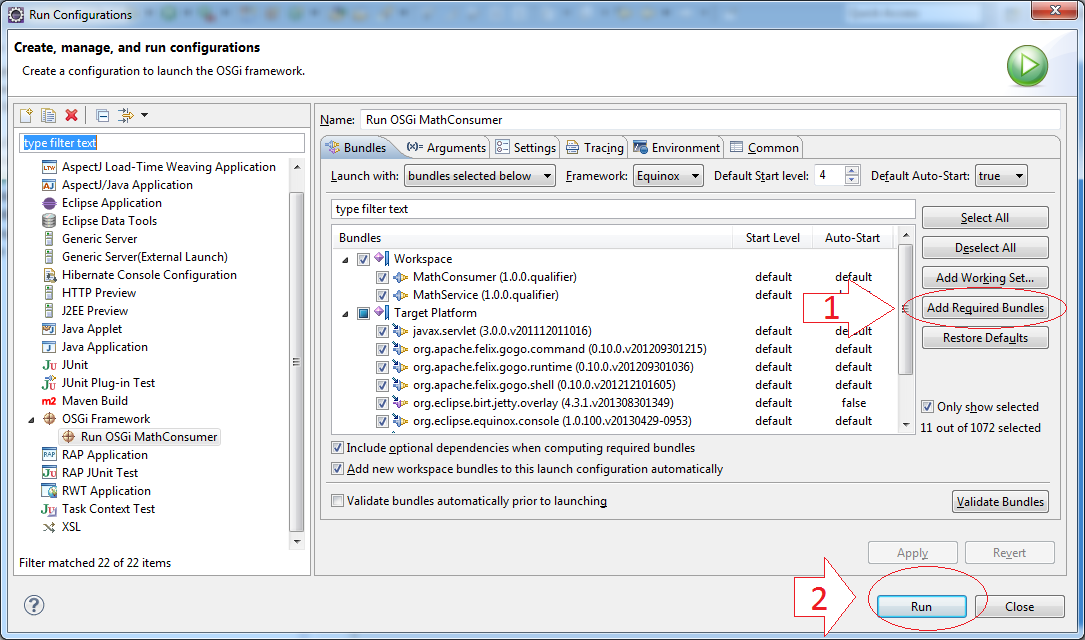
Nhấn phải chuột vào project MathConsumer chọn "Run As/Run Configuration.."


Công nghệ của Eclipse
- Làm sao để có các thư viện mã nguồn mở Java dưới dạng OSGi
- Cài đặt Tycho cho Eclipse
- Hướng dẫn lập trình Java OSGi cho người mới bắt đầu
- Tạo dự án Java OSGi với Maven và Tycho
- Cài đặt WindowBuilder cho Eclipse
- Các nền tảng nào bạn nên chọn để lập trình ứng dụng Java Desktop?
- Lập trình ứng dụng Java Desktop sử dụng SWT
- Hướng dẫn và ví dụ Eclipse JFace
- Cài đặt e4 Tools Developer Resources cho Eclipse
- Đóng gói và triển khai ứng dụng Desktop SWT/RCP
- Cài đặt Eclipse RAP Target Platform
- Cài đặt EMF cho Eclipse
- Cài đặt RAP e4 Tooling cho Eclipse
- Tạo Eclipse RAP Widget từ ClientScripting widget
- Cài đặt GEF cho Eclipse
- Hướng dẫn lập trình Eclipse RAP cho người mới bắt đầu - Ứng dụng Workbench (trước e4)
- Hướng dẫn lập trình Eclipse RCP 3 cho người mới bắt đầu - Ứng dụng Workbench
- Ứng dụng Eclipse RCP 3 đơn giản - Tương tác View và Editor
- Hướng dẫn lập trình Eclipse RCP 4 cho người mới bắt đầu - Ứng dụng e4 Workbench
- Cài đặt RAP Tools cho Eclipse
- Hướng dẫn lập trình Eclipse RAP cho người mới bắt đầu - Ứng dụng cơ bản
- Hướng dẫn lập trình Eclipse RAP cho người mới bắt đầu - Ứng dụng e4 Workbench
- Đóng gói và triển khai ứng dụng Eclipse RAP
Show More
