Hướng dẫn và ví dụ ReactJS props và state
1. Gợi ý
Trong bài học này tôi sẽ giải thích về khái niệm "props" và "state" trong React. Và so sánh sự khác biệt giữa "props" và "state".
Nếu bạn là người mới bắt đầu với React, bạn nên tham khảo bài học đầu tiên của React theo đường dẫn dưới đây, nó sẽ giúp bạn thiết lập môi trường cho React và chạy thành công ví dụ "Xin chào React".
2. ReactJS props
"props" là một từ viết ngắn gọn của "properties", nhưng nó là một khái niệm trong ReactJS. Về cơ bản props là một đối tượng, nó lưu trữ các giá trị của các attribute (thuộc tính) của một thẻ (Tag).
Chúng ta cần làm rõ khái niệm props là gì thông qua các ví dụ.
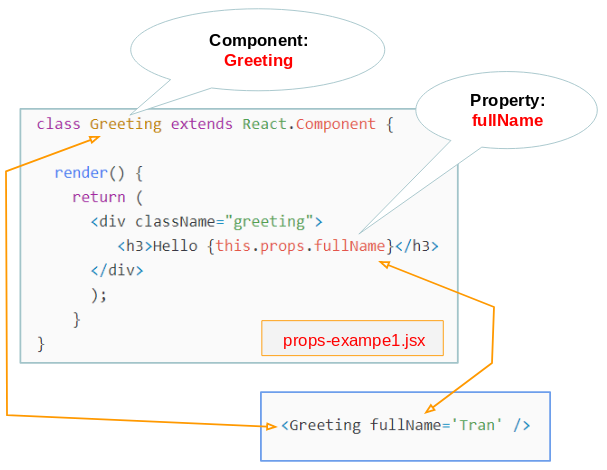
OK, ví dụ đầu tiên, trên một thư mục tạo 2 tập tin props-example.jsx & props-example.html.
props-example.jsx
// Create a ES6 class component
class Greeting extends React.Component {
  // Use the render function to return JSX component
  render() {
    return (
      <div className="greeting">
         <h3>Hello {this.props.fullName}</h3>
      </div>
      );
    }
}

const element1 = document.getElementById('greeting1')

// Use the ReactDOM.render to show your component on the browser
ReactDOM.render(
    <Greeting fullName='Tran' />,
    element1
)
props-example.html
<!DOCTYPE html>
<html lang="en">
<head>
<meta charset="UTF-8">
<title>ReactJS Props</title>
<script src="https://unpkg.com/react@16.4.2/umd/react.production.min.js"></script>
<script src="https://unpkg.com/react-dom@16.4.2/umd/react-dom.production.min.js"></script>
<script src="https://unpkg.com/babel-standalone@6.26.0/babel.min.js"></script>
<style>
.greeting {
border: 1px solid #bdbcae;
background-color: #fbfad9;
margin: 5px 0px;
padding: 5px;
}
</style>
</head>
<body>
<h1>Props example:</h1>
<div id="greeting1"></div>
<script src="props-example.jsx" type="text/babel"></script>
</body>
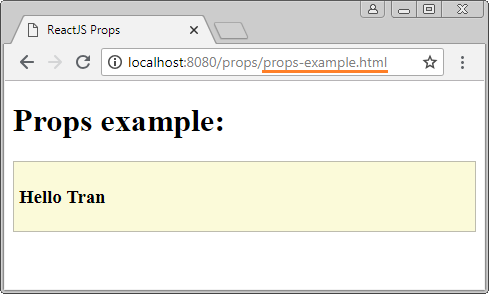
</html>Khởi động HTTP Server của bạn và chạy tập tin props-example.html. Và bạn nhận được kết quả giống như mình minh họa dưới đây:
Trong ReactJS khi bạn tạo một Component, nó giống như việc bạn tạo ra một thẻ (tag) mới của chính bạn. Mỗi property của Component sẽ tương ứng với một attribute của thẻ. (Xem hình minh họa phía dưới).

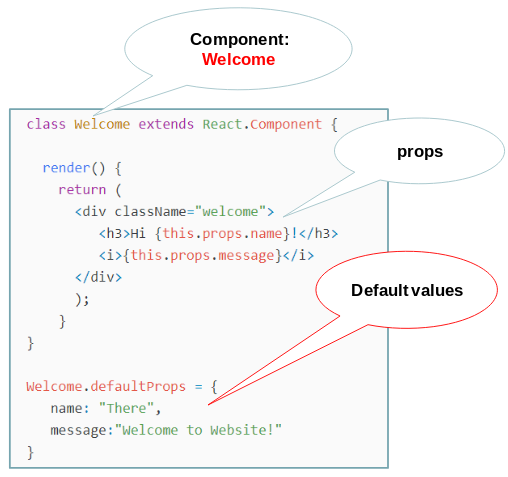
Giá trị của attribute (Của thẻ) sẽ được truyền vào (pass) cho property (Của Component). Tuy nhiên bạn có thể khởi tạo các giá trị mặc định cho các property.
OK ví dụ tiếp theo. Trong ví dụ này bạn tạo ra một Component với các property của nó sẽ được gán (assign) các giá trị mặc định:
props-example2.jsx
class Welcome extends React.Component {

  render() {
    return (
      <div className="welcome">
         <h3>Hi {this.props.name}!</h3>
         <i>{this.props.message}</i>
      </div>
      );
    }
}
// Default values of props
Welcome.defaultProps = {
   name: "There",
   message:"Welcome to Website!"
}

const element1 = document.getElementById('welcome1')
const element2 = document.getElementById('welcome2')


ReactDOM.render(
    <Welcome name='Tran' message='Welcome back!' />,
    element1
)

ReactDOM.render(
    <Welcome />,
    element2
)
props-example2.html
<!DOCTYPE html>
<html lang="en">
   <head>
      <meta charset="UTF-8">

      <title>ReactJS Props</title>
      <script src="https://unpkg.com/react@16.4.2/umd/react.production.min.js"></script>
      <script src="https://unpkg.com/react-dom@16.4.2/umd/react-dom.production.min.js"></script>
      <script src="https://unpkg.com/babel-standalone@6.26.0/babel.min.js"></script>
      <style>
         .welcome {
           border: 1px solid #bdbcae;
           background-color: #fbfad9;
           margin: 5px 0px;
           padding: 5px;
         }
      </style>
   </head>
   <body>
      <h1>Props example:</h1>

      <div id="welcome1"></div>

      <div id="welcome2"></div>

      <script src="props-example2.jsx" type="text/babel"></script>

   </body>
</html>
Chạy tập tin props-example2.html:

Tạo một Component có tên Welcome, và khởi tạo giá trị cho các property:
Nếu một attribute nào đó không xuất hiện trên thẻ, coi như giá trị của nó là mặc định:

Kết luận:
- Bạn có thể khởi tạo giá trị mặc định cho props.someProp.
- Bạn có thể sét đặt giá trị cho props.someProp từ attribute someProp của thẻ.
- Từ bên trong Component (class) bạn không có cách nào để gán giá trị mới cho props.someProp.
Chú ý: Thực tế là có phương thức để bạn thay đổi giá trị của props, chẳng hạn như setProps(), replaceProps(), nhưng các phương thức này đã không được chấp nhận (Deprecated) từ phiên bản ReactJS 0.15. Như vậy về cơ bản có thể kết luận props là bất biến (immutable).
3. ReactJS state
state (Trạng thái) là một khái niệm trong React, nó khá giống với props. Trước khi so sánh state và props hãy xem một ví dụ:
state-example.jsx
// Create a ES6 class component
class Button extends React.Component {
  constructor(props) {
    super(props);

    this.state = {
      text: "Please Click me!",
      clickCount: 0
    };
  }
  // Method updateCount()
  updateCount() {
    this.setState((prevState, props) => {
      return {
        clickCount: prevState.clickCount + 1,
        text: "Clicked"
      };
    });
  }

  render() {
    return (
      <button onClick={() => this.updateCount()}>
        {this.state.text} : {this.state.clickCount}
      </button>
    );
  }
}

// Render
ReactDOM.render(<Button />, document.getElementById("button1"));

// Render
ReactDOM.render(<Button />, document.getElementById("button2"));
state-example.html
<!DOCTYPE html>
<html lang="en">
   <head>
      <meta charset="UTF-8">

      <title>ReactJS State</title>
      <script src="https://unpkg.com/react@16.4.2/umd/react.production.min.js"></script>
      <script src="https://unpkg.com/react-dom@16.4.2/umd/react-dom.production.min.js"></script>
      <script src="https://unpkg.com/babel-standalone@6.26.0/babel.min.js"></script>

   </head>
   <body>
      <h1>State example:</h1>

      <div id="button1"></div>
      <br>
      <div id="button2"></div>

      <script src="state-example.jsx" type="text/babel"></script>

   </body>
</html>
Chạy tập tin state-example.html trên HTTP và xem nó hoạt động.

Cảnh báoBạn không thể sét đặt giá trị mới cho state theo các cách dưới đây, bởi vì React không lắng nghe sự thay đổi của state theo cách này, do vậy Component sẽ không được re-render (Vẽ lại) trên giao diện.Error!!// Do not do this: this.state.clickCount = this.state.clickCount + 1 // And do not do this: this.setState({ clickCount: this.state.clickCount + 1 });
Kết luận:
- props.someProp tương ứng với một attribute của thẻ, nhưng state.someState thì không.
- Bạn có thể khởi tạo giá trị mặc định cho state.someState trong constructor của class (Component).
- Trong Component (class) bạn không thể thay đổi giá trị của props.someProp, nhưng có thể thay đổi giá trị của state.someState.
4. ReactJS state (2)
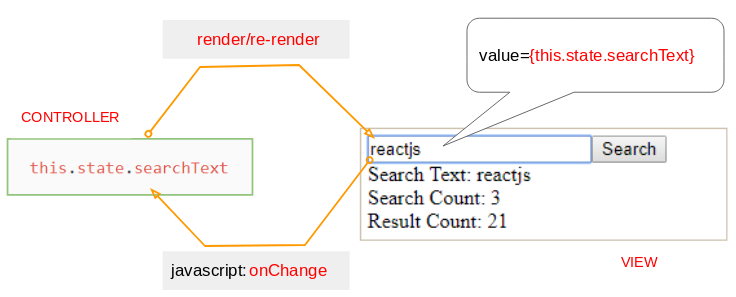
OK, ví dụ tiếp theo. Trong ví dụ này chúng ta sẽ tạo một mối liên hệ 2 chiều giữa giá trị của một phần tử <input> và state:
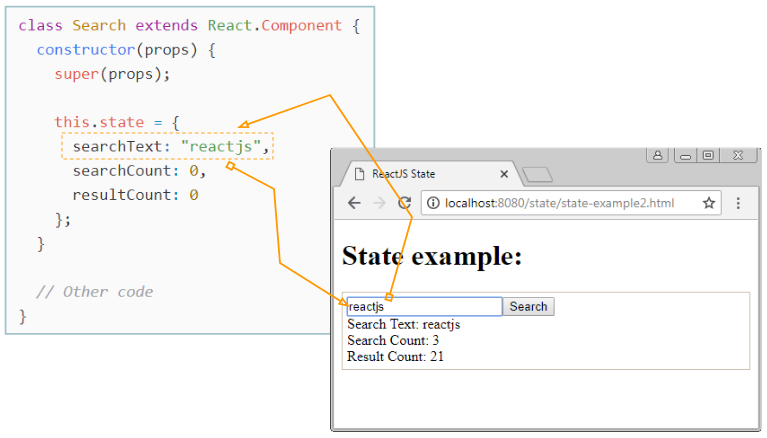
Khi trạng thái của Component thay đổi, ReactJS sẽ re-render (vẽ lại) Component này trên giao diện. Khi người dùng thay đổi nội dung trên phần tử <input>, giá trị này sẽ được cập nhập cho đối tượng state của Component thông qua sự kiện onChange.
state-example2.jsx
class Search extends React.Component {
  constructor(props) {
    super(props);

    this.state = {
      searchText: "",
      searchCount: 0,
      resultCount: 0
    };
  }

  changeSearchText(event) {
    var v = event.target.value;
    this.setState((prevState, props) => {
      return {
        searchText: v
      };
    });
  }

  doSearch() {
    this.setState( (prevState, props) => {
      var count = this.state.searchText.length * 3;
      return {
        searchCount: prevState.searchCount + 1,
        resultCount: count
      };
    });
  }

  render() {
    return (
      <div className='search-box'>
        <input
          type="text"
          value={this.state.searchText}
          onChange={this.changeSearchText.bind(this)}
        />
        <button onClick={this.doSearch.bind(this)}>Search</button>
        <div>Search Text: {this.state.searchText}</div>
        <div>Search Count: {this.state.searchCount}</div>
        <div>Result Count: {this.state.resultCount}</div>
      </div>
    );
  }
}

// Render
ReactDOM.render(<Search />, document.getElementById("search1"));
state-example2.html
<!DOCTYPE html>
<html lang="en">
<head>
<meta charset="UTF-8">
<title>ReactJS State</title>
<script src="https://unpkg.com/react@16.4.2/umd/react.production.min.js"></script>
<script src="https://unpkg.com/react-dom@16.4.2/umd/react-dom.production.min.js"></script>
<script src="https://unpkg.com/babel-standalone@6.26.0/babel.min.js"></script>
<style>
.search-box {
border:1px solid #cbbfab;
padding: 5px;
}
</style>
</head>
<body>
<h1>State example:</h1>
<div id="search1"></div>
<script src="state-example2.jsx" type="text/babel"></script>
</body>
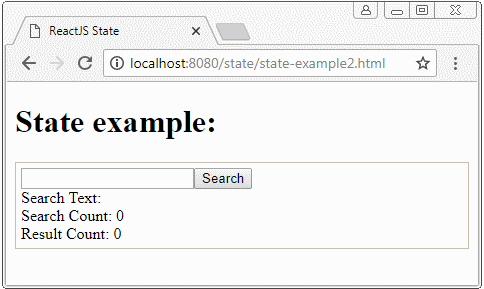
</html>Chạy tập tin state-example2.html trên HTTP Server và xem cách nó hoạt động.
Các hướng dẫn ReactJS
- Hướng dẫn và ví dụ ReactJS props và state
- Xử lý sự kiện (Event) trong ReactJS
- Hướng dẫn và ví dụ ReactJS Component API
- Các phương thức trong vòng đời của ReactJS Component
- Hướng dẫn và ví dụ ReactJS Refs
- Hướng dẫn và ví dụ ReactJS Lists và Keys
- Hướng dẫn và ví dụ ReactJS Form
- Tìm hiểu về ReactJS Router với ví dụ tại phía Client
- Giới thiệu về Redux
- Ví dụ đơn giản với React và Redux tại phía Client
- Hướng dẫn sử dụng React-Transition-Group API
- Bắt đầu nhanh với ReactJS trên môi trường NodeJS
- Tìm hiểu về ReactJS Router với một ví dụ cơ bản (NodeJS)
- Ví dụ React-Transition-Group Transition (NodeJS)
- Ví dụ React-Transition-Group CSSTransition (NodeJS)
- Giới thiệu về ReactJS
- Cài đặt React Plugin cho trình soạn thảo Atom
- Tạo một HTTP Server đơn giản với NodeJS
- Bắt đầu nhanh với ReactJS
Show More
