Ví dụ đơn giản với React và Redux tại phía Client
1. Mục tiêu của ví dụ
Trong bài học tôi sẽ hướng dẫn bạn tạo một ứng dụng nhỏ với React & Redux. Trong đó thư viện Redux giúp quản lý trạng thái của ứng dụng. Toàn bộ ứng dụng này chạy tại phía Client (Client Side).
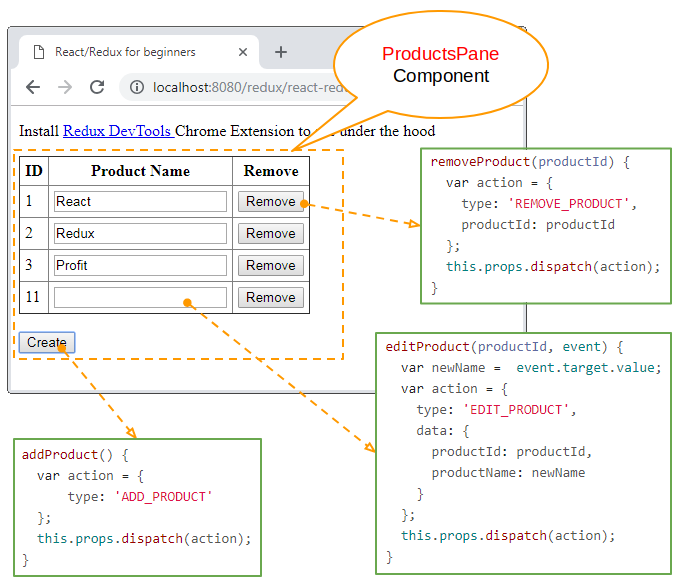
Dưới đây là hình ảnh Demo của ứng dụng:
Các thư viện được sử dụng trong ứng dụng này:
Libraries
<!--
   NOTE: Check other version at: https://cdnjs.com
   -->
<!-- React Libraries -->
<script src="https://cdnjs.cloudflare.com/ajax/libs/react/16.4.2/umd/react.production.min.js"></script>
<script src="https://cdnjs.cloudflare.com/ajax/libs/react-dom/16.4.2/umd/react-dom.production.min.js"></script>

<!-- Redux & React-Redux Libraries -->
<script src="https://cdnjs.cloudflare.com/ajax/libs/redux/4.0.0/redux.min.js"></script>
<script src="https://cdnjs.cloudflare.com/ajax/libs/react-redux/5.0.7/react-redux.min.js"></script>

<!-- Babel Library -->
<script src="https://cdnjs.cloudflare.com/ajax/libs/babel-standalone/6.26.0/babel.min.js"></script>
Kiến trúc của Redux:
Bạn có thể xem bài viết "Giới thiệu về Redux" của tôi theo liên kết dưới đây để hiểu hơn về Redux và kiến trúc của nó, cũng như tìm hiểu sự khác nhau giữa Flux và Redux.

2. Code của ứng dụng
Tạo 2 tập tin react-redux-example.html & react-redux-example.jsx:
react-redux-example.html
<!DOCTYPE html>
<html>
   <head>
      <meta charset="UTF-8">
      <title>React/Redux for beginners</title>
      <!--
         NOTE: Check other version at: https://cdnjs.com
      -->
      <!-- React Libraries -->
      <script src="https://cdnjs.cloudflare.com/ajax/libs/react/16.4.2/umd/react.production.min.js"></script>
      <script src="https://cdnjs.cloudflare.com/ajax/libs/react-dom/16.4.2/umd/react-dom.production.min.js"></script>

      <!-- Redux & React-Redux Libraries -->
      <script src="https://cdnjs.cloudflare.com/ajax/libs/redux/4.0.0/redux.min.js"></script>
      <script src="https://cdnjs.cloudflare.com/ajax/libs/react-redux/5.0.7/react-redux.min.js"></script>

      <!-- Babel Library -->
      <script src="https://cdnjs.cloudflare.com/ajax/libs/babel-standalone/6.26.0/babel.min.js"></script>

      <style>
        table {
          border-collapse: collapse;
        }
        table td, th {
          padding: 5px;
        }
      </style>
   </head>
   <body>

     <p>Install
       <a target="_blank"
         href="https://chrome.google.com/webstore/detail/redux-devtools/lmhkpmbekcpmknklioeibfkpmmfibljd/related?hl=en">
         Redux DevTools
       </a>
       Chrome Extension to see under the hood
     </p>

      <div id="app">
         Loading...
      </div>

      <script type="text/babel" src="react-redux-example.jsx"></script>

   </body>
</html>
react-redux-example.jsx
// REACT COMPONENT
// Generally you would spilt this up into logical components
// and pass props around correctly etc but we are keeping it as simply as possible
class ProductsPane extends React.Component {
  constructor (props, context) {
    super(props, context);
  }

  // EVENT HANDLERS
  // They are responsible for calling `dispatch` which will send events to redux
  addProduct = () => {
    var action = {
        type: 'ADD_PRODUCT'
    };
    this.props.dispatch(action);
  }

  removeProduct  = (productId) =>  {
    var action = {
      type: 'REMOVE_PRODUCT',
      productId: productId
    };
    this.props.dispatch(action);
  }

  editProduct = (productId, event) =>   {
    var newName =  event.target.value;
    var action = {
      type: 'EDIT_PRODUCT',
      data: {
        productId: productId,
        productName: newName
      }
    };
    this.props.dispatch(action);
  }


  render () {
    const products = this.props.products;

    // Example product: { productId : 4 , productName :'Profit' }
    var trList = products.map( (product, index) => {
      return (<tr key={product.productId}>
        <td>{product.productId}</td>
        <td><input type="text" onChange={this.editProduct.bind(null, product.productId)} value={product.productName} /></td>
        <td>
          <button onClick={this.removeProduct.bind(null, product.productId)}>
             Remove
          </button>
        </td>
      </tr>);
    });


    return (<div>
      <table border="1">
        <thead>
           <th>ID</th>
           <th>Product Name</th>
           <th>Remove</th>
        </thead>
        <tbody>
          {trList}
        </tbody>
      </table>
      <br/>
      <button onClick={this.addProduct}>
          Create
      </button>
    </div>);
  }
}

var nextProductId = 10;

// MAP STATE TO PROPS
// Probably the most important method of the demo which handles the React/Redux integration.
// When state changes, this method is called, which then you can use to customly
// map the state into props that your React component can use
// MAP: state.productList <==> props.products
const mapStateToProps = (state) => {
  return {
    products: state.productList
  }
}

// Example product: { productId : 4 , productName :'Profit' }
const getIndexByProductId = (products, productId)  => {
    for(var i = 0; i < products.length; i++) {
       var product = products[i];
       if(product.productId === productId) {
         return i;
       }
    }
    return -1;
};


// REDUCERS
// Reducers listen for actions that are dispatched and react depending on your logic
// All state in Redux is immutable(never changes) so we always have to return a new
// state object.
// We are going to copy the current state and return a new one based off the action creators above
const appReducer = (state = {productList: []}, action) => {

  // Clone Array.
  let products = state.productList.slice();
  // This is quite a common way of deciding which event to process
  // Note: ALL events will be coming through this reducer
  console.log('Actions', action); // Open your console to see what actions look like

  // Even better, install Redux DevTools and your mind will be blown
  switch (action.type) {
    case 'ADD_PRODUCT':
      nextProductId++;
      var product = {productId : nextProductId, productName: "" };
      products.push(product);
      break;
    case 'REMOVE_PRODUCT':
      var idx = getIndexByProductId(products, action.productId);
      if(idx != -1)  {
        products.splice(idx, 1); // Removes element at `idx`
      }
      break;
    case 'EDIT_PRODUCT':
      var idx = getIndexByProductId(products, action.data.productId);
      if(idx != -1)  {
          products[idx].productName = action.data.productName;
      }
      break;
  }
  // As above, we have to return a new state object each time (Redux store is immutable)
  // It makes sure we know our data can only be modified in one visible way
  // Also lets us time travel through our application state!
  const newState = {
    productList: products
  }
  console.log('Current State', newState);
  return newState;
}

// REDUX STORE
// Create store initializes our Redux store and only has to be called once
// The first argument is our `appReducer` defined above, it is almost like a listener
// The second is just our initial state which is just a Javascript object
// The third is usually where enhancers/middleware goes
// In this example it just loads Redux DevTools so everyone can play around
let store = Redux.createStore(appReducer, {
  productList: [
    { productId : 1 , productName :'React' },
    { productId : 2 , productName :'Redux' },
    { productId : 3 , productName :'Profit' }
  ]
}, window.devToolsExtension ? window.devToolsExtension() : undefined);

// We want to use Redux connect to attach our mapStateToProps to our ProductsPane (React Component)
const MyApp = ReactRedux.connect (
  mapStateToProps
)(ProductsPane);

// Render
ReactDOM.render(
  <ReactRedux.Provider store={store}>
    <MyApp />
  </ReactRedux.Provider>,
  document.getElementById('app')
);


if (window.devToolsExtension) {
  window.devToolsExtension.open();
}
Chạy tập tin react-redux-example.html trên HTTP Server:

3. Giải thích code của ứng dụng
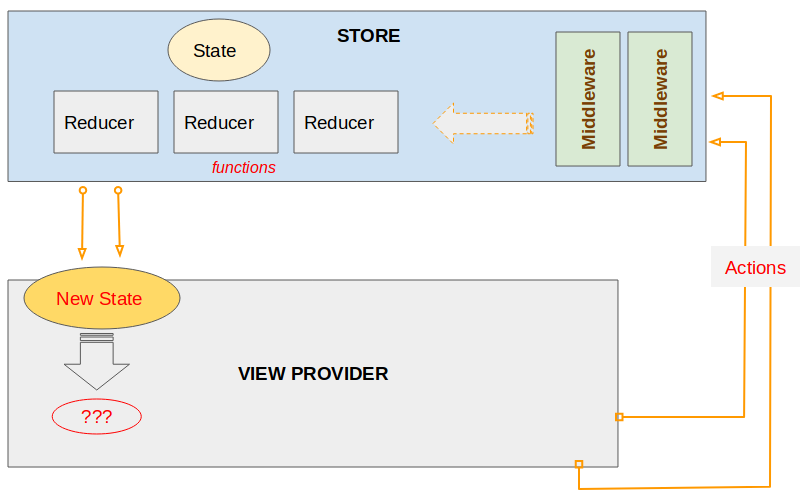
OK, Trong ứng dụng này chúng ta sử dụng React và Redux. Trong đó Redux là một thư viện Javascript giúp quản lý trạng thái của ứng dụng. Hình dưới đây minh họa kiến trúc của Redux.
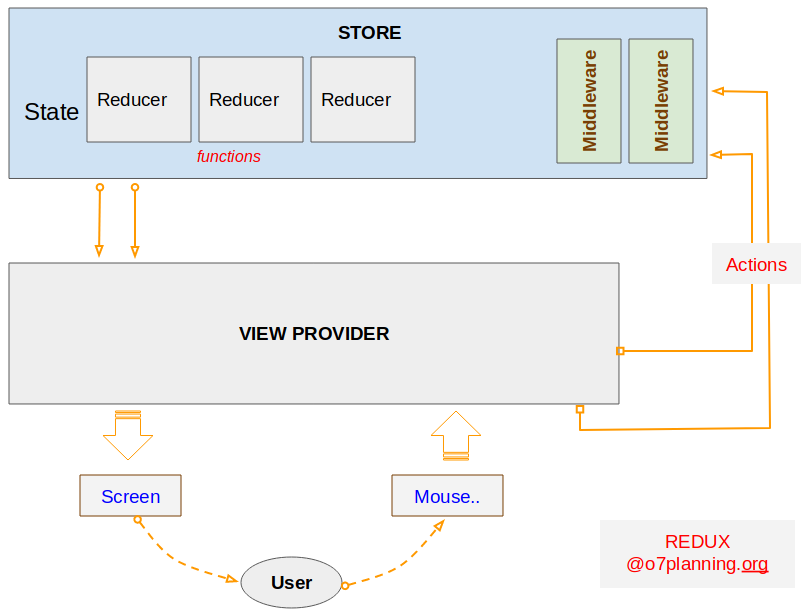
Khi người dùng tương tác trên giao diện của ứng dụng (Chẳng hạn nhấn chuột), một phương thức của Component sẽ được gọi để thực thi. Trong phương thức này, một đối tượng action được tạo ra, nó là một đối tượng thuần thúy, chứa các thông tin liên quan tới sự kiện và các trạng thái cần cập nhập. Cuối cùng gửi đối tượng này tới STORE bằng cách gọi this.props.dispatch(action).
REDUCER: (Bộ biến đổi) Là một hàm Javascript, và bạn phải viết mã cho hàm này để trả về một trạng thái mới cho ứng dụng. Nó có 2 tham số:
- Tham số 1: Trạng thái ban đầu của ứng dụng.
- Tham số 2: Đối tượng action được gửi đến từ bước trước.
Trong Redux, STORE là duy nhất, nó lưu trữ trạng thái của ứng dụng, và chứa các Reducer và các Middleware. Bạn có thể tạo một STORE thông qua phương thức Redux.createStore(..).
// createStore method:
Redux.createStore(reducer, [preloadedState], [enhancer])

// @see API docs: https://redux.js.org/api/createstore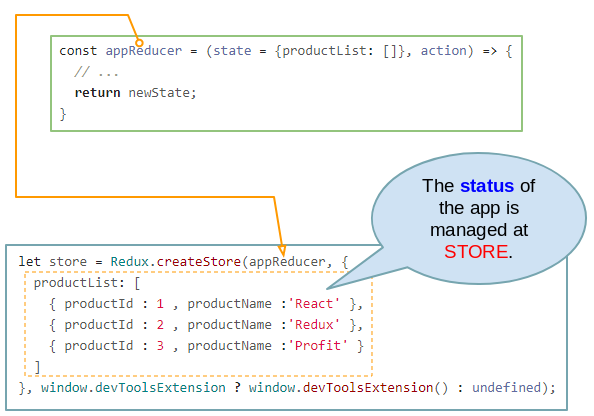
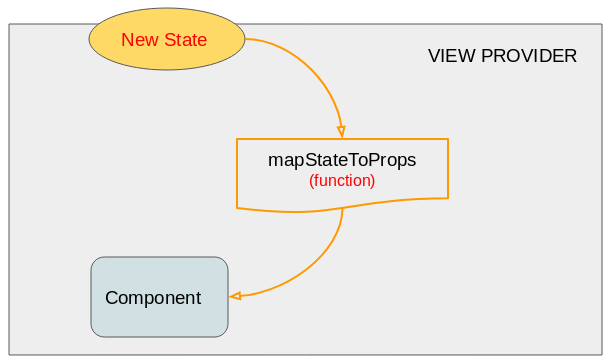
Sau khi action được xử lý trên STORE, một trạng thái mới được trả về cho VIEW PROVIDER.
Trạng thái mới được cập nhập cho Component:

Các hướng dẫn ReactJS
- Hướng dẫn và ví dụ ReactJS props và state
- Xử lý sự kiện (Event) trong ReactJS
- Hướng dẫn và ví dụ ReactJS Component API
- Các phương thức trong vòng đời của ReactJS Component
- Hướng dẫn và ví dụ ReactJS Refs
- Hướng dẫn và ví dụ ReactJS Lists và Keys
- Hướng dẫn và ví dụ ReactJS Form
- Tìm hiểu về ReactJS Router với ví dụ tại phía Client
- Giới thiệu về Redux
- Ví dụ đơn giản với React và Redux tại phía Client
- Hướng dẫn sử dụng React-Transition-Group API
- Bắt đầu nhanh với ReactJS trên môi trường NodeJS
- Tìm hiểu về ReactJS Router với một ví dụ cơ bản (NodeJS)
- Ví dụ React-Transition-Group Transition (NodeJS)
- Ví dụ React-Transition-Group CSSTransition (NodeJS)
- Giới thiệu về ReactJS
- Cài đặt React Plugin cho trình soạn thảo Atom
- Tạo một HTTP Server đơn giản với NodeJS
- Bắt đầu nhanh với ReactJS
Show More
