Cấu hình các trang phản hồi lỗi cho CloudFront
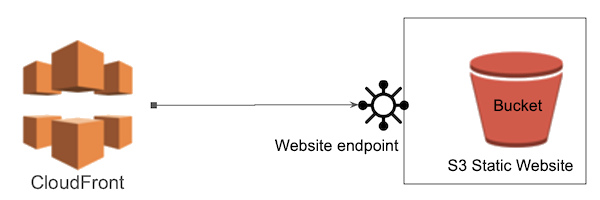
Trong bài học trước chúng ta đã tạo bản phân phối CloudFront cho S3 Bucket.
Trong bài viết này, chúng ta sẽ cấu hình để xử lý các lỗi liên quan tới Website xảy ra trên CloudFront, cụ thể là các lỗi 403, 404,... Nếu không cấu hình các trang lỗi, người dùng có thể sẽ nhìn thấy các thông báo lỗi khó hiểu và không thân thiện giống như thế này:
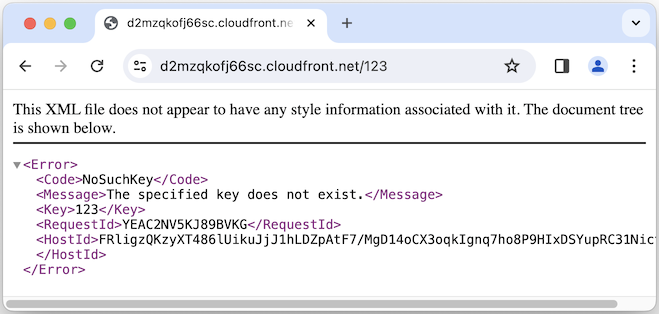
Chú ý: Việc xử lý các lỗi HTTP (403, 404,...) có thể được thực hiện trên S3 Bucket nếu nó đã được bật tính năng "Static Website hosting" . Dù sao, cách xử lý lỗi HTTP của CloudFront và S3 Bucket là hoàn toàn khác nhau, và lựa chọn giải pháp nào tuỳ thuộc vào bạn.
1. Tại sao xuất hiện lỗi 403 với các URL không tồn tại
Sau khi tạo bản phân phối CloudFront. Bạn hãy thử truy cập vào một URL không tồn tại, và có thể bạn nhận được môt thông báo lỗi "Access Denied". Đây là mã lỗi 403, trong khi đáng nhẽ nó phải là 404 (NoSuchKey / Page Not Found).
<?xml version="1.0" encoding="UTF-8"?>
<Error>
   <Code>AccessDenied</Code>
   <Message>Access Denied</Message>
   <RequestId>W1GYWM3Z8WRHPYC3</RequestId>
   <HostId>GNRyvO3x/JrA2aTLjO5TWQMYJlqNZWkigBZ0A8heMzAXkjumCICIAjtLqtAxapp0I122P0oef8U=</HostId>
</Error>
Lỗi trên xuất hiện khi người dùng gửi một yêu cầu truy xuất một đối tượng không tồn tại, trong khi không có quyền liệt kê các đối tượng trên S3 Bucket. Để xử lý vấn đề này bạn cần cấu hình chính sách trên S3 Bucket cho phép quyền s3:ListBucket.
Sau khi cấu hình chính sách trên S3 Bucket cho phép người dùng liệt kê các đối tượng. Bạn truy cập lại vào một URL không tồn tại, lúc này bạn sẽ nhận được thông báo lỗi 404 (NoSuchKey / Page Not Found), đúng với mong đợi của bạn.
<?xml version="1.0" encoding="UTF-8"?>
<Error>
	<Code>NoSuchKey</Code>
	<Message>The specified key does not exist.</Message>
	<Key>123</Key>
	<RequestId>YEAC2NV5KJ89BVKG</RequestId>
	<HostId>FRligzQKzyXT486lUikuJjJ1hLDZpAtF7/MgD14oCX3oqkIgnq7ho8P9HIxDSYupRC31NictozA=</HostId>
</Error>
2. Cấu hình các trang lỗi ở đâu?
Đầu tiên, đăng nhập vào CloudFront.
Lựa chọn một Distribution (bản phân phối):
- [Selected Distribution] > Error pages > Create custom error response

3. Ví dụ đơn giản xử lý lỗi 404
Trong phần này chúng ta sẽ cấu hình nội dung phản hồi (response) để trả về cho người dùng khi họ truy cập vào một URL không tồn tại.
Trên S3 Bucket tạo một đối tượng "response-404-simple.html" với nội dung như sau:
response-404-simple.html
<!DOCTYPE html>
<html>
<head>
  <title>404 - Page Not Found</title>
</head>
<body>
   <h1>Sorry, 404 - Page Not Found!</h1>
   Click <a href="/">here</a> to home page.
</body>
</html>
Trên CloudFront tạo một "Error response":
Http error code | 404: Not Found |
Customize error response | Yes |
Response page path | /response-404-simple.html |
HTTP Response code | 404: Not Found |
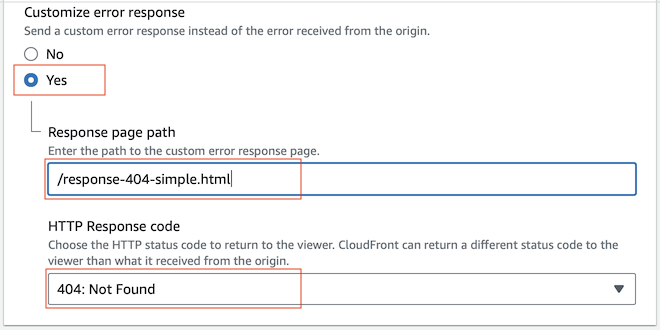
Cuối cùng, truy cập vào một URL nào đó không tồn tại và xem kết quả. Nội dung của "response-404-simple.html" đã được trả về cho người dùng.
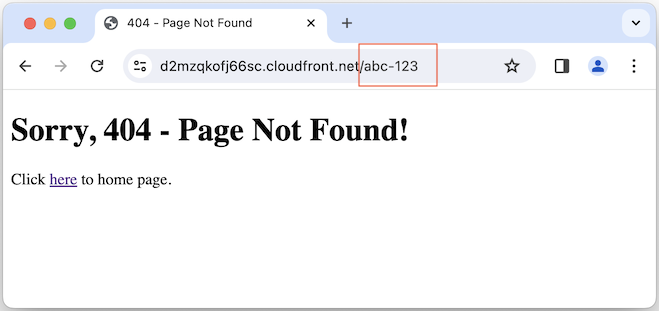
Chú ý: Mỗi khi bạn thay đổi cấu hình trên CloudFront hoặc dữ liệu trên S3 Bucket, bạn cần vô hiệu hoá (invalidate) bộ nhớ đệm của CloudFront.
4. Ví dụ xử lý lỗi 404 nâng cao (1)
Giả sử Website của bạn có các bài viết dưới đây:
- 11111/css-tutorial.html
- 22222/java-tutorial.html
Đôi khi người dùng vô tình truy cập vào các URL không tồn tại, có thể do lỗi chính tả, chẳng hạn:
- 11111/csstutorial.html
- 11111/css
Và bạn muốn chuyển hướng yêu cầu của người dùng tới URL chính xác.
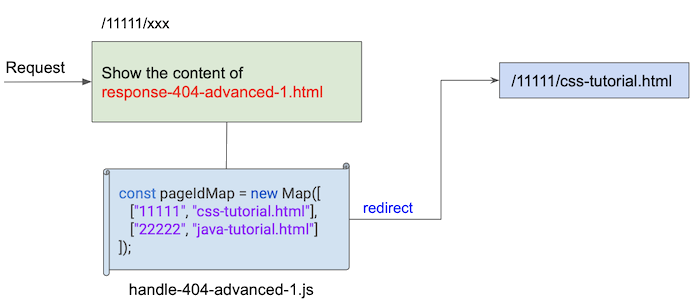
Trong phần này, chúng ta sẽ xem xét một giải pháp được minh hoạ dưới đây:
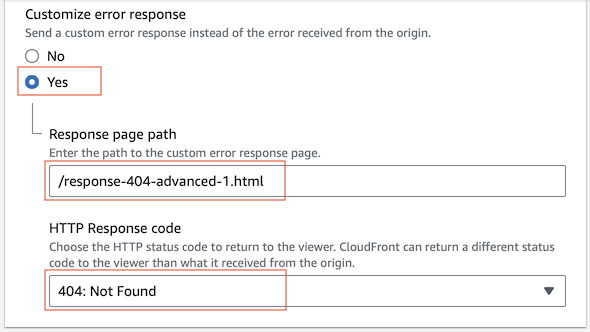
Cấu hình "Error pages" cho lỗi 404:
Http error code | 404: Not Found |
Customize error response | Yes |
Response page path | /response-404-advanced-1.html |
HTTP Response code | 404: Not Found |
response-404-advanced-1.html
<!DOCTYPE html>
<html>
<head>
  <title>404 - Page Not Found</title>
  <meta name='referrer' content='no-referrer' />
  <script src="/handle-404-advanced-1.js"></script>
</head>
<body>
   <h1>Sorry, 404 - Page Not Found!</h1>
   Click <a href="/">here</a> to home page.
</body>
</html>
Javascript sẽ chuyển hướng yêu cầu của người dùng tới các URL chính xác.
handle-404-advanced-1.js
// Create Page ID Map
const pageIdMap = new Map([
   ["11111", "css-tutorial.html"], // 11111/css-tutorial.html
   ["22222", "java-tutorial.html"] // 22222/java-tutorial.html
]);

// Check Page URL and redirect to correct URL If need.
function redirectIfNeed() {
   const currentUrl = window.location.href;
   const currentPathname = window.location.pathname;

   console.log('currentPathname: ' + currentPathname);
   if (currentPathname == '/response-404-advanced-1.html') {
      console.log('Ignore for /response-404-advanced-1.html page');
      return;
   }
   // currentPathname --> /11111/suffix-text
   let j = currentPathname.indexOf('/', 1);
   let pageId = '';
   let suffixText = '';
   if (j == -1) {
      pageId = currentPathname.substring(1);
      suffixText = '';
   } else {
      pageId = currentPathname.substring(1, j);
      suffixText = currentPathname.substring(j + 1);
   }
   console.log('pageId= ' + pageId);
   console.log('suffixText= ' + suffixText);

   let correctSuffixText = pageIdMap.get(pageId);
   console.log('correctSuffixText= ' + correctSuffixText);

   if (!correctSuffixText) {
      console.log('correctSuffixText is undefined -> The Correct Page Not Found!');
      return;
   }
   if (correctSuffixText == suffixText) {
      console.log('correctSuffixText == suffixText -> The Correct Page Not Found!');
      return;
   }
   console.log('Wait 3 seconds before redirect to the correct URL...');
   // Wait 3 seconds before redirect to the correct URL
   // --> So you can see the logs in the console
   setTimeout(()=> {
      // Redirect
      window.location.href = '/' + pageId + '/' + correctSuffixText;
   } ,3000);
}

redirectIfNeed();
5. Ví dụ xử lý lỗi 404 nâng cao (2)
Tiếp tục với tình huống đã được nêu ra ở trên, trong phần này chúng ta đưa ra một giải pháp khác để chuyển hướng yêu cầu của người dùng tới URL chính xác.
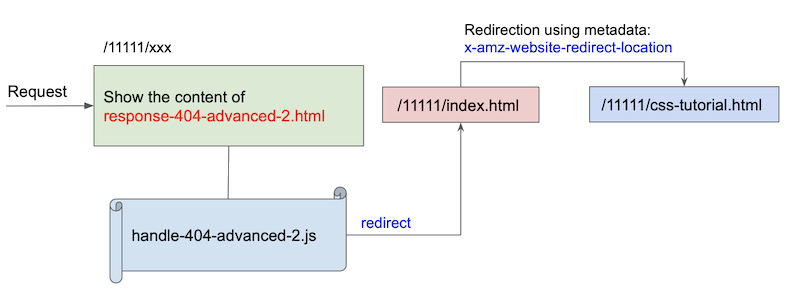
Khi người dùng gửi yêu cầu tới một trang không tồn tại, như thế này:
- /{pageId}/suffix-text
Javascript sẽ chuyển hướng yêu cầu của người dùng tới trang:
- /{pageId}/index.html
Các đối tượng "{pageId}/index.html" được thiết lập siêu dữ liệu x-amz-website-redirect-location, giá trị của nó là một địa chỉ URL chính xác.
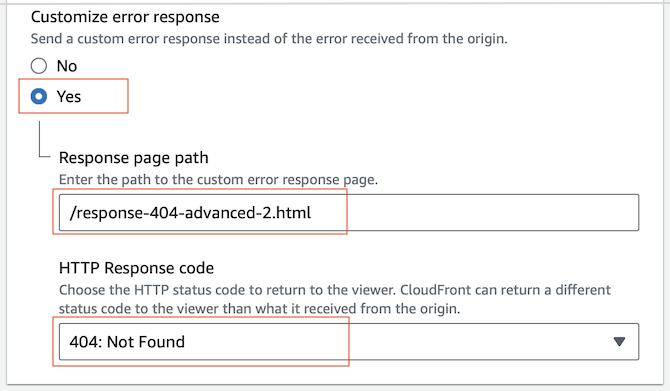
- {pageId}/index.html metadata:

Chú ý: x-amz-website-redirect-location chỉ hoạt động trong trường hợp CloudFront của bạn đang được kết nối với S3 Bucket thông qua Website Endpoint.
response-404-advanced-2.html
<!DOCTYPE html>
<html>
<head>
  <title>404 - Page Not Found</title>
  <meta name='referrer' content='no-referrer' />
  <script src="/handle-404-advanced-2.js"></script>
</head>
<body>
   <h1>Sorry, 404 - Page Not Found!</h1>
   Click <a href="/">here</a> to home page.
</body>
</html>
handle-404-advanced-2.java
// Check Page URL and redirect to correct URL If need.
function redirectIfNeed() {
   const currentUrl = window.location.href;
   const currentPathname = window.location.pathname;

   console.log('currentPathname: ' + currentPathname);
   if (currentPathname == '/response-404-advanced-2.html') {
      console.log('Ignore for /response-404-advanced-2.html page');
      return;
   }
   // currentPathname --> /11111/suffix-text
   let j = currentPathname.indexOf('/', 1);
   let pageId = '';
   let suffixText = '';
   if (j == -1) {
      pageId = currentPathname.substring(1);
      suffixText = '';
   } else {
      pageId = currentPathname.substring(1, j);
      suffixText = currentPathname.substring(j + 1);
   }
   console.log('pageId= ' + pageId);
   console.log('suffixText= ' + suffixText);

   let idxPagePath = '/' + pageId + '/index.html';
   if (currentPathname == idxPagePath) {
      console.log('Not Found: ' + idxPagePath);
      return;
   }

   console.log('Wait 3 seconds before redirect to the correct URL...');
   // Wait 3 seconds before redirect to the correct URL
   // --> So you can see the logs in the console
   setTimeout(()=> {
      // Redirect
      window.location.href = idxPagePath;
   } ,3000);
}

redirectIfNeed();
Hãy thử xem kết quả:
Các hướng dẫn Amazon Web Services
- Giới thiệu về Amazon Web Services (AWS)
- Giới thiệu về Amazon S3
- Giới thiệu về Amazon Cloudfront và kiến trúc của nó
- Làm sao để giảm chi phí Amazon Cloudfront?
- Vô hiệu hoá bộ nhớ đệm CloudFront
- Giới thiệu về DigitalOcean Spaces
- Hướng dẫn tạo DigitalOcean Spaces Bucket
- Giới thiệu về Amazon ACM
- Java Awssdk S3 Tải tệp lên S3 Bucket với S3Client
- Tạo AWS accessKeyId/secretAccessKey
- Java Awssdk S3 Liệt kê các đối tượng trong S3 Bucket
- Lưu trữ (host) một Website tĩnh trên Amazon S3
- Vô hiệu hoá bộ nhớ đệm của CloudFront với Java
- Tạo DigitalOcean Spaces Access Key
- Java Awssdk Các Credentials Provider thông dụng
- Java Awssdk Tạo và sử dụng ProfileCredentialsProvider
- Java Awssdk Tạo và sử dụng EnvironmentVariableCredentialsProvider
- Java Awssdk Tạo và sử dụng SystemPropertyCredentialsProvider
- Java Awssdk S3 Tải object lên với S3TransferManager
- Java Awssdk S3 Tải object xuống với S3TransferManager
- Java thao tác với DigitalOcean Spaces sử dụng S3TransferManager
- Java tạo, liệt kê và xoá S3 Bucket
- Aws Console Tạo tài khoản người dùng IAM
- Tạo một vùng chứa Amazon S3 (S3 Bucket)
- Các quy tắc chuyển hướng cho S3 Static Website
- Cấu hình tên miền tuỳ chỉnh cho website tĩnh Amazon S3
- Tạo bản phân phối CloudFront cho S3 Bucket
- Cấu hình các trang phản hồi lỗi cho CloudFront
- Tạo các chính sách S3 Bucket
- Công cụ tạo các chính sách cho AWS - policygen
- So sánh Amazon S3 Rest API Endpoint và S3 Web Endpoint
- Chuyển hướng trong S3 Website với x-amz-website-redirect-location
- Di chuyển (migrate) dịch vụ DNS tới Amazon Route 53
- Chuyển (transfer) đăng ký tên miền tới Amazon Route 53
- Yêu cầu chứng chỉ SSL từ Amazon ACM
Show More
