Hướng dẫn lập trình Spring MVC cho người mới bắt đầu - Hello Spring 4 MVC

1. Giới thiệu
Tài liệu hướng dẫn này được viết dựa trên:
- Eclipse 4.6 (NEON)
- Spring 4.0.3.RELEASE
Gợi ý: Bạn nên xem trước tài liệu giới thiệu về cấu trúc Spring Framework, và bản chất Spring làm gì, thông qua một hướng dẫn HelloWorld Spring tại:
(Mục tiêu: Giới thiệu về Spring, giải thích @Service, @Component, @Repository, ... và ví dụ HelloWorld)
Xem trước ví dụ:
2. Tạo Maven Project
Tạo một Project kiểu Maven. Maven giúp chúng ta quản lý thư viện một cách tốt nhất. Bạn sẽ rảnh tay để xử lý các vấn đề khác.
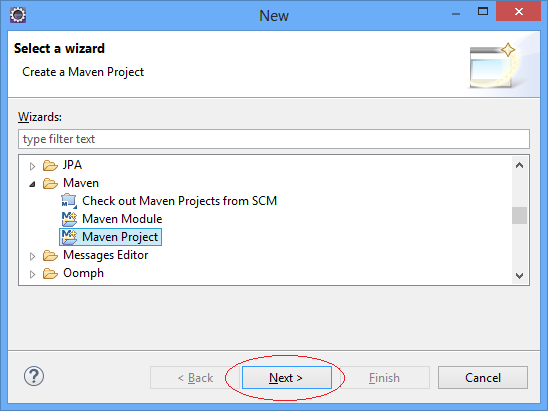
Trên Eclipse chọn:
- File/New/Other...
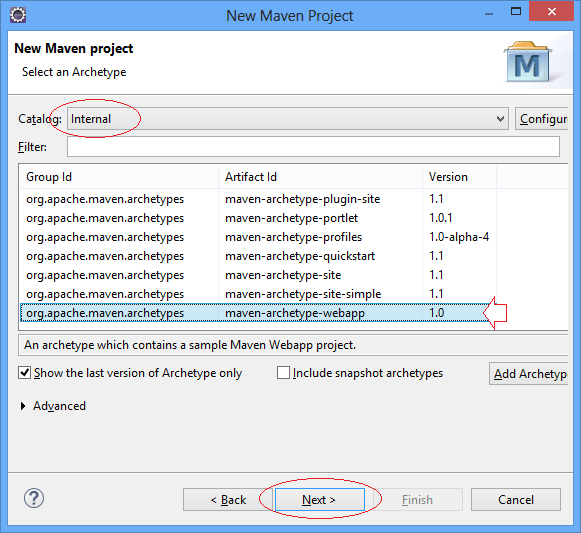
Chọn nguyên mẫu (archetype) "maven-archetype-webapp".
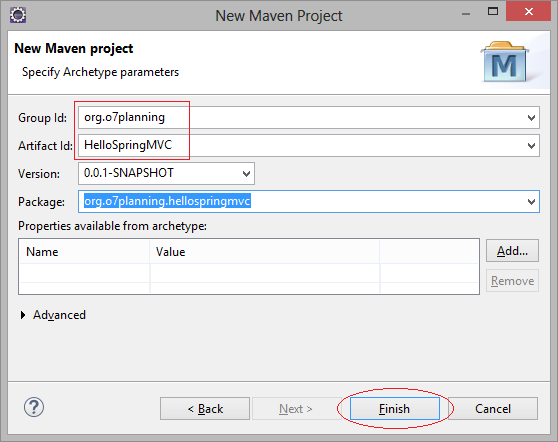
Nhập vào:
- Group Id: org.o7planning
- Artifact Id: HelloSpringMVC
- Package: org.o7planning.hellospringmvc
Đây là cấu trúc Project được tạo ra:
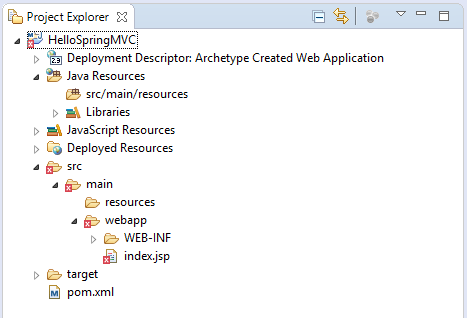
Bạn đừng lo lắng với thông báo lỗi khi Project vừa được tạo ra. Lý do là bạn chưa khai báo thư viện Servlet.
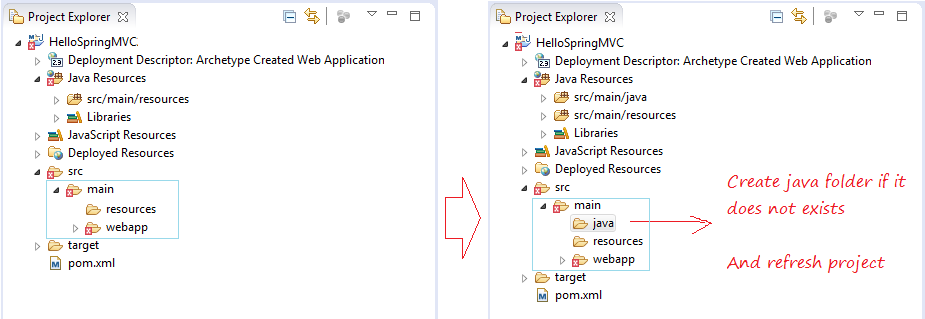
Eclipse tạo ra project Maven có thể sai cấu trúc. Bạn cần phải kiểm tra.
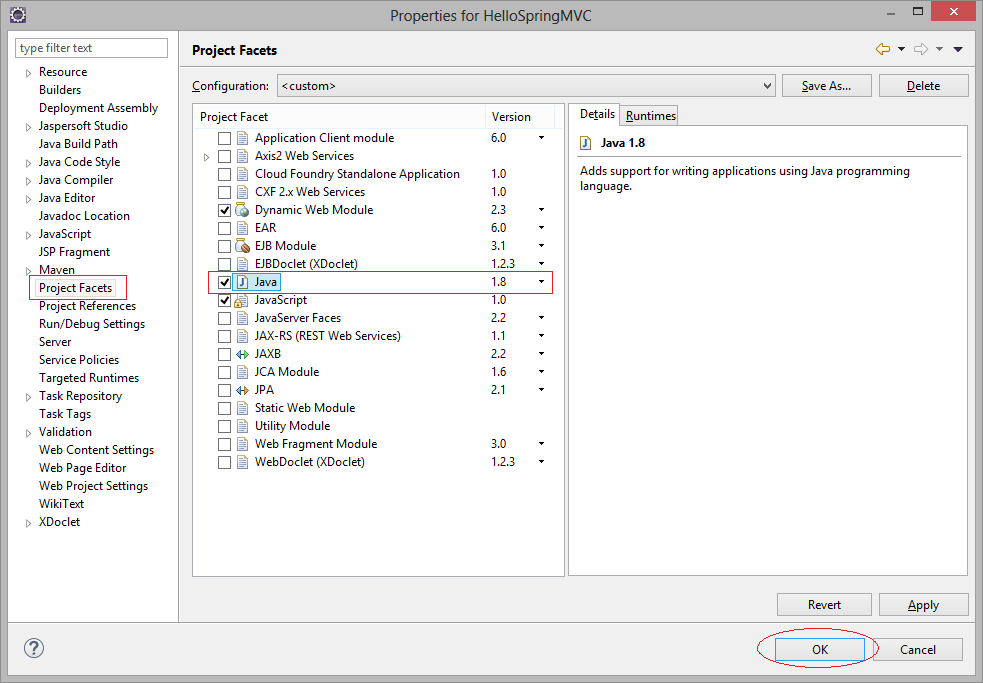
Đảm bảo rằng bạn sử dụng Java >= 6
Project Properties:
3. Khai báo Maven và web.xml
Khai báo sử dụng thư viện:
pom.xml
<project xmlns="http://maven.apache.org/POM/4.0.0" xmlns:xsi="http://www.w3.org/2001/XMLSchema-instance"
  xsi:schemaLocation="http://maven.apache.org/POM/4.0.0 http://maven.apache.org/maven-v4_0_0.xsd">
  <modelVersion>4.0.0</modelVersion>
  <groupId>org.o7planning</groupId>
  <artifactId>HelloSpringMVC</artifactId>
  <packaging>war</packaging>
  <version>0.0.1-SNAPSHOT</version>
  <name>HelloSpringMVC Maven Webapp</name>
  <url>http://maven.apache.org</url>


    <dependencies>

        <dependency>
            <groupId>junit</groupId>
            <artifactId>junit</artifactId>
            <version>3.8.1</version>
            <scope>test</scope>
        </dependency>

        <!-- Servlet Library -->
        <!-- http://mvnrepository.com/artifact/javax.servlet/javax.servlet-api -->
        <dependency>
            <groupId>javax.servlet</groupId>
            <artifactId>javax.servlet-api</artifactId>
            <version>3.1.0</version>
            <scope>provided</scope>
        </dependency>

        <!-- Spring dependencies -->
        <!-- http://mvnrepository.com/artifact/org.springframework/spring-core -->
        <dependency>
            <groupId>org.springframework</groupId>
            <artifactId>spring-core</artifactId>
            <version>4.3.1.RELEASE</version>
        </dependency>

        <!-- http://mvnrepository.com/artifact/org.springframework/spring-web -->
        <dependency>
            <groupId>org.springframework</groupId>
            <artifactId>spring-web</artifactId>
            <version>4.3.1.RELEASE</version>
        </dependency>

        <!-- http://mvnrepository.com/artifact/org.springframework/spring-webmvc -->
        <dependency>
            <groupId>org.springframework</groupId>
            <artifactId>spring-webmvc</artifactId>
            <version>4.3.1.RELEASE</version>
        </dependency>

    </dependencies>


    <build>
        <finalName>HelloSpringMVC</finalName>
        <plugins>

            <!-- Config: Maven Tomcat Plugin -->
            <!-- http://mvnrepository.com/artifact/org.apache.tomcat.maven/tomcat7-maven-plugin -->
            <plugin>
                <groupId>org.apache.tomcat.maven</groupId>
                <artifactId>tomcat7-maven-plugin</artifactId>
                <version>2.2</version>
                <!-- Config: contextPath and Port (Default: /HelloSpringMVC : 8080) -->
                <!--
                <configuration>
                    <path>/</path>
                    <port>8899</port>
                </configuration>
                -->
            </plugin>
        </plugins>
    </build>

</project>
Sử dụng Servlet API 3 hoặc mới hơn:
web.xml
<?xml version="1.0" encoding="UTF-8"?>
<web-app xmlns:xsi="http://www.w3.org/2001/XMLSchema-instance"
    xmlns="http://java.sun.com/xml/ns/javaee"
    xsi:schemaLocation="http://java.sun.com/xml/ns/javaee
    http://java.sun.com/xml/ns/javaee/web-app_3_0.xsd"
    id="WebApp_ID" version="3.0">

    <display-name>HelloSpringMVC</display-name>

</web-app>
4. Cấu hình Spring MVC
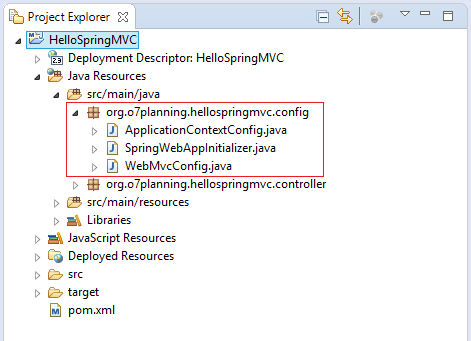
SpringWebAppInitializer là class thi hành (implements) interface WebApplicationInitializer. Spring sẽ đọc các thông tin cấu hình trong class này để bắt đầu (initial) ứng dụng Web của bạn.
Thông thường trong lớp này bạn có thể đăng ký các Servlet, các Servlet Filter, và Servlet Listener thay cho việc đăng ký chúng trong web.xml.
Một servlet quan trọng là org.springframework.web.servlet.DispatcherServlet, bạn cần đăng ký nó.
Thông thường trong lớp này bạn có thể đăng ký các Servlet, các Servlet Filter, và Servlet Listener thay cho việc đăng ký chúng trong web.xml.
Một servlet quan trọng là org.springframework.web.servlet.DispatcherServlet, bạn cần đăng ký nó.
SpringWebAppInitializer.java
package org.o7planning.hellospringmvc.config;

import javax.servlet.FilterRegistration;
import javax.servlet.ServletContext;
import javax.servlet.ServletException;
import javax.servlet.ServletRegistration;

import org.springframework.web.WebApplicationInitializer;
import org.springframework.web.context.ContextLoaderListener;
import org.springframework.web.context.support.AnnotationConfigWebApplicationContext;
import org.springframework.web.filter.CharacterEncodingFilter;
import org.springframework.web.servlet.DispatcherServlet;

public class SpringWebAppInitializer implements WebApplicationInitializer {

    @Override
    public void onStartup(ServletContext servletContext) throws ServletException {
        AnnotationConfigWebApplicationContext appContext = new AnnotationConfigWebApplicationContext();
        appContext.register(ApplicationContextConfig.class);

        // Dispatcher Servlet
        ServletRegistration.Dynamic dispatcher = servletContext.addServlet("SpringDispatcher",
                new DispatcherServlet(appContext));
        dispatcher.setLoadOnStartup(1);
        dispatcher.addMapping("/");

        dispatcher.setInitParameter("contextClass", appContext.getClass().getName());

        servletContext.addListener(new ContextLoaderListener(appContext));

        // UTF8 Charactor Filter.
        FilterRegistration.Dynamic fr = servletContext.addFilter("encodingFilter", CharacterEncodingFilter.class);

        fr.setInitParameter("encoding", "UTF-8");
        fr.setInitParameter("forceEncoding", "true");
        fr.addMappingForUrlPatterns(null, true, "/*");
    }

}
Class ApplicationContextConfig được sử dụng để khai báo các Spring BEAN. Nó được chú thích bởi @Configuration.
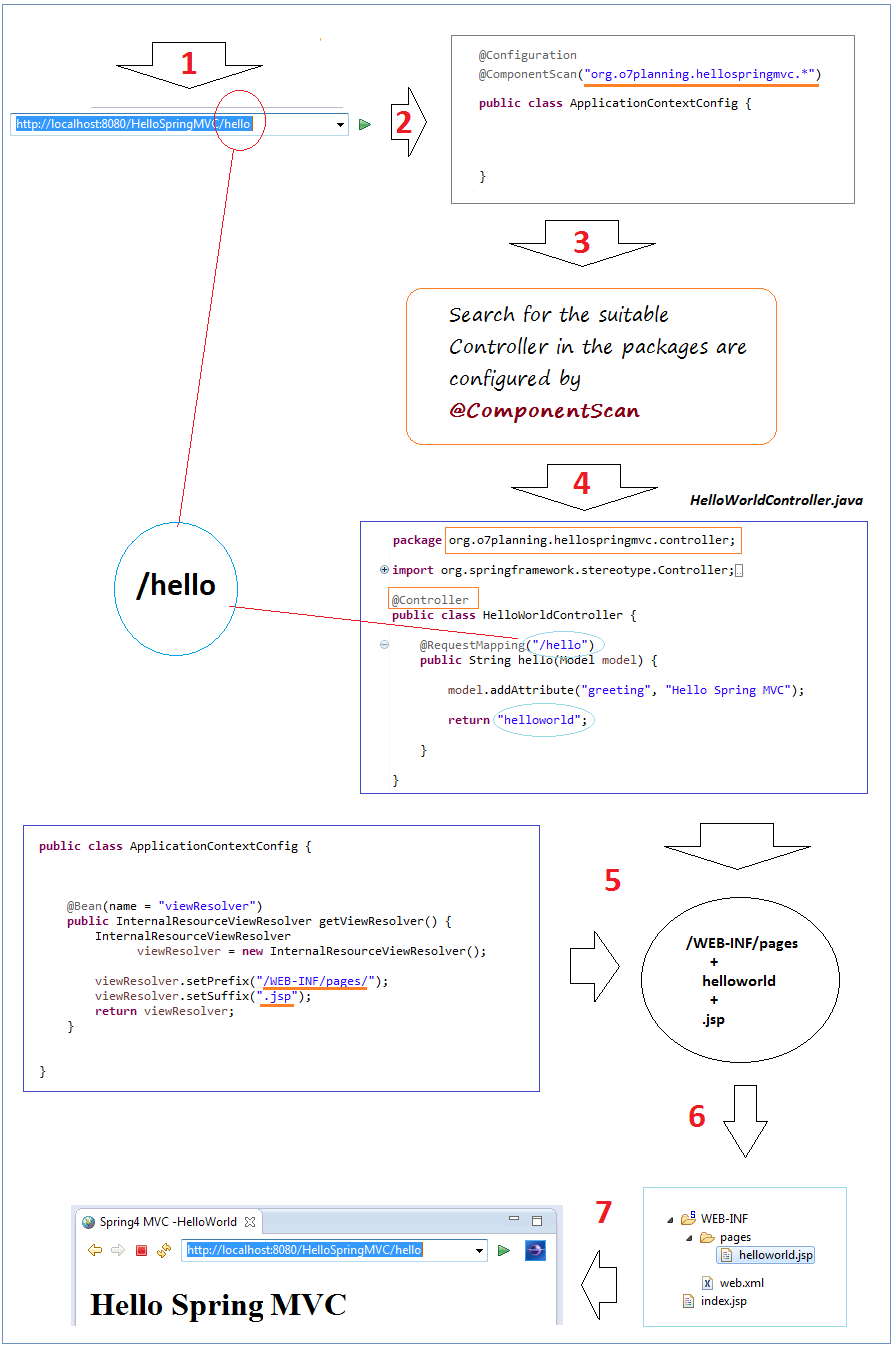
@ComponentScan("org.o7planning.hellospringmvc.*") - Nói với Spring tìm kiếm các Spring BEAN khác, và các Controller trong các package "con trực tiếp" của package org.o7planning.hellospringmvc.
@ComponentScan("org.o7planning.hellospringmvc.*") - Nói với Spring tìm kiếm các Spring BEAN khác, và các Controller trong các package "con trực tiếp" của package org.o7planning.hellospringmvc.
ApplicationContextConfig.java
package org.o7planning.hellospringmvc.config;

import org.springframework.context.annotation.Bean;
import org.springframework.context.annotation.ComponentScan;
import org.springframework.context.annotation.Configuration;
import org.springframework.web.servlet.view.InternalResourceViewResolver;

@Configuration
@ComponentScan("org.o7planning.hellospringmvc.*")
public class ApplicationContextConfig {


    @Bean(name = "viewResolver")
    public InternalResourceViewResolver getViewResolver() {
        InternalResourceViewResolver viewResolver = new InternalResourceViewResolver();
        viewResolver.setPrefix("/WEB-INF/pages/");
        viewResolver.setSuffix(".jsp");
        return viewResolver;
    }


}
Class WebMvcConfig mở rộng từ WebMvcConfigurerAdapter, sử dụng để cấu hình các tài nguyên sử dụng trong Spring MVC, chẳng hạn các nguồn tài nguyên tĩnh (Image, CSS, Javascript,..)
WebMvcConfig.java
package org.o7planning.hellospringmvc.config;

import org.springframework.context.annotation.Configuration;
import org.springframework.web.servlet.config.annotation.DefaultServletHandlerConfigurer;
import org.springframework.web.servlet.config.annotation.EnableWebMvc;
import org.springframework.web.servlet.config.annotation.ResourceHandlerRegistry;
import org.springframework.web.servlet.config.annotation.WebMvcConfigurerAdapter;


@Configuration
@EnableWebMvc
public class WebMvcConfig extends WebMvcConfigurerAdapter {


   // Cấu hình để sử dụng các file nguồn tĩnh (html, image, ..)
   @Override
   public void addResourceHandlers(ResourceHandlerRegistry registry) {
       registry.addResourceHandler("/css/**").addResourceLocations("/css/").setCachePeriod(31556926);
       registry.addResourceHandler("/img/**").addResourceLocations("/img/").setCachePeriod(31556926);
       registry.addResourceHandler("/js/**").addResourceLocations("/js/").setCachePeriod(31556926);
   }


   @Override
   public void configureDefaultServletHandling(DefaultServletHandlerConfigurer configurer) {
       configurer.enable();
   }

}
5. Jsp & Spring Controller
Các lớp Controller sử dụng để điều khiển đường đi của ứng dụng.
HelloWorldController.java
package org.o7planning.hellospringmvc.controller;

import org.springframework.stereotype.Controller;
import org.springframework.ui.Model;
import org.springframework.web.bind.annotation.RequestMapping;

@Controller
public class HelloWorldController {

    @RequestMapping("/hello")
    public String hello(Model model) {

        model.addAttribute("greeting", "Hello Spring MVC");

        return "helloworld";

    }

}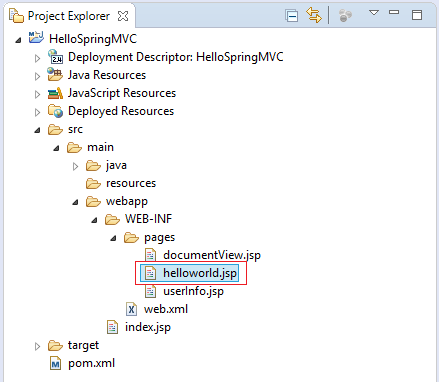
/WEB-INF/pages/helloworld.jsp
<!DOCTYPE html>
<html>
<head>
<meta charset="UTF-8">
<title>Spring MVC -HelloWorld</title>
</head>


<body>
    <h1>${greeting}</h1>
</body>


</html>
6. Chạy ứng dụng Spring MVC
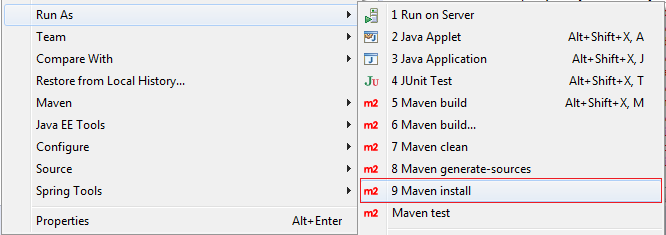
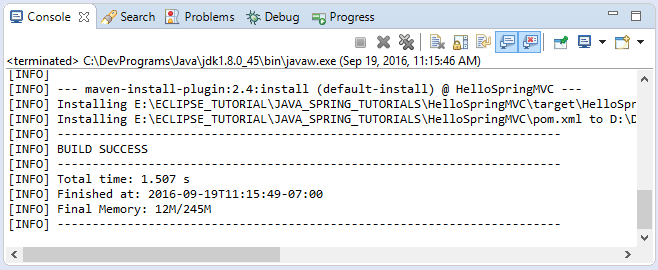
Trong lần đầu tiên, trước khi chạy ứng dụng bạn cần phải build toàn bộ project.
Nhấn phải chuột vào project chọn:
- Run As/Maven install
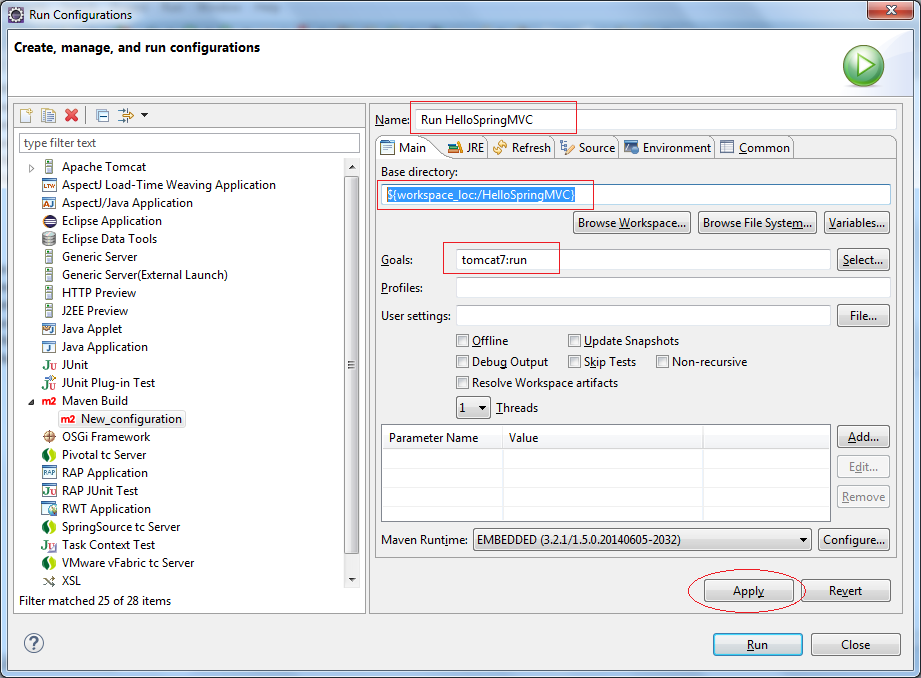
Cấu hình để chạy ứng dụng:


Nhập vào:
- Name: Run HelloSpringMVC
- Base directory: ${workspace_loc:/HelloSpringMVC}
- Goals: tomcat7:run
Nhấn Run để chạy:
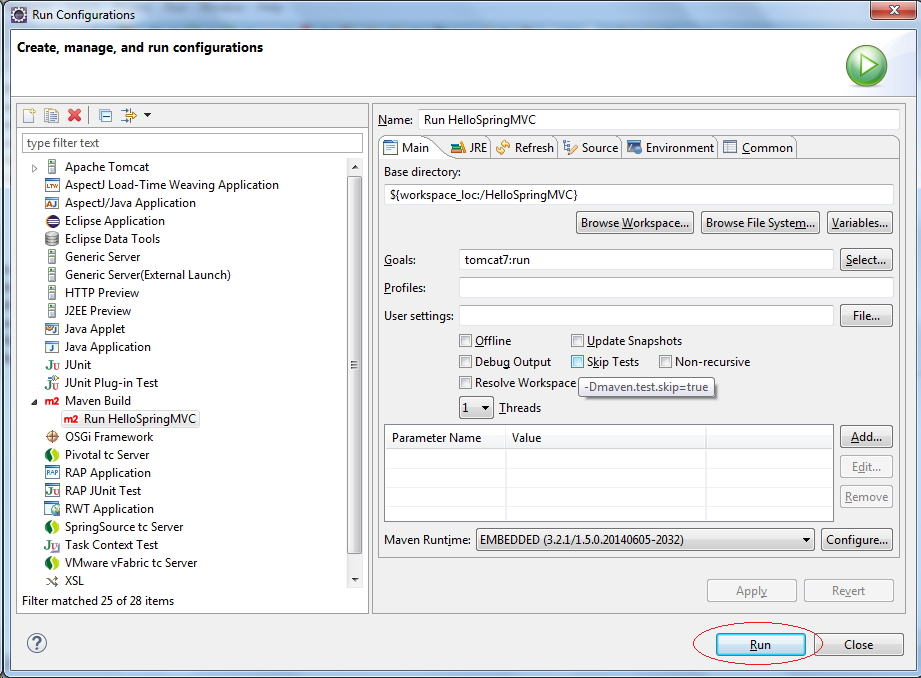
Trong lần chạy đầu tiên sẽ hơi lâu do chương trình download các thư viện tomcat plugin về để chạy.

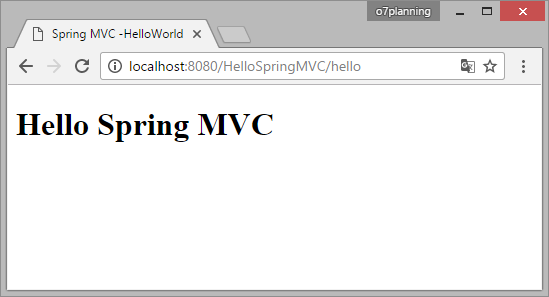
Mọi thứ đã hoàn thành:

Chạy URL:
7. Luồng đi của ứng dụng
Bạn đã hoàn thành xong project và chạy thành công ở bước trên. Lúc này chúng ta sẽ xem chương trình chạy thế nào.

8. Controller và các phương thức
HttpServletRequest & HttpServletResponse
Bạn có thể sử dụng HttpServletRequest, HttpServletResponse trong các phương thức của Controller.
OtherExampleController.java
package org.o7planning.tutorial.springmvc;

import javax.servlet.http.HttpServletRequest;
import javax.servlet.http.HttpServletResponse;

import org.springframework.stereotype.Controller;
import org.springframework.ui.Model;
import org.springframework.web.bind.annotation.PathVariable;
import org.springframework.web.bind.annotation.RequestMapping;
import org.springframework.web.bind.annotation.RequestParam;

@Controller
public class OtherExampleController {

  ......

  @RequestMapping("/somePath")
  public String requestResponseExample(HttpServletRequest request,
          HttpServletResponse reponses, Model model) {

      // Todo something here

      return "someView";
  }

  ......
}
Redirect trong Controller
Sử dụng tiếp đầu ngữ "redirect:" trong String trả về của phương thức, bạn có thể redirect sang một trang khác. Hãy xem ví dụ minh họa:
RedirectExampleController.java
package org.o7planning.hellospringmvc.controller;

import org.springframework.stereotype.Controller;
import org.springframework.ui.Model;
import org.springframework.web.bind.annotation.RequestMapping;
import org.springframework.web.bind.annotation.RequestMethod;

@Controller
public class RedirectExampleController {

 @RequestMapping(value = "/redirect", method = RequestMethod.GET)
 public String authorInfo(Model model) {

     // Làm gì đó tại đây ...

     return "redirect:/hello";
 }
}
Chạy URL:
Ví dụ @RequestParam
Sử dụng @RequestParam để trói buộc (bind) một tham số của request vào tham số của phương thức trong Controller của bạn.
Dưới đây là đoạn code sử dụng:
RequestParamExampleController.java
package org.o7planning.hellospringmvc.controller;
import org.springframework.stereotype.Controller;
import org.springframework.ui.Model;
import org.springframework.web.bind.annotation.RequestMapping;
import org.springframework.web.bind.annotation.RequestParam;
@Controller
public class RequestParamExampleController {
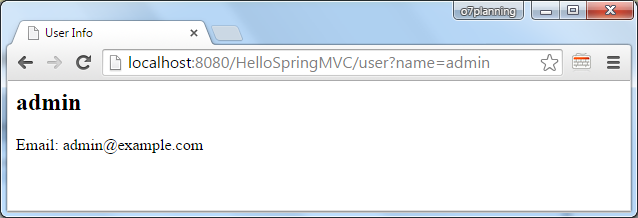
@RequestMapping("/user")
public String userInfo(Model model,
@RequestParam(value = "name", defaultValue = "Guest") String name) {
model.addAttribute("name", name);
if ("admin".equals(name)) {
model.addAttribute("email", "admin@example.com");
} else {
model.addAttribute("email", "Not set");
}
return "userInfo";
}
}/WEB-INF/pages/userInfo.jsp
<html>
<head>
<meta http-equiv="Content-Type" content="text/html; charset=ISO-8859-1">
<title>User Info</title>
</head>
<body>

  <h2>${name}</h2>

  Email: ${email}
  <br>


</body>
</html>
Chạy URL:
Ví dụ @PathVariable
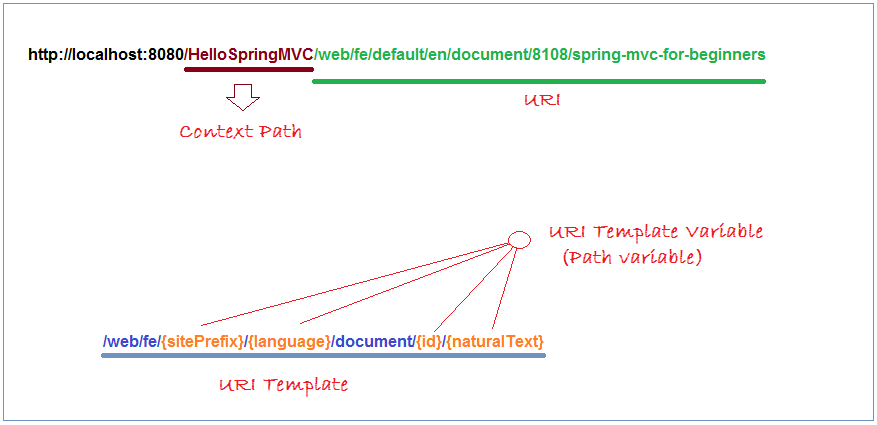
Trong Spring MVC bạn có thể sử dụng @PathVariable để trói buộc một tham số của phương thức với một biến Template URI (URI Template variable).
Ví dụ đây là một mẫu URI:
- /web/fe/{sitePrefix}/{language}/document/{id}/{naturalText}
Và các URI sau khớp với mẫu trên:
- /web/fe/default/en/document/8108/spring-mvc-for-beginners
- /web/fe/default/vi/document/8108/spring-mvc-cho-nguoi-moi-bat-dau
- .....
Đoạn code dưới đây chỉ ra cách sử dụng nó:
PathVariableExampleController.java
package org.o7planning.hellospringmvc.controller;
import org.springframework.stereotype.Controller;
import org.springframework.ui.Model;
import org.springframework.web.bind.annotation.PathVariable;
import org.springframework.web.bind.annotation.RequestMapping;
@Controller
public class PathVariableExampleController {
/**
* @PathVariable Example:
*
* <pre>
*
* http://o7planning.org/web/fe/default/en/document/8108/spring-mvc-for-beginners
*
* or
*
* http://localhost:8080/HelloSpringMVC/web/fe/default/en/document/8108/spring-mvc-for-beginners
*
* </pre>
*/
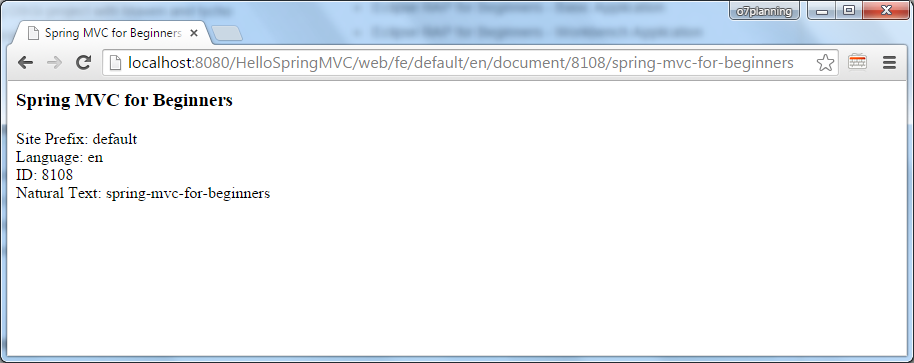
@RequestMapping("/web/fe/{sitePrefix}/{language}/document/{id}/{naturalText}")
public String documentView(Model model,
@PathVariable(value = "sitePrefix") String sitePrefix,
@PathVariable(value = "language") String language,
@PathVariable(value = "id") Long id,
@PathVariable(value = "naturalText") String naturalText) {
model.addAttribute("sitePrefix", sitePrefix);
model.addAttribute("language", language);
model.addAttribute("id", id);
model.addAttribute("naturalText", naturalText);
String documentName = "Java tutorial for Beginners";
if (id == 8108) {
documentName = "Spring MVC for Beginners";
}
model.addAttribute("documentName", documentName);
return "documentView";
}
}/WEB-INF/pages/documentView.jsp
<html>
<head>
<meta http-equiv="Content-Type" content="text/html; charset=ISO-8859-1">
<title>${documentName}</title>
</head>
<body>

   <h3>${documentName}</h3>

   Site Prefix: ${sitePrefix}
   <br> Language: ${language}
   <br> ID: ${id}
   <br> Natural Text: ${naturalText}
   <br>

</body>
</html>
Chạy URL:
Ví dụ @ResponseBody
Nếu bạn chú thích một phương thức trong Controller với @ResponseBody, Spring sẽ chuyển đổi giá trị trả về của phương thức thành String và ghi vào Http response một cách tự động. Trong trường hợp này bạn không cần một View cụ thể.
Chú ý: Phương thức không nhất thiết phải trả về kiểu String.
Ví dụ minh họa đơn giản với @ResponseBody, phương thức trả về kiểu String.
ResponseBodyExample1Controller.java
package org.o7planning.hellospringmvc.controller;
import org.springframework.stereotype.Controller;
import org.springframework.ui.Model;
import org.springframework.web.bind.annotation.RequestMapping;
import org.springframework.web.bind.annotation.ResponseBody;
@Controller
public class ResponseBodyExample1Controller {
// Một ví dụ đơn giản, method trả về kiểu String.
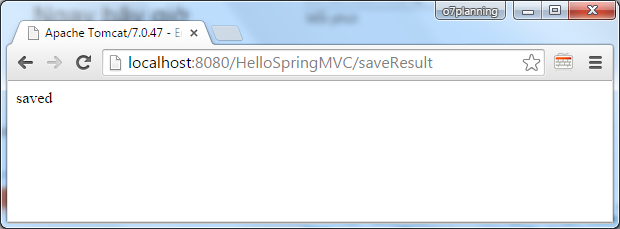
@RequestMapping(value = "/saveResult")
@ResponseBody
public String authorInfo(Model model) {
return "saved";
}
}Kết quả chạy ví dụ:
Ví dụ với @ResponseBody, phương thức trả về kiểu Object.
- TODO
Các hướng dẫn Spring MVC
- Hướng dẫn lập trình Spring cho người mới bắt đầu
- Cài đặt Spring Tool Suite cho Eclipse
- Hướng dẫn lập trình Spring MVC cho người mới bắt đầu - Hello Spring 4 MVC
- Cấu hình các nguồn dữ liệu tĩnh trong Spring MVC
- Hướng dẫn sử dụng Spring MVC Interceptor
- Tạo ứng dụng web đa ngôn ngữ với Spring MVC
- Hướng dẫn Upload File với Spring MVC
- Ứng dụng Java Web login đơn giản sử dụng Spring MVC, Spring Security và Spring JDBC
- Hướng dẫn sử dụng Spring MVC Security với Hibernate
- Hướng dẫn sử dụng Spring MVC Security và Spring JDBC (XML Config)
- Đăng nhập bằng mạng xã hội trong Spring MVC với Spring Social Security
- Hướng dẫn sử dụng Spring MVC và Velocity
- Hướng dẫn sử dụng Spring MVC với FreeMarker
- Sử dụng Template trong Spring MVC với Apache Tiles
- Hướng dẫn sử dụng Spring MVC và Spring JDBC Transaction
- Sử dụng nhiều DataSource trong Spring MVC
- Hướng dẫn sử dụng Spring MVC, Hibernate và Spring Transaction Manager
- Hướng dẫn sử dụng Spring MVC Form và Hibernate
- Chạy các nhiệm vụ nền theo lịch trình trong Spring
- Tạo một ứng dụng Java Web bán hàng sử dụng Spring MVC và Hibernate
- Ví dụ CRUD đơn giản với Spring MVC RESTful Web Service
- Triển khai ứng dụng Spring MVC trên Oracle WebLogic Server
Show More
