Hướng dẫn lập trình đa luồng trong Java - Java Multithreading
2. Ví dụ bắt đầu với Thread
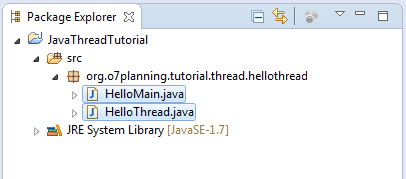
Chúng ta cần 2 class tham gia vào ví dụ này.
- HelloMain là một class thông thường có hàm main, nó là một luồng chính (main thread).
- HelloThread là một class mở rộng từ class Thread. Nó được tạo và chạy kích hoạt chạy bên trong luồng chính và sẽ chạy song song với luồng chính.
package org.o7planning.tutorial.thread.hellothread;
public class HelloMain {
public static void main(String[] args) throws InterruptedException {
int idx = 1;
for (int i = 0; i < 2; i++) {
System.out.println("Main thread running " + idx++);
// Ngủ 2101 milli giây.
Thread.sleep(2101);
}
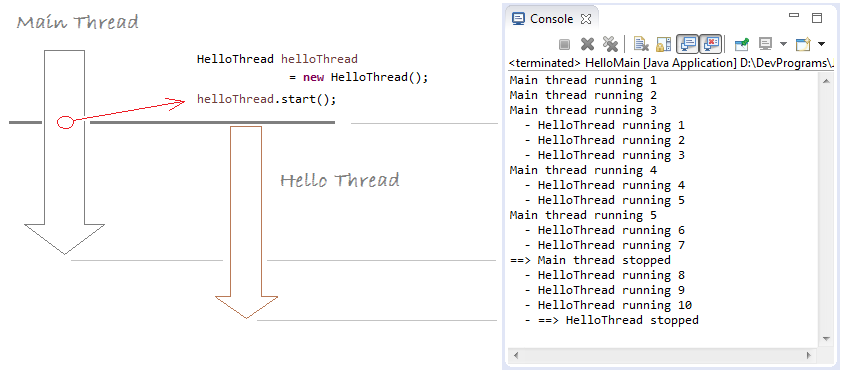
HelloThread helloThread = new HelloThread();
// Chạy thread
helloThread.start();
for (int i = 0; i < 3; i++) {
System.out.println("Main thread running " + idx++);
// Ngủ 2101 milli giây.
Thread.sleep(2101);
}
System.out.println("==> Main thread stopped");
}
}HelloThread.java
package org.o7planning.tutorial.thread.hellothread;

public class HelloThread extends Thread {

   // Code trong hàm run() sẽ được thực thi khi
   // thread được chạy (start)
   @Override
   public void run() {
       int index = 1;

       for (int i = 0; i < 10; i++) {
           System.out.println("  - HelloThread running " + index++);

           try {
               // Ngủ 1030 milli giây.
               Thread.sleep(1030);
           } catch (InterruptedException e) {
           }

       }
       System.out.println("  - ==> HelloThread stopped");
   }
}
Kết quả chạy class HelloMain:
3. Runnable Interface
Bạn cũng có thể tạo một thread từ một class thi hành interface Runnable. Xem ví dụ minh họa:
RunnableDemo.java
package org.o7planning.tutorial.thread.runnable;

public class RunnableDemo implements Runnable {

   @Override
   public void run() {
       int idx = 1;
       for (int i = 0; i < 5; i++) {
           System.out.println("Hello from RunnableDemo " + idx++);
           // Ngủ 2 giây.
           try {
               Thread.sleep(2000);
           } catch (InterruptedException e) {
           }
       }
   }

}
RunnableTest.java
package org.o7planning.tutorial.thread.runnable;

public class RunnableTest {

   public static void main(String[] args) throws InterruptedException {

       System.out.println("Main thread running..");

       // Tạo một thread từ Runnable.
       Thread thread = new Thread(new RunnableDemo());

       thread.start();

       // Ngủ 5 giây.
       Thread.sleep(5000);
       System.out.println("Main thread stopped");
   }
}
Chạy class RunnableTest:
Main thread running..
Hello from RunnableDemo 1
Hello from RunnableDemo 2
Hello from RunnableDemo 3
Main thread stopped
Hello from RunnableDemo 4
Hello from RunnableDemo 5
4. Luồng Deamon (Deamon Thread)
Java chia thread làm 2 loại một loại thông thường và Deamon Thread. Chúng chỉ khác nhau ở cách thức ngừng hoạt động. Trong một chương trình các luồng thông thường và luồng Deamon chạy song song với nhau. Khi tất cả các luồng thông thường kết thúc, mọi luồng Deamon cũng sẽ bị kết thúc theo bất kể nó đang làm việc gì.
Chú ý:
Sử dụng setDeamon(boolean) để sét đặt một luồng là Deamon hoặc không. Chú ý, bạn chỉ có thể gọi hàm setDeamon(boolean) khi thread chưa được chạy. Điều đó có nghĩa là khi thread đã chạy bạn không thể chuyển luồng từ non-deamon sang deamon và ngược lại.
Khi một luồng mới được tạo ra, nó được thừa hưởng đặc tính deamon từ luồng cha. Như vậy khi bạn tạo một luồng trong hàm main của 1 class nó vốn là luồng non-deamon, vì vậy thread tạo ra mặc định cũng là none-deamon. Như vậy nếu bạn tạo một luồng mới trong một luồng Deamon, mặc định nó cũng sẽ là Deamon.
Thread thread = new MyThread();

// sét luồng này là deamon.
// Chỉ gọi được method này khi thread chưa start.
// Trong trường hợp start rồi sẽ bị một ngoại lệ.
thread.setDeamon(true);

// Sét luồng này là non-deamon.
// Chỉ gọi được method này khi thread chưa start.
// Trong trường hợp start rồi sẽ bị một ngoại lệ.
thread.setDeamon(false);
Để dễ hiểu chúng ta xem ví dụ sau, chúng ta cần 3 class tham gia vào minh họa:
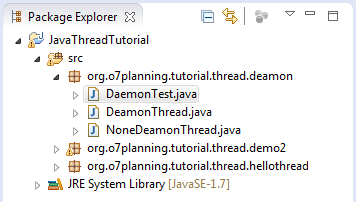
NoneDeamonThread.java
package org.o7planning.tutorial.thread.deamon;

public class NoneDeamonThread extends Thread {

  @Override
  public void run() {
      int i = 0;

      // Vòng lặp 10 lần. Luồng này sẽ kết thúc.
      while (i < 10) {
          System.out.println("  - Hello from None Deamon Thread " + i++);
          try {
              // Ngủ 1 giây.
              Thread.sleep(1000);
          } catch (InterruptedException e) {
          }
      }

      // Ghi ra thông báo luồng này kết thúc.
      System.out.println("\n==> None Deamon Thread ending\n");
  }
}
DeamonThread.java
package org.o7planning.tutorial.thread.deamon;

class DeamonThread extends Thread {

  @Override
  public void run() {
      int count = 0;

      // Vòng lặp vô tận.
      while (true) {
          System.out.println("+ Hello from Deamon Thread " + count++);
          try {
              // Ngủ 2 giây.
              sleep(2000);
          } catch (InterruptedException e) {
          }
      }
  }
}
DaemonTest.java
package org.o7planning.tutorial.thread.deamon;

public class DaemonTest {

   public static void main(String[] args) {
       System.out.println("==> Main Thread running..\n");
       // Tạo một Thread
       Thread deamonThread = new DeamonThread();
       // Sét nó là Deamon Thread.
       deamonThread.setDaemon(true);
       deamonThread.start();

       // Tạo một Thread khác
       new NoneDeamonThread().start();

       try {
           // Ngủ 5 giây.
           Thread.sleep(5000);
       } catch (InterruptedException e) {
       }

       // Ghi ra thông báo luồng main này kết thúc.
       System.out.println("\n==> Main Thread ending\n");
   }

}
Kết quả chạy class DeamonTest:
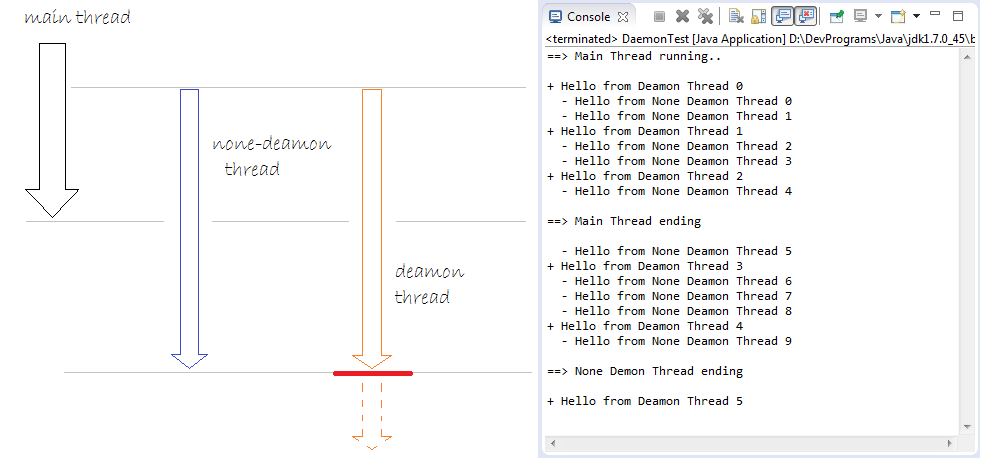
Hình minh họa trên cho thấy rằng luồng Deamon đã bị dừng lại khi tất cả các luồng thông thường đã dừng. Mặc dù code của nó là chạy vô tận.
Luồng deamon thường dùng làm gì?
Một trong các luồng Deamon quan trọng của Java đó là luồng gom rác (Garbage Collection Thread), nghĩa là gom các tài nguyên không còn sử dụng để giải phóng bộ nhớ. Khi tất cả các luồng người dùng không còn hoạt động nữa luồng gom rác cũng bị dừng theo.
5. Sử dụng join() & join(long)
Thread.join() là một method thông báo rằng hãy chờ thread này hoàn thành rồi thread cha mới được tiếp tục chạy.
// Thread cha cần phải đợi cho tới khi luồng này kết thúc
// mới được chạy tiếp.
// (Nó tương đương với gọi join(0) )
public final void join() throws InterruptedException;

// Thread cha cần phải đợi 'millis' milli giây mới được tiếp tục chạy.
// kể từ lúc gọi join(long).
// Nếu tham số millis = 0 nghĩa là đợi cho tới khi luồng này kết thúc.
public final synchronized void join(long millis) throws InterruptedException;


// Thread cha cần phải đợi 'millis' milli giây và 'nanos' nano giây  mới được tiếp tục chạy.
// kể từ lúc gọi join(long,int).
// Nếu tham số millis = 0 & nanos = 0 nghĩa là đợi cho tới khi luồng này kết thúc.
// 1 giây = 1000000 nano giây.
public final synchronized void join(long millis, int nanos) throws InterruptedException;
Hãy xem một ví dụ minh họa:
JoinThread.java
package org.o7planning.tutorial.thread.join;

public class JoinThread extends Thread {
  private String threadName;
  private int count;

  public JoinThread(String threadName, int count) {
      this.threadName = threadName;
      this.count = count;
  }

  @Override
  public void run() {

      for (int i = 1; i < count + 1; i++) {
          System.out.println("Hello from " + this.threadName + " " + i);
          try {
              Thread.sleep(2000);
          } catch (InterruptedException e) {
          }
      }
      System.out.println("\n==> Thread " + threadName + " end!\n");
  }
}
JoinTest.java
package org.o7planning.tutorial.thread.join;

public class JoinTest {

   public static void main(String[] args) throws InterruptedException {

       System.out.println("\n==> Main thread starting..\n");

       Thread joinThreadA = new JoinThread("A*", 2);
       Thread joinThreadB = new JoinThread("B*", 3);

       // Thread thông thường, sẽ không sử dụng join().
       Thread noJoinThreadC = new JoinThread("C", 5);

       joinThreadA.start();
       joinThreadB.start();
       noJoinThreadC.start();
       // Sử dụng join()
       joinThreadA.join();
       joinThreadB.join();

       // Đoạn code dưới đây sẽ phải chờ cho tới khi 2
       // joinThread A,B hoàn thành, mới được chạy tiếp.
       System.out.println("Hello from main thread...");

       System.out.println("Thread A isLive? " + joinThreadA.isAlive());
       System.out.println("Thread B isLive? " + joinThreadB.isAlive());
       System.out.println("Thread C isLive? " + noJoinThreadC.isAlive());

       System.out.println("\n==> Main Thread end!\n");
   }
}
Kết quả chạy class JoinTest:
==> Main thread starting..

Hello from A* 1
Hello from C 1
Hello from B* 1
Hello from A* 2
Hello from C 2
Hello from B* 2

==> Thread A* end!

Hello from B* 3
Hello from C 3

==> Thread B* end!

Hello from C 4
Hello from main thread...
Thread A isLive? false
Thread B isLive? false
Thread C isLive? true

==> Main Thread end!

Hello from C 5

==> Thread C end!
Ví dụ sử dụng join(long millis):
JoinTest2.java
package org.o7planning.tutorial.thread.join;

public class JoinTest2 {

   public static void main(String[] args) throws InterruptedException {

       System.out.println("\n==> Main thread starting..\n");

       Thread joinThreadA = new JoinThread("A*", 5);

       joinThreadA.start();
       // Luồng cha (main) phải chờ 5000 milli giây
       // mới được tiếp tục chạy. (Không nhất thiết phải A kết thúc)
       joinThreadA.join(5000);

       System.out.println("Main thread after 5000 milli second");
       System.out.println("Hello from main thread...");

       System.out.println("Thread A isLive? " + joinThreadA.isAlive());

       System.out.println("\n==> Main Thread end!\n");
   }

}
Kết quả chạy ví dụ:
==> Main thread starting..

Hello from A* 1
Hello from A* 2
Hello from A* 3
Main thread after 5000 milli second
Hello from main thread...
Thread A isLive? true

==> Main Thread end!

Hello from A* 4
Hello from A* 5

==> Thread A* end!
6. Xử lý ngoại lệ cho Thread
Phương thức Thread.setDefaultUncaughtExceptionHandler() thiết lập mặc định xử lý khi luồng đột ngột chấm dứt do một ngoại lệ còn tự do, mà không có xử lý khác đã được xác định cho luồng đó.
ThreadExceptionDemo.java
package org.o7planning.tutorial.thread.exception;

import java.util.Random;

public class ThreadExceptionDemo {

   public static class RunnableTest implements Runnable {

       @Override
       public void run() {
           System.out.println("Thread running ..");

           while (true) {
               Random r = new Random();
               // Một số ngẫu nhiên từ 0 - 99
               int i = r.nextInt(100);
               System.out.println("Next value " + i);

               try {
                   Thread.sleep(2000);
               } catch (InterruptedException e) {
               }

               if (i > 70) {
                   // Mô phỏng một ngoại lệ đã không được sử lý trong luồng.
                   throw new RuntimeException("Have a problem...");
               }
           }
       }

   }

   public static void main(String[] args) {
       System.out.println("==> Main thread running...");

       Thread thread = new Thread(new RunnableTest());
       Thread.setDefaultUncaughtExceptionHandler(new Thread.UncaughtExceptionHandler() {

           @Override
           public void uncaughtException(Thread t, Throwable e) {
               System.out.println("#Thread: " + t);
               System.out.println("#Thread exception message: " + e.getMessage());
           }
       });

       thread.start();
       System.out.println("==> Main thread end...");
   }

}
Kết quả chạy ví dụ:
==> Main thread running...
==> Main thread end...
Thread running ..
Next value 21
Next value 42
Next value 67
Next value 18
Next value 34
Next value 40
Next value 11
Next value 1
Next value 92
#Thread: Thread[Thread-0,5,main]
#Thread exception message: Have a problem...
7. Sử dụng yield()
Về mặt lý thuyết, "yield" có nghĩa là để cho đi, từ bỏ, đầu hàng. Một luồng yield nói với máy ảo là nó sẵn sàng để cho các thread khác được sắp xếp ở vị trí của nó. Điều này cho thấy rằng nó không phải làm một cái gì đó quá quan trọng. Lưu ý rằng nó chỉ là một gợi ý, mặc dù, và không đảm bảo có hiệu lực ở tất cả.
yield() được định nghĩa như sau trong Thread.java
public static native void yield();Như vậy phương thức yield() được sử dụng khi bạn bạn thấy rằng thread đó đang rảnh rỗi, nó không phải làm việc gì quan trọng, nên nó gợi ý hệ điều hành tạm thời nhường quyền ưu tiên cho các luồng khác.
Ví dụ dưới đây, có 2 luồng, mỗi luồng in ra một dòng văn bản 100K lần (con số đủ lớn để thấy sự khác biệt). Một luồng được sét độ ưu tiên cao nhất và một luồng được sét độ ưu tiên ít nhất. Đo khoảng thời gian kết thúc của 2 luồng.
YieldThreadExample.java
package org.o7planning.tutorial.thread.yield;

import java.util.Date;

public class YieldThreadExample {

	private static Date importantEndTime;
	private static Date unImportantEndTime;

	public static void main(String[] args) {
		importantEndTime = new Date();
		unImportantEndTime = new Date();

		System.out.println("Create thread 1");

		Thread importantThread = new ImportantThread();

		// Sét đặt độ ưu tiên cao nhất cho thread này.
		importantThread.setPriority(Thread.MAX_PRIORITY);

		System.out.println("Create thread 2");

		Thread unImportantThread = new UnImportantThread();

		// Sét đặt độ ưu tiên thấp nhất cho thread này.
		unImportantThread.setPriority(Thread.MIN_PRIORITY);

		// Start threads.
		unImportantThread.start();
		importantThread.start();

	}

	// Một nhiệm vụ quan trọng, yêu cầu độ ưu tiên cao.
	static class ImportantThread extends Thread {

		@Override
		public void run() {
			for (int i = 0; i < 100000; i++) {
				System.out.println("\n Important work " + i);

				// Thông báo với hệ điều hành,
				// thread này nhường quyền ưu tiên cho các luồng khác.
				Thread.yield();
			}

			// Thời điểm kết thúc của thread này.
			importantEndTime = new Date();
			printTime();
		}

	}

	static class UnImportantThread extends Thread {
		@Override
		public void run() {
			for (int i = 0; i < 100000; i++) {
				System.out.println("\n  -- UnImportant work " + i);
			}
			// Thời điểm kết thúc của thread này.
			unImportantEndTime = new Date();
			printTime();
		}
	}

	private static void printTime() {
		// Khoảng thời gian (Mili giây).
		long interval = unImportantEndTime.getTime() - importantEndTime.getTime();

		System.out.println("UnImportant Thread - Important Thread = " //
				+ interval + " milliseconds");
	}

}
Kết quả: thread có ưu tiên thấp hơn đã hoàn thành công việc trước 51 mili giây so với thread có ưu tiên cao hơn.
...

 Important work 99995

 Important work 99996

 Important work 99997

 Important work 99998

 Important work 99999
UnImportant Thread - Important Thread = -269 millisecondsJava cơ bản
- Tùy biến trình biên dịch java xử lý Annotation của bạn (Annotation Processing Tool)
- Lập trình Java theo nhóm sử dụng Eclipse và SVN
- Hướng dẫn và ví dụ Java WeakReference
- Hướng dẫn và ví dụ Java PhantomReference
- Hướng dẫn nén và giải nén trong Java
- Cấu hình Eclipse để sử dụng JDK thay vì JRE
- Phương thức String.format() và printf() trong Java
- Cú pháp và các tính năng mới trong Java 5
- Cú pháp và các tính năng mới trong Java 8
- Hướng dẫn sử dụng biểu thức chính quy trong Java
- Hướng dẫn lập trình đa luồng trong Java - Java Multithreading
- Thư viện điều khiển các loại cơ sở dữ liệu khác nhau trong Java
- Hướng dẫn sử dụng Java JDBC kết nối cơ sở dữ liệu
- Lấy các giá trị của các cột tự động tăng khi Insert một bản ghi sử dụng JDBC
- Hướng dẫn và ví dụ Java Stream
- Functional Interface trong Java
- Giới thiệu về Raspberry Pi
- Hướng dẫn và ví dụ Java Predicate
- Abstract class và Interface trong Java
- Access modifier trong Java
- Hướng dẫn và ví dụ Java Enum
- Hướng dẫn và ví dụ Java Annotation
- So sánh và sắp xếp trong Java
- Hướng dẫn và ví dụ Java String, StringBuffer và StringBuilder
- Hướng dẫn xử lý ngoại lệ trong Java - Java Exception Handling
- Hướng dẫn và ví dụ Java Generics
- Thao tác với tập tin và thư mục trong Java
- Hướng dẫn và ví dụ Java BiPredicate
- Hướng dẫn và ví dụ Java Consumer
- Hướng dẫn và ví dụ Java BiConsumer
- Bắt đầu với Java cần những gì?
- Lịch sử của Java và sự khác biệt giữa Oracle JDK và OpenJDK
- Cài đặt Java trên Windows
- Cài đặt Java trên Ubuntu
- Cài đặt OpenJDK trên Ubuntu
- Cài đặt Eclipse
- Cài đặt Eclipse trên Ubuntu
- Học nhanh Java cho người mới bắt đầu
- Lịch sử của bit và byte trong khoa học máy tính
- Các kiểu dữ liệu trong Java
- Các toán tử Bitwise
- Câu lệnh rẽ nhánh (if else) trong Java
- Câu lệnh rẽ nhánh switch trong Java
- Vòng lặp trong Java
- Mảng (Array) trong Java
- JDK Javadoc định dạng CHM
- Thừa kế và đa hình trong Java
- Hướng dẫn và ví dụ Java Function
- Hướng dẫn và ví dụ Java BiFunction
- Ví dụ về Java encoding và decoding sử dụng Apache Base64
- Hướng dẫn và ví dụ Java Reflection
- Hướng dẫn gọi phương thức từ xa với Java RMI
- Hướng dẫn lập trình Java Socket
- Các nền tảng nào bạn nên chọn để lập trình ứng dụng Java Desktop?
- Hướng dẫn và ví dụ Java Commons IO
- Hướng dẫn và ví dụ Java Commons Email
- Hướng dẫn và ví dụ Java Commons Logging
- Tìm hiểu về Java System.identityHashCode, Object.hashCode và Object.equals
- Hướng dẫn và ví dụ Java SoftReference
- Hướng dẫn và ví dụ Java Supplier
- Lập trình Java hướng khía cạnh với AspectJ (AOP)
Show More
- Hướng dẫn lập trình Java Servlet/JSP
- Các hướng dẫn Java Collections Framework
- Java API cho HTML & XML
- Các hướng dẫn Java IO
- Các hướng dẫn Java Date Time
- Các hướng dẫn Spring Boot
- Các hướng dẫn Maven
- Các hướng dẫn Gradle
- Các hướng dẫn Java Web Services
- Các hướng dẫn lập trình Java SWT
- Các hướng dẫn lập trình JavaFX
- Các hướng dẫn Java Oracle ADF
- Các hướng dẫn Struts2 Framework
- Các hướng dẫn Spring Cloud
