Ví dụ CRUD với Spring Boot, REST và AngularJS
1. Mục tiêu của bài học
Trong bài học này tôi sẽ hướng dẫn bạn tạo một ứng dụng đơn giản kết hợp các công nghệ Spring Boot, Rest và AngularJS. Trước hết, bạn có thể xem trước ứng dụng mà chúng ta sẽ thực hiện:
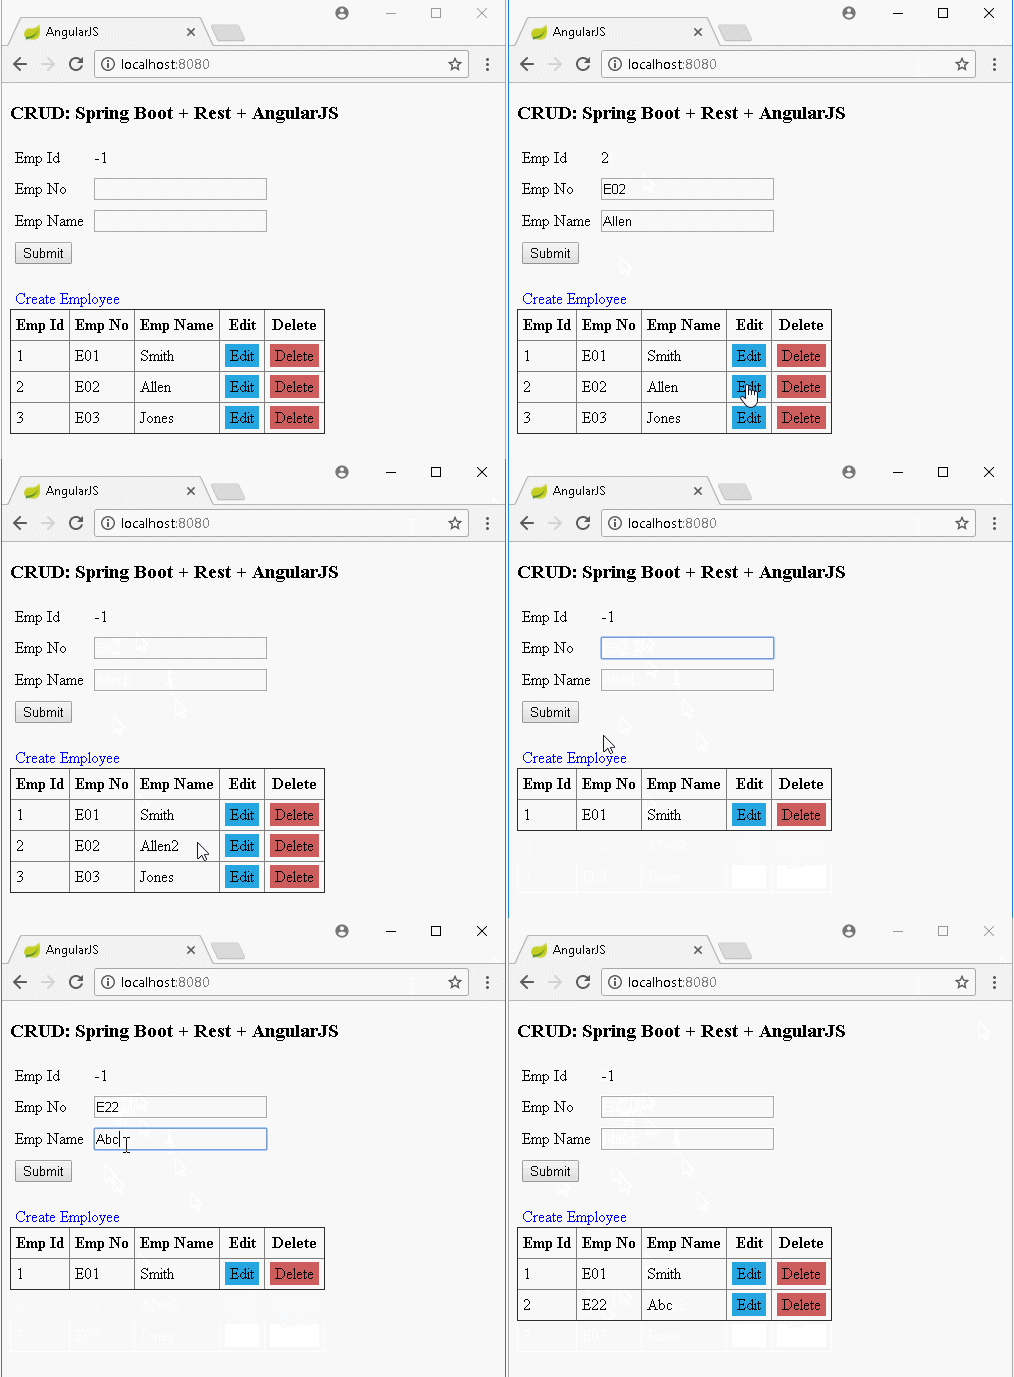
AngularJS là một thư viện mã nguồn mở, nó được tạo ra dựa trên Javascript, và giúp bạn xây dựng các ứng dụng Single Page (một trang đơn nhất). Trong bài học này chúng ta sẽ tạo một trang, trang này hiển thị danh sách các nhân viên, đồng thời cho phép bạn thêm, xóa, sửa các nhân viên.
Các vấn đề sẽ được đề cập trong bài học này:
- Tạo một ứng dụng Spring Boot.
- Tạo các REST API với các chức năng: Truy vấn, tạo, sửa, xóa dữ liệu.
- AngularJS gọi đến các REST API để truy vấn dữ liệu và hiển thị dữ liệu trên giao diện. AngularJS gọi đến các REST API để tạo, xóa, sửa dữ liệu.
Ở cuối bài học này chúng ta sẽ chạy ứng dụng và giải thích nguyên tắc hoạt động của AngularJS trong từng chức năng cụ thể.
2. Tạo dự án Spring Boot
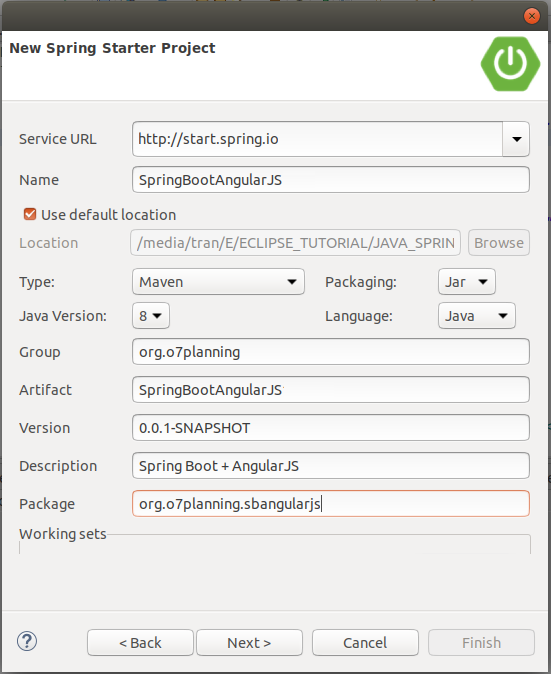
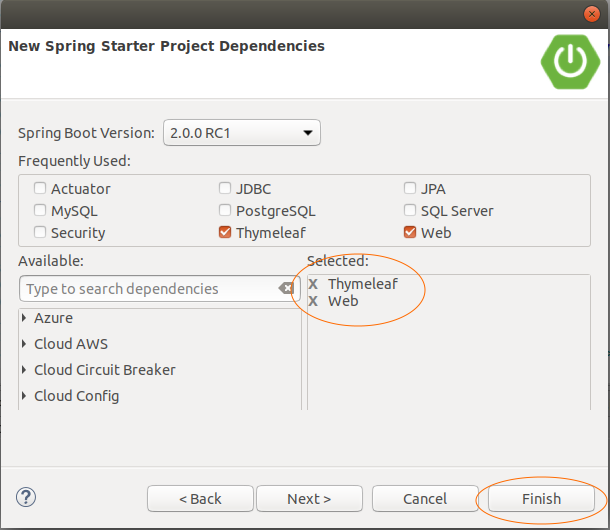
Trên Eclipse tạo một dự án Spring Boot:
pom.xml
<?xml version="1.0" encoding="UTF-8"?>
<project xmlns="http://maven.apache.org/POM/4.0.0"
    xmlns:xsi="http://www.w3.org/2001/XMLSchema-instance"
    xsi:schemaLocation="http://maven.apache.org/POM/4.0.0
    http://maven.apache.org/xsd/maven-4.0.0.xsd">

    <modelVersion>4.0.0</modelVersion>

    <groupId>org.o7planning</groupId>
    <artifactId>SpringBootAngularJS</artifactId>
    <version>0.0.1-SNAPSHOT</version>
    <packaging>jar</packaging>

    <name>SpringBootAngularJS</name>
    <description>Spring Boot + AngularJS</description>

    <parent>
        <groupId>org.springframework.boot</groupId>
        <artifactId>spring-boot-starter-parent</artifactId>
        <version>2.0.0.RELEASE</version>
        <relativePath/> <!-- lookup parent from repository -->
    </parent>

    <properties>
        <project.build.sourceEncoding>UTF-8</project.build.sourceEncoding>
        <project.reporting.outputEncoding>UTF-8</project.reporting.outputEncoding>
        <java.version>1.8</java.version>
    </properties>

    <dependencies>
        <dependency>
            <groupId>org.springframework.boot</groupId>
            <artifactId>spring-boot-starter-web</artifactId>
        </dependency>

        <dependency>
            <groupId>org.springframework.boot</groupId>
            <artifactId>spring-boot-starter-thymeleaf</artifactId>
        </dependency>

        <dependency>
            <groupId>org.springframework.boot</groupId>
            <artifactId>spring-boot-starter-test</artifactId>
            <scope>test</scope>
        </dependency>
    </dependencies>

    <build>
        <plugins>
            <plugin>
                <groupId>org.springframework.boot</groupId>
                <artifactId>spring-boot-maven-plugin</artifactId>
            </plugin>
        </plugins>
    </build>

</project>
application.properties
spring.thymeleaf.cache=falseSpringBootAngularJsApplication.java
package org.o7planning.sbangularjs;

import org.springframework.boot.SpringApplication;
import org.springframework.boot.autoconfigure.SpringBootApplication;

@SpringBootApplication
public class SpringBootAngularJsApplication {

    public static void main(String[] args) {
        SpringApplication.run(SpringBootAngularJsApplication.class, args);
    }
}
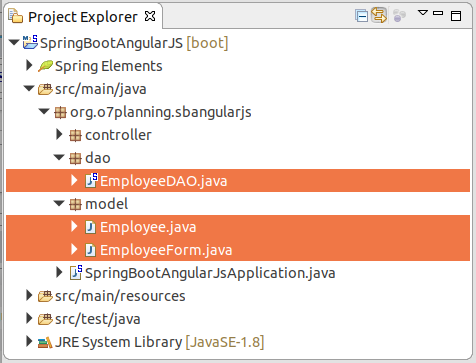
3. Model, DAO
Employee.java
package org.o7planning.sbangularjs.model;

public class Employee {

    private Long empId;
    private String empNo;
    private String empName;
    private String position;

    public Employee() {

    }

    public Employee(EmployeeForm empForm) {
        this.empId = empForm.getEmpId();
        this.empNo = empForm.getEmpNo();
        this.empName = empForm.getEmpName();
        this.position = empForm.getPosition();
    }

    public Employee(Long empId, String empNo, String empName, String position) {
        this.empId = empId;
        this.empNo = empNo;
        this.empName = empName;
        this.position = position;
    }

    public Long getEmpId() {
        return empId;
    }

    public void setEmpId(Long empId) {
        this.empId = empId;
    }

    public String getEmpNo() {
        return empNo;
    }

    public void setEmpNo(String empNo) {
        this.empNo = empNo;
    }

    public String getEmpName() {
        return empName;
    }

    public void setEmpName(String empName) {
        this.empName = empName;
    }

    public String getPosition() {
        return position;
    }

    public void setPosition(String position) {
        this.position = position;
    }

}
EmployeeForm.java
package org.o7planning.sbangularjs.model;

public class EmployeeForm {

    private Long empId;
    private String empNo;
    private String empName;
    private String position;

    public Long getEmpId() {
        return empId;
    }

    public void setEmpId(Long empId) {
        this.empId = empId;
    }

    public String getEmpNo() {
        return empNo;
    }

    public void setEmpNo(String empNo) {
        this.empNo = empNo;
    }

    public String getEmpName() {
        return empName;
    }

    public void setEmpName(String empName) {
        this.empName = empName;
    }

    public String getPosition() {
        return position;
    }

    public void setPosition(String position) {
        this.position = position;
    }
}
EmployeeDAO.java
package org.o7planning.sbangularjs.dao;

import java.util.ArrayList;
import java.util.Collection;
import java.util.HashMap;
import java.util.List;
import java.util.Map;
import java.util.Set;

import org.o7planning.sbangularjs.model.Employee;
import org.o7planning.sbangularjs.model.EmployeeForm;
import org.springframework.stereotype.Repository;

@Repository
public class EmployeeDAO {

    private static final Map<Long, Employee> empMap = new HashMap<Long, Employee>();

    static {
        initEmps();
    }

    private static void initEmps() {
        Employee emp1 = new Employee(1L, "E01", "Smith", "Clerk");
        Employee emp2 = new Employee(2L, "E02", "Allen", "Salesman");
        Employee emp3 = new Employee(3L, "E03", "Jones", "Manager");

        empMap.put(emp1.getEmpId(), emp1);
        empMap.put(emp2.getEmpId(), emp2);
        empMap.put(emp3.getEmpId(), emp3);
    }

    public Long getMaxEmpId() {
        Set<Long> keys = empMap.keySet();
        Long max = 0L;
        for (Long key : keys) {
            if (key > max) {
                max = key;
            }
        }
        return max;
    }

    public Employee getEmployee(Long empId) {
        return empMap.get(empId);
    }

    public Employee addEmployee(EmployeeForm empForm) {
        Long empId= this.getMaxEmpId()+ 1;
        empForm.setEmpId(empId);
        Employee newEmp = new Employee(empForm);

        empMap.put(newEmp.getEmpId(), newEmp);
        return newEmp;
    }

    public Employee updateEmployee(EmployeeForm empForm) {
        Employee emp = this.getEmployee(empForm.getEmpId());
        if(emp!= null)  {
            emp.setEmpNo(empForm.getEmpNo());
            emp.setEmpName(empForm.getEmpName());
            emp.setPosition(empForm.getPosition());
        }
        return emp;
    }

    public void deleteEmployee(Long empId) {
        empMap.remove(empId);
    }

    public List<Employee> getAllEmployees() {
        Collection<Employee> c = empMap.values();
        List<Employee> list = new ArrayList<Employee>();
        list.addAll(c);
        return list;
    }

}
4. Controller, Rest Controller
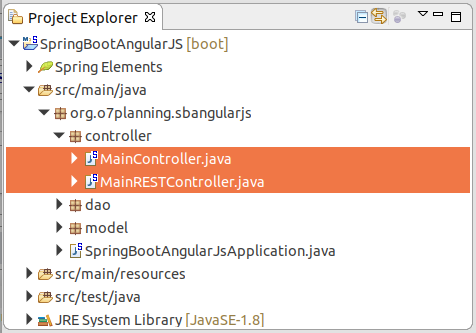
MainController.java
package org.o7planning.sbangularjs.controller;

import org.springframework.stereotype.Controller;
import org.springframework.web.bind.annotation.RequestMapping;

@Controller
public class MainController {

    @RequestMapping("/")
    public String welcome() {
        return "index";
    }
}
MainRESTController.java
package org.o7planning.sbangularjs.controller;

import java.util.List;

import org.o7planning.sbangularjs.dao.EmployeeDAO;
import org.o7planning.sbangularjs.model.Employee;
import org.o7planning.sbangularjs.model.EmployeeForm;
import org.springframework.beans.factory.annotation.Autowired;
import org.springframework.http.MediaType;
import org.springframework.web.bind.annotation.PathVariable;
import org.springframework.web.bind.annotation.RequestBody;
import org.springframework.web.bind.annotation.RequestMapping;
import org.springframework.web.bind.annotation.RequestMethod;
import org.springframework.web.bind.annotation.ResponseBody;
import org.springframework.web.bind.annotation.RestController;

@RestController
public class MainRESTController {

    @Autowired
    private EmployeeDAO employeeDAO;


    // URL:
    // http://localhost:8080/SomeContextPath/employees
    // http://localhost:8080/SomeContextPath/employees.xml
    // http://localhost:8080/SomeContextPath/employees.json
    @RequestMapping(value = "/employees", //
            method = RequestMethod.GET, //
            produces = { MediaType.APPLICATION_JSON_VALUE, //
                    MediaType.APPLICATION_XML_VALUE })
    @ResponseBody
    public List<Employee> getEmployees() {
        List<Employee> list = employeeDAO.getAllEmployees();
        return list;
    }

    // URL:
    // http://localhost:8080/SomeContextPath/employee/{empId}
    // http://localhost:8080/SomeContextPath/employee/{empId}.xml
    // http://localhost:8080/SomeContextPath/employee/{empId}.json
    @RequestMapping(value = "/employee/{empId}", //
            method = RequestMethod.GET, //
            produces = { MediaType.APPLICATION_JSON_VALUE, //
                    MediaType.APPLICATION_XML_VALUE })
    @ResponseBody
    public Employee getEmployee(@PathVariable("empId") Long empId) {
        return employeeDAO.getEmployee(empId);
    }

    // URL:
    // http://localhost:8080/SomeContextPath/employee
    // http://localhost:8080/SomeContextPath/employee.xml
    // http://localhost:8080/SomeContextPath/employee.json

    @RequestMapping(value = "/employee", //
            method = RequestMethod.POST, //
            produces = { MediaType.APPLICATION_JSON_VALUE, //
                    MediaType.APPLICATION_XML_VALUE })
    @ResponseBody
    public Employee addEmployee(@RequestBody EmployeeForm empForm) {

        System.out.println("(Service Side) Creating employee with empNo: " + empForm.getEmpNo());

        return employeeDAO.addEmployee(empForm);
    }

    // URL:
    // http://localhost:8080/SomeContextPath/employee
    // http://localhost:8080/SomeContextPath/employee.xml
    // http://localhost:8080/SomeContextPath/employee.json
    @RequestMapping(value = "/employee", //
            method = RequestMethod.PUT, //
            produces = { MediaType.APPLICATION_JSON_VALUE, //
                    MediaType.APPLICATION_XML_VALUE })
    @ResponseBody
    public Employee updateEmployee(@RequestBody EmployeeForm empForm) {

        System.out.println("(Service Side) Editing employee with Id: " + empForm.getEmpId());

        return employeeDAO.updateEmployee(empForm);
    }

    // URL:
    // http://localhost:8080/SomeContextPath/employee/{empId}
    @RequestMapping(value = "/employee/{empId}", //
            method = RequestMethod.DELETE, //
            produces = { MediaType.APPLICATION_JSON_VALUE, MediaType.APPLICATION_XML_VALUE })
    @ResponseBody
    public void deleteEmployee(@PathVariable("empId") Long empId) {

        System.out.println("(Service Side) Deleting employee with Id: " + empId);

        employeeDAO.deleteEmployee(empId);
    }

}
5. Javascript, Css, View
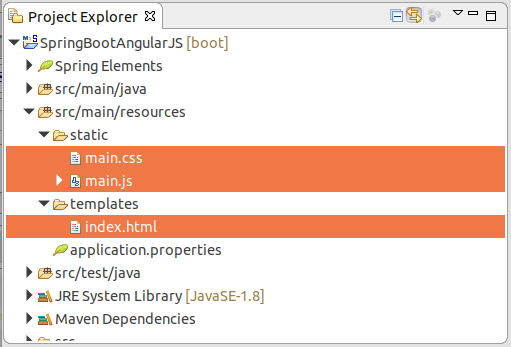
index.html
<!DOCTYPE HTML>
<html xmlns:th="http://www.thymeleaf.org">
   <head>
      <title>AngularJS</title>
      <script src="https://ajax.googleapis.com/ajax/libs/angularjs/1.6.7/angular.js"></script>

      <script th:src="@{/main.js}"></script>
      <link th:href="@{/main.css}" rel="stylesheet" />

      <head>
   <body ng-app="EmployeeManagement" ng-controller="EmployeeController">
      <h3>
         CRUD: Spring Boot + Rest + AngularJS
      </h3>
      <form ng-submit="submitEmployee()">
         <table border="0">
            <tr>
               <td>Emp Id</td>
               <td>{{employeeForm.empId}}</td>
            </tr>
            <tr>
               <td>Emp No</td>
               <td><input type="text" ng-model="employeeForm.empNo" /></td>
            </tr>
            <tr>
               <td>Emp Name</td>
               <td><input type="text" ng-model="employeeForm.empName"  /></td>
            </tr>
            <tr>
               <td colspan="2">
                  <input type="submit" value="Submit" class="blue-button" />
               </td>
            </tr>
         </table>
      </form>
      <br/>
      <a class="create-button" ng-click="createEmployee()">Create Employee</a>
      <table border="1">
         <tr>
            <th>Emp Id</th>
            <th>Emp No</th>
            <th>Emp Name</th>
            <th>Edit</th>
            <th>Delete</th>
         </tr>
         <!-- $scope.employees -->
         <tr ng-repeat="employee in employees">
            <td> {{ employee.empId }}</td>
            <td> {{ employee.empNo }}</td>
            <td >{{ employee.empName }}</td>
            <td>
            <a ng-click="editEmployee(employee)" class="edit-button">Edit</a>
            </td>
            <td>
            <a ng-click="deleteEmployee(employee)" class="delete-button">Delete</a>
            </td>
         </tr>
      </table>
   </body>
</html>
main.css
table  {
    border-collapse: collapse;
}

table td, th  {
    padding: 5px;
}

.create-button  {
    color: blue;
    cursor: pointer;
    padding: 5px;
}
.edit-button  {
    padding: 2px 5px;
    background: #25A6E1;
    cursor: pointer;
}

.delete-button  {
    padding: 2px 5px;
    background: #CD5C5C;
    cursor: pointer;
}
main.js
var app = angular.module("EmployeeManagement", []);

// Controller Part
app.controller("EmployeeController", function($scope, $http) {


    $scope.employees = [];
    $scope.employeeForm = {
        empId: 1,
        empNo: "",
        empName: ""
    };

    // Now load the data from server
    _refreshEmployeeData();

    // HTTP POST/PUT methods for add/edit employee
    // Call: http://localhost:8080/employee
    $scope.submitEmployee = function() {

        var method = "";
        var url = "";

        if ($scope.employeeForm.empId == -1) {
            method = "POST";
            url = '/employee';
        } else {
            method = "PUT";
            url = '/employee';
        }

        $http({
            method: method,
            url: url,
            data: angular.toJson($scope.employeeForm),
            headers: {
                'Content-Type': 'application/json'
            }
        }).then(_success, _error);
    };

    $scope.createEmployee = function() {
        _clearFormData();
    }

    // HTTP DELETE- delete employee by Id
    // Call: http://localhost:8080/employee/{empId}
    $scope.deleteEmployee = function(employee) {
        $http({
            method: 'DELETE',
            url: '/employee/' + employee.empId
        }).then(_success, _error);
    };

    // In case of edit
    $scope.editEmployee = function(employee) {
        $scope.employeeForm.empId = employee.empId;
        $scope.employeeForm.empNo = employee.empNo;
        $scope.employeeForm.empName = employee.empName;
    };

    // Private Method
    // HTTP GET- get all employees collection
    // Call: http://localhost:8080/employees
    function _refreshEmployeeData() {
        $http({
            method: 'GET',
            url: '/employees'
        }).then(
            function(res) { // success
                $scope.employees = res.data;
            },
            function(res) { // error
                console.log("Error: " + res.status + " : " + res.data);
            }
        );
    }

    function _success(res) {
        _refreshEmployeeData();
        _clearFormData();
    }

    function _error(res) {
        var data = res.data;
        var status = res.status;
        var header = res.header;
        var config = res.config;
        alert("Error: " + status + ":" + data);
    }

    // Clear the form
    function _clearFormData() {
        $scope.employeeForm.empId = -1;
        $scope.employeeForm.empNo = "";
        $scope.employeeForm.empName = ""
    };
});
6. Giải thích nguyên tắc hoạt động
OK, lúc này bạn có thể chạy ứng dụng và xem cách mà AngularJS làm việc trong từng chức năng cụ thể.
Chức năng hiển thị danh sách nhân viên:
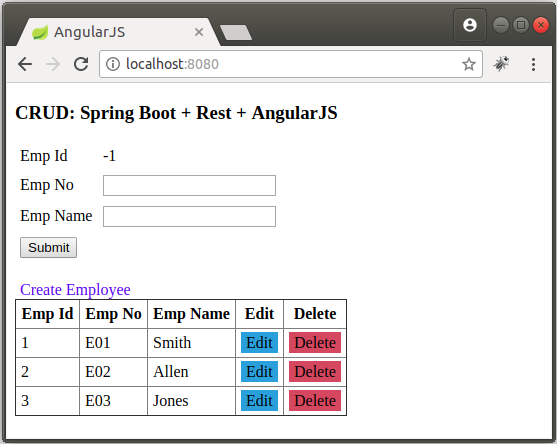
Khi trang web được chạy, AngularJS sẽ gọi đến REST API để lấy danh sách các nhân viên, dữ liệu này được lưu trữ trên biến $scope.employees. Và AngularJS sẽ hiển thị nó trên giao diện. Nếu dữ liệu của $scope.employees thay đổi AngularJS sẽ tự động cập nhập lại giao diện.
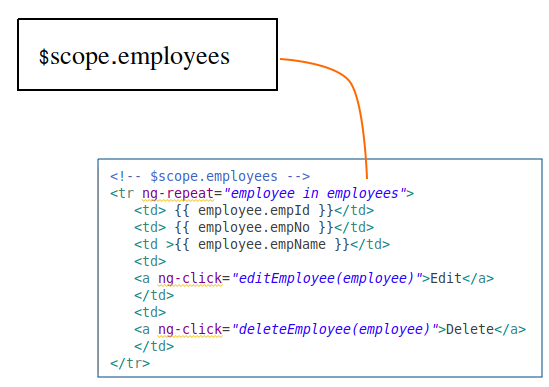
AngularJS gọi tới REST API để lấy danh sách các nhân viên (Employee) và lưu trữ dữ liệu lấy được vào biến $scope.employees.
// Private Method
// HTTP GET- get all employees collection
// Call: http://localhost:8080/employees
function _refreshEmployeeData() {
    $http({
        method: 'GET',
        url: '/employees'
    }).then(
        function(res) { // success
            $scope.employees = res.data;
        },
        function(res) { // error
            console.log("Error: " + res.status + " : " + res.data);
        }
    );
}

.....
AngularJS hiển thị các dữ liệu trong biến $scope.employees lên trên giao diện:
<table border="1">
   <tr>
      <th>Emp Id</th>
      <th>Emp No</th>
      <th>Emp Name</th>
      <th>Edit</th>
      <th>Delete</th>
   </tr>
   <!-- $scope.employees -->
   <tr ng-repeat="employee in employees">
      <td> {{ employee.empId }}</td>
      <td> {{ employee.empNo }}</td>
      <td >{{ employee.empName }}</td>
      <td>
         <a ng-click="editEmployee(employee)" class="edit-button">Edit</a>
      </td>
      <td>
         <a ng-click="deleteEmployee(employee)" class="delete-button">Delete</a>
      </td>
   </tr>
</table>
Chức năng sửa đổi thông tin nhân viên:
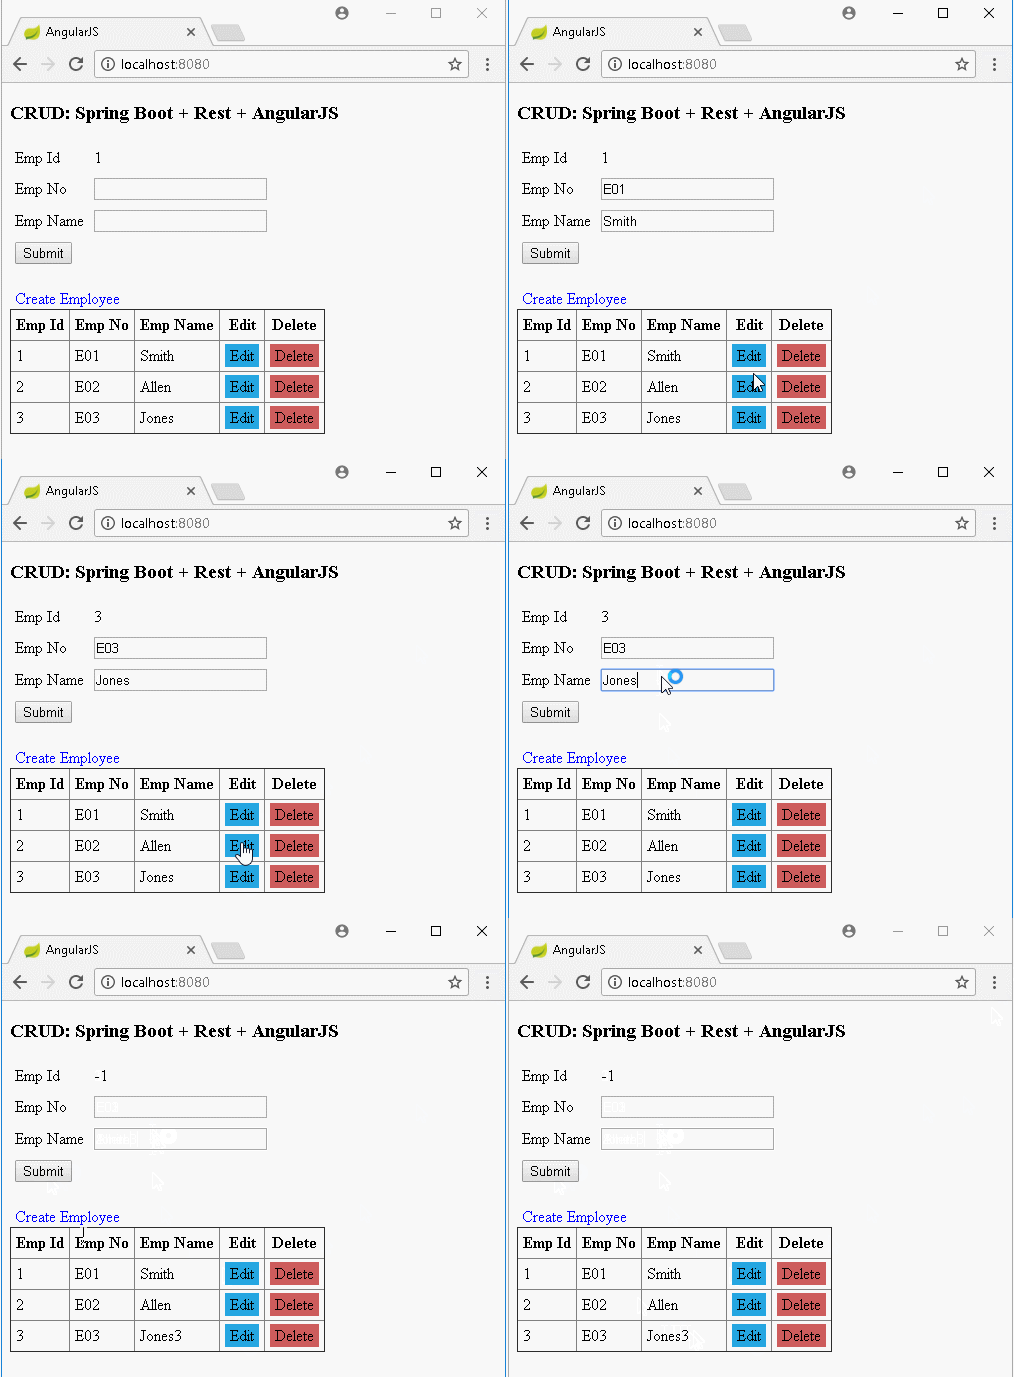
AngularJS có thể giàng buộc 2 chiều (2-way binding) dữ liệu trên Model và View với nhau. Điều này có nghĩa là nếu người dùng nhập dữ liệu trên View dữ liệu này sẽ tự động được cập nhập cho Model, và ngược lại nếu dữ liệu trên Model thay đổi nó sẽ hiển thị trên View.
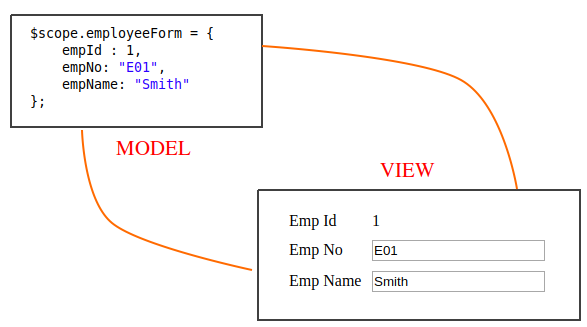
AngularJS sử dụng thuộc tính (attribute) ng-model để giàng buộc 2 chiều (2-way binding) giữa Model và View:
<form ng-submit="submitEmployee()">
   <table border="0">
      <tr>
         <td>Emp Id</td>
         <td>{{employeeForm.empId}}</td>
      </tr>
      <tr>
         <td>Emp No</td>
         <td><input type="text" ng-model="employeeForm.empNo" /></td>
      </tr>
      <tr>
         <td>Emp Name</td>
         <td><input type="text" ng-model="employeeForm.empName"  /></td>
      </tr>
      <tr>
         <td colspan="2">
            <input type="submit" value="Submit" class="blue-button" />
         </td>
      </tr>
   </table>
</form>
Người dùng nhấn vào nút "Edit", hàm $scope.editEmployee sẽ được gọi.
<a ng-click="editEmployee(employee)" class="edit-button">Edit</a>Javascript:
// JavaScript: When user Click to Edit button:
$scope.editEmployee = function(employee) {
    $scope.employeeForm.empId = employee.empId;
    $scope.employeeForm.empNo = employee.empNo;
    $scope.employeeForm.empName = employee.empName;
};

// SAVE !!
// HTTP POST/PUT methods for add/edit employee
// Call: http://localhost:8080/employee
$scope.submitEmployee = function() {

    var method = "";
    var url = "";

    if ($scope.employeeForm.empId == -1) {
        method = "POST";
        url = '/employee';
    } else {
        method = "PUT";
        url = '/employee';
    }

    $http({
        method: method,
        url: url,
        data: angular.toJson($scope.employeeForm),
        headers: {
            'Content-Type': 'application/json'
        }
    }).then(_success, _error);
};
Chức năng xóa nhân viên (Employee):
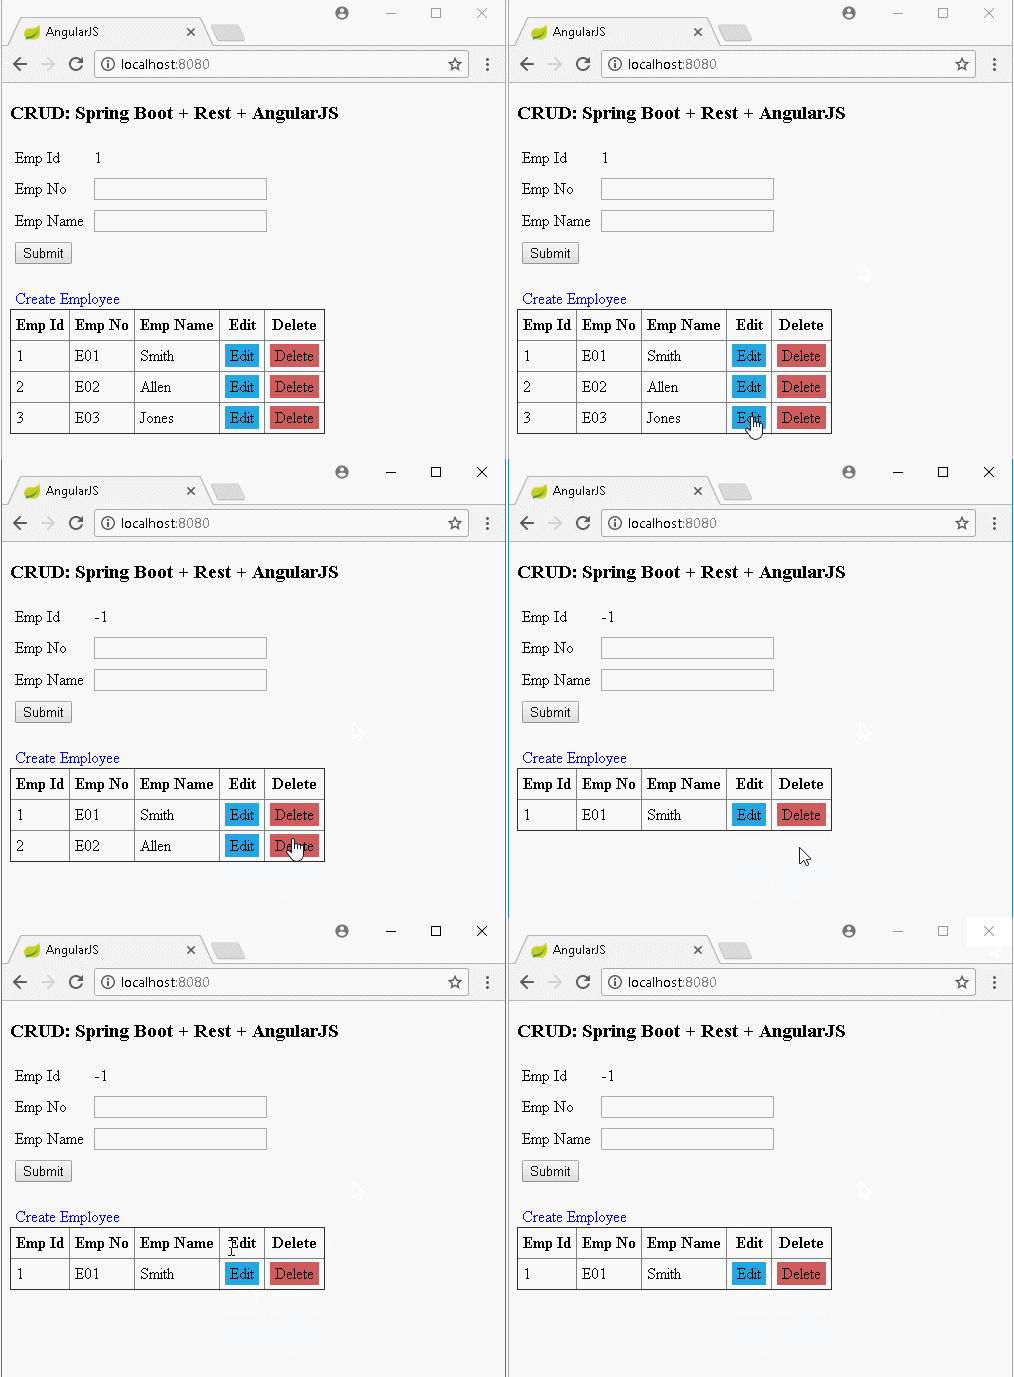
Để xóa một nhân viên (Employee) AngularJS gọi đến REST API yêu cầu xóa một nhân viên. Nếu thành công (success) nó gọi tiếp tới REST API để truy vấn lại danh sách nhân viên và hiển thị trên giao diện.
// HTTP DELETE- delete employee by Id
// Call: http://localhost:8080/employee/{empId}
$scope.deleteEmployee = function(employee) {
    $http({
        method: 'DELETE',
        url: '/employee/' + employee.empId
    }).then(_success, _error);
};

.....


function _success(res) {
     _refreshEmployeeData();
     _clearFormData();
 }

 function _error(res) {
     var data = res.data;
     var status = res.status;
     var header = res.header;
     var config = res.config;
     alert("Error: " + status + ":" + data);
 }
7. Thưởng: Hàm success và error
Trong AngularJS có 2 cách để bạn sử dụng hàm success và error:
- Hàm success & error với 1 tham số
- Hàm success & error với 4 tham số
- success & error with 1 parameter:
$http.get('/someURL').then(
    // Success
    function(response) {
        var data = response.data;
        var status = response.status;
        var header = response.header;
        var config = response.config;
        // ...
    },
    // Error
    function(response) {
        var data = response.data;
        var status = response.status;
        var header = response.header;
        var config = response.config;
        // ...
    }
);- success & error with 4 parameters:
$http.get('/someURL')
    // Success
    .success(
        function(data, status, header, config) {
            // ...
        }
    )
    // Error
    .error(
        function(data, status, header, config) {
            // error handler
        }
    );
Các hướng dẫn Spring Boot
- Cài đặt Spring Tool Suite cho Eclipse
- Hướng dẫn lập trình Spring cho người mới bắt đầu
- Hướng dẫn lập trình Spring Boot cho người mới bắt đầu
- Các thuộc tính thông dụng của Spring Boot
- Hướng dẫn sử dụng Spring Boot và Thymeleaf
- Hướng dẫn sử dụng Spring Boot và FreeMarker
- Hướng dẫn sử dụng Spring Boot và Groovy
- Hướng dẫn sử dụng Spring Boot và Mustache
- Hướng dẫn sử dụng Spring Boot và JSP
- Hướng dẫn sử dụng Spring Boot, Apache Tiles, JSP
- Sử dụng Logging trong Spring Boot
- Giám sát ứng dụng với Spring Boot Actuator
- Tạo ứng dụng web đa ngôn ngữ với Spring Boot
- Sử dụng nhiều ViewResolver trong Spring Boot
- Sử dụng Twitter Bootstrap trong Spring Boot
- Hướng dẫn và ví dụ Spring Boot Interceptor
- Hướng dẫn sử dụng Spring Boot, Spring JDBC và Spring Transaction
- Hướng dẫn và ví dụ Spring JDBC
- Hướng dẫn sử dụng Spring Boot, JPA và Spring Transaction
- Hướng dẫn sử dụng Spring Boot và Spring Data JPA
- Hướng dẫn sử dụng Spring Boot, Hibernate và Spring Transaction
- Tương tác Spring Boot, JPA và cơ sở dữ liệu H2
- Hướng dẫn sử dụng Spring Boot và MongoDB
- Sử dụng nhiều DataSource với Spring Boot và JPA
- Sử dụng nhiều DataSource với Spring Boot và RoutingDataSource
- Tạo ứng dụng Login với Spring Boot, Spring Security, Spring JDBC
- Tạo ứng dụng Login với Spring Boot, Spring Security, JPA
- Tạo ứng dụng đăng ký tài khoản với Spring Boot, Spring Form Validation
- Ví dụ OAuth2 Social Login trong Spring Boot
- Chạy các nhiệm vụ nền theo lịch trình trong Spring
- Ví dụ CRUD Restful Web Service với Spring Boot
- Ví dụ Spring Boot Restful Client với RestTemplate
- Ví dụ CRUD với Spring Boot, REST và AngularJS
- Bảo mật Spring Boot RESTful Service sử dụng Basic Authentication
- Bảo mật Spring Boot RESTful Service sử dụng Auth0 JWT
- Ví dụ Upload file với Spring Boot
- Ví dụ Download file với Spring Boot
- Ví dụ Upload file với Spring Boot và jQuery Ajax
- Ví dụ Upload file với Spring Boot và AngularJS
- Tạo ứng dụng Web bán hàng với Spring Boot, Hibernate
- Hướng dẫn và ví dụ Spring Email
- Tạo ứng dụng Chat đơn giản với Spring Boot và Websocket
- Triển khai ứng dụng Spring Boot trên Tomcat Server
- Triển khai ứng dụng Spring Boot trên Oracle WebLogic Server
- Cài đặt chứng chỉ SSL miễn phí Let's Encrypt cho Spring Boot
- Cấu hình Spring Boot chuyển hướng HTTP sang HTTPS
- Tìm nạp dữ liệu với Spring Data JPA DTO Projections
Show More
