Hướng dẫn và ví dụ CSS Display
1. Tổng quan về CSS display
CSS display được sử dụng trong các tình huống sau:
1 - CSS {display: none}
CSS {display:none} được sử dụng để ẩn một phần tử và giải phóng không gian mà nó chiếm.
2 - CSS {display: block | inline | inline-block}
Sử dụng CSS display với một trong các giá trị block, inline, inline-block để làm cho phần tử được đối xử như một phần tử khối (Block element), phần tử nội tuyến (inline element), hoặc phần tử nội tuyến khối (inline-block element).
3 - CSS {display: grid | flex | ... }
Sử dụng CSS display với các giá trị khác (grid, inline-grid, flex,...) để thiết lập cách bố trí (Layout) cho các phần tử con của phần tử hiện tại. Chẳng hạn, CSS {display:grid | inline-grid} chia bề mặt của phần tử hiện tại thành một lưới (grid), bao gồm nhiều hàng (row) và nhiều cột (column), các phần tử con của nó sẽ được bố trí trên các ô lưới này.
2. CSS {display: none}
CSS {display:none} được sử dụng để ẩn một phần tử, và giải phóng vùng không gian mà nó chiếm. Để hiển thị lại phần tử này sử dụng CSS {display:block | inline | inline-block} hoặc loại bỏ CSS display.
display-none-example.html
<!DOCTYPE html>
<html>
   <head>
      <title>CSS {display:none}</title>
      <meta charset="UTF-8"/>
      <script>
          function showHideImage(event)  {
             var myImage = document.getElementById("myImage");
             var displayValue = myImage.style.display;
             if(!displayValue) {
                 myImage.style.display = "none";
             } else {
                 // Remove CSS display.
                 myImage.style.display = null;
                 // OR Set to: block|inline|inline-block.
             }
          }
      </script>
   </head>
   <body>
       <h2>CSS {display:none}</h2>
       <button onClick="showHideImage(event)">Show/Hide Image</button>
       <div style="padding:5px; margin-top:10px; background:#eee;">
           <img src="../images/flower.png" id= "myImage"/>
           Apollo 11 was the spaceflight that landed the first humans,
           Americans Neil Armstrong and Buzz Aldrin,
           on the Moon on July 20, 1969, at 20:18 UTC.
           Armstrong became the first to step onto the lunar
           surface 6 hours later on July 21 at 02:56 UTC.
       </div>
   </body>
</html>
CSS {visibility:hidden} làm một phần tử trở thành vô hình (invisible), nhưng nó không giải phóng vùng không gian mà phần tử đang chiếm.
3. CSS {display:block}
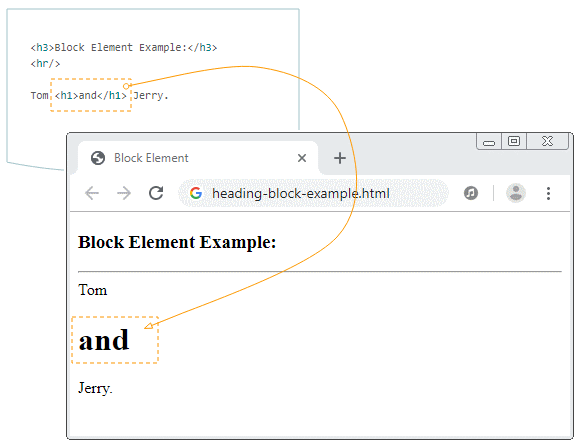
Sử dụng CSS {display:block} cho một phần tử để làm nó được đối xử như một phần tử khối (Block-level element).
- Một số phần tử mặc định là một phần tử khối, chẳng hạn <div>, <hr>, ...
- Một số phần tử khác mặc định là các phần tử nội tuyến (Inline element), chẳng hạn <span>, bạn có thể sử dụng CSS {display:block} cho chúng để biến nó thành phần tử khối.
Một phần tử khối luôn luôn hiển thị dưới dạng một hình chữ nhật, trình duyệt sẽ tự động được thêm các ngắt dòng (line break) vào phía trước và phía sau của phần tử này.
Ví dụ: Áp dụng CSS {display:block} cho phần tử <span> để biến nó thành phần tử khối:
display-block-example.html
<!DOCTYPE html>
<html>
   <head>
      <title>CSS {display:block}</title>
      <meta charset="UTF-8"/>
      <script>
          function setDisplayBlock()  {
             var mySpan = document.getElementById("mySpan");
             mySpan.style.display = "block";
          }
          // Use default display.
          function removeDisplay()  {
             var mySpan = document.getElementById("mySpan");
             mySpan.style.display = null;
          }
      </script>
   </head>
   <body>
       <h2>CSS {display:block}</h2>
       <button onClick="setDisplayBlock()">Set {display:block}</button>
       <button onClick="removeDisplay()">Remove display property</button>
       <div style="padding:5px; margin-top:10px; background:#eee;">
           <img src="../images/flower.png" id= "myImage"/>

           <span id="mySpan" style="background:yellow">Apollo 11</span> was the
           spaceflight that landed the first humans,
           Americans Neil Armstrong and Buzz Aldrin,
           on the Moon on July 20, 1969, at 20:18 UTC.
           Armstrong became the first to step onto the lunar
           surface 6 hours later on July 21 at 02:56 UTC.
       </div>
   </body>
</html>
4. CSS {display: inline}
Sử dụng CSS {display:inline} cho một phần tử để làm nó được đối xử như một phần tử nội tuyến (Inline element).
- Một số phần tử mặc định là một phần tử nội tuyến, chẳng hạn <span>, <strong>, ...
- Một số phần tử khác mặc định là các phần tử khối, chẳng hạn <div>, bạn có thể sử dụng CSS {display:inline} cho chúng để biến nó thành phần tử nội tuyến.
Phần tử nội tuyến trong nhiều trường hợp không phải là một hình chữ nhật, nó có thể nằm trên nhiều dòng (line).
Apollo 11 was the spaceflight that landed the first humans,
Americans Neil Armstrong and Buzz Aldrin,
on the Moon on July 20, 1969, at 20:18 UTC.

Armstrong
<span style="background:yellow;">
  became the first to step onto the lunar
   surface 6 hours later on July 21 at 02:56 UTC.
</span>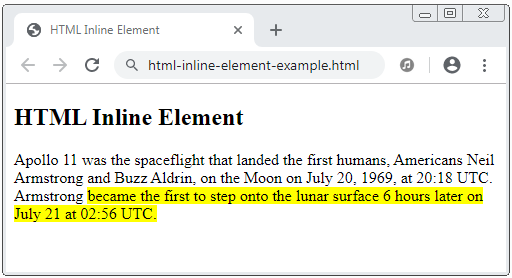
Ví dụ, áp dụng CSS {display:inline} cho một phần tử <div> để biến nó thành một phần tử nội tuyến.
display-inline-example.html
<!DOCTYPE html>
<html>
   <head>
      <title>CSS {display:inline}</title>
      <meta charset="UTF-8"/>
      <script>
          function setDisplayInline()  {
             var myDiv = document.getElementById("myDiv");
             myDiv.style.display = "inline";
          }
          // Use default display.
          function removeDisplay()  {
             var myDiv = document.getElementById("myDiv");
             myDiv.style.display = null;
          }
      </script>
   </head>
   <body>
       <h2>CSS {display:inline}</h2>
       <button onClick="setDisplayInline()">Set {display:inline}</button>
       <button onClick="removeDisplay()">Remove display property</button>
       <div style="padding:5px; margin-top:10px; background:#eee;">
           <img src="../images/flower.png" />
           <div id="myDiv" style="background:yellow">
             Apollo 11 was the spaceflight that landed the first humans,
             Americans Neil Armstrong and Buzz Aldrin,
             on the Moon on July 20, 1969, at 20:18 UTC.
           </div>
           Armstrong became the first to step onto the lunar
           surface 6 hours later on July 21 at 02:56 UTC.
       </div>
   </body>
</html>
5. CSS {display: inline-block}
Sử dụng CSS {display:inline-block} cho một phần tử để làm nó được đối xử như một phần tử "nội tuyến khối" (Inline-block element).
Phần tử "nội tuyến khối" (Inline-block element) là một hình chữ nhật, trình duyệt sẽ không tự động thêm các ngắt dòng (line break) vào phía trước và phía sau phần tử này, điều này làm cho các phần tử nội tuyến khối có thể nằm trên cùng một dòng (Line).
display-inline-block-example.html
<!DOCTYPE html>
<html>
   <head>
      <title>CSS {display:inline-block}</title>
      <meta charset="UTF-8"/>
      <style>
          div {
            background: yellow;
            padding: 5px;
            margin: 5px;
          }
      </style>
   </head>
   <body>
       <h2>CSS {display:inline-block}</h2>
       <div style="display:inline-block">
           HTML Tutorial
       </div>
       <div style="display:inline-block">
           CSS Tutorial
       </div>
       <div style="display:inline-block">
           Javascript Tutorial
       </div>
       <div style="display:inline-block">
           Bootstrap Tutorial
       </div>
       <div style="display:inline-block">
           JQuery Tutorial
       </div>
   </body>
</html>
6. CSS {display: grid | inline-grid}
CSS {display:grid | inline-grid} được áp dụng cho một phần tử để chia bề mặt của nó thành một lưới (grid), bao gồm các hàng (row) và các cột (column), các phần tử con của nó sẽ được bố trí trên các ô lưới. Nó giúp bạn dễ dàng hơn trong việc thiết kế các trang thay vì sử dụng CSS float hoặc các kỹ thuật định vị phần tử.

Các hướng dẫn CSS
- Các đơn vị tính trong CSS
- Hướng dẫn và ví dụ CSS Selectors cơ bản
- Hướng dẫn và ví dụ CSS Attribute Selector
- Hướng dẫn và ví dụ CSS Selectors kết hợp
- Hướng dẫn và ví dụ CSS Backgrounds
- Hướng dẫn và ví dụ CSS Opacity
- Hướng dẫn và ví dụ CSS Padding
- Hướng dẫn và ví dụ CSS Margins
- Hướng dẫn và ví dụ CSS Borders
- Hướng dẫn và ví dụ CSS Outline
- Hướng dẫn và ví dụ CSS box-sizing
- Hướng dẫn và ví dụ CSS max-width và min-width
- Các từ khóa min-content, max-content, fit-content, stretch trong CSS
- Hướng dẫn và ví dụ CSS Links
- Hướng dẫn và ví dụ CSS Fonts
- Tìm hiểu về Generic Font Family trong CSS
- Hướng dẫn và ví dụ CSS @font-face
- Hướng dẫn và ví dụ CSS Align
- Hướng dẫn và ví dụ CSS Cursors
- Hướng dẫn và ví dụ CSS Overflow
- Hướng dẫn và ví dụ CSS Lists
- Hướng dẫn và ví dụ CSS Tables
- Hướng dẫn và ví dụ CSS visibility
- Hướng dẫn và ví dụ CSS Display
- Hướng dẫn và ví dụ CSS Grid Layout
- Hướng dẫn và ví dụ CSS Float và Clear
- Hướng dẫn và ví dụ CSS Position
- Hướng dẫn và ví dụ CSS line-height
- Hướng dẫn và ví dụ CSS text-align
- Hướng dẫn và ví dụ CSS text-decoration
Show More
