Các hiệu ứng (effects) trong JavaFX
1. Tổng quan về các hiệu ứng
Một hiệu ứng (Effect) là một hành động bất kỳ tác động vào một hình ảnh đồ họa (Graphic image) để tạo ra một hình ảnh đồ họa khác. Một trong các hiệu ứng bạn thường gặp đó là hiệu ứng chuyển động mờ (Motion Blur), hiệu ứng bóng đổ (Drop Shadow),...
Motion Blur Effect (Hiệu ứng chuyển động mờ):

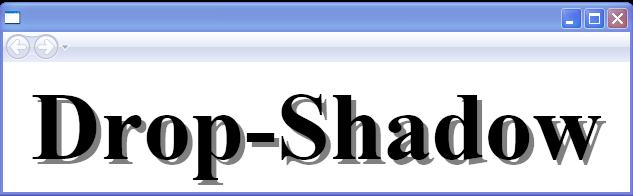
Drop Shadow Effect (Hiệu ứng bóng đổ):
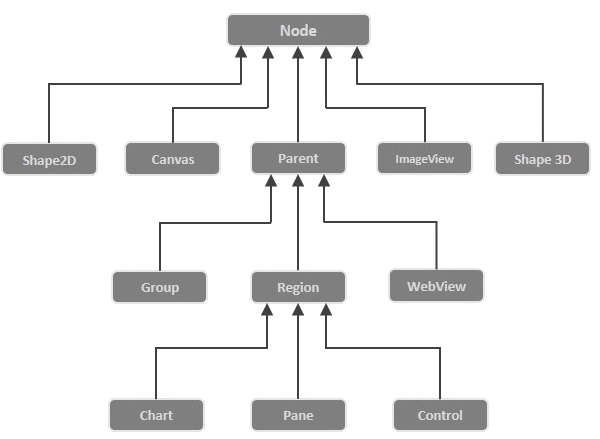
Trong JavaFX một hiệu ứng (effect) có thể được áp dụng cho một đối tượng có kiểu Node, thông qua phương thức Node.setEffect(effect).
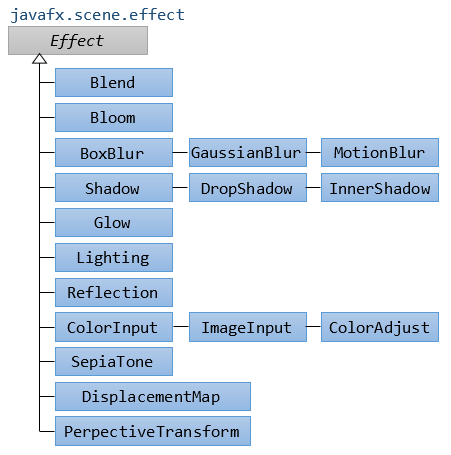
JavaFX đã xây dựng sẵn một vài lớp hiệu ứng, cho các hiệu ứng khác nhau, tất cả nằm trong gói (package) javafx.scene.effect. Sau đây là một số lớp trong package này.
- Blend
- Bloom
- BoxBlur
- ColorAdjust
- ColorInput
- DropShadow
- GaussianBlur
- Glow
- ImageInput
- InnerShadow
- Lighting
- MotionBlur
- PerspectiveTransform
- Reflection
- SepiaTone
- Shadow
2. ColorInput
ColorInput là một hiệu ứng dùng để vẽ ra (render) một hình chữ nhật lấp đầy (fill) bởi mầu sắc trên một vật thể bị ảnh hưởng. Hiệu ứng này sẽ làm ẩn hoàn toàn vật thể bị ảnh hưởng.
ColorInput thường được sử dụng cùng với các hiệu ứng khác để tạo ra một hiệu ứng pha trộn. Và thường áp dụng cho nền (background).
Ví dụ:
Ví dụ dưới đây, một Button được sét đặt hiệu ứng ColorInput, nó sẽ bị che hoàn toàn, bạn chỉ còn nhìn thấy một hình chữ nhật có mầu sắc.
ColorInputEffectExample.java
package org.o7planning.javafx.effect;

import javafx.application.Application;
import javafx.event.ActionEvent;
import javafx.event.EventHandler;
import javafx.scene.Group;
import javafx.scene.Scene;
import javafx.scene.control.Button;
import javafx.scene.effect.ColorInput;
import javafx.scene.paint.Color;
import javafx.scene.shape.Rectangle;
import javafx.stage.Stage;

public class ColorInputEffectExample extends Application {

   @Override
   public void start(Stage stage) {

      double x = 10;
      double y = 10;
      double w = 40;
      double h = 180;

      // Rectangle
      Rectangle rect = new Rectangle(x, y, w, h);
      rect.setFill(Color.WHITE);
      rect.setStrokeWidth(1);
      rect.setStroke(Color.BLACK);

      // Button
      Button button = new Button("Click me to apply ColorInput effect to me");

      button.setLayoutX(100);
      button.setLayoutY(30);

      button.setPrefSize(250, 150);

      button.setOnAction(new EventHandler<ActionEvent>() {

         @Override
         public void handle(ActionEvent event) {
            ColorInput colorInput = new ColorInput();
            colorInput.setPaint(Color.STEELBLUE);
            colorInput.setX(x);
            colorInput.setY(y);
            colorInput.setWidth(w);
            colorInput.setHeight(h);

            // Setting ColorInput effect
            button.setEffect(colorInput);
         }
      });

      Group root = new Group();

      root.getChildren().addAll(button, rect);

      Scene scene = new Scene(root, 450, 300);
      stage.setTitle("JavaFX ColorInput Effect (o7planning.org)");
      stage.setScene(scene);

      stage.show();

   }

   public static void main(String args[]) {
      launch(args);
   }

}
3. ImageInput
ImageInput là một hiệu ứng dùng để vẽ ra (render) một ảnh (image) lên một vật thể bị ảnh hưởng. Hiệu ứng này sẽ làm ẩn hoàn toàn vật thể bị ảnh hưởng.
ImageInput thường được sử dụng cùng với các hiệu ứng khác để tạo ra một hiệu ứng pha trộn. Và thường áp dụng cho nền (background).
Ví dụ:
Ví dụ dưới đây, một Button được sét đặt hiệu ứng ImageInput, nó sẽ bị che hoàn toàn, bạn chỉ còn nhìn thấy một ảnh (image).
ImageInputEffectExample.java
package org.o7planning.javafx.effect;
import javafx.application.Application;
import javafx.event.ActionEvent;
import javafx.event.EventHandler;
import javafx.scene.Group;
import javafx.scene.Scene;
import javafx.scene.control.Button;
import javafx.scene.effect.ImageInput;
import javafx.scene.image.Image;
import javafx.stage.Stage;
public class ImageInputEffectExample extends Application {
@Override
public void start(Stage stage) {
double x = 10;
double y = 10;
// Button
Button button = new Button("Click me to apply ImageInput effect to me");
button.setLayoutX(100);
button.setLayoutY(30);
button.setPrefSize(250, 50);
button.setOnAction(new EventHandler<ActionEvent>() {
@Override
public void handle(ActionEvent event) {
String imageUrl= "http://o7planning.org/templates/o7planning/resources/images/favi.png";
Image image = new Image(imageUrl);
ImageInput imageInput = new ImageInput();
imageInput.setSource(image);
imageInput.setX(x);
imageInput.setY(y);
// Setting ColorInput effect
button.setEffect(imageInput);
}
});
Group root = new Group();
root.getChildren().addAll(button );
Scene scene = new Scene(root, 450, 250);
stage.setTitle("JavaFX ImageInput Effect (o7planning.org)");
stage.setScene(scene);
stage.show();
}
public static void main(String args[]) {
launch(args);
}
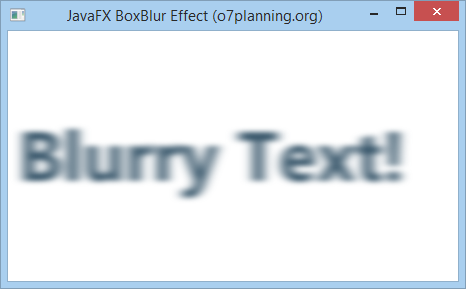
}4. BoxBlur
Ví dụ:
BoxBlurEffectExample.java
package org.o7planning.javafx.effect;

import javafx.application.Application;
import javafx.scene.Group;
import javafx.scene.Scene;
import javafx.scene.effect.BoxBlur;
import javafx.scene.paint.Color;
import javafx.scene.text.Font;
import javafx.scene.text.FontWeight;
import javafx.scene.text.Text;
import javafx.stage.Stage;

public class BoxBlurEffectExample extends Application {

    @Override
    public void start(Stage stage) {

        double x = 10;
        double y = 150;

        Text text = new Text();
        text.setText("Blurry Text!");
        text.setFill(Color.web("0x3b596d"));
        text.setFont(Font.font(null, FontWeight.BOLD, 70));
        text.setX(x);
        text.setY(y);

        BoxBlur boxBlur = new BoxBlur();

        // Min: 0.0 Max: 255.0
        boxBlur.setWidth(10);

        // Min: 0.0 Max: 255.0
        boxBlur.setHeight(5);

        // Min: 0 Max: 3
        boxBlur.setIterations(3);
        text.setEffect(boxBlur);

        Group root = new Group();

        root.getChildren().addAll(text);

        Scene scene = new Scene(root, 450, 250);
        stage.setTitle("JavaFX BoxBlur Effect (o7planning.org)");
        stage.setScene(scene);

        stage.show();

    }

    public static void main(String args[]) {
        launch(args);
    }

}
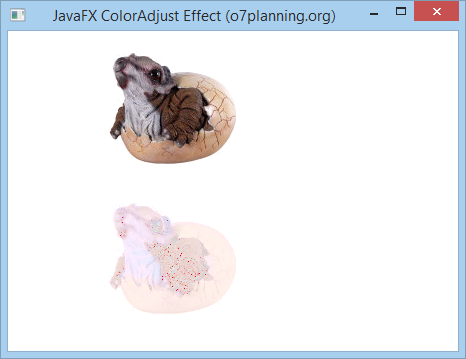
5. ColorAdjust (Điều chỉnh màu)
Bạn có thể điều chỉnh mầu sắc cho một hình ảnh bằng cách áp dụng hiệu ứng điều chỉnh mầu sắc (Color adjust efffect). Để điều chỉnh mầu sắc trên hình ảnh bạn phải điều chỉnh 5 thuộc tính (property) sau:
- hue - Độ sắc
- saturation - Độ bão hòa
- brightness - Độ sáng
- contrast - Độ tương phản.
Tất cả các thuộc tính trên có thể áp dụng cho từng pixel (điểm phân giải) khác nhau.
Thuộc tính | Mô tả |
hue | hue là một thuộc tính có kiểu double, giá trị nằm trong khoảng -1..1, nó đại diện cho giá trị điều chỉnh sắc độ (hue) cho hiệu ứng này. |
saturation | saturation là một thuộc tính có kiểu double, giá trị nằm trong khoảng -1..1, nó đại diện cho giá trị điều chỉnh độ bão hòa (saturation) cho hiệu ứng này. |
brightness | brightness là một thuộc tính có kiểu double, giá trị nằm trong khoảng -1..1, nó đại diện cho độ sáng (brightness) cho hiệu ứng này. |
contrast | contrast là một thuộc tính có kiểu double, giá trị nằm trong khoảng -1..1, nó đại diện cho độ tương phản (contrast) cho hiệu ứng này. |
Ví dụ:
ColorAdjustEffectExample.java
package org.o7planning.javafx.effect;

import javafx.application.Application;
import javafx.scene.Group;
import javafx.scene.Scene;
import javafx.scene.effect.ColorAdjust;
import javafx.scene.image.Image;
import javafx.scene.image.ImageView;
import javafx.stage.Stage;

public class ColorAdjustEffectExample extends Application {

	@Override
	public void start(Stage stage) {

		String imageUrl = "http://o7planning.org/templates/o7planning/resources/images/favi.png";
		Image image = new Image(imageUrl);

		ImageView imageView1 = new ImageView(image);
		imageView1.setX(100);
		imageView1.setY(20);

		ImageView imageView2 = new ImageView(image);

		imageView2.setX(100);
		imageView2.setY(170);

		// Tạo đối tượng ColorAdjust
		ColorAdjust colorAdjust = new ColorAdjust();

		// Sét đặt giá trị cho contrast (Độ tương phản)
		colorAdjust.setContrast(0.3);

		// Sét đặt giá trị cho hue (Sắc độ)
		colorAdjust.setHue(-0.05);

		// Sét đặt giá trị cho brightness (Độ sáng)
		colorAdjust.setBrightness(0.9);

		// Sét đặt giá trị cho saturation (Độ bão hòa)
		colorAdjust.setSaturation(0.7);

		// Áp dụng ColorAdjust cho ImageView.
		imageView2.setEffect(colorAdjust);

		Group root = new Group(imageView1, imageView2);

		Scene scene = new Scene(root, 450, 320);
		stage.setTitle("JavaFX ColorAdjust Effect (o7planning.org)");
		stage.setScene(scene);
		stage.show();
	}

	public static void main(String args[]) {
		launch(args);
	}

}
Chạy ví dụ:
Ví dụ 2:
Một ví dụ khác cho phép bạn điều chỉnh các thuộc tính hue, saturation, brightness và contrast thông qua các Slider:
ColorAdjustEffectExample2.java
package org.o7planning.javafx.effect;
import javafx.application.Application;
import javafx.beans.value.ChangeListener;
import javafx.beans.value.ObservableValue;
import javafx.geometry.Insets;
import javafx.scene.Scene;
import javafx.scene.control.Label;
import javafx.scene.control.Slider;
import javafx.scene.effect.ColorAdjust;
import javafx.scene.image.Image;
import javafx.scene.image.ImageView;
import javafx.scene.layout.VBox;
import javafx.stage.Stage;
public class ColorAdjustEffectExample2 extends Application {
private static final int ADJUST_TYPE_HUE = 1;
private static final int ADJUST_TYPE_CONTRAST = 2;
private static final int ADJUST_TYPE_SATURATION = 3;
private static final int ADJUST_TYPE_BRIGHTNESS = 4;
private ColorAdjust colorAdjust;
@Override
public void start(Stage stage) {
Label contrastLabel = new Label("Contrast:");
Label hueLabel = new Label("Hue:");
Label saturationLabel = new Label("Saturation:");
Label brightnessLabel = new Label("Brightness:");
Slider contrastSlider = this.createSlider(ADJUST_TYPE_CONTRAST);
Slider hueSlider = this.createSlider(ADJUST_TYPE_HUE);
Slider saturationSlider = this.createSlider(ADJUST_TYPE_SATURATION);
Slider brightnessSlider = this.createSlider(ADJUST_TYPE_BRIGHTNESS);
String imageUrl = "http://o7planning.org/templates/o7planning/resources/images/favi.png";
Image image = new Image(imageUrl);
ImageView imageView = new ImageView(image);
// Tạo đối tượng ColorAdjust
colorAdjust = new ColorAdjust();
// Áp dụng ColorAdjust cho ImageView.
imageView.setEffect(colorAdjust);
VBox root = new VBox();
root.setPadding(new Insets(10));
root.getChildren().addAll(contrastLabel, contrastSlider, //
hueLabel, hueSlider, //
saturationLabel, saturationSlider, //
brightnessLabel, brightnessSlider, imageView);
Scene scene = new Scene(root, 450, 320);
stage.setTitle("JavaFX ColorAdjust Effect (o7planning.org)");
stage.setScene(scene);
stage.show();
}
// Tạo Slider để điều chỉnh Color
private Slider createSlider(final int adjustType) {
Slider slider = new Slider();
slider.setMin(-1);
slider.setMax(1);
slider.setBlockIncrement(0.1);
slider.setValue(0);
slider.valueProperty().addListener(new ChangeListener<Number>() {
@Override
public void changed(ObservableValue<? extends Number> observable, //
Number oldValue, Number newValue) {
switch (adjustType) {
case ADJUST_TYPE_HUE:
colorAdjust.setHue(newValue.doubleValue());
break;
case ADJUST_TYPE_CONTRAST:
colorAdjust.setContrast(newValue.doubleValue());
break;
case ADJUST_TYPE_SATURATION:
colorAdjust.setSaturation(newValue.doubleValue());
break;
case ADJUST_TYPE_BRIGHTNESS:
colorAdjust.setBrightness(newValue.doubleValue());
break;
}
}
});
return slider;
}
public static void main(String args[]) {
launch(args);
}
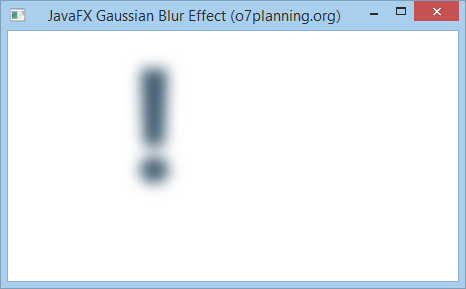
}6. Gaussian Blur (Hiệu ứng mờ Gaussian)
Gaussian Blur effect (Hiệu ứng mờ Gaussian) sử dụng thuật toán Gaussian để tạo ra hiệu ứng mờ. Cho phép cấu hình thuộc tính (property) radius.
- Thuộc tính radius chính là bán kính đường tròn mờ bao quanh mỗi điểm của đối tượng hình học được sét đặt hiệu ứng này.
Ví dụ:
GaussianBlurEffectExample.java
package org.o7planning.javafx.effect;

import javafx.animation.KeyFrame;
import javafx.animation.KeyValue;
import javafx.animation.Timeline;
import javafx.application.Application;
import javafx.scene.Group;
import javafx.scene.Node;
import javafx.scene.Scene;
import javafx.scene.effect.GaussianBlur;
import javafx.scene.paint.Color;
import javafx.scene.text.Font;
import javafx.scene.text.FontWeight;
import javafx.scene.text.Text;
import javafx.stage.Stage;
import javafx.util.Duration;

public class GaussianBlurEffectExample extends Application {

	// 30 millisencond.
	private static final int UI_ANIMATION_TIME_MSEC = 30000;

	private static final double MIN_RADIUS = 0.0;
	private static final double MAX_RADIUS = 70.0;

	private void applyEffect(Node node) {
		// Tạo Gaussian Blur với radius (bán kính) = 0.
		GaussianBlur blur = new GaussianBlur(MIN_RADIUS);
		node.setEffect(blur);

		// Tạo hiệu ứng hoạt hình
		Timeline timeline = new Timeline();
		KeyValue kv = new KeyValue(blur.radiusProperty(), MAX_RADIUS);
		KeyFrame kf = new KeyFrame(Duration.millis(UI_ANIMATION_TIME_MSEC), kv);
		timeline.getKeyFrames().add(kf);
		timeline.play();
	}

	@Override
	public void start(Stage stage) {

		Text text = new Text();
		text.setX(120.0);
		text.setY(150.0);
		text.setText("!");
		text.setFill(Color.web("0x3b596d"));
		text.setFont(Font.font(null, FontWeight.BOLD, 160));

		this.applyEffect(text);

		Group root = new Group();

		root.getChildren().addAll(text);

		Scene scene = new Scene(root, 450, 250);
		stage.setTitle("JavaFX Gaussian Blur Effect (o7planning.org)");
		stage.setScene(scene);

		stage.show();

	}

	public static void main(String args[]) {
		launch(args);
	}

}
Chạy ví dụ:
7. Bloom Effect (Hiệu ứng chói)
Bloom (chói) là môt hiệu ứng, nó giống cảm giác khi bạn nhìn vào một nguồn sáng mạnh. Bạn có thể sét đặt ngưỡng (Threshold) cho độ chói của hiệu ứng. Nó là một con số nằm trong khoảng 0..1.
Ví dụ:
Ví dụ dưới đây, một đối tượng Text được sét đặt hiệu ứng Bloom (Chói).
BloomEffectExample.java
package org.o7planning.javafx.effect;
import javafx.application.Application;
import javafx.event.ActionEvent;
import javafx.event.EventHandler;
import javafx.scene.Group;
import javafx.scene.Scene;
import javafx.scene.control.Button;
import javafx.scene.control.Label;
import javafx.scene.effect.Bloom;
import javafx.scene.paint.Color;
import javafx.scene.shape.Rectangle;
import javafx.scene.text.Font;
import javafx.scene.text.FontWeight;
import javafx.scene.text.Text;
import javafx.stage.Stage;
public class BloomEffectExample extends Application {
@Override
public void start(Stage stage) {
Label label = new Label();
label.setLayoutX(10);
label.setLayoutY(50);
Rectangle rect = new Rectangle();
rect.setX(10);
rect.setY(70);
rect.setWidth(360);
rect.setHeight(80);
rect.setFill(Color.DARKSLATEBLUE);
Text text = new Text();
text.setText("Bloom!");
text.setFill(Color.ALICEBLUE);
text.setFont(Font.font(null, FontWeight.BOLD, 40));
text.setX(25);
text.setY(125);
// Tạo hiệu ứng Bloom (Chói).
Bloom bloom = new Bloom();
// Sét đặt ngưỡng (Threshold).
bloom.setThreshold(0.8);
text.setEffect(bloom);
Button plusButton = new Button("+");
plusButton.setLayoutX(50);
plusButton.setLayoutY(10);
plusButton.setOnAction(new EventHandler<ActionEvent>() {
@Override
public void handle(ActionEvent event) {
double threshold = bloom.getThreshold();
threshold += 0.1;
if (threshold > 1) {
threshold = 1;
}
bloom.setThreshold(threshold);
label.setText("Threshold: " + threshold);
}
});
Button minusButton = new Button("-");
minusButton.setLayoutX(10);
minusButton.setLayoutY(10);
minusButton.setOnAction(new EventHandler<ActionEvent>() {
@Override
public void handle(ActionEvent event) {
double threshold = bloom.getThreshold();
threshold -= 0.1;
if (threshold < 0) {
threshold = 0;
}
bloom.setThreshold(threshold);
label.setText("Threshold: " + threshold);
}
});
Group root = new Group();
root.getChildren().addAll(rect, text, label, minusButton, plusButton);
Scene scene = new Scene(root, 450, 250);
stage.setTitle("JavaFX Bloom Effect (o7planning.org)");
stage.setScene(scene);
stage.show();
}
public static void main(String args[]) {
launch(args);
}
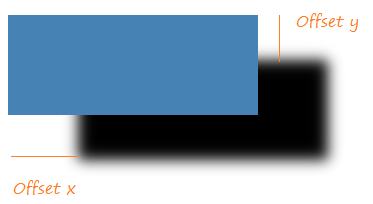
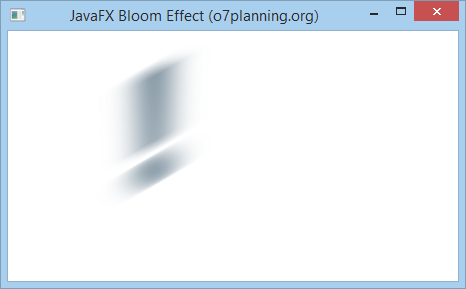
}8. Drop Shadow (Hiệu ứng bóng đổ)
Drop Shadow là một hiệu ứng cấp cao (hight level), nó tạo ra một cái bóng cho một đối tượng hình học.

Drop Shadow Effect (Hiệu ứng bóng đổ) có 3 thuộc tính (property) quan trọng mà bạn cần thiết lập đó là:
- Offset (Offset x, Offset y)
- Radius (Bán kính của đường tròn mờ)
- Color (Mầu sắc của bóng đổ)
Offset
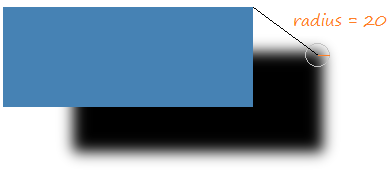
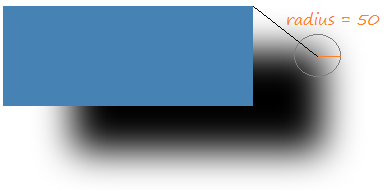
Radius (Bán kính)
Mỗi một điểm trên đối tượng sẽ tạo ra một điểm bóng của nó. Điểm bóng này là tâm của một đường tròn mờ. Bạn có thể thiết lập bán kính cho đường tròn này.
Ví dụ:
DropShadowEffectExample.java
package org.o7planning.javafx.effect;

import javafx.application.Application;
import javafx.scene.Group;
import javafx.scene.Scene;
import javafx.scene.effect.DropShadow;
import javafx.scene.paint.Color;
import javafx.scene.shape.Rectangle;
import javafx.scene.text.Font;
import javafx.scene.text.FontWeight;
import javafx.scene.text.Text;
import javafx.stage.Stage;

public class DropShadowEffectExample extends Application {

    @Override
    public void start(Stage stage) {

        DropShadow dropShadow = new DropShadow();
        dropShadow.setRadius(5.0);
        dropShadow.setOffsetX(3.0);
        dropShadow.setOffsetY(3.0);
        dropShadow.setColor(Color.color(0.4, 0.5, 0.5));

        Text text = new Text();
        text.setCache(true);
        text.setX(10.0);
        text.setY(70.0);
        text.setFill(Color.web("0x3b596d"));
        text.setText("JavaFX Drop Shadow...");
        text.setFont(Font.font(null, FontWeight.BOLD, 40));

        text.setEffect(dropShadow);

        DropShadow dropShadow2 = new DropShadow();
        dropShadow2.setOffsetX(70.0);
        dropShadow2.setOffsetY(45.0);
        dropShadow2.setRadius(20);

        Rectangle rect = new Rectangle(20, 150, 250, 100);
        rect.setFill(Color.STEELBLUE);
        rect.setCache(true);

        rect.setEffect(dropShadow2);

        Group root = new Group();

        root.getChildren().addAll(rect, text);

        Scene scene = new Scene(root, 450, 350);
        stage.setTitle("JavaFX Drop Shadow Effect (o7planning.org)");
        stage.setScene(scene);

        stage.show();

    }

    public static void main(String args[]) {
        launch(args);
    }

}
Chạy ví dụ:

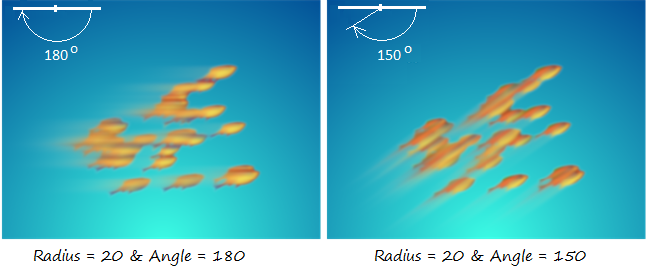
9. Motion Blur (Chuyển động mờ)
Motion Blur effect (Hiệu ứng chuyển động mờ) sử dụng hạt nhân (kernel) là thuật toán Gaussian để tạo hiệu ứng mờ, đồng thời cho phép cấu hình các thuộc tính (property) bán kính (radius) và góc (angle).
- Thuộc tính angle giúp xác định hướng chuyển động của đối tượng đang chuyển động.
- Thuộc tính radius chính là bán kính của hình tròn mờ bao quanh mỗi điểm của đối tượng đang chuyển động.
Ví dụ 1:
MotionBlurEffectExample.java
package org.o7planning.javafx.effect;

import javafx.application.Application;
import javafx.scene.Group;
import javafx.scene.Scene;
import javafx.scene.effect.MotionBlur;
import javafx.scene.paint.Color;
import javafx.scene.text.Font;
import javafx.scene.text.FontWeight;
import javafx.scene.text.Text;
import javafx.stage.Stage;

public class MotionBlurEffectExample extends Application {

    @Override
    public void start(Stage stage) {

        MotionBlur motionBlur = new MotionBlur();
        motionBlur.setRadius(55);
        motionBlur.setAngle(150.0);

        Text text = new Text();
        text.setX(120.0);
        text.setY(150.0);
        text.setText("!");
        text.setFill(Color.web("0x3b596d"));
        text.setFont(Font.font(null, FontWeight.BOLD, 160));
        text.setEffect(motionBlur);

        Group root = new Group();

        root.getChildren().addAll(text);

        Scene scene = new Scene(root, 450, 250);
        stage.setTitle("JavaFX Motion Blur Effect (o7planning.org)");
        stage.setScene(scene);

        stage.show();

    }

    public static void main(String args[]) {
        launch(args);
    }

}
Chạy ví dụ:
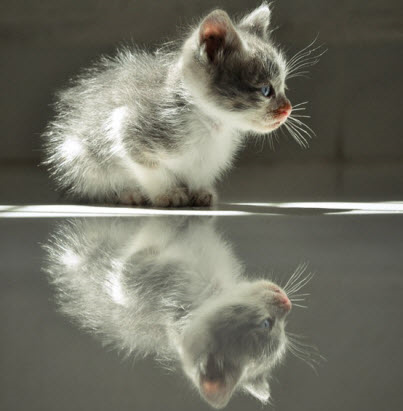
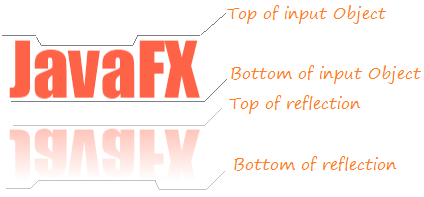
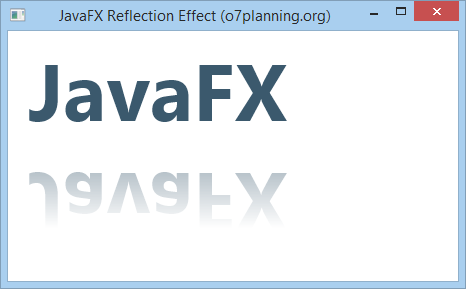
10. Reflection (Hiệu ứng phản chiếu)
Reflection (Phản chiếu) là một hiệu ứng nó tạo ra một hình ảnh phản chiếu của đối tượng đầu vào, giống như bạn đứng trước một tấm gương.
Có 4 thuộc tính (property) quan trọng đối với hiệu ứng phản xạ:
- topOpacity
- bottomOpacity
- topOffset
- fraction
- input
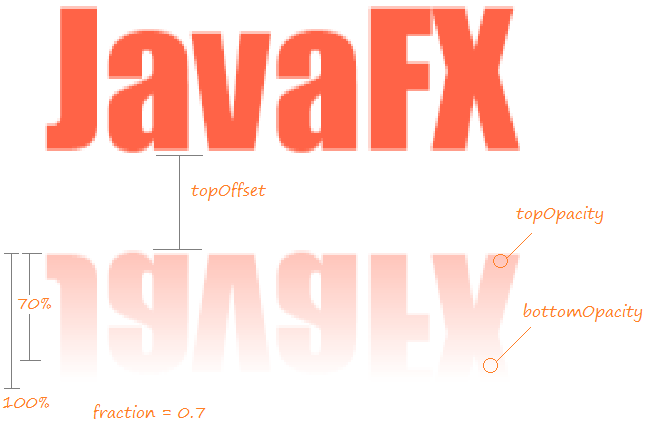
Thuộc tính | Mô tả |
topOpacity | topOpacity là thuộc tính có kiểu double, có giá trị nằm trong phạm vi 0..1, mặc định là 0, giá trị này đại diện cho độ mờ đục (opacity) của ảnh phản xạ ở trên cùng của nó. |
bottomOpacity | bottomOpacity là thuộc tính có kiểu double, có giá trị nằm trong phạm vi 0..1, mặc định là 0, giá trị này đại diện cho độ mờ đục (opacity) của ảnh phản xạ ở dưới cùng của nó. |
topOffset | topOffset là thuộc tính có kiểu double, nó là khoảng cách giữa điểm dưới cùng của đối tượng và trên cùng của ảnh phản xa. |
fraction | fraction là thuộc tính có kiểu double, nó có giá trị nằm trong phạm vi 0..1, mặc định là 0.75 (75%). Nếu giá trị này càng tiến tới 1 (100%), các điểm gần điểm trên cùng của vật thể sẽ có ảnh phản xạ. (Xem thêm ảnh minh họa phía dưới). |
input |
Ví dụ:
ReflectionEffectExample.java
package org.o7planning.javafx.effect;

import javafx.application.Application;
import javafx.scene.Group;
import javafx.scene.Scene;
import javafx.scene.effect.Reflection;
import javafx.scene.paint.Color;
import javafx.scene.text.Font;
import javafx.scene.text.FontWeight;
import javafx.scene.text.Text;
import javafx.stage.Stage;

public class ReflectionEffectExample extends Application {

	@Override
	public void start(Stage stage) {

		Reflection reflection = new Reflection();

		// Sét đặt độ mờ đục (opacity) ở phần cuối của phản xạ
		reflection.setBottomOpacity(0.0);

		// Sét đặt độ mờ đục (opacity) ở phần trên của phản xạ
		reflection.setTopOpacity(0.5);

		// Sét đặt khoảng cách giữa đối tượng và ảnh phản xạ.
		reflection.setTopOffset(10);

		// Sét đặt giá trị cho thuộc tính fraction.
		reflection.setFraction(0.7);

		Text text = new Text();
		text.setX(20.0);
		text.setY(90.0);

		text.setCache(true);
		text.setText("JavaFX");
		text.setFill(Color.web("0x3b596d"));
		text.setFont(Font.font(null, FontWeight.BOLD, 80));

		text.setEffect(reflection);

		Group root = new Group();

		root.getChildren().addAll(text);

		Scene scene = new Scene(root, 450, 250);
		stage.setTitle("JavaFX Reflection Effect (o7planning.org)");
		stage.setScene(scene);

		stage.show();

	}

	public static void main(String args[]) {
		launch(args);
	}
}
Chạy ví dụ:
Các hướng dẫn lập trình JavaFX
- Mở một cửa sổ (window) mới trong JavaFX
- Hướng dẫn và ví dụ JavaFX ChoiceDialog
- Hướng dẫn và ví dụ JavaFX Alert Dialog
- Hướng dẫn và ví dụ JavaFX TextInputDialog
- Cài đặt e(fx)clipse cho Eclipse (Bộ công cụ lập trình JavaFX)
- Cài đặt JavaFX Scene Builder cho Eclipse
- Hướng dẫn lập trình JavaFX cho người mới bắt đầu - Hello JavaFX
- Hướng dẫn và ví dụ JavaFX FlowPane Layout
- Hướng dẫn và ví dụ JavaFX TilePane Layout
- Hướng dẫn và ví dụ JavaFX HBox, VBox Layout
- Hướng dẫn và ví dụ JavaFX BorderPane Layout
- Hướng dẫn và ví dụ JavaFX AnchorPane Layout
- Hướng dẫn và ví dụ JavaFX TitledPane
- Hướng dẫn và ví dụ JavaFX Accordion
- Hướng dẫn và ví dụ JavaFX ListView
- Hướng dẫn và ví dụ JavaFX Group
- Hướng dẫn và ví dụ JavaFX ComboBox
- Hướng dẫn sử dụng các phép biến hình (Transformations) trong JavaFX
- Các hiệu ứng (effects) trong JavaFX
- Hướng dẫn và ví dụ JavaFX GridPane Layout
- Hướng dẫn và ví dụ JavaFX StackPane Layout
- Hướng dẫn và ví dụ JavaFX ScrollPane
- Hướng dẫn và ví dụ JavaFX WebView và WebEngine
- Hướng dẫn và ví dụ JavaFX HTMLEditor
- Hướng dẫn và ví dụ JavaFX TableView
- Hướng dẫn và ví dụ JavaFX TreeView
- Hướng dẫn và ví dụ JavaFX TreeTableView
- Hướng dẫn và ví dụ JavaFX Menu
- Hướng dẫn và ví dụ JavaFX ContextMenu
- Hướng dẫn và ví dụ JavaFX Image và ImageView
- Hướng dẫn và ví dụ JavaFX Label
- Hướng dẫn và ví dụ JavaFX Hyperlink
- Hướng dẫn và ví dụ JavaFX Button
- Hướng dẫn và ví dụ JavaFX ToggleButton
- Hướng dẫn và ví dụ JavaFX RadioButton
- Hướng dẫn và ví dụ JavaFX MenuButton và SplitMenuButton
- Hướng dẫn và ví dụ JavaFX TextField
- Hướng dẫn và ví dụ JavaFX PasswordField
- Hướng dẫn và ví dụ JavaFX TextArea
- Hướng dẫn và ví dụ JavaFX Slider
- Hướng dẫn và ví dụ JavaFX Spinner
- Hướng dẫn và ví dụ JavaFX ProgressBar và ProgressIndicator
- Hướng dẫn và ví dụ JavaFX ChoiceBox
- Hướng dẫn và ví dụ JavaFX Tooltip
- Hướng dẫn và ví dụ JavaFX DatePicker
- Hướng dẫn và ví dụ JavaFX ColorPicker
- Hướng dẫn và ví dụ JavaFX FileChooser và DirectoryChooser
- Hướng dẫn và ví dụ JavaFX PieChart
- Hướng dẫn và ví dụ JavaFX AreaChart và StackedAreaChart
- Hướng dẫn và ví dụ JavaFX BarChart và StackedBarChart
- Hướng dẫn và ví dụ JavaFX Line
- Hướng dẫn và ví dụ JavaFX Rectangle và Ellipse
Show More
