Hướng dẫn và ví dụ Javascript Console
1. Console
Đối tượng console cung cấp khả năng truy cập vào debugging console (bàn điều khiển gỡ rối) của trình duyệt (Chẳng hạn Web Console trong Firefox). Console không có ích đối với người dùng cuối, nhưng nó có ích đối với các lập trình viên, giúp họ biết được các mã Javascript của họ hoạt động thế nào trên trình duyệt, và hỗ trợ dò ra vị trí phát sinh lỗi để xử lý.
Cú pháp để truy cập vào đối tượng console:
window.console
// Or Simple:
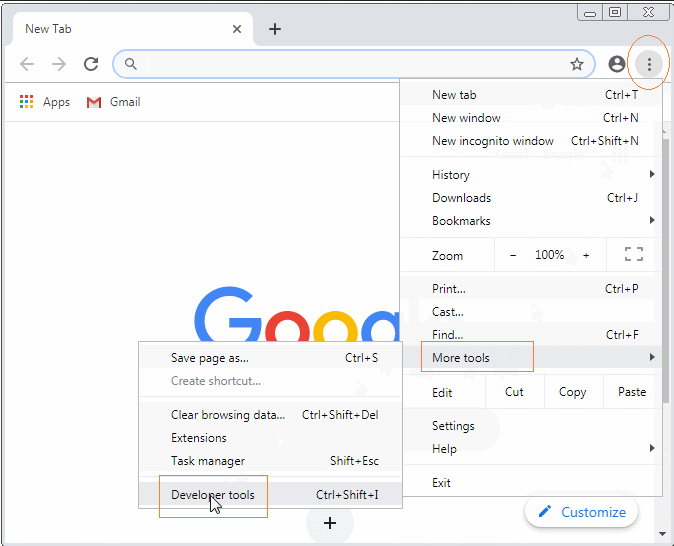
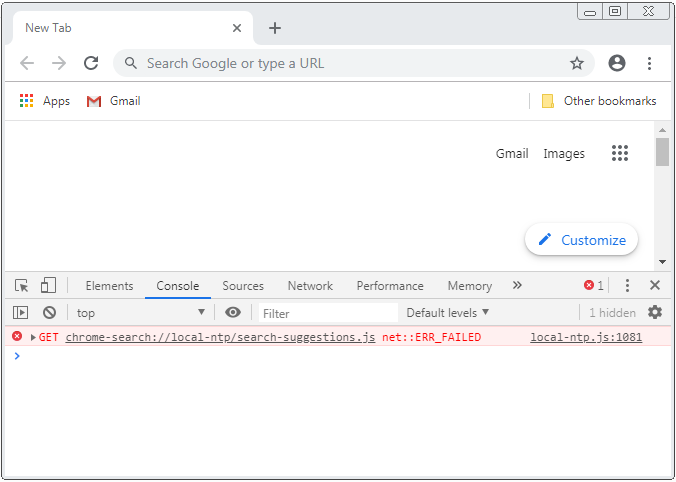
consoleMở cửa sổ Console trên trình duyệt Chrome:
 / More Tools / Developer Tools
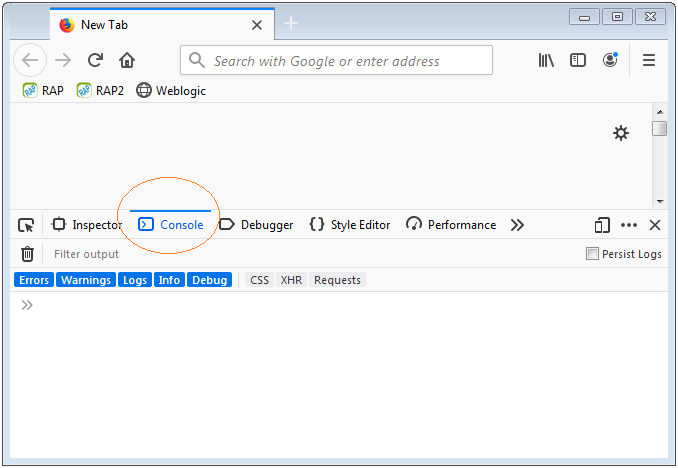
Mở cửa sổ Console trên trình duyệt Firefox:
 / Web Developer / Web Console
2. Các phương thức thông dụng
Đối tượng console có khá nhiều phương thức, nhưng có 5 phương thức được sử dụng nhiều nhất đó là:
- console.debug(..)
- console.log(..)
- console.info(..)
- console.warn(..)
- console.error(..)
// (Important!!) Read more notes for debug() method.
console.debug(obj1 [, obj2, ..., objN]);
console.debug(message [, subst1, ..., substN]);

console.log(obj1 [, obj2, ..., objN]);
console.log(message [, subst1, ..., substN]);

console.info(obj1 [, obj2, ..., objN]);
console.info(message [, subst1, ..., substN]);

console.warn(obj1 [, obj2, ..., objN]);
console.warn(message [, subst1, ..., substN]);

console.error(obj1 [, obj2, ..., objN]);
console.error(message [, subst1, ..., substN]);
Các phương thức trên ghi một đối tượng (Hoặc nhiều đối tượng), hoặc một String ra cửa sổ console. Nội dung được in ra trên cửa sổ Console có thể có mầu sắc và kiểu dáng khác nhau tùy thuộc vào phương thức được sử dụng.
Các tham số:
obj1 ... objN
Danh sách các đối tượng cần in ra trên cửa sổ Console.
message
Một String cần in ra trên cửa sổ Console.
subst1 ... substN
Các đối tượng dùng để thay thế cho các chuỗi thay thế (Substitution strings) trong chuỗi message. Điều này cho phép bạn kiểm soát bổ xung định dạng đầu ra.
Substitution string | Description |
%o | Outputs a JavaScript object. Clicking the object name opens more information about it in the inspector. |
%O | Outputs a JavaScript object. Clicking the object name opens more information about it in the inspector. |
%d | Outputs an integer. Number formatting is supported, for example console.log("Foo %.2d", 1.1) will output the number as two significant figures with a leading 0: Foo 01 |
%i | Outputs an integer. Number formatting is supported, for example console.log("Foo %.2d", 1.1) will output the number as two significant figures with a leading 0: Foo 01 |
%s | Outputs a string. |
%f | Outputs a floating-point value. Formatting is supported, for example console.log("Foo %.2f", 1.1) will output the number to 2 decimal places: Foo 1.10 |
console.debug(..)Bạn chỉ có thể nhìn thấy nội dung được in ra bởi phương thức console.debug(..) nếu Console của bạn được cấu hình Log-Level="debug". Mặc định Log-Level="log".
Ví dụ, Sử dụng các phương thức console.log(), console.info(), console.warn(), console.error() để ghi một đối tượng ra cửa sổ Console.
var myObject = {id : 123, text : 'Some Text'};

console.log(myObject);
console.info(myObject);
console.warn(myObject);
console.error(myObject);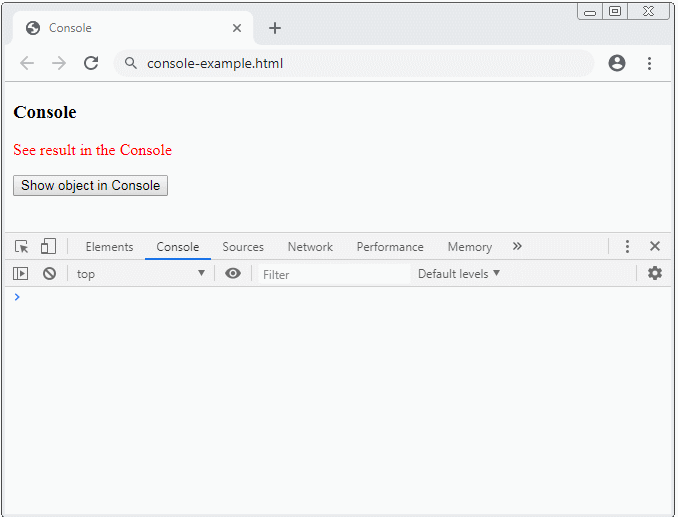
console-example.html
<!DOCTYPE html>
<html>
   <head>
      <title>Console</title>
      <meta charset="UTF-8">
      <script>
          function test() {
             var myObject = {id : 123, text : 'Some Text'};

             console.log(myObject);
             console.info(myObject);
             console.warn(myObject);
             console.error(myObject);
          }
      </script>
   </head>
   <body>
      <h3>Console</h3>
      <p style="color:red;">See result in the Console</p>
      <button onclick="test()">Show object in Console</button>
   </body>
</html>
Ví dụ sử dụng console.log(message, obj1, obj2,.. , objN):
var message = "Hello, %s. You've called me %d times.";

console.log(message, "Tom", 5);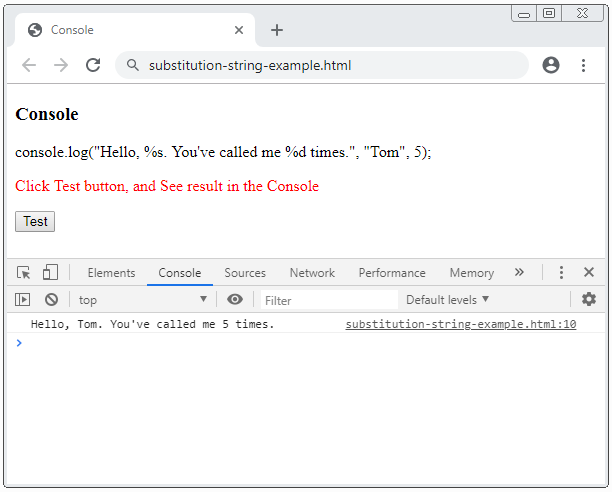
substitution-string-example.html
<!DOCTYPE html>
<html>
   <head>
      <title>Console</title>
      <meta charset="UTF-8">
      <script>
          function test() {
             var message = "Hello, %s. You've called me %d times.";
             console.log(message, "Tom", 5);
          }
      </script>
   </head>
   <body>
      <h3>Console</h3>
      <p>console.log("Hello, %s. You've called me %d times.", "Tom", 5);</p>
      <p style="color:red;">Click Test button, and See result in the Console</p>
      <button onclick="test()">Test</button>
   </body>
</html>
3. Tùy biến kiểu dáng đầu ra
Bạn có thể sử dụng chỉ thị (directive) %c để áp dụng một kiểu dáng CSS cho đầu ra của Console.
function test() {
    var style = "color: yellow; font-style: italic; background-color: blue;padding: 2px";
    console.log("This is %cMy stylish message", style);
}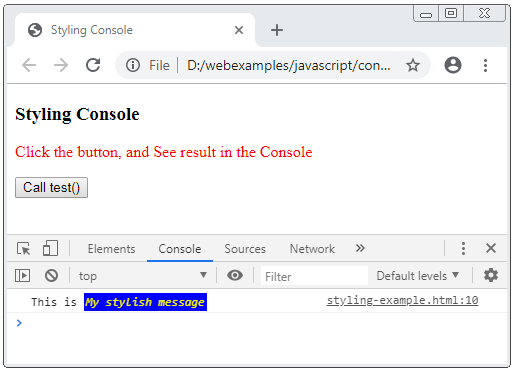
styling-example.html
<!DOCTYPE html>
<html>
<head>
<title>Styling Console</title>
<meta charset="UTF-8">
<script>
function test() {
var style = "color: yellow; font-style: italic; background-color: blue;padding: 2px";
console.log("This is %cMy stylish message", style);
}
</script>
</head>
<body>
<h3>Styling Console</h3>
<p style="color:red;">
Click the button, and See result in the Console
</p>
<button onclick="test()">Call test()</button>
</body>
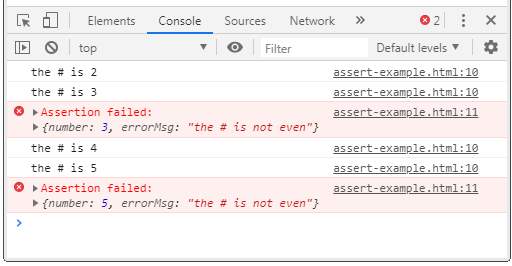
</html>4. Console assert(..)
console.assert(assertion, obj1 [, obj2, ..., objN]);
console.assert(assertion, message [, subst1, ..., substN]);
Phương thức console.assert(..) rất giống với phương thức console.error(..), điều khác biệt là nội dung chỉ được hiển thị trên cửa sổ Console nếu tham số assertion được đánh giá là false.
Các tham số:
assertion
Một biểu thức bất kỳ, nếu nó được đánh giá là false thì các tham số khác sẽ được dùng để hiển thị trên cửa sổ Console, giống như bạn đang sử dụng phương thức console.error(..). Ngược lại, nếu nó được đánh giá là true thì phương thức này sẽ không làm gì cả.
obj1 ... objN
Danh sách các đối tượng cần in ra trên cửa sổ Console.
message
Một String cần in ra trên cửa sổ Console.
subst1 ... substN
Các đối tượng dùng để thay thế cho các chuỗi thay thế (Substitution strings) trong chuỗi message. Điều này cho phép bạn kiểm soát bổ xung định dạng đầu ra.
Ví dụ:
const errorMsg = 'the # is not even';

for (let number = 2; number <= 5; number += 1) {
    console.log('the # is ' + number);
    console.assert(number % 2 === 0, {
        number: number,
        errorMsg: errorMsg
    });
}
Code đầy đủ của ví dụ:
assert-example.html
<!DOCTYPE html>
<html>
<head>
    <title>Console assert()</title>
    <meta charset="UTF-8">
    <script>
        function test()  {
          const errorMsg = 'the # is not even';
          for (let number = 2; number <= 5; number += 1) {
              console.log('the # is ' + number);
              console.assert(number % 2 === 0, {number: number, errorMsg: errorMsg});
          }
        }
    </script>
</head>
<body>
    <h3>Console assert()</h3>
    <p style="color:red;">Click the button, and See result in the Console</p>
    <button onclick="test()">Test</button>
</body>
</html>
5. Console clear()
Phương thức console.clear() được sử dụng để dọn dẹp (clear) hết tất cả các nội dung đã được ghi ra (log) trên cửa sổ console.
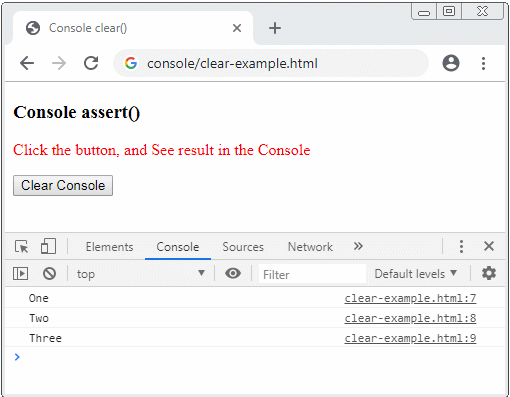
clear-example.html
<!DOCTYPE html>
<html>
<head>
    <title>Console clear()</title>
    <meta charset="UTF-8">
    <script>
        console.log("One");
        console.log("Two");
        console.log("Three");
        function clearConsole()  {
           console.clear();
        }
    </script>
</head>
<body>
    <h3>Console assert()</h3>
    <p style="color:red;">Click the button, and See result in the Console</p>
    <button onclick="clearConsole()">Clear Console</button>
</body>
</html>
6. Console Group
Đôi khi nội dung được in ra trên cửa sổ Console khá khó nhìn, vì vậy bạn muốn chúng hiển thị trên các khối một cách có tổ chức, có một vài phương thức giúp bạn làm được điều đó.
- console.group()
- console.groupCollapsed()
- console.groupEnd()
Phương thức console.group() giúp bạn tạo ra một khối trong cửa sổ Console, bạn có thể tạo ra các khối lồng nhau. Và sử dụng console.groupEnd() để thoát ra khỏi khối hiện tại, trở về với khối cha.
Phương thức console.groupCollapsed() cũng để tạo ra một khối nhưng khối này sẽ trong trạng thái cụp (Collapsed), trong khi phương thức console.group() tạo ra một khối trong trạng thái mở rộng (Expanded).
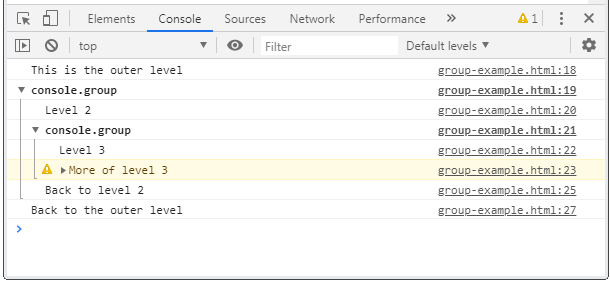
Xem 1 ví dụ đơn giản:
console.log("This is the outer level");
console.group();
console.log("Level 2");
console.group();
console.log("Level 3");
console.warn("More of level 3");
console.groupEnd();
console.log("Back to level 2");
console.groupEnd();
console.log("Back to the outer level");
Kết quả bạn nhìn thấy trên cửa sổ Console (của trình duyệt Chrome):
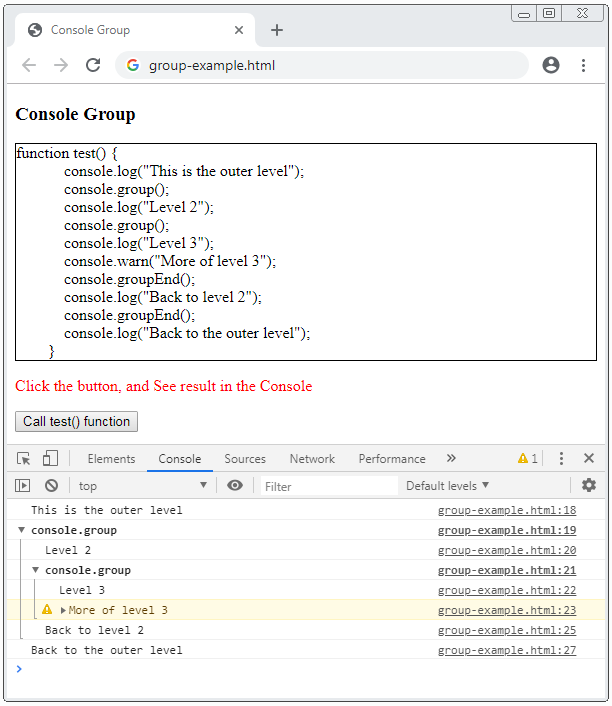
Code đầy đủ của ví dụ:
group-example.html
<!DOCTYPE html>
<html>
<head>
    <title>Console Group</title>
    <meta charset="UTF-8">
    <style>
        #div-code {
            border: 1px solid;
            padding: 5px 5px 5px -15px;
            display: block;
            unicode-bidi: embed;
            white-space: pre;
        }
    </style>
    <script>
        function test() {
            console.log("This is the outer level");
            console.group();
            console.log("Level 2");
            console.group();
            console.log("Level 3");
            console.warn("More of level 3");
            console.groupEnd();
            console.log("Back to level 2");
            console.groupEnd();
            console.log("Back to the outer level");
        }
        function showCode_of_test_function()  {
            document.getElementById("div-code").innerHTML = test.toString();
        }
    </script>
</head>
<body onload="showCode_of_test_function()">
    <h3>Console Group</h3>
    <div id="div-code"></div>
    <p style="color:red;">Click the button, and See result in the Console</p>
    <button onclick="test()">Call test() function</button>
</body>
</html>
7. Console Timer
Đôi khi bạn muốn kiểm tra xem mất bao nhiêu lâu để một đoạn code của bạn thực thi xong, có một vài phương thức của Console giúp bạn thực hiện điều này.
- console.time(label)
- console.timeEnd(label)
- console.timeLog(label)
console.time(label)
Phương thức console.time(label) bắt đầu một bộ đếm thời gian (Timer) trong Console. Tham số label có thể coi là tên của bộ đếm thời gian, nó giúp bạn phân biệt các bộ đếm thời gian đang hoạt động trong Console.
console.timeEnd(label)
Phương thức console.timeEnd(label) được sử dụng để kết thúc một bộ đếm thời gian (Timer) và hiển thị kết quả trên cửa sổ Console.
console.timeLog(label)
Phương thức console.timeLog(label) ghi ra giá trị hiện thời của bộ đếm thời gian (Timer) mà bạn đã tạo ra trước đó bởi phương thức console.time(label).
Ví dụ, sử dụng Console Timer để đánh giá thời gian trả lời của người dùng.
console.time("Answer time");
alert("Click to continue");
console.timeLog("Answer time");
alert("Do a bunch of other stuff...");
console.timeEnd("Answer time");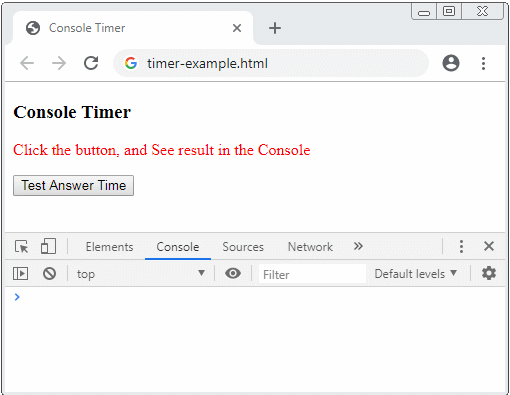
Xem code đầy đủ của ví dụ:
timer-example.html
<!DOCTYPE html>
<html>
<head>
    <title>Console Timer</title>
    <meta charset="UTF-8">
    <script>
        function testAnswerTime() {
          console.time("Answer time");
          alert("Click to continue");
          console.timeLog("Answer time");
          alert("Do a bunch of other stuff...");
          console.timeEnd("Answer time");
        }
    </script>
</head>
<body>
    <h3>Console Timer</h3>
    <p style="color:red;">Click the button, and See result in the Console</p>
    <button onclick="testAnswerTime()">Test Answer Time</button>
</body>
</html>
8. Console Stack Trace
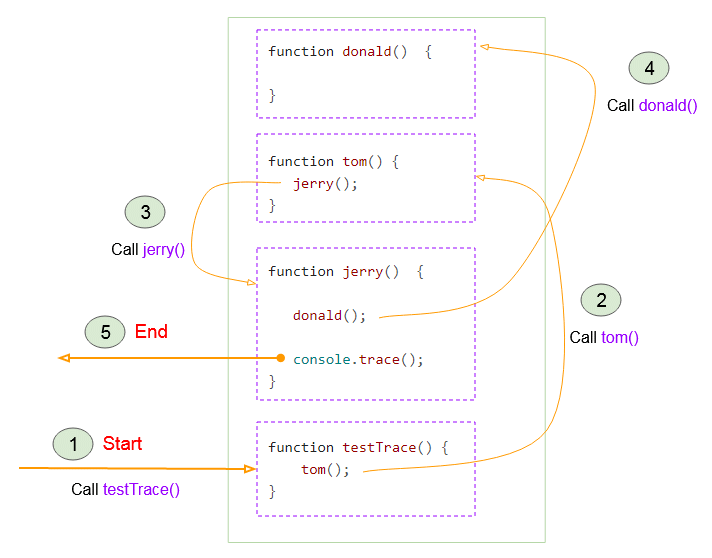
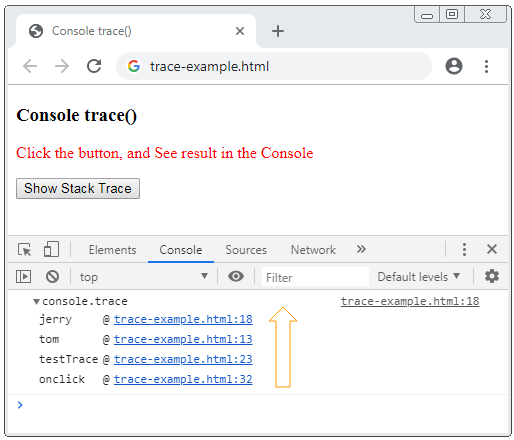
Đôi khi bạn muốn ghi ra (log) tất cả các hàm đã được gọi trước khi bắt gặp hàm chứa dòng mã console.trace(). Điều này giúp bạn biết được thứ tự các hàm được gọi trong chương trình.
Để đơn giản hãy xem một ví dụ:
function donald() {
}
function tom() {
    jerry();
}
function jerry() {
    donald();
    console.trace();
}
// Start Here!!
function testTrace() {
    tom();
}
Dưới đây là hình ảnh minh họa thứ tự các hàm đã được gọi cho tới khi bắt gặp console.trace().
Kết quả mà bạn nhận được khi chạy ví dụ:
Xem code đầy đủ của ví dụ:
trace-example.html
<!DOCTYPE html>
<html>
<head>
    <title>Console trace()</title>
    <meta charset="UTF-8">
    <script>
        function donald()  {
        }
        function tom() {
           jerry();
        }
        function jerry()  {
           donald();
           console.trace();
        }
        // Start Here!!
        function testTrace() {
            tom();
        }
    </script>
</head>
<body>
    <h3>Console trace()</h3>
    <p style="color:red;">Click the button, and See result in the Console</p>
    <button onclick="testTrace()">Show Stack Trace</button>
</body>
</html>
Bạn có thể gọi console.trace() tại nhiều vị trí trong chương trình. Xem ví dụ:
trace-example2
function donald() {
    console.trace();
}
function tom() {
    jerry();
}
function jerry() {
    console.trace();
    donald();
}
// Start Here!!
function testTrace() {
    tom();
}
Và kết quả nhận được:

trace-example2.html
<!DOCTYPE html>
<html>
<head>
    <title>Console trace()</title>
    <meta charset="UTF-8">
    <script>
        function donald()  {
           console.trace();
        }
        function tom() {
           jerry();
        }
        function jerry()  {
           console.trace();
           donald();
        }
        // Start Here!!
        function testTrace() {
            tom();
        }
    </script>
</head>
<body>
    <h3>Console trace()</h3>
    <p style="color:red;">Click the button, and See result in the Console</p>
    <button onclick="testTrace()">Show Stack Trace</button>
</body>
</html>
9. Console Table
console.table(data [,columns])
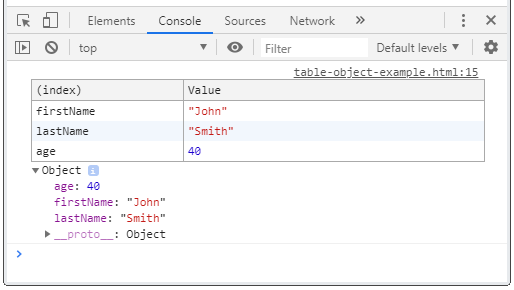
Phương thức console.table(data[,columns]) hiển thị một dữ liệu dưới dạng một bảng.
data - Object:
Nếu tham số data là một đối tượng, bảng sẽ gồm 2 cột, cột đầu tiên (Cột index) chứa các thuộc tính (property) và cột thứ hai (Cột value) chứa các giá trị của thuộc tính.
var person = {
    firstName: 'John',
    lastName: 'Smith',
    age: 40
}
function test() {
    console.table(person);
}
Kết quả bạn nhận được:
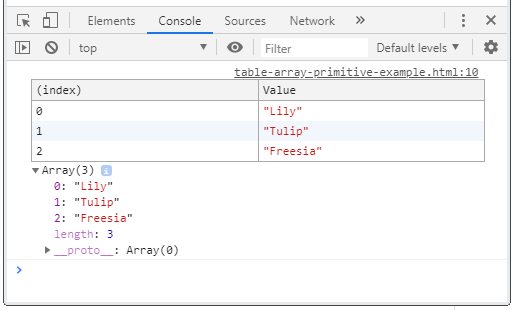
data - Array of primitives
Nếu tham số data là một mảng của các giá trị nguyên thủy (primitive), bảng sẽ bao gồm 2 cột. Cột thứ nhất (Cột index) chứa các index của mảng. Cột thứ hai (Cột value) chứa các phần tử của mảng.
var flowers = ["Lily", "Tulip", "Freesia"];

function test() {
    console.table(flowers);
}
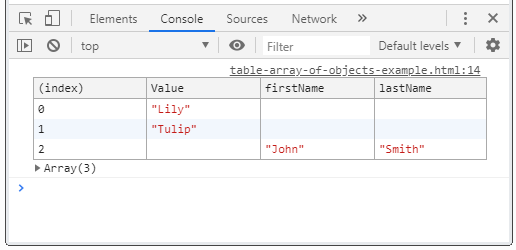
data - Array of Objects
Nếu tham số data là một mảng của các đối tượng. Bảng sẽ có ít nhất hai cột. Cột thứ nhất (Cột index) chứa các index của mảng.
var person = {
    firstName: 'John',
    lastName: 'Smith'
};
var array = ["Lily", "Tulip", person];
function test() {
    console.table(array);
}
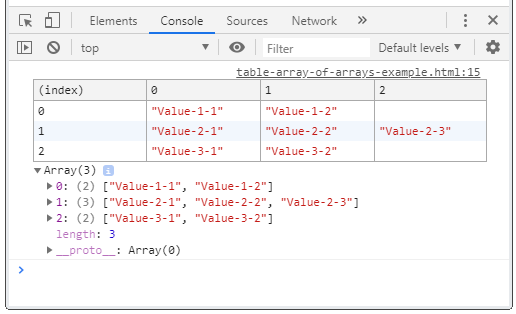
data - Array of arrays
Nếu tham số data là một mảng của các mảng. Bảng sẽ có ít nhất 2 cột. Cột thứ nhất (Cột index) chứa các index của mảng.
var array = [
    ["Value-0-1", "Value-0-2"],
    ["Value-1-1", "Value-1-2", "Value-1-3"],
    ["Value-2-1", "Value-2-2"],
];
function test() {
    console.table(array);
}
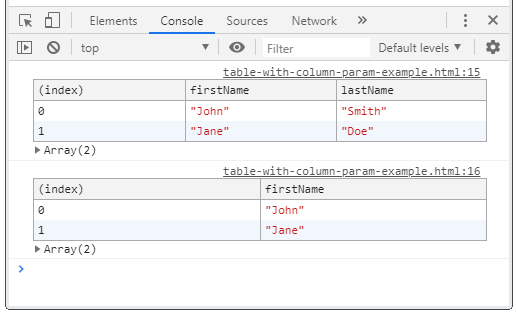
data, columns
Sử dụng tham số columns để chỉ định các cột mà bảng sẽ bao gồm.
var john =  {firstName: "John", lastName: "Smith"};
var jane =  {firstName: "Jane", lastName: "Doe"};

var array = [john, jane];

function test() {
    var columns = ["firstName"];
    // All columns
    console.table(array);
    // Custome Columns
    console.table(array, columns);
}
10. Console count(), countReset()
count([label])
Ghi ra (log) số lần bạn đã gọi phương thức console.count([label]),
console.count( [label] );Ví dụ:
function greet(userName) {
    console.count(userName);
    if (userName != null) {
        return "Hi " + userName;
    }
    return "Hi!";
}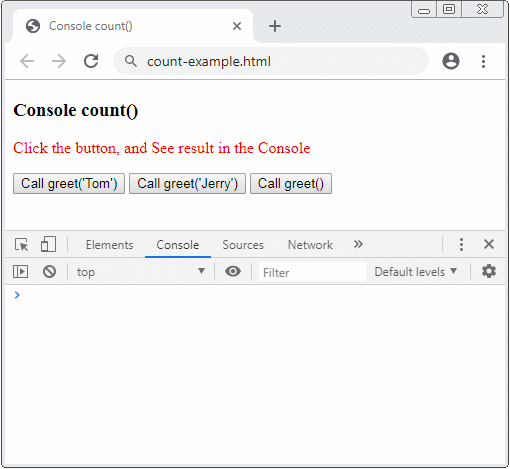
count-example.html
<!DOCTYPE html>
<html>
<head>
    <title>Console count()</title>
    <meta charset="UTF-8">
    <script>
        function greet(userName)  {
          console.count(userName);
          if(userName != null)  {
              return "Hi " + userName;
          }
          return "Hi!";
        }
    </script>
</head>
<body>
    <h3>Console count()</h3>
    <p style="color:red;">
       Click the button, and See result in the Console
     </p>
    <button onclick="greet('Tom')">Call greet('Tom')</button>
    <button onclick="greet('Jerry')">Call greet('Jerry')</button>
    <button onclick="greet()">Call greet()</button>
</body>
</html>
console.countReset([label])
Phương thức console.countReset([label]) thiết lập lại bộ đến (counter) của console.count([label]) về 0.
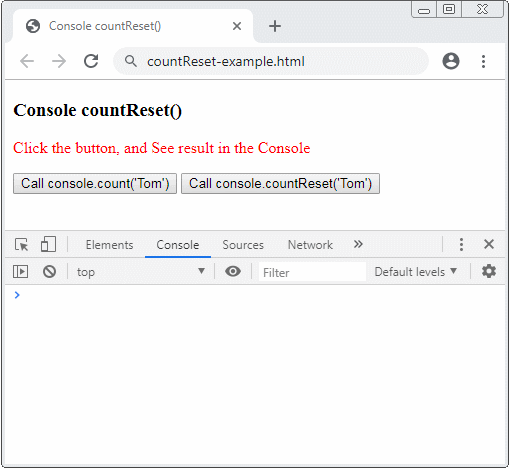
countReset-example.html
<!DOCTYPE html>
<html>
<head>
    <title>Console countReset()</title>
    <meta charset="UTF-8">
</head>
<body>
    <h3>Console countReset()</h3>
    <p style="color:red;">
       Click the button, and See result in the Console
     </p>
    <button onclick="console.count('Tom')">Call console.count('Tom')</button>
    <button onclick="console.countReset('Tom')">Call console.countReset('Tom')</button>
</body>
</html>
Các hướng dẫn ECMAScript, Javascript
- Giới thiệu về Javascript và ECMAScript
- Bắt đầu nhanh với Javascript
- Hộp thoại Alert, Confirm, Prompt trong Javascript
- Bắt đầu nhanh với JavaScript
- Biến (Variable) trong JavaScript
- Các toán tử Bitwise
- Mảng (Array) trong JavaScript
- Vòng lặp trong JavaScript
- Hàm trong JavaScript
- Hướng dẫn và ví dụ JavaScript Number
- Hướng dẫn và ví dụ JavaScript Boolean
- Hướng dẫn và ví dụ JavaScript String
- Câu lệnh rẽ nhánh if/else trong JavaScript
- Câu lệnh rẽ nhánh switch trong JavaScript
- Hướng dẫn xử lý lỗi trong JavaScript
- Hướng dẫn và ví dụ JavaScript Date
- Hướng dẫn và ví dụ JavaScript Module
- Lịch sử phát triển của module trong JavaScript
- Hàm setTimeout và setInterval trong JavaScript
- Hướng dẫn và ví dụ Javascript Form Validation
- Hướng dẫn và ví dụ JavaScript Web Cookie
- Từ khóa void trong JavaScript
- Lớp và đối tượng trong JavaScript
- Kỹ thuật mô phỏng lớp và kế thừa trong JavaScript
- Thừa kế và đa hình trong JavaScript
- Tìm hiểu về Duck Typing trong JavaScript
- Hướng dẫn và ví dụ JavaScript Symbol
- Hướng dẫn JavaScript Set Collection
- Hướng dẫn JavaScript Map Collection
- Tìm hiểu về JavaScript Iterable và Iterator
- Hướng dẫn sử dụng biểu thức chính quy trong JavaScript
- Hướng dẫn và ví dụ JavaScript Promise, Async Await
- Hướng dẫn và ví dụ Javascript Window
- Hướng dẫn và ví dụ Javascript Console
- Hướng dẫn và ví dụ Javascript Screen
- Hướng dẫn và ví dụ Javascript Navigator
- Hướng dẫn và ví dụ Javascript Geolocation API
- Hướng dẫn và ví dụ Javascript Location
- Hướng dẫn và ví dụ Javascript History API
- Hướng dẫn và ví dụ Javascript Statusbar
- Hướng dẫn và ví dụ Javascript Locationbar
- Hướng dẫn và ví dụ Javascript Scrollbars
- Hướng dẫn và ví dụ Javascript Menubar
- Hướng dẫn xử lý JSON trong JavaScript
- Xử lý sự kiện (Event) trong Javascript
- Hướng dẫn và ví dụ Javascript MouseEvent
- Hướng dẫn và ví dụ Javascript WheelEvent
- Hướng dẫn và ví dụ Javascript KeyboardEvent
- Hướng dẫn và ví dụ Javascript FocusEvent
- Hướng dẫn và ví dụ Javascript InputEvent
- Hướng dẫn và ví dụ Javascript ChangeEvent
- Hướng dẫn và ví dụ Javascript DragEvent
- Hướng dẫn và ví dụ Javascript HashChangeEvent
- Hướng dẫn và ví dụ Javascript URL Encoding
- Hướng dẫn và ví dụ Javascript FileReader
- Hướng dẫn và ví dụ Javascript XMLHttpRequest
- Hướng dẫn và ví dụ Javascript Fetch API
- Phân tích XML trong Javascript với DOMParser
- Giới thiệu về Javascript HTML5 Canvas API
- Làm nổi bật Code với thư viện Javascript SyntaxHighlighter
- Polyfill là gì trong khoa học lập trình?
Show More
