Hướng dẫn sử dụng Service trong Android
1. Các loại dịch vụ trong Android
Dịch vụ là gì?
Một dịch vụ (Service) là một thành phần chạy ngầm trên hệ điều hành để thực hiện các hoạt động dài hạn mà không cần phải tương tác với người sử dụng và nó hoạt động ngay cả khi ứng dụng bị phá hủy. Một dịch vụ cơ bản có thể có hai loại.
Trạng thái | Mô tả |
Started
(Được khởi động) | Một dịch vụ được gọi là started (được khởi động) khi một thành phần ứng dụng, chẳng hạn như Activity khởi động nó bằng cách gọi startService(). Một khi được gọi, dịch vụ này có thể chạy ở chế độ nền vô thời hạn, thậm chí cả khi thành phần đã khởi động nó bị phá hủy.
Dịch vụ này còn được gọi là dịch vụ không bị giàng buộc (Un Bounded Service). |
Bound
(Giàng buộc) | Một dịch vụ được giàng buộc (bound) khi một thành phần ứng dụng giàng buộc nó bằng cách gọi bindService().
Một dịch vụ ràng buộc cung cấp một giao diện client-server cho phép các thành phần tương tác với dịch vụ, gửi các yêu cầu, nhận kết quả, và thậm chí làm như vậy xuyên qua nhiều tiến trình với Interprocess communication (IPC) (Truyền thông nhiều tiến trình). |
Trong khoa học máy tính, inter-process communication (IPC) là hoạt động chia sẻ dữ liệu qua nhiều tiến trình chuyên dụng thông thường sử dụng giao thức truyền thông. Cụ thể ứng dụng sử dụng IPC được phân ra như clients và servers, khi các clients yêu cầu dữ liệu, và server đáp ứng yêu cầu của client.
Một dịch vụ có phương thức gọi lại chu kỳ vòng đời của nó (life cycle callback methods) mà bạn có thực hiện (implement) để theo dõi những thay đổi trong trạng thái của dịch vụ và bạn có thể thực hiện công việc ở giai đoạn thích hợp. Sơ đồ dưới đây về bên trái cho thấy vòng đời khi dịch vụ được tạo ra với startService(), sơ đồ bên phải cho thấy vòng đời của dịch vụ được tạo ra bởi bindService().
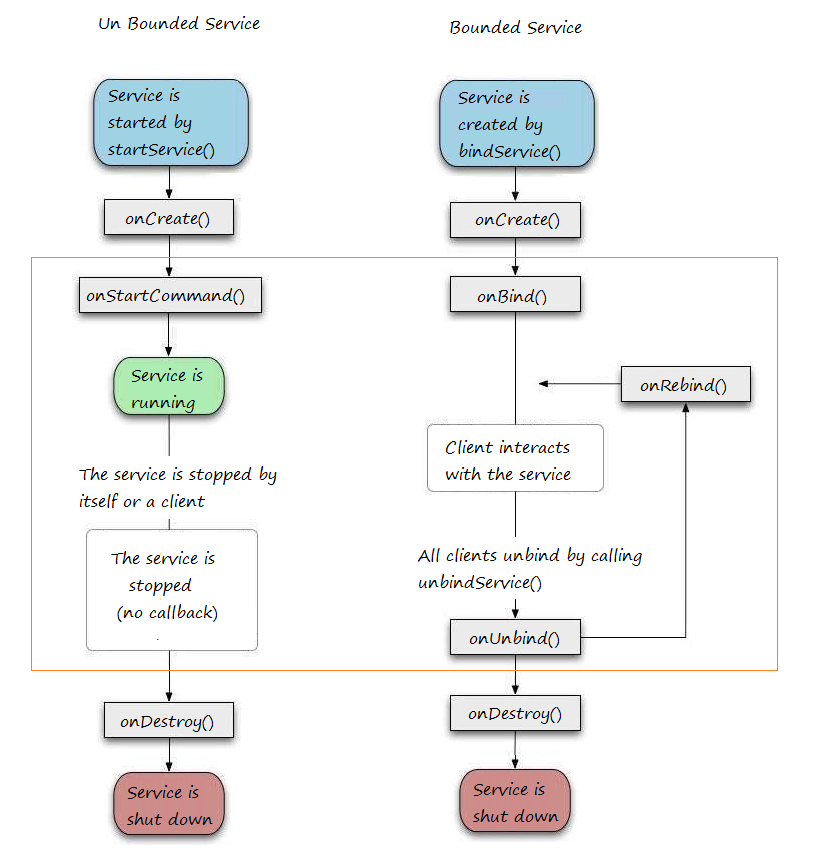
Để tạo ra một dịch vụ, bạn tạo một lớp Java mở rộng lớp Service hoặc một trong các lớp con của nó. Lớp Service định nghĩa các phương thức callback khác nhau và quan trọng nhất được đưa ra dưới đây. Bạn không cần phải thực hiện (implements) tất cả các phương thức callbacks. Tuy nhiên, điều quan trọng là bạn hiểu mỗi phương thức thực hiện những điều gì, đảm bảo ứng dụng của bạn cư xử theo cách người dùng mong đợi.
Ngoài 2 loại dịch vụ trên, có một dịch vụ khác gọi là IntentService. Intent Service được sử dụng để thực hiện các nhiệm vụ một lần duy nhất, nghĩa là khi nhiệm vụ hoàn thành dịch vụ tự hủy.
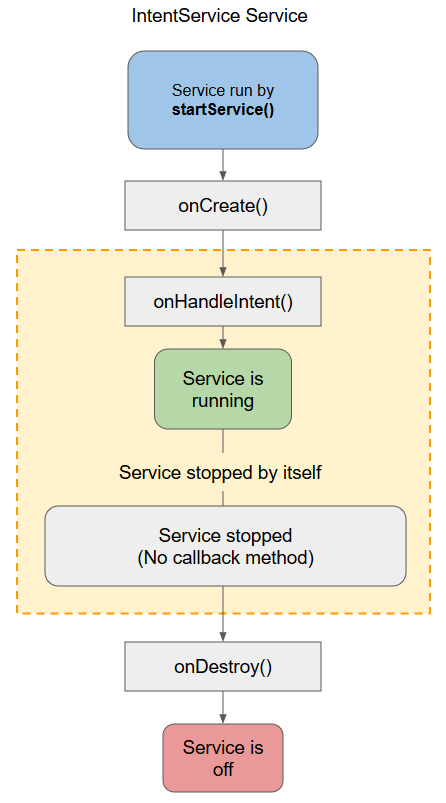
So sánh các loại dịch vụ:
Unbound Service
(Không giàng buộc) | Bound Service
(Giàng buộc) | Intent
Service |
Unbounded Service được sử dụng để thực hiện nhiệm vụ lâu dài và lặp đi lặp lại. | Bounded Service được sử dụng để thực hiện nhiệm vụ ở nền (background) và giàng buộc với thành phần giao diện. | Intent Service được sử dụng để thực hiện các nhiệm vụ một lần duy nhất, nghĩa là khi nhiệm vụ hoàn thành dịch vụ tự hủy. |
Unbound Service được khởi động bởi gọi startService(). | Bounded Service được khởi động bởi gọi bindService(). | Intent Service được khởi động bởi gọi startService(). |
Unbound Service bị dừng lại hoặc bị hủy bởi gọi một cách tường minh phương thức stopService(). | Bounded Service bị gỡ giàng buộc hoặc bị hủy bởi gọi unbindService(). | IntentService gọi một cách không tường minh phương thức stopself() để hủy |
Unbound Service độc lập với thành phần đã khởi động nó. | Bound Service phụ thuộc vào thành phần giao diện đã khởi động nó. | Intent Service độc lập với thành phần đã khởi động nó. |
Các phương thức callback và mô tả:
Callback | Description |
onStartCommand() | Hệ thống gọi phương thức này khi một thành phần khác, chẳng hạn như một Activity, yêu cầu khởi động dịch vụ, bằng cách gọi startService(). Nếu bạn thực thi phương pháp này, trách nhiệm của bạn là ngừng dịch vụ khi nó hoàn thành công việc, bằng cách gọi phương thức stopSelf() hoặc stopService(). |
onBind() | Hệ thống gọi phương thức này khi thành phần khác muốn liên kết với các dịch vụ bằng cách gọi bindService(). Nếu bạn thi hành phương pháp này, bạn phải cung cấp một giao diện (Giao diện ứng dụng) mà khách hàng sử dụng để giao tiếp với các dịch vụ, bằng cách trả lại một đối tượng IBinder. Bạn phải luôn luôn thi hành phương thức này, nhưng nếu bạn không muốn cho phép ràng buộc, bạn có thể trả về null. |
onUnbind() | Hệ thống gọi phương thức này khi tất cả các clients đã bị ngắt kết nối từ một giao diện cụ thể được công bố bởi các dịch vụ. |
onRebind() | Hệ thống gọi phương thức này khi khách hàng mới đã kết nối với dịch vụ, sau khi trước đó đã được thông báo rằng tất cả đã bị ngắt kết nối trong onUnbind(Intent). |
onCreate() | Hệ thống gọi phương thức này khi dịch vụ được tạo ra sử dụng đầu tiên onStartCommand() hoặc onBind(). Gọi một lần tại thời điểm thiết lập. |
onDestroy() | Hệ thống gọi phương thức này khi dịch vụ không còn được sử dụng và đang bị hủy (destroy). Dịch vụ của bạn nên thi hành điều này để dọn dẹp các dữ liệu rác... |
2. Dịch vụ không bị giàng buộc (Un bounded Service)
Unbound Service (hoặc còn gọi là Started Service): Trong trường hợp này, một thành phần ứng dụng khởi động dịch vụ bằng cách gọi startService(), và dịch vụ sẽ tiếp tục chạy trong nền (background), ngay cả khi các thành phần khởi tạo nó bị phá hủy. Ví dụ, khi được bắt đầu, một dịch vụ sẽ tiếp tục chơi nhạc trong nền vô thời hạn.
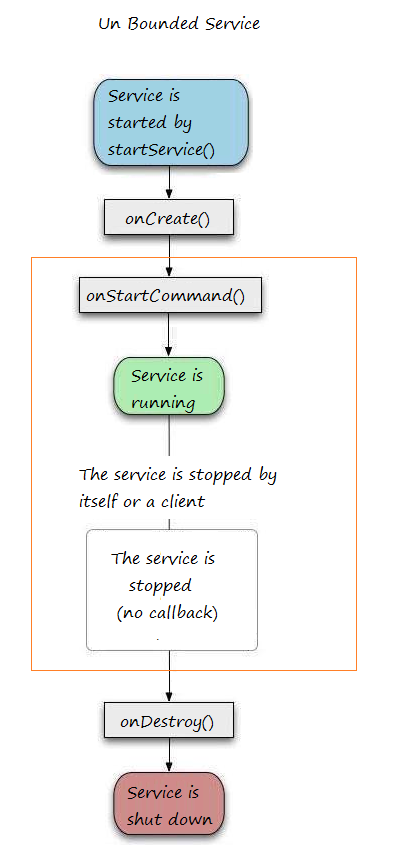
Phương thức onStartCommand() trả về kiểu integer, và là một trong các giá trị sau:
- START_STICKY
- START_NOT_STICKY
- TART_REDELIVER_INTENT
START_STICKY & START_NOT_STICKYCả hai giá trị này chỉ thích hợp khi điện thoại hết bộ nhớ và giết các dịch vụ trước khi nó kết thúc thực hiện.START_STICKY nói với các hệ điều hành để tạo lại các dịch vụ sau khi đã có đủ bộ nhớ và gọi onStartCommand() một lần nữa với một Intent null.START_NOT_STICKY nói với các hệ điều hành để không bận tâm tái tạo các dịch vụ một lần nữa.Ngoài ra còn có một START_REDELIVER_INTENT giá trị thứ ba mà nói với các hệ điều hành để tạo lại các dịch vụ và truyền một Intent tương tự cho onStartCommand().
Ví dụ dịch vụ chơi nhạc (Chạy ngầm)
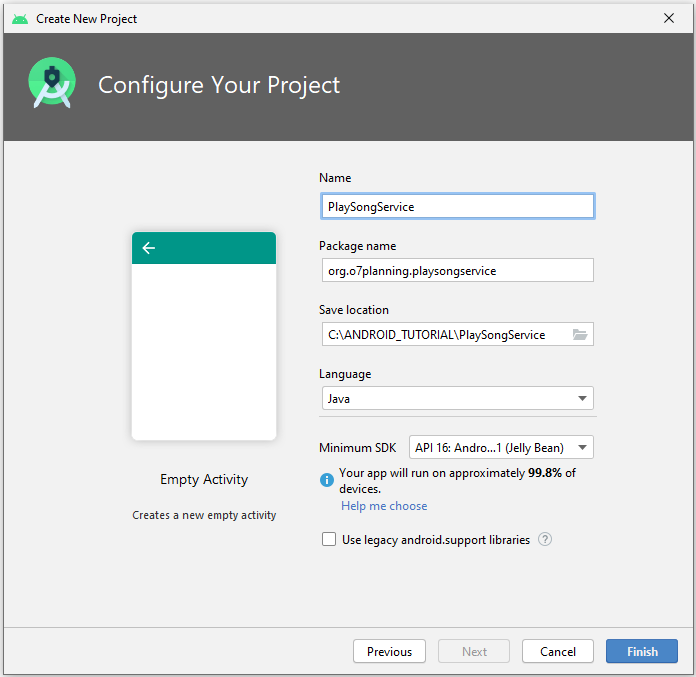
Tạo mới một "Empty Activity" project với tên PlaySongService
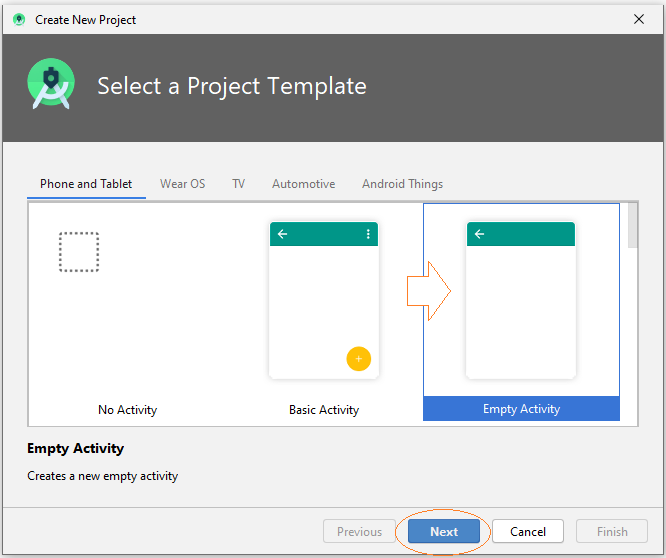
- Name: PlaySongService
- Package name: org.o7planning.playsongservice
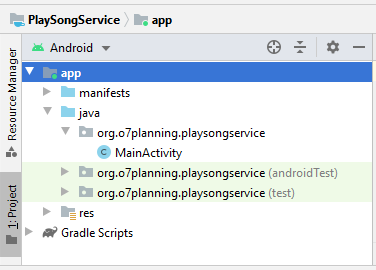
Project đã được tạo ra.
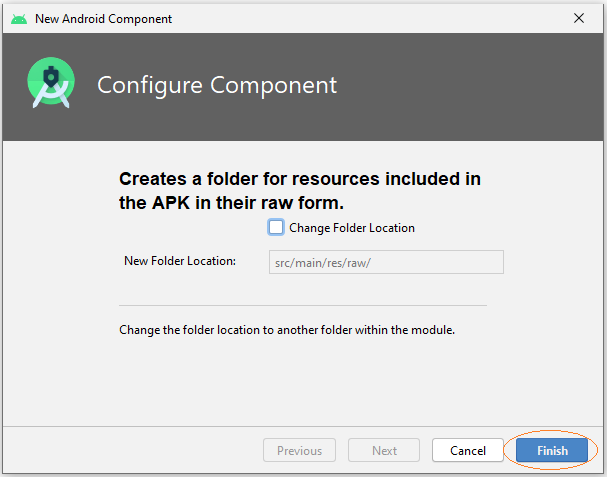
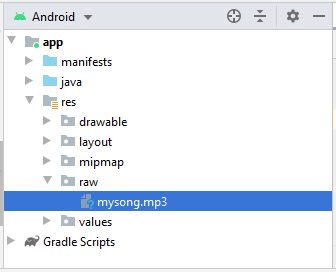
Chuẩn bị file nhạc mp3:
Nhấn phải chuột vào thư mục res chọn:
- New > Folder > Raw Resources Folder
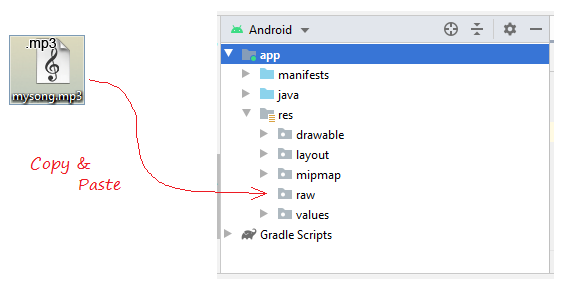
Copy và Paste một file nhạc mp3 vào thư mục 'raw' bạn vừa tạo ra.
Thiết kế giao diện của ứng dụng:
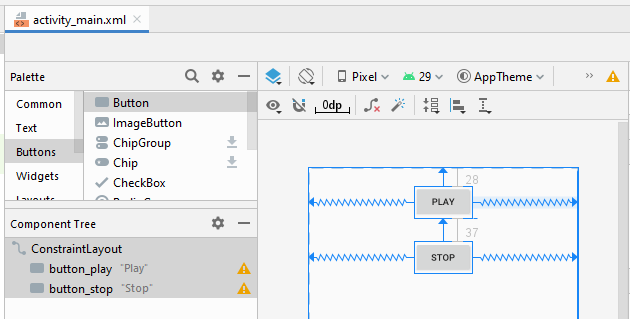
activity_main.xml
<?xml version="1.0" encoding="utf-8"?>
<androidx.constraintlayout.widget.ConstraintLayout
    xmlns:android="http://schemas.android.com/apk/res/android"
    xmlns:app="http://schemas.android.com/apk/res-auto"
    xmlns:tools="http://schemas.android.com/tools"
    android:layout_width="match_parent"
    android:layout_height="match_parent"
    tools:context=".MainActivity">

    <Button
        android:id="@+id/button_play"
        android:layout_width="wrap_content"
        android:layout_height="wrap_content"
        android:layout_marginTop="28dp"
        android:text="Play"
        app:layout_constraintEnd_toEndOf="parent"
        app:layout_constraintStart_toStartOf="parent"
        app:layout_constraintTop_toTopOf="parent" />

    <Button
        android:id="@+id/button_stop"
        android:layout_width="wrap_content"
        android:layout_height="wrap_content"
        android:layout_marginTop="37dp"
        android:text="Stop"
        app:layout_constraintEnd_toEndOf="parent"
        app:layout_constraintStart_toStartOf="parent"
        app:layout_constraintTop_toBottomOf="@+id/button_play" />
</androidx.constraintlayout.widget.ConstraintLayout>
Tạo lớp Service
Nhấn phải chuột vào một java package, chọn:
- New > Service > Service
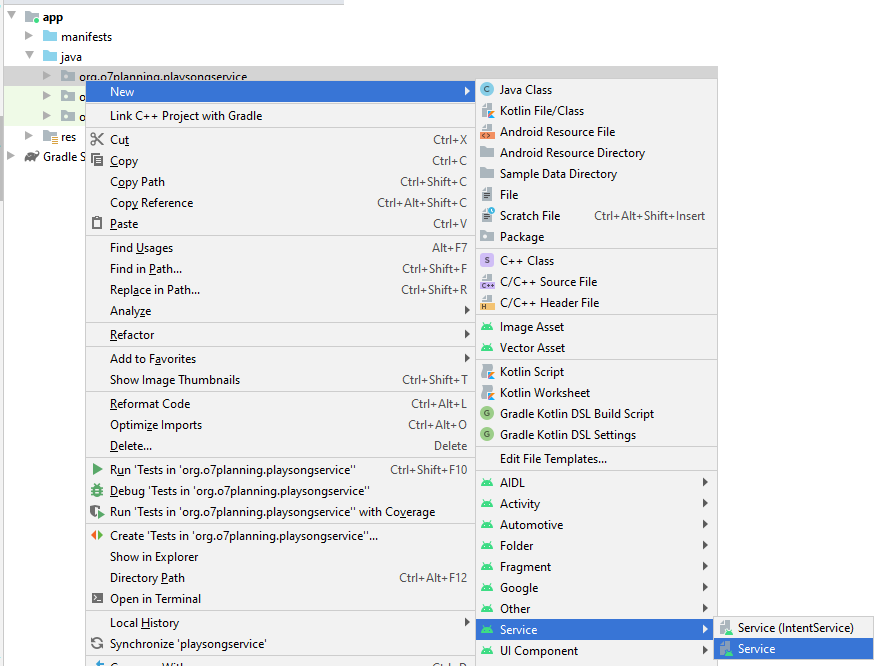
Nhập vào tên lớp:
- PlaySongService
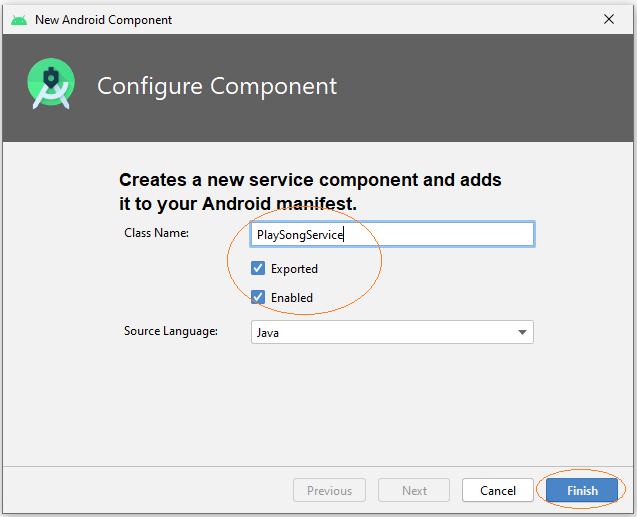
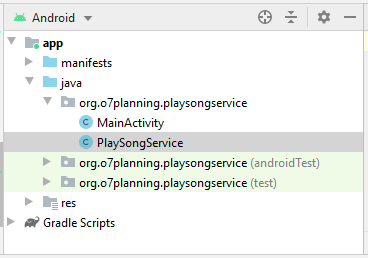
Bạn có thể nhìn thấy PlaySongService đã được khai báo với AndroidManifest.xml:
** AndroidManifest.xml **
<?xml version="1.0" encoding="utf-8"?>
<manifest xmlns:android="http://schemas.android.com/apk/res/android"
    package="org.o7planning.playsongservice">

    <application ...>

        <service
            android:name=".PlaySongService"
            android:enabled="true"
            android:exported="true"></service>

            ....

    </application>

</manifest>
PlaySongService.java
package org.o7planning.playsongservice;

import android.app.Service;
import android.content.Intent;
import android.os.IBinder;
import android.media.MediaPlayer;

public class PlaySongService extends Service {

    private MediaPlayer mediaPlayer;

    public PlaySongService() {
    }

    // Return the communication channel to the service.
    @Override
    public IBinder onBind(Intent intent){
        // This service is unbounded
        // So this method is never called.
        return null;
    }


    @Override
    public void onCreate(){
        super.onCreate();
        // Create MediaPlayer object, to play your song.
        mediaPlayer = MediaPlayer.create(getApplicationContext(), R.raw.mysong);
    }

    @Override
    public int onStartCommand(Intent intent, int flags, int startId){
        // Play song.
        mediaPlayer.start();

        return START_STICKY;
    }

    // Destroy
    @Override
    public void onDestroy() {
        // Release the resources
        mediaPlayer.release();
        super.onDestroy();
    }
}
MainActivity.java
package org.o7planning.playsongservice;

import androidx.appcompat.app.AppCompatActivity;

import android.os.Bundle;
import android.content.Intent;
import android.view.View;
import android.widget.Button;

public class MainActivity extends AppCompatActivity {

    private Button buttonPlay;
    private Button buttonStop;

    @Override
    protected void onCreate(Bundle savedInstanceState) {
        super.onCreate(savedInstanceState);
        setContentView(R.layout.activity_main);

        this.buttonPlay = (Button) this.findViewById(R.id.button_play);
        this.buttonStop = (Button) this.findViewById(R.id.button_stop);

        this.buttonPlay.setOnClickListener(new View.OnClickListener() {
            @Override
            public void onClick(View v) {
                playSong();
            }
        });

        this.buttonStop.setOnClickListener(new View.OnClickListener() {
            @Override
            public void onClick(View v) {
                stopSong();
            }
        });
    }

    // This method is called when users click on the Play button.
    public void playSong()  {
        // Create Intent object for PlaySongService.
        Intent myIntent = new Intent(MainActivity.this, PlaySongService.class);

        // Call startService with Intent parameter.
        this.startService(myIntent);
    }

    // This method is called when users click on the Stop button.
    public void stopSong( )  {

        // Create Intent object
        Intent myIntent = new Intent(MainActivity.this, PlaySongService.class);
        this.stopService(myIntent);
    }

}
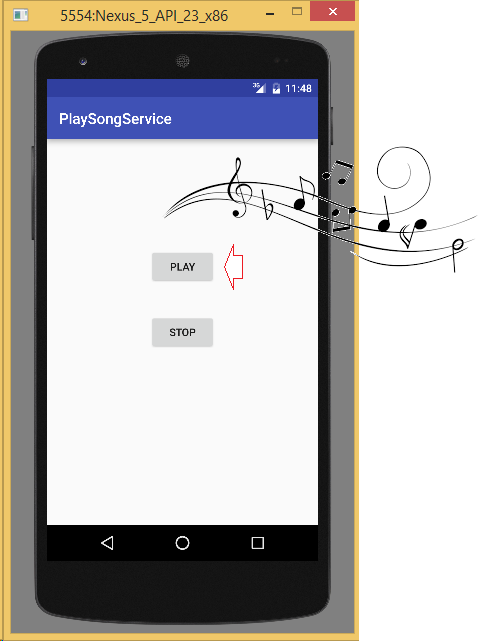
OK bây giờ bạn có thể chạy ứng dụng của mình và thưởng thức bài hát.
3. Dịch vụ bị giàng buộc (Bouned Service)
Ở đây tôi mô phỏng một dịch vụ cung cấp thông tin thời tiết cho ngày hiện tại, với đầu vào là vị trí địa lý (Hanoi, Chicago, ...), kết quả trả về là mưa, nắng,...
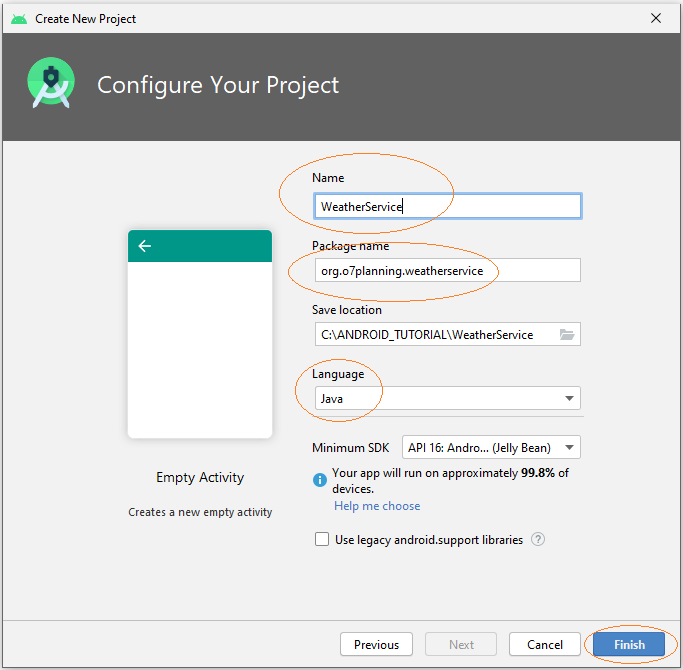
Tạo một project có tên WeatherService.
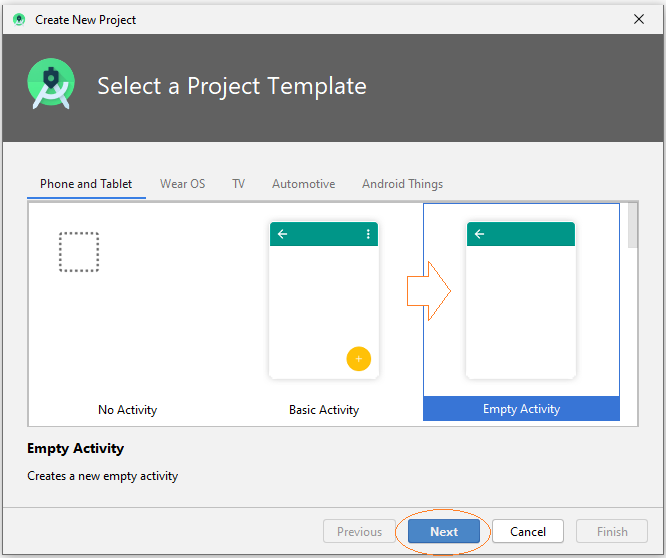
- Name: WeatherService
- Package name: org.o7planning.weatherservice
Thiết kế giao diện cho ứng dụng:
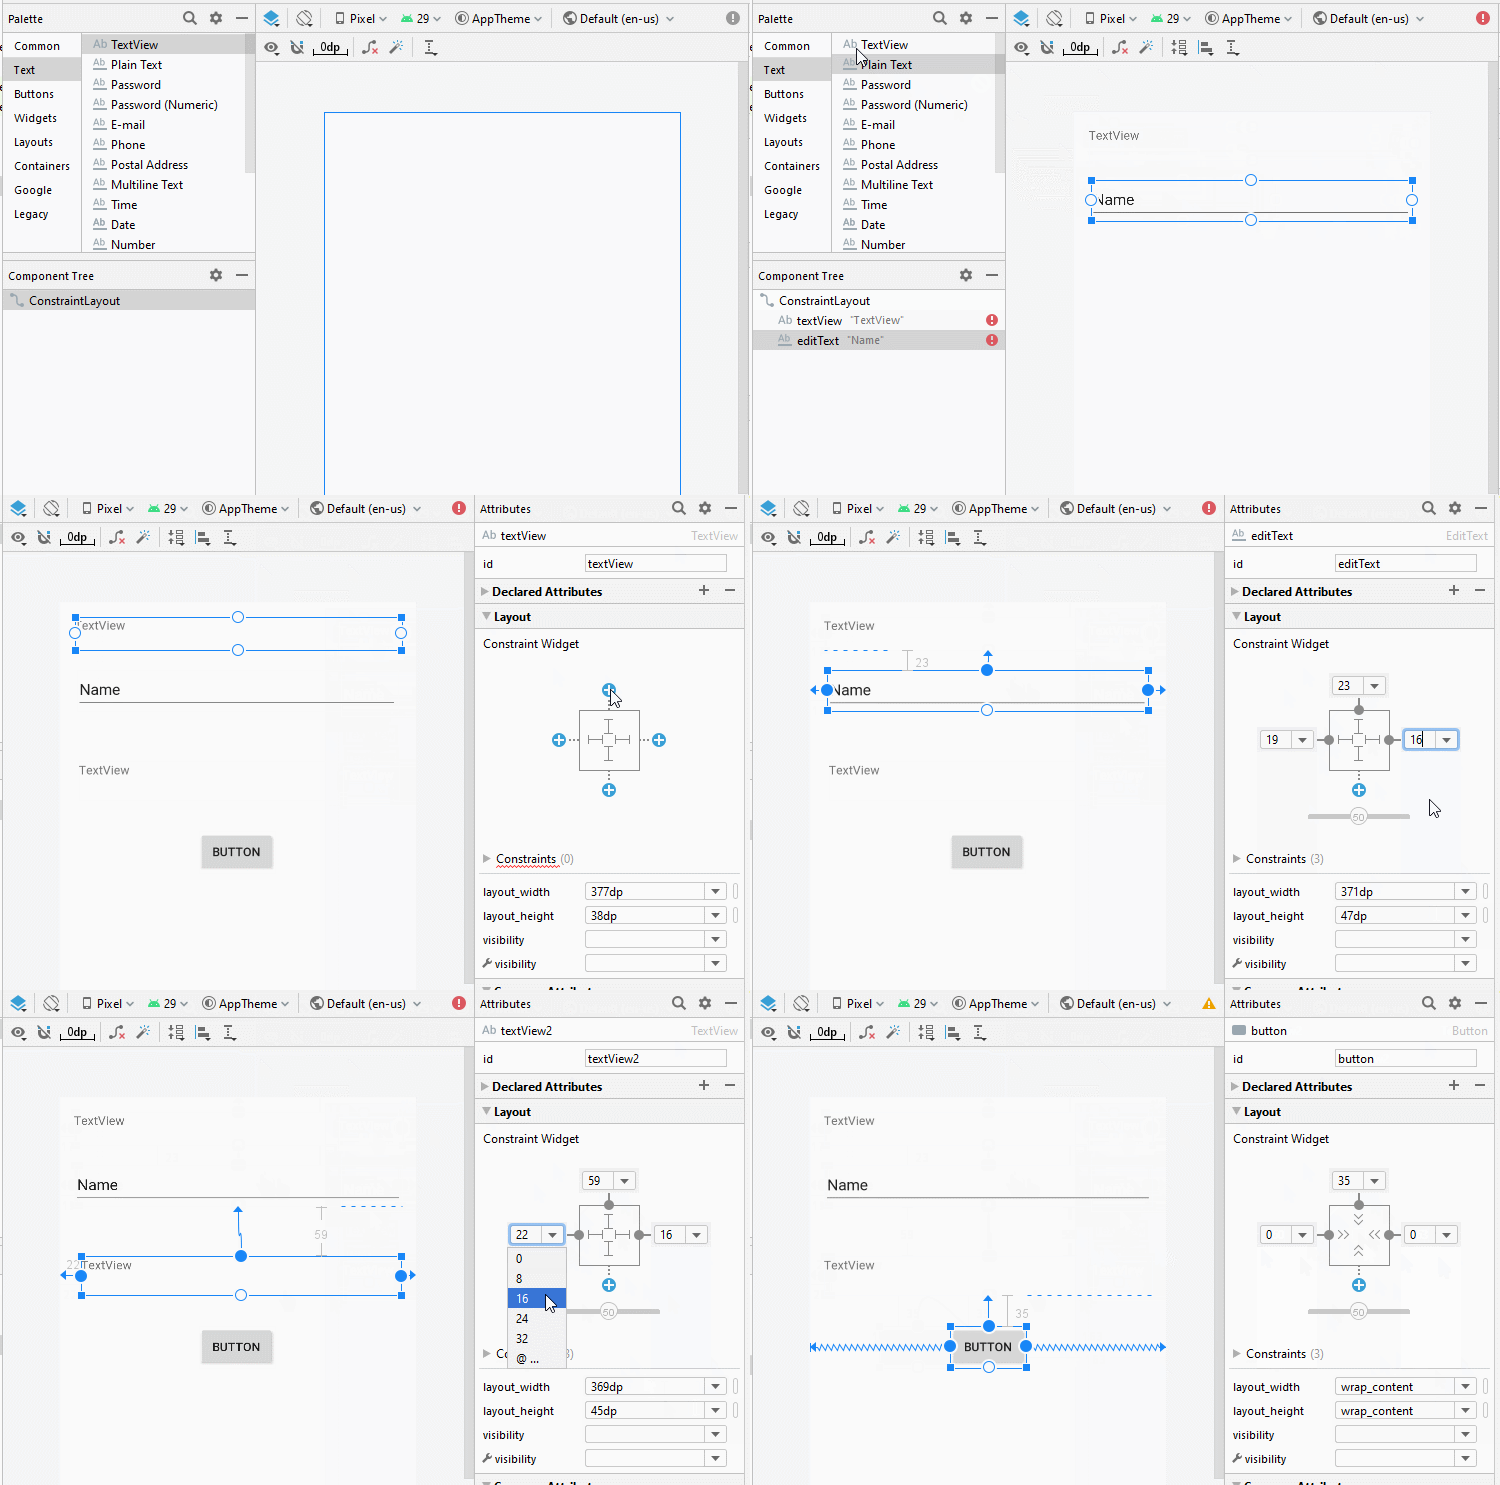
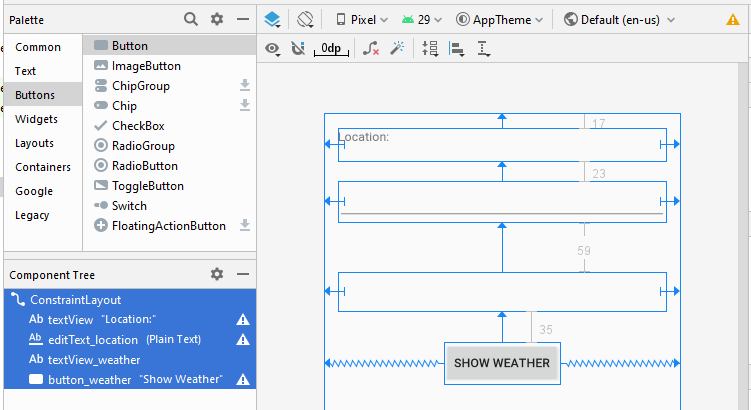
activity_main.xml
<?xml version="1.0" encoding="utf-8"?>
<androidx.constraintlayout.widget.ConstraintLayout
    xmlns:android="http://schemas.android.com/apk/res/android"
    xmlns:app="http://schemas.android.com/apk/res-auto"
    xmlns:tools="http://schemas.android.com/tools"
    android:layout_width="match_parent"
    android:layout_height="match_parent"
    tools:context=".MainActivity">

    <TextView
        android:id="@+id/textView"
        android:layout_width="0dp"
        android:layout_height="38dp"
        android:layout_marginStart="16dp"
        android:layout_marginLeft="16dp"
        android:layout_marginTop="17dp"
        android:layout_marginEnd="16dp"
        android:layout_marginRight="16dp"
        android:text="Location:"
        app:layout_constraintEnd_toEndOf="parent"
        app:layout_constraintStart_toStartOf="parent"
        app:layout_constraintTop_toTopOf="parent" />

    <EditText
        android:id="@+id/editText_location"
        android:layout_width="0dp"
        android:layout_height="47dp"
        android:layout_marginStart="16dp"
        android:layout_marginLeft="16dp"
        android:layout_marginTop="23dp"
        android:layout_marginEnd="16dp"
        android:layout_marginRight="16dp"
        android:ems="10"
        android:inputType="textPersonName"
        app:layout_constraintEnd_toEndOf="parent"
        app:layout_constraintStart_toStartOf="parent"
        app:layout_constraintTop_toBottomOf="@+id/textView" />

    <TextView
        android:id="@+id/textView_weather"
        android:layout_width="0dp"
        android:layout_height="45dp"
        android:layout_marginStart="16dp"
        android:layout_marginLeft="16dp"
        android:layout_marginTop="59dp"
        android:layout_marginEnd="16dp"
        android:layout_marginRight="16dp"
        app:layout_constraintEnd_toEndOf="parent"
        app:layout_constraintStart_toStartOf="parent"
        app:layout_constraintTop_toBottomOf="@+id/editText_location" />

    <Button
        android:id="@+id/button_weather"
        android:layout_width="wrap_content"
        android:layout_height="wrap_content"
        android:layout_marginTop="35dp"
        android:text="Show Weather"
        app:layout_constraintEnd_toEndOf="parent"
        app:layout_constraintStart_toStartOf="parent"
        app:layout_constraintTop_toBottomOf="@+id/textView_weather" />
</androidx.constraintlayout.widget.ConstraintLayout>
Tạo Service:
Nhấn phải chuột vào một java package chọn:
- New > Service > Service
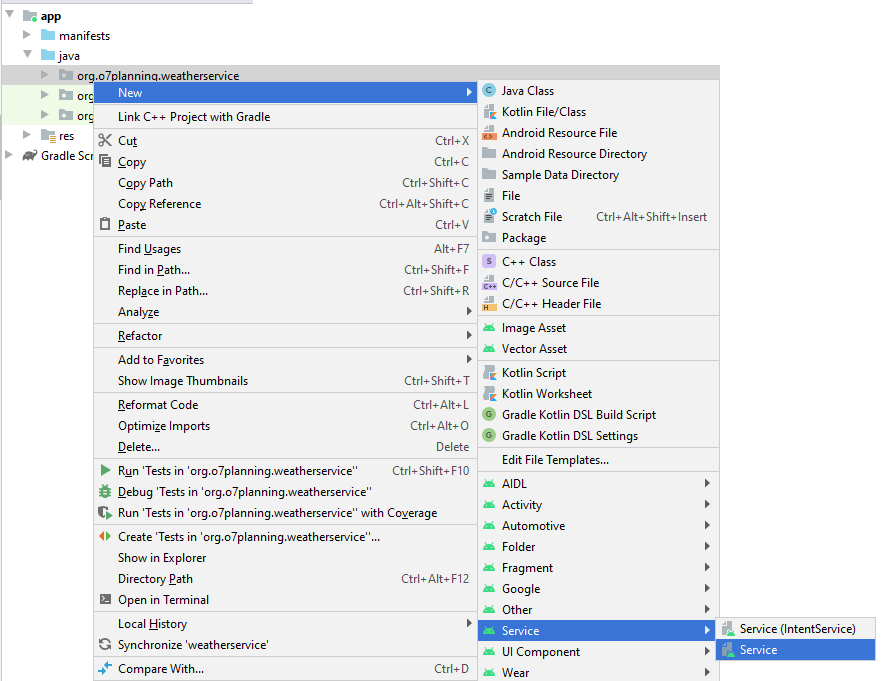
Nhập vào:
- Class name: WeatherService
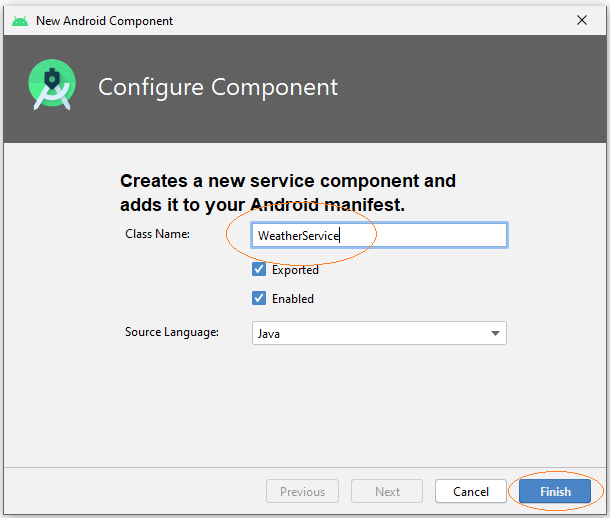
Lớp WeatherService đã được tạo ra, đây là class mở rộng từ class android.app.Service.
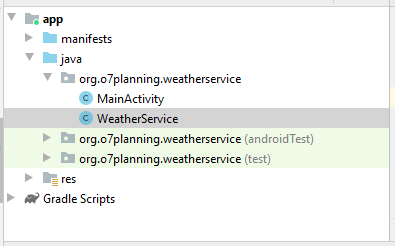
Bạn có thể nhìn thấy WeatherService đã được khai báo với AndroidManifest.xml:
** AndroidManifest.xml **
<?xml version="1.0" encoding="utf-8"?>
<manifest xmlns:android="http://schemas.android.com/apk/res/android"
    package="org.o7planning.weatherservice">

    <application ...>
        <service
            android:name=".WeatherService"
            android:enabled="true"
            android:exported="true"></service>

        ...

    </application>

</manifest>
WeatherService.java
package org.o7planning.weatherservice;

import android.app.Service;
import android.content.Intent;
import android.os.IBinder;
import android.os.Binder;
import android.util.Log;
import java.text.DateFormat;
import java.text.SimpleDateFormat;
import java.util.Date;
import java.util.HashMap;
import java.util.Map;
import java.util.Random;


public class WeatherService extends Service {

    private static String LOG_TAG = "WeatherService";

    // Store the weather data.
    private static final Map<String, String> weatherData = new HashMap<String,String>();

    private final IBinder binder = new LocalWeatherBinder();

    public class LocalWeatherBinder extends Binder {

        public WeatherService getService()  {
            return WeatherService.this;
        }
    }

    public WeatherService() {
    }

    @Override
    public IBinder onBind(Intent intent) {
        Log.i(LOG_TAG,"onBind");
        return this.binder;
    }

    @Override
    public void onRebind(Intent intent) {
        Log.i(LOG_TAG, "onRebind");
        super.onRebind(intent);
    }

    @Override
    public boolean onUnbind(Intent intent) {
        Log.i(LOG_TAG, "onUnbind");
        return true;
    }

    @Override
    public void onDestroy() {
        super.onDestroy();
        Log.i(LOG_TAG, "onDestroy");
    }

    // Returns the weather information corresponding to the location of the current date.
    public String getWeatherToday(String location) {
        Date now= new Date();
        DateFormat df= new SimpleDateFormat("dd-MM-yyyy");

        String dayString = df.format(now);
        String keyLocAndDay = location + "$"+ dayString;

        String weather=  weatherData.get(keyLocAndDay);
        //
        if(weather != null)  {
            return weather;
        }

        //
        String[] weathers = new String[]{"Rainy", "Hot", "Cool", "Warm" ,"Snowy"};

        // Random value from 0 to 4
        int i= new Random().nextInt(5);

        weather =weathers[i];
        weatherData.put(keyLocAndDay, weather);
        //
        return weather;
    }

}
MainActivity.java
package org.o7planning.weatherservice;

import androidx.appcompat.app.AppCompatActivity;

import android.os.Bundle;
import android.content.ComponentName;
import android.content.Context;
import android.content.Intent;
import android.content.ServiceConnection;
import android.os.IBinder;
import android.view.View;
import android.widget.Button;
import android.widget.EditText;
import android.widget.TextView;

public class MainActivity extends AppCompatActivity {

    private boolean binded = false;
    private WeatherService weatherService;

    private TextView textViewWeather;
    private EditText editTextLocation;
    private Button buttonWeather;

    ServiceConnection weatherServiceConnection = new ServiceConnection() {

        @Override
        public void onServiceConnected(ComponentName name, IBinder service) {
            WeatherService.LocalWeatherBinder binder = (WeatherService.LocalWeatherBinder) service;
            weatherService = binder.getService();
            binded = true;
        }

        @Override
        public void onServiceDisconnected(ComponentName name) {
            binded = false;
        }
    };

    // When the Activity creating its interface.
    @Override
    protected void onCreate(Bundle savedInstanceState) {
        super.onCreate(savedInstanceState);
        setContentView(R.layout.activity_main);


        this.textViewWeather = (TextView) this.findViewById(R.id.textView_weather);
        this.editTextLocation = (EditText) this.findViewById(R.id.editText_location);
        this.buttonWeather = (Button) this.findViewById(R.id.button_weather);

        this.buttonWeather.setOnClickListener(new View.OnClickListener() {
            @Override
            public void onClick(View v) {
                 showWeather();
            }
        });
    }

    // When Activity starting.
    @Override
    protected void onStart() {
        super.onStart();

        // Create Intent object for WeatherService.
        Intent intent = new Intent(this, WeatherService.class);

        // Call bindService(..) method to bind service with UI.
        this.bindService(intent, weatherServiceConnection, Context.BIND_AUTO_CREATE);
    }

    // Activity stop
    @Override
    protected void onStop() {
        super.onStop();
        if (binded) {
            // Unbind Service
            this.unbindService(weatherServiceConnection);
            binded = false;
        }
    }

    // When user click on 'Show weather' button.
    public void showWeather()  {
        String location = this.editTextLocation.getText().toString();

        String weather= this.weatherService.getWeatherToday(location);

        this.textViewWeather.setText(weather);
    }

}
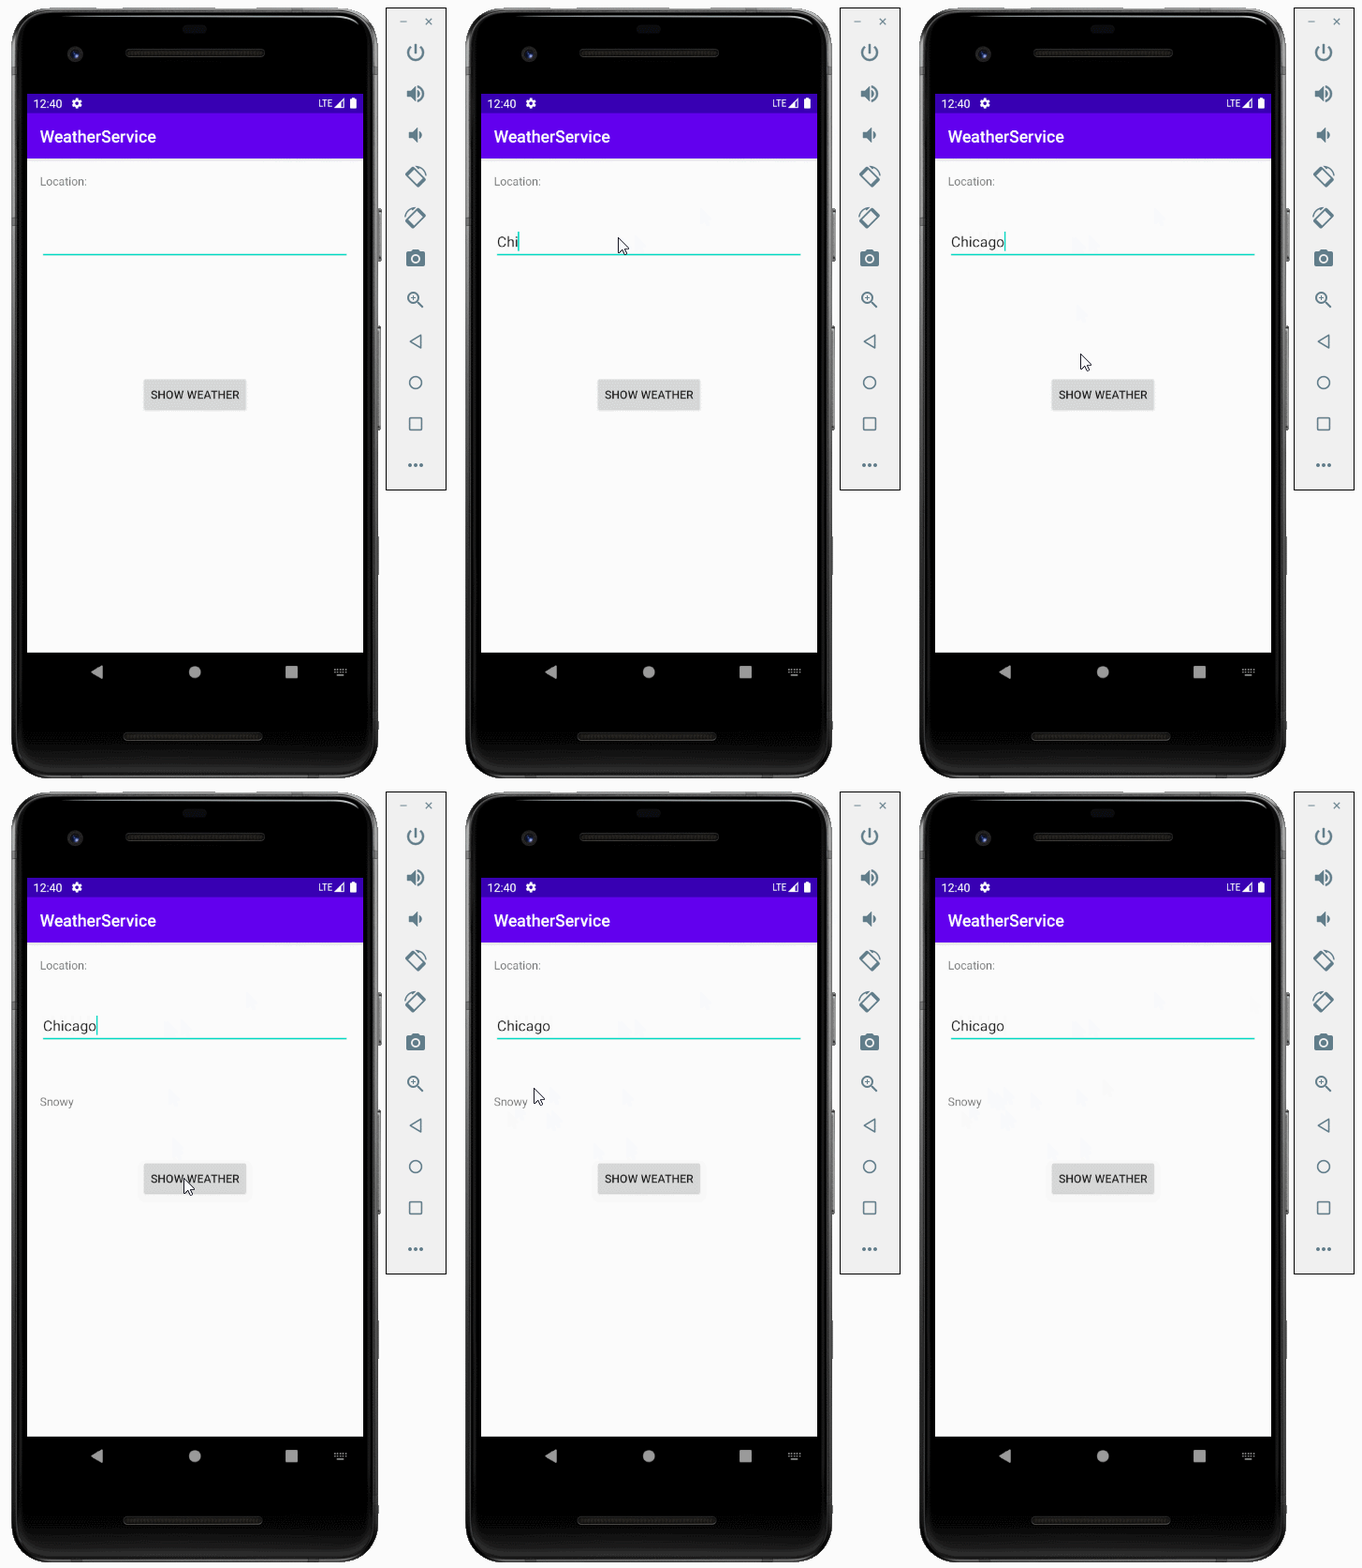
OK, giờ bạn có thể chạy ứng dụng.
4. Dịch vụ IntentService
Ví dụ IntentService:
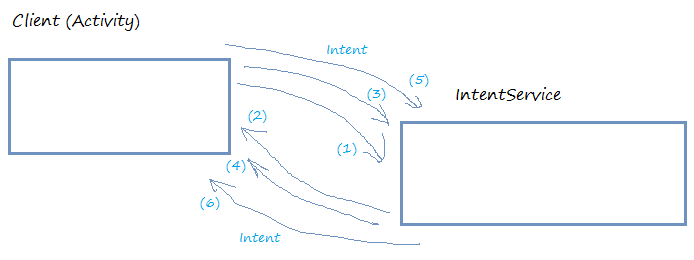
Hình ảnh dưới đây minh họa cách giao tiếp giữa Client (Activity) và IntentService, Client khởi động dịch vụ, nó gửi yêu cầu của nó thông qua một đối tượng Intent, dịch vụ chạy và làm các công việc của nó, đồng thời nó có thể gửi thông tin liên quan tới tình trạng công việc của nó, chẳng hạn làm được bao nhiêu phần trăm. Tại client có thể sử dụng ProgressBar để hiển thị phần trăm công việc đã làm được.
Các IntentService được thiết kế để tự động stop một cách tự nhiên khi công việc hoàn thành, và chỉ sử dụng một lần, vì vậy bạn nên sử dụng nó trong các tình huống như vậy. Phương thức <context>.stopService(intentService) sẽ không hoạt động với IntentService. Hơn nữa, rất khó để bạn sử dụng UI của ứng dụng để tương tác với IntentService.
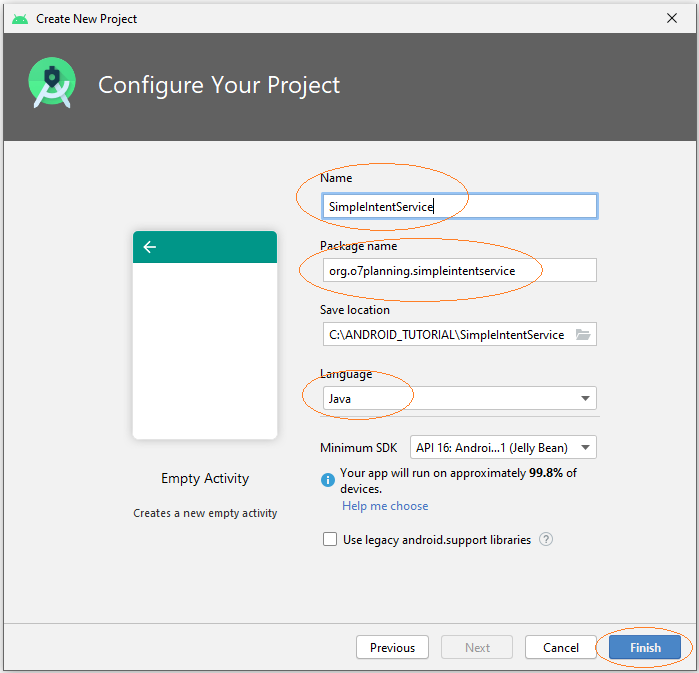
Tạo mới một project SimpleIntentService.
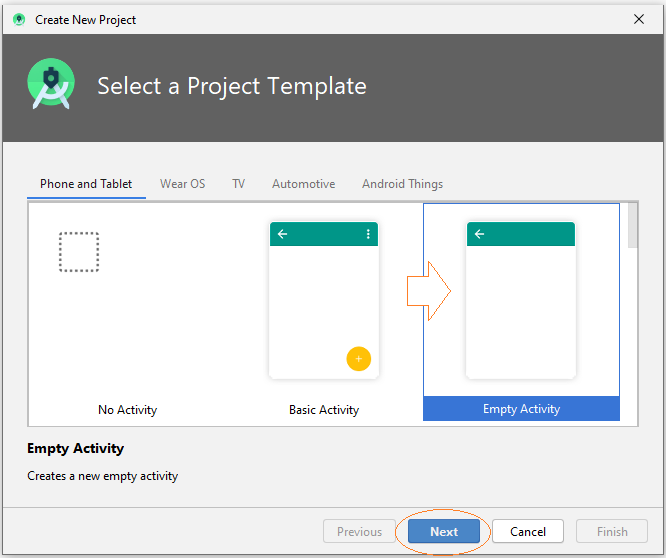
- Name: SimpleIntentService
- Package name: org.o7planning.simpleintentservice
Thiết kế giao diện:
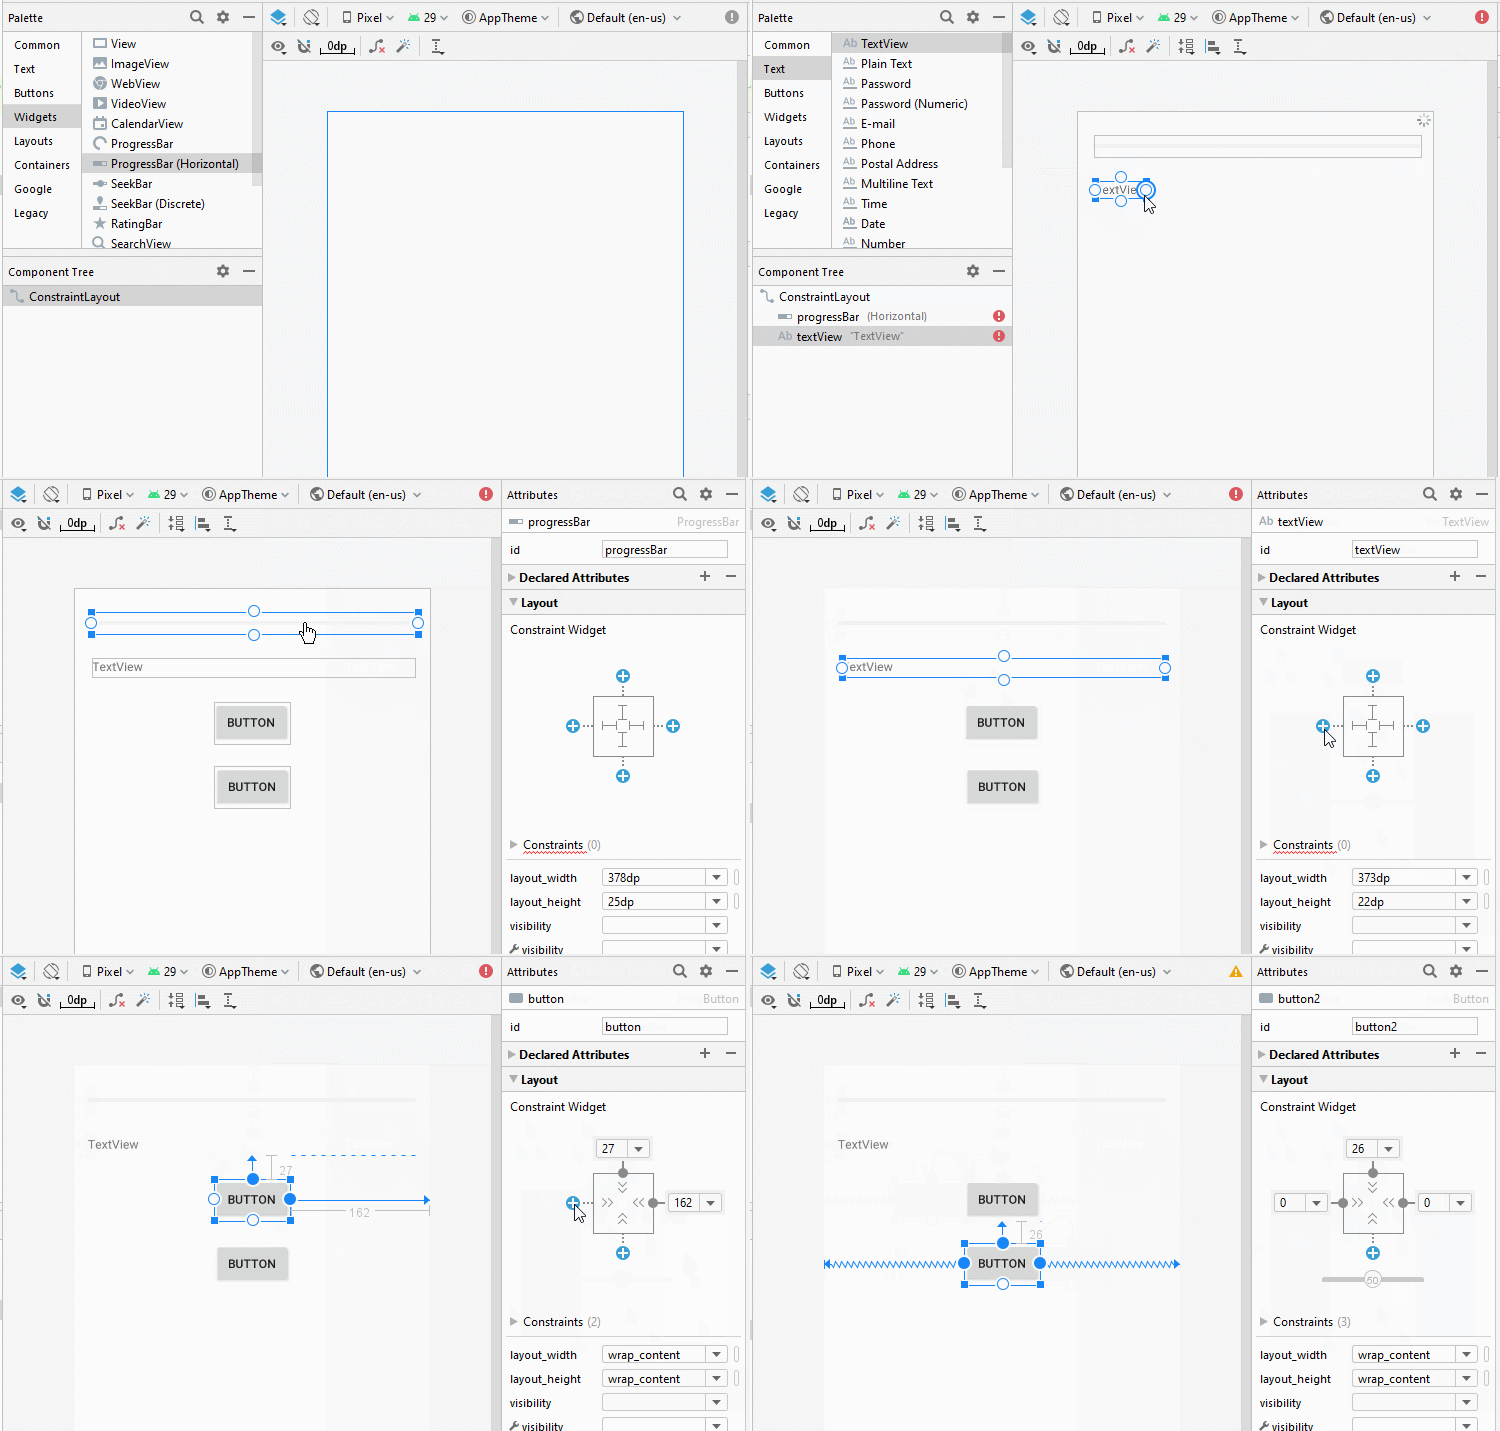
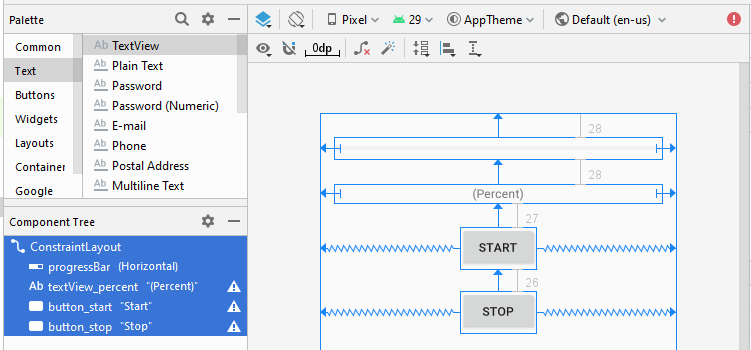
activity_main.xml
<?xml version="1.0" encoding="utf-8"?>
<androidx.constraintlayout.widget.ConstraintLayout
    xmlns:android="http://schemas.android.com/apk/res/android"
    xmlns:app="http://schemas.android.com/apk/res-auto"
    xmlns:tools="http://schemas.android.com/tools"
    android:layout_width="match_parent"
    android:layout_height="match_parent"
    tools:context=".MainActivity">

    <ProgressBar
        android:id="@+id/progressBar"
        style="?android:attr/progressBarStyleHorizontal"
        android:layout_width="0dp"
        android:layout_height="25dp"
        android:layout_marginStart="16dp"
        android:layout_marginLeft="16dp"
        android:layout_marginTop="28dp"
        android:layout_marginEnd="16dp"
        android:layout_marginRight="16dp"
        app:layout_constraintEnd_toEndOf="parent"
        app:layout_constraintStart_toStartOf="parent"
        app:layout_constraintTop_toTopOf="parent" />

    <TextView
        android:id="@+id/textView_percent"
        android:layout_width="0dp"
        android:layout_height="22dp"
        android:layout_marginStart="16dp"
        android:layout_marginLeft="16dp"
        android:layout_marginTop="28dp"
        android:layout_marginEnd="16dp"
        android:layout_marginRight="16dp"
        android:gravity="center"
        android:text="(Percent)"
        app:layout_constraintEnd_toEndOf="parent"
        app:layout_constraintStart_toStartOf="parent"
        app:layout_constraintTop_toBottomOf="@+id/progressBar" />

    <Button
        android:id="@+id/button_start"
        android:layout_width="wrap_content"
        android:layout_height="wrap_content"
        android:layout_marginTop="27dp"
        android:text="Start"
        app:layout_constraintEnd_toEndOf="parent"
        app:layout_constraintStart_toStartOf="parent"
        app:layout_constraintTop_toBottomOf="@+id/textView_percent" />

    <Button
        android:id="@+id/button_stop"
        android:layout_width="wrap_content"
        android:layout_height="wrap_content"
        android:layout_marginTop="26dp"
        android:text="Stop"
        app:layout_constraintEnd_toEndOf="parent"
        app:layout_constraintStart_toStartOf="parent"
        app:layout_constraintTop_toBottomOf="@+id/button_start" />
</androidx.constraintlayout.widget.ConstraintLayout>
Tạo một IntentService bằng cách nháy phải chuột vào một package, chọn:
- New > Service > Service (IntentService)
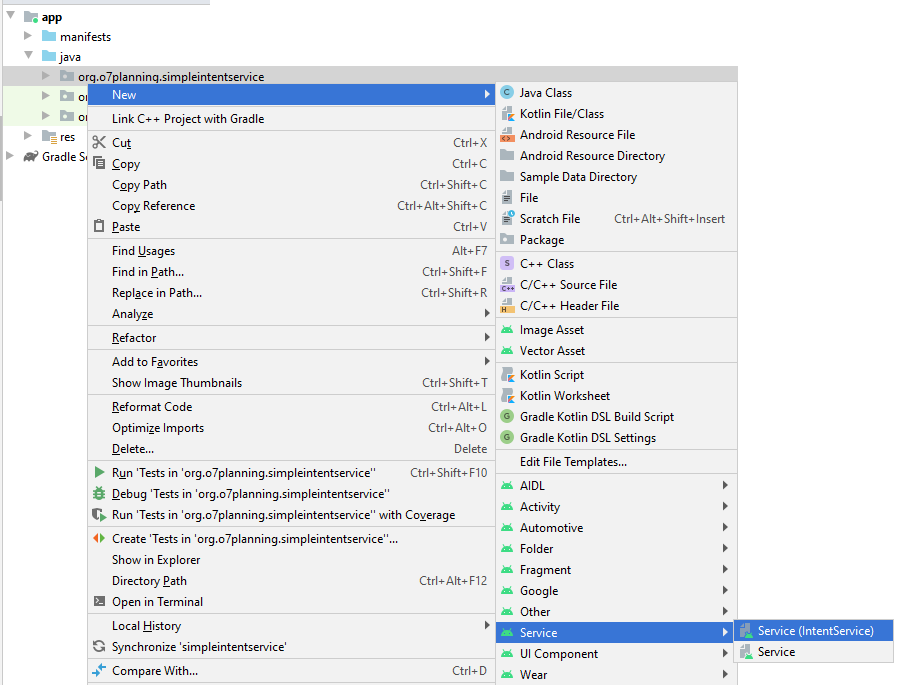
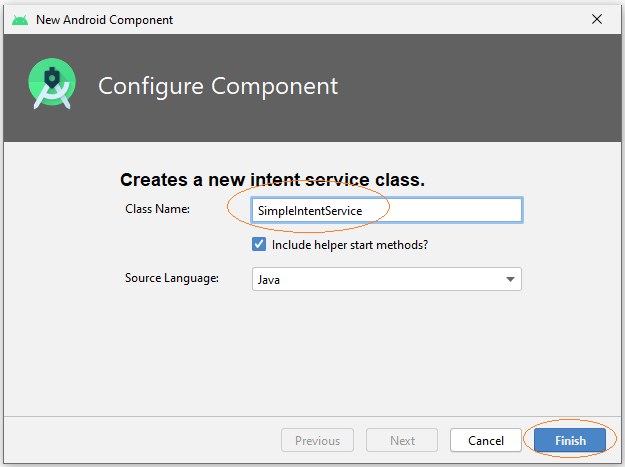
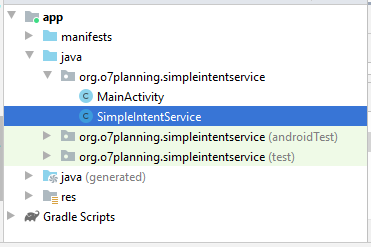
Bạn có thể nhìn thấy SimpleIntentService đã được khai báo với AndroidManifest.xml:
** AndroidManifest.xml **
<?xml version="1.0" encoding="utf-8"?>
<manifest xmlns:android="http://schemas.android.com/apk/res/android"
    package="org.o7planning.simpleintentservice">

    <application ...>
        <service
            android:name=".SimpleIntentService"
            android:exported="false"></service>

        ...
    </application>

</manifest>
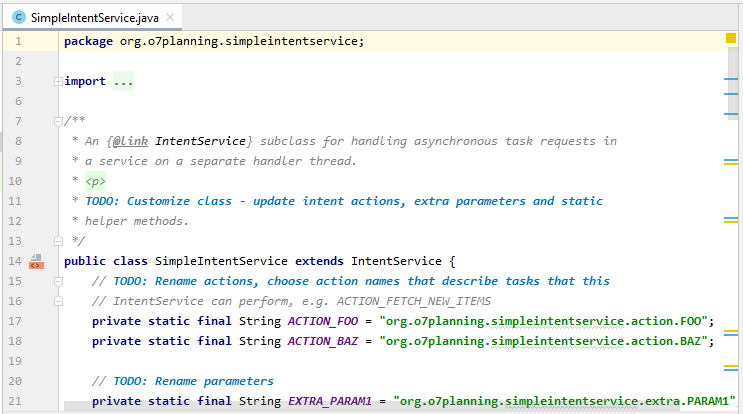
Lớp SimpleIntentService đã được tạo ra, nó cũng đã được đăng ký với AndroidManifest.xml, code được tạo ra là một gợi ý cho bạn viết một IntentService, bạn có thể xóa hết các code được tạo ra.
SimpleIntentService.java
package org.o7planning.simpleintentservice;

import android.app.IntentService;
import android.content.Intent;
import android.os.SystemClock;

public class SimpleIntentService extends IntentService {

    public static volatile boolean shouldStop = false;

    public static final String ACTION_1 ="MY_ACTION_1";

    public static final String PARAM_PERCENT = "percent";

    public SimpleIntentService() {
        super("SimpleIntentService");
    }

    @Override
    protected void onHandleIntent(Intent intent) {

        // Create Intent object (to broadcast).
        Intent broadcastIntent = new Intent();

        // Set Action name for this Intent.
        // A Intent can perform many different actions.
        broadcastIntent.setAction(SimpleIntentService.ACTION_1);

        // Loop 100 times broadcast of Intent.
        for (int i = 0; i <= 100; i++) {

            // Set data
            // (Percent of work)
            broadcastIntent.putExtra(PARAM_PERCENT, i);

            // Send broadcast
            sendBroadcast(broadcastIntent);

            // Sleep 100 Milliseconds.
            SystemClock.sleep(100);

            if(shouldStop) {
                stopSelf();
                return;
            }
        }

    }
}
MainActivity.java
package org.o7planning.simpleintentservice;

import androidx.appcompat.app.AppCompatActivity;

import android.os.Bundle;
import android.content.BroadcastReceiver;
import android.content.Context;
import android.content.Intent;
import android.content.IntentFilter;
import android.os.AsyncTask;
import android.view.View;
import android.widget.Button;
import android.widget.ProgressBar;
import android.widget.TextView;

public class MainActivity extends AppCompatActivity {

    private Button buttonStart;
    private Button buttonStop;
    private TextView textViewPercent;

    private ProgressBar progressBar;

    private Intent serviceIntent;

    private ResponseReceiver receiver = new ResponseReceiver();


    // Broadcast component
    public class ResponseReceiver extends BroadcastReceiver {

        // On broadcast received
        @Override
        public void onReceive(Context context, Intent intent) {

            // Check action name.
            if(intent.getAction().equals(SimpleIntentService.ACTION_1)) {
                int value = intent.getIntExtra(SimpleIntentService.PARAM_PERCENT, 0);

                new ShowProgressBarTask().execute(value);
            }
        }
    }

    // Display value for the ProgressBar.
    class ShowProgressBarTask extends AsyncTask<Integer, Integer, Integer> {

        @Override
        protected Integer doInBackground(Integer... args) {

            return args[0];
        }

        @Override
        protected void onPostExecute(Integer result) {
            super.onPostExecute(result);

            progressBar.setProgress(result);

            textViewPercent.setText(result + " % Loaded");

            if (result == 100) {
                textViewPercent.setText("Completed");
                buttonStart.setEnabled(true);
            }

        }
    }

    @Override
    protected void onCreate(Bundle savedInstanceState) {
        super.onCreate(savedInstanceState);
        setContentView(R.layout.activity_main);

        this.textViewPercent = (TextView) this.findViewById(R.id.textView_percent);
        this.progressBar = (ProgressBar) this.findViewById(R.id.progressBar);
        this.buttonStart = (Button) this.findViewById(R.id.button_start);
        this.buttonStop = (Button)this.findViewById(R.id.button_stop);

        this.buttonStart.setOnClickListener(new View.OnClickListener() {
            @Override
            public void onClick(View v) {
                buttonStartClicked();
            }
        });

        this.buttonStop.setOnClickListener(new View.OnClickListener() {
            @Override
            public void onClick(View v) {
                buttonStopClicked();
            }
        });
    }


    // On Resume of MainActivity
    @Override
    protected void onResume() {
        super.onResume();

        // Register receiver with Activity.
        registerReceiver(receiver, new IntentFilter(
                SimpleIntentService.ACTION_1));
    }

    // On Stop of MainActivity
    @Override
    protected void onStop() {
        super.onStop();

        // Unregister receiver with Activity.
        unregisterReceiver(receiver);
    }

    // Method is called when the user clicks on the Start button.
    public void buttonStartClicked( )  {
        this.buttonStart.setEnabled(false);

        this.serviceIntent = new Intent(this, SimpleIntentService.class);

        startService(this.serviceIntent);
    }


    public void buttonStopClicked( )  {
        if(this.serviceIntent!= null)  {
            // stopService(this.serviceIntent) does not work with IntentService(s).

            // Mandatory stopping of an IntentService is not recommended.
            SimpleIntentService.shouldStop = true;
        }
    }

}
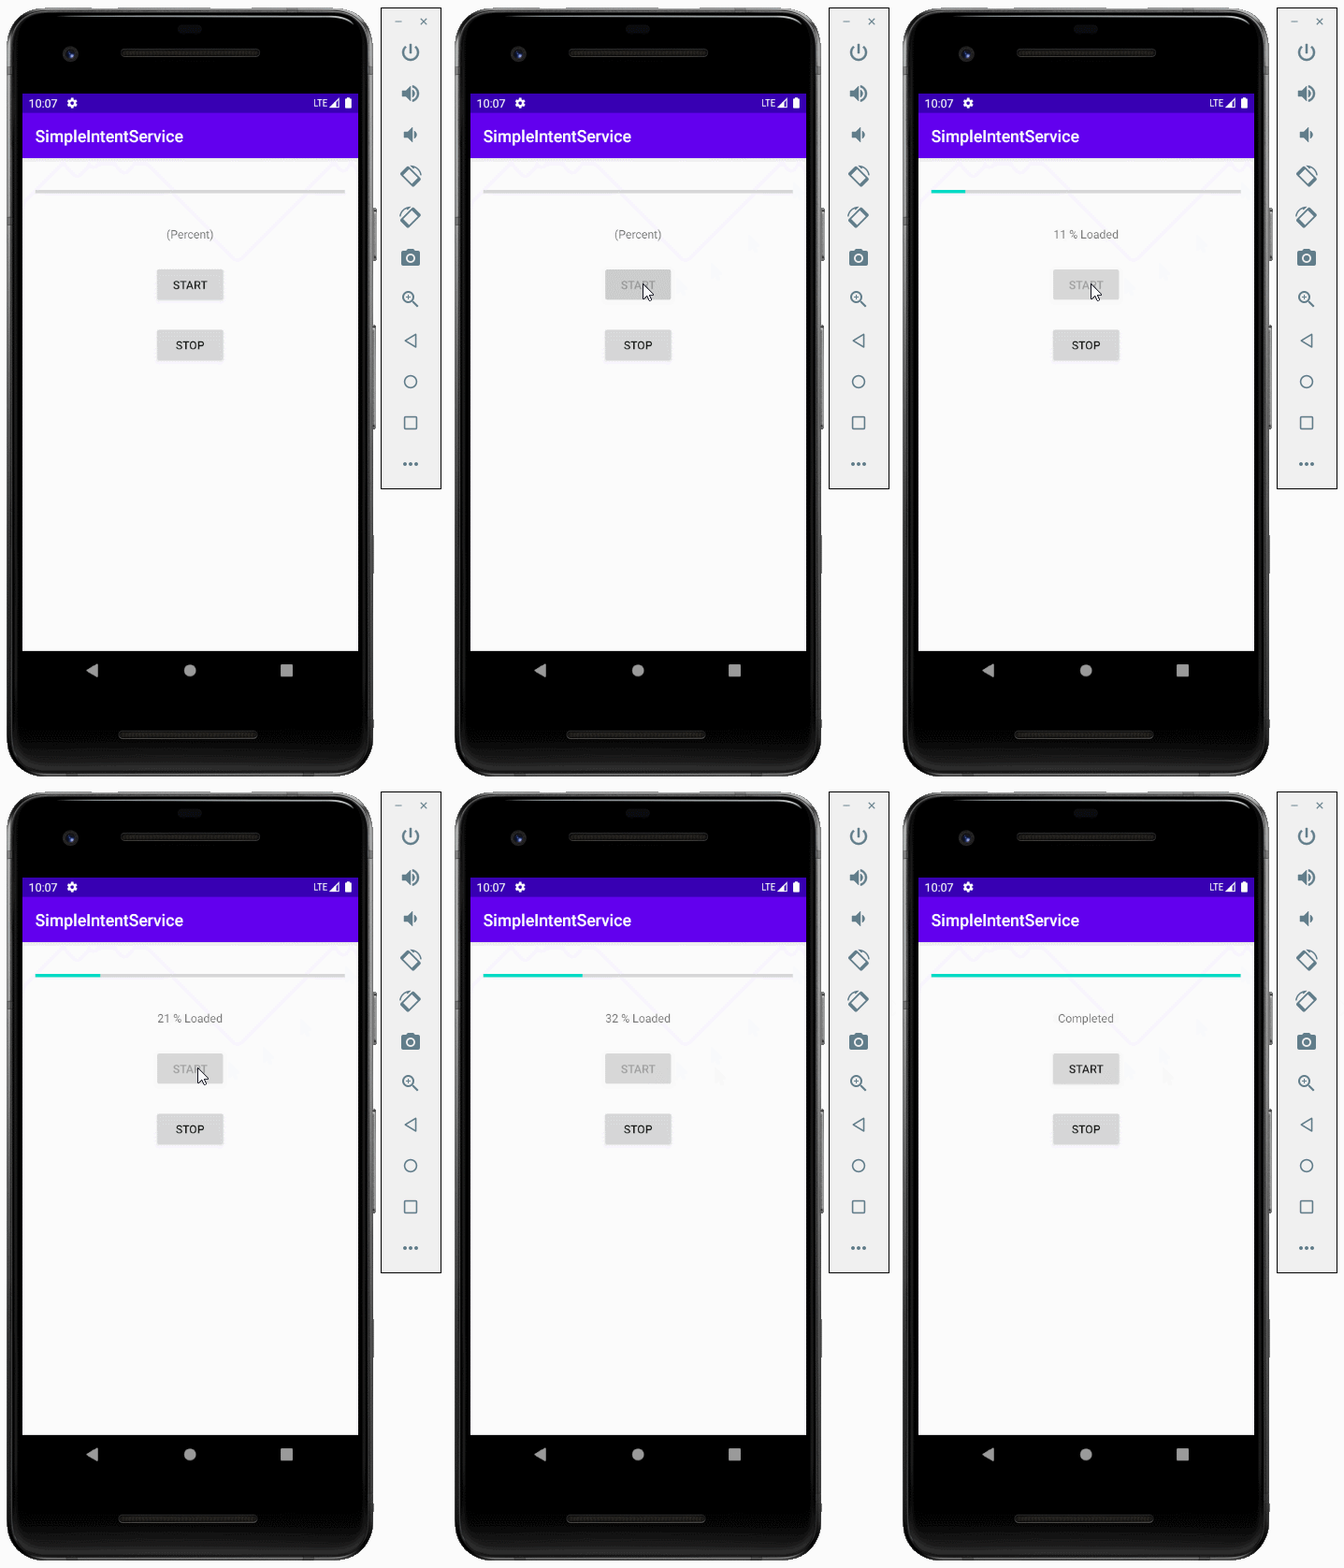
Chạy ứng dụng:
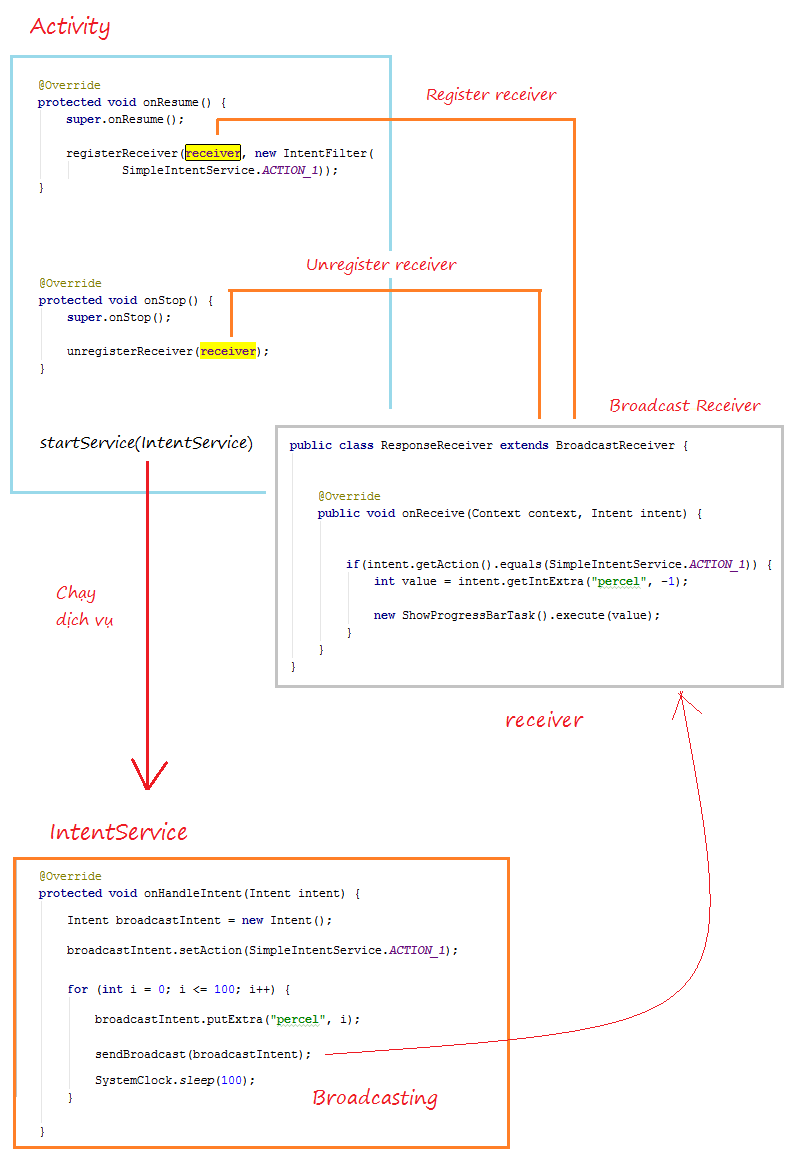
Và bạn có thể xem nguyên tắc hoạt động của ví dụ trên theo hình minh họa dưới đây:
Các hướng dẫn lập trình Android
- Cấu hình Android Emulator trong Android Studio
- Hướng dẫn và ví dụ Android ToggleButton
- Tạo một File Finder Dialog đơn giản trong Android
- Hướng dẫn và ví dụ Android TimePickerDialog
- Hướng dẫn và ví dụ Android DatePickerDialog
- Bắt đầu với Android cần những gì?
- Cài đặt Android Studio trên Windows
- Cài đặt Intel® HAXM cho Android Studio
- Hướng dẫn và ví dụ Android AsyncTask
- Hướng dẫn và ví dụ Android AsyncTaskLoader
- Hướng dẫn lập trình Android cho người mới bắt đầu - Các ví dụ cơ bản
- Làm sao biết số số điện thoại của Android Emulator và thay đổi nó
- Hướng dẫn và ví dụ Android TextInputLayout
- Hướng dẫn và ví dụ Android CardView
- Hướng dẫn và ví dụ Android ViewPager2
- Lấy số điện thoại trong Android sử dụng TelephonyManager
- Hướng dẫn và ví dụ Android Phone Call
- Hướng dẫn và ví dụ Android Wifi Scanning
- Hướng dẫn lập trình Android Game 2D cho người mới bắt đầu
- Hướng dẫn và ví dụ Android DialogFragment
- Hướng dẫn và ví dụ Android CharacterPickerDialog
- Hướng dẫn lập trình Android cho người mới bắt đầu - Hello Android
- Hướng dẫn sử dụng Android Device File Explorer
- Bật tính năng USB Debugging trên thiết bị Android
- Hướng dẫn và ví dụ Android UI Layouts
- Hướng dẫn và ví dụ Android SMS
- Hướng dẫn lập trình Android với Database SQLite
- Hướng dẫn và ví dụ Google Maps Android API
- Hướng dẫn chuyển văn bản thành lời nói trong Android
- Hướng dẫn và ví dụ Android Space
- Hướng dẫn và ví dụ Android Toast
- Tạo một Android Toast tùy biến
- Hướng dẫn và ví dụ Android SnackBar
- Hướng dẫn và ví dụ Android TextView
- Hướng dẫn và ví dụ Android TextClock
- Hướng dẫn và ví dụ Android EditText
- Hướng dẫn và ví dụ Android TextWatcher
- Định dạng số thẻ tín dụng với Android TextWatcher
- Hướng dẫn và ví dụ Android Clipboard
- Tạo một File Chooser đơn giản trong Android
- Hướng dẫn và ví dụ Android AutoCompleteTextView và MultiAutoCompleteTextView
- Hướng dẫn và ví dụ Android ImageView
- Hướng dẫn và ví dụ Android ImageSwitcher
- Hướng dẫn và ví dụ Android ScrollView và HorizontalScrollView
- Hướng dẫn và ví dụ Android WebView
- Hướng dẫn và ví dụ Android SeekBar
- Hướng dẫn và ví dụ Android Dialog
- Hướng dẫn và ví dụ Android AlertDialog
- Hướng dẫn và ví dụ Android RatingBar
- Hướng dẫn và ví dụ Android ProgressBar
- Hướng dẫn và ví dụ Android Spinner
- Hướng dẫn và ví dụ Android Button
- Hướng dẫn và ví dụ Android Switch
- Hướng dẫn và ví dụ Android ImageButton
- Hướng dẫn và ví dụ Android FloatingActionButton
- Hướng dẫn và ví dụ Android CheckBox
- Hướng dẫn và ví dụ Android RadioGroup và RadioButton
- Hướng dẫn và ví dụ Android Chip và ChipGroup
- Sử dụng các tài sản ảnh và biểu tượng của Android Studio
- Thiết lập SD Card cho Android Emulator
- Ví dụ với ChipGroup và các Chip Entry
- Làm sao thêm thư viện bên ngoài vào dự án Android trong Android Studio?
- Làm sao loại bỏ các quyền đã cho phép trên ứng dụng Android
- Làm sao loại bỏ các ứng dụng ra khỏi Android Emulator?
- Hướng dẫn và ví dụ Android LinearLayout
- Hướng dẫn và ví dụ Android TableLayout
- Hướng dẫn và ví dụ Android FrameLayout
- Hướng dẫn và ví dụ Android QuickContactBadge
- Hướng dẫn và ví dụ Android StackView
- Hướng dẫn và ví dụ Android Camera
- Hướng dẫn và ví dụ Android MediaPlayer
- Hướng dẫn và ví dụ Android VideoView
- Phát hiệu ứng âm thanh trong Android với SoundPool
- Hướng dẫn lập trình mạng trong Android - Android Networking
- Hướng dẫn xử lý JSON trong Android
- Lưu trữ dữ liệu trên thiết bị với Android SharedPreferences
- Hướng dẫn lập trình Android với bộ lưu trữ trong (Internal Storage)
- Hướng dẫn lập trình Android với bộ lưu trữ ngoài (External Storage)
- Hướng dẫn sử dụng Intent trong Android
- Ví dụ về một Android Intent tường minh, gọi một Intent khác
- Ví dụ về Android Intent không tường minh, mở một URL, gửi một email
- Hướng dẫn sử dụng Service trong Android
- Hướng dẫn sử dụng thông báo trong Android - Android Notification
- Hướng dẫn và ví dụ Android DatePicker
- Hướng dẫn và ví dụ Android TimePicker
- Hướng dẫn và ví dụ Android Chronometer
- Hướng dẫn và ví dụ Android OptionMenu
- Hướng dẫn và ví dụ Android ContextMenu
- Hướng dẫn và ví dụ Android PopupMenu
- Hướng dẫn và ví dụ Android Fragment
- Hướng dẫn và ví dụ Android ListView
- Android ListView với Checkbox sử dụng ArrayAdapter
- Hướng dẫn và ví dụ Android GridView
Show More
