Hướng dẫn và ví dụ Android Phone Call
1. Android Phone Call
Trong Android, bạn dễ dàng tạo một cuộc gọi từ ứng dụng của mình bằng cách tạo một Intent không tường minh ACTION_CALL và gửi đến hệ thống để yêu cầu mở ứng dụng gọi điện có sẵn trên hệ thống.
Intent callIntent = new Intent(Intent.ACTION_CALL);
callIntent.setData(Uri.parse("tel:" + phoneNumber));

startActivity(callIntent);
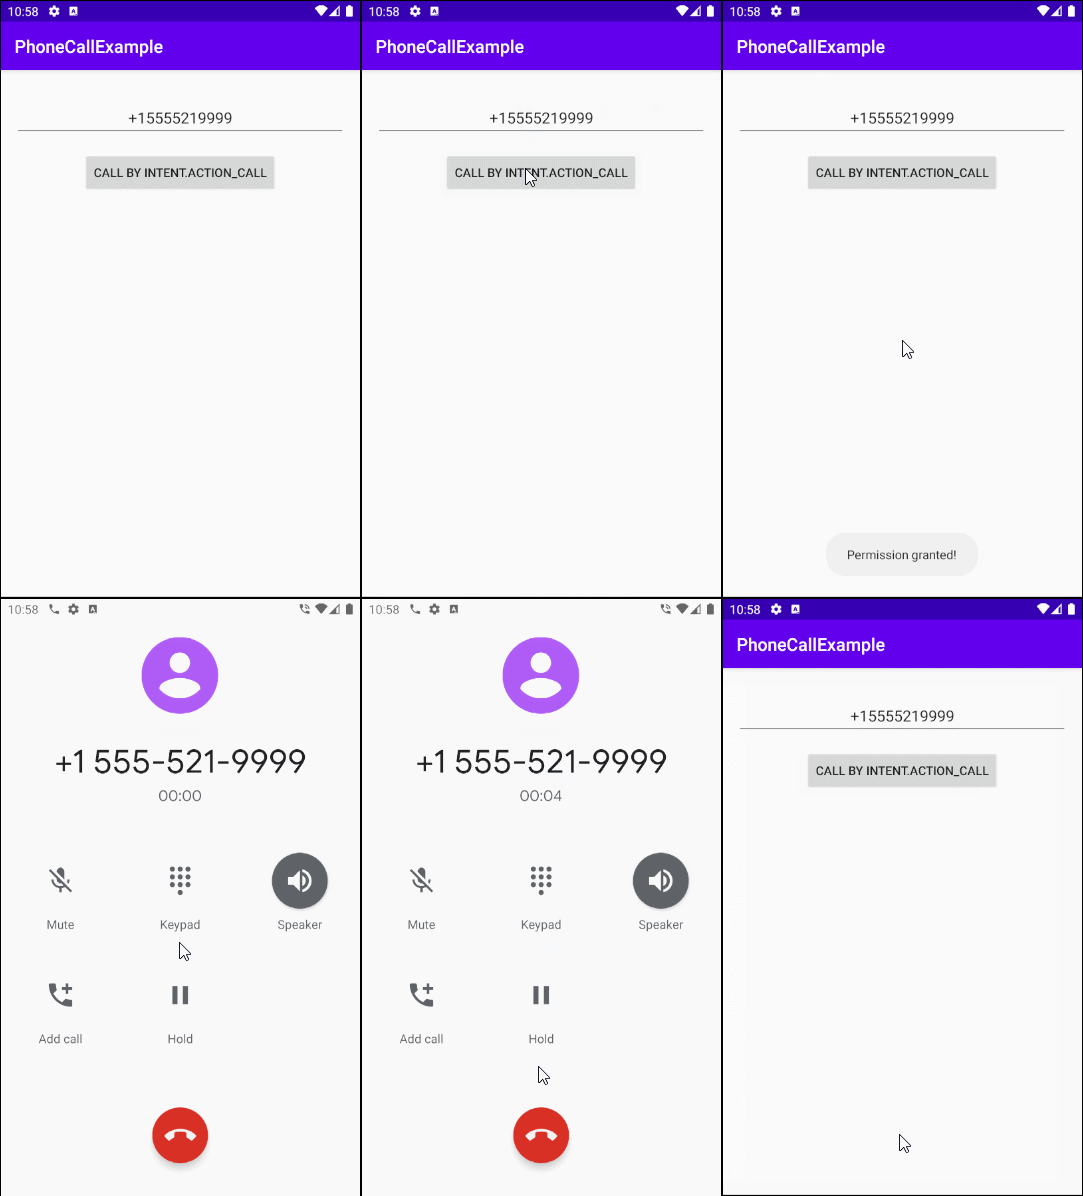
Xem trước ví dụ:

Trên Android Studio tạo một project:
- File > New > New Project > Empty Activity
- Name: PhoneCallExample
- Package name: org.o7planning.phonecallexample
- Language: Java
Ứng dụng của bạn cần được cho phép thực hiện cuộc gọi, vì vậy cần thêm một đoạn mã sau vào tập tin AndroidManifest.xml:
<uses-permission android:name="android.permission.CALL_PHONE" />AndroidManifest.xml
<?xml version="1.0" encoding="utf-8"?>
<manifest xmlns:android="http://schemas.android.com/apk/res/android"
    package="org.o7planning.phonecallexample">

    <uses-permission android:name="android.permission.CALL_PHONE" />

    <application
        android:allowBackup="true"
        android:icon="@mipmap/ic_launcher"
        android:label="@string/app_name"
        android:roundIcon="@mipmap/ic_launcher_round"
        android:supportsRtl="true"
        android:theme="@style/AppTheme">
        <activity android:name=".MainActivity">
            <intent-filter>
                <action android:name="android.intent.action.MAIN" />

                <category android:name="android.intent.category.LAUNCHER" />
            </intent-filter>
        </activity>
    </application>

</manifest>
Ngoài ra, từ Android 6.0 (API Level 23) một ứng dụng muốn thực hiện một cuộc gọi nó phải được sự cho phép của người dùng, vì vậy trong ứng dụng bạn cần có thêm một vài xử lý (Xem trong code của ví dụ).
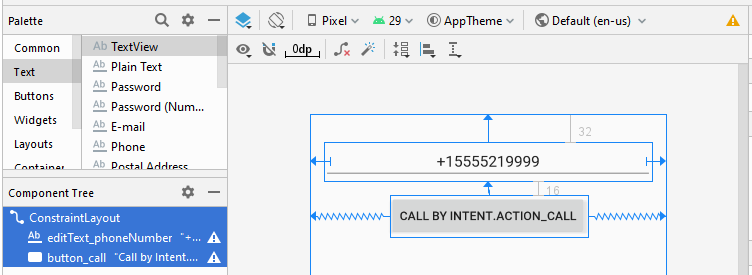
Giao diện của ứng dụng:

activity_main.xml
<?xml version="1.0" encoding="utf-8"?>
<androidx.constraintlayout.widget.ConstraintLayout
    xmlns:android="http://schemas.android.com/apk/res/android"
    xmlns:app="http://schemas.android.com/apk/res-auto"
    xmlns:tools="http://schemas.android.com/tools"
    android:layout_width="match_parent"
    android:layout_height="match_parent"
    tools:context=".MainActivity">


    <EditText
        android:id="@+id/editText_phoneNumber"
        android:layout_width="0dp"
        android:layout_height="wrap_content"
        android:layout_marginStart="16dp"
        android:layout_marginLeft="16dp"
        android:layout_marginTop="32dp"
        android:layout_marginEnd="16dp"
        android:layout_marginRight="16dp"
        android:ems="10"
        android:gravity="center"
        android:inputType="phone"
        android:text="+15555219999"
        app:layout_constraintEnd_toEndOf="parent"
        app:layout_constraintStart_toStartOf="parent"
        app:layout_constraintTop_toTopOf="parent" />

    <Button
        android:id="@+id/button_call"
        android:layout_width="wrap_content"
        android:layout_height="wrap_content"
        android:layout_marginTop="16dp"
        android:text="Call by Intent.ACTION_CALL"
        app:layout_constraintEnd_toEndOf="parent"
        app:layout_constraintStart_toStartOf="parent"
        app:layout_constraintTop_toBottomOf="@+id/editText_phoneNumber" />

</androidx.constraintlayout.widget.ConstraintLayout>
MainActivity.java
package org.o7planning.phonecallexample;


import androidx.appcompat.app.AppCompatActivity;
import androidx.core.app.ActivityCompat;

import android.Manifest;
import android.annotation.SuppressLint;
import android.content.Intent;
import android.content.pm.PackageManager;
import android.net.Uri;
import android.os.Bundle;
import android.util.Log;
import android.view.View;
import android.widget.Button;
import android.widget.EditText;
import android.widget.Toast;

public class MainActivity extends AppCompatActivity {

    private static final int MY_PERMISSION_REQUEST_CODE_CALL_PHONE = 555;

    private static final String LOG_TAG = "AndroidExample";

    private EditText editTextPhoneNumber;
    private Button buttonCall;

    @Override
    protected void onCreate(Bundle savedInstanceState) {
        super.onCreate(savedInstanceState);
        setContentView(R.layout.activity_main);

        this.editTextPhoneNumber = (EditText) this.findViewById(R.id.editText_phoneNumber);
        this.buttonCall = (Button) this.findViewById(R.id.button_call);

        this.buttonCall.setOnClickListener(new View.OnClickListener() {
            @Override
            public void onClick(View v) {
                askPermissionAndCall();
            }
        });
    }

    private void askPermissionAndCall() {

        // With Android Level >= 23, you have to ask the user
        // for permission to Call.
        if (android.os.Build.VERSION.SDK_INT >= android.os.Build.VERSION_CODES.M) { // 23

            // Check if we have Call permission
            int sendSmsPermisson = ActivityCompat.checkSelfPermission(this,
                    Manifest.permission.CALL_PHONE);

            if (sendSmsPermisson != PackageManager.PERMISSION_GRANTED) {
                // If don't have permission so prompt the user.
                this.requestPermissions(
                        new String[]{Manifest.permission.CALL_PHONE},
                        MY_PERMISSION_REQUEST_CODE_CALL_PHONE
                );
                return;
            }
        }
        this.callNow();
    }

    @SuppressLint("MissingPermission")
    private void callNow() {
        String phoneNumber = this.editTextPhoneNumber.getText().toString();

        Intent callIntent = new Intent(Intent.ACTION_CALL);
        callIntent.setData(Uri.parse("tel:" + phoneNumber));
        try {
            this.startActivity(callIntent);
        } catch (Exception ex) {
            Toast.makeText(getApplicationContext(),"Your call failed... " + ex.getMessage(),
                    Toast.LENGTH_LONG).show();
            ex.printStackTrace();
        }
    }


    // When you have the request results
    @Override
    public void onRequestPermissionsResult(int requestCode,
                                           String permissions[], int[] grantResults) {

        super.onRequestPermissionsResult(requestCode, permissions, grantResults);
        //
        switch (requestCode) {
            case MY_PERMISSION_REQUEST_CODE_CALL_PHONE: {

                // Note: If request is cancelled, the result arrays are empty.
                // Permissions granted (CALL_PHONE).
                if (grantResults.length > 0
                        && grantResults[0] == PackageManager.PERMISSION_GRANTED) {

                    Log.i( LOG_TAG,"Permission granted!");
                    Toast.makeText(this, "Permission granted!", Toast.LENGTH_LONG).show();

                    this.callNow();
                }
                // Cancelled or denied.
                else {
                    Log.i( LOG_TAG,"Permission denied!");
                    Toast.makeText(this, "Permission denied!", Toast.LENGTH_LONG).show();
                }
                break;
            }
        }
    }

    // When results returned
    @Override
    protected void onActivityResult(int requestCode, int resultCode, Intent data) {
        super.onActivityResult(requestCode, resultCode, data);

        if (requestCode == MY_PERMISSION_REQUEST_CODE_CALL_PHONE) {
            if (resultCode == RESULT_OK) {
                // Do something with data (Result returned).
                Toast.makeText(this, "Action OK", Toast.LENGTH_LONG).show();
            } else if (resultCode == RESULT_CANCELED) {
                Toast.makeText(this, "Action Cancelled", Toast.LENGTH_LONG).show();
            } else {
                Toast.makeText(this, "Action Failed", Toast.LENGTH_LONG).show();
            }
        }
    }
}Các hướng dẫn lập trình Android
- Cấu hình Android Emulator trong Android Studio
- Hướng dẫn và ví dụ Android ToggleButton
- Tạo một File Finder Dialog đơn giản trong Android
- Hướng dẫn và ví dụ Android TimePickerDialog
- Hướng dẫn và ví dụ Android DatePickerDialog
- Bắt đầu với Android cần những gì?
- Cài đặt Android Studio trên Windows
- Cài đặt Intel® HAXM cho Android Studio
- Hướng dẫn và ví dụ Android AsyncTask
- Hướng dẫn và ví dụ Android AsyncTaskLoader
- Hướng dẫn lập trình Android cho người mới bắt đầu - Các ví dụ cơ bản
- Làm sao biết số số điện thoại của Android Emulator và thay đổi nó
- Hướng dẫn và ví dụ Android TextInputLayout
- Hướng dẫn và ví dụ Android CardView
- Hướng dẫn và ví dụ Android ViewPager2
- Lấy số điện thoại trong Android sử dụng TelephonyManager
- Hướng dẫn và ví dụ Android Phone Call
- Hướng dẫn và ví dụ Android Wifi Scanning
- Hướng dẫn lập trình Android Game 2D cho người mới bắt đầu
- Hướng dẫn và ví dụ Android DialogFragment
- Hướng dẫn và ví dụ Android CharacterPickerDialog
- Hướng dẫn lập trình Android cho người mới bắt đầu - Hello Android
- Hướng dẫn sử dụng Android Device File Explorer
- Bật tính năng USB Debugging trên thiết bị Android
- Hướng dẫn và ví dụ Android UI Layouts
- Hướng dẫn và ví dụ Android SMS
- Hướng dẫn lập trình Android với Database SQLite
- Hướng dẫn và ví dụ Google Maps Android API
- Hướng dẫn chuyển văn bản thành lời nói trong Android
- Hướng dẫn và ví dụ Android Space
- Hướng dẫn và ví dụ Android Toast
- Tạo một Android Toast tùy biến
- Hướng dẫn và ví dụ Android SnackBar
- Hướng dẫn và ví dụ Android TextView
- Hướng dẫn và ví dụ Android TextClock
- Hướng dẫn và ví dụ Android EditText
- Hướng dẫn và ví dụ Android TextWatcher
- Định dạng số thẻ tín dụng với Android TextWatcher
- Hướng dẫn và ví dụ Android Clipboard
- Tạo một File Chooser đơn giản trong Android
- Hướng dẫn và ví dụ Android AutoCompleteTextView và MultiAutoCompleteTextView
- Hướng dẫn và ví dụ Android ImageView
- Hướng dẫn và ví dụ Android ImageSwitcher
- Hướng dẫn và ví dụ Android ScrollView và HorizontalScrollView
- Hướng dẫn và ví dụ Android WebView
- Hướng dẫn và ví dụ Android SeekBar
- Hướng dẫn và ví dụ Android Dialog
- Hướng dẫn và ví dụ Android AlertDialog
- Hướng dẫn và ví dụ Android RatingBar
- Hướng dẫn và ví dụ Android ProgressBar
- Hướng dẫn và ví dụ Android Spinner
- Hướng dẫn và ví dụ Android Button
- Hướng dẫn và ví dụ Android Switch
- Hướng dẫn và ví dụ Android ImageButton
- Hướng dẫn và ví dụ Android FloatingActionButton
- Hướng dẫn và ví dụ Android CheckBox
- Hướng dẫn và ví dụ Android RadioGroup và RadioButton
- Hướng dẫn và ví dụ Android Chip và ChipGroup
- Sử dụng các tài sản ảnh và biểu tượng của Android Studio
- Thiết lập SD Card cho Android Emulator
- Ví dụ với ChipGroup và các Chip Entry
- Làm sao thêm thư viện bên ngoài vào dự án Android trong Android Studio?
- Làm sao loại bỏ các quyền đã cho phép trên ứng dụng Android
- Làm sao loại bỏ các ứng dụng ra khỏi Android Emulator?
- Hướng dẫn và ví dụ Android LinearLayout
- Hướng dẫn và ví dụ Android TableLayout
- Hướng dẫn và ví dụ Android FrameLayout
- Hướng dẫn và ví dụ Android QuickContactBadge
- Hướng dẫn và ví dụ Android StackView
- Hướng dẫn và ví dụ Android Camera
- Hướng dẫn và ví dụ Android MediaPlayer
- Hướng dẫn và ví dụ Android VideoView
- Phát hiệu ứng âm thanh trong Android với SoundPool
- Hướng dẫn lập trình mạng trong Android - Android Networking
- Hướng dẫn xử lý JSON trong Android
- Lưu trữ dữ liệu trên thiết bị với Android SharedPreferences
- Hướng dẫn lập trình Android với bộ lưu trữ trong (Internal Storage)
- Hướng dẫn lập trình Android với bộ lưu trữ ngoài (External Storage)
- Hướng dẫn sử dụng Intent trong Android
- Ví dụ về một Android Intent tường minh, gọi một Intent khác
- Ví dụ về Android Intent không tường minh, mở một URL, gửi một email
- Hướng dẫn sử dụng Service trong Android
- Hướng dẫn sử dụng thông báo trong Android - Android Notification
- Hướng dẫn và ví dụ Android DatePicker
- Hướng dẫn và ví dụ Android TimePicker
- Hướng dẫn và ví dụ Android Chronometer
- Hướng dẫn và ví dụ Android OptionMenu
- Hướng dẫn và ví dụ Android ContextMenu
- Hướng dẫn và ví dụ Android PopupMenu
- Hướng dẫn và ví dụ Android Fragment
- Hướng dẫn và ví dụ Android ListView
- Android ListView với Checkbox sử dụng ArrayAdapter
- Hướng dẫn và ví dụ Android GridView
Show More
