Hướng dẫn và ví dụ Android ContextMenu
1. Android ContextMenu
Khi bạn không thể cấp bất kỳ không gian của giao diện người dùng của bạn cho một chức năng cần thiết, bạn có thể sử dụng một Context Menu (Trình đơn ngữ cảnh), Context Menu là một menu nổi (floating menu) hiển thị để đáp ứng một cú nhấn dài (long press), mặc định là 500 mili giây. Context Menu có thể chứa nhiều Menu Item và Sub Menu.

Một cú nhấn dài (long press) tiêu chuẩn trong Android là 500 mili giây, bạn có thể có được giá trị này bằng cách gọi phương thức ViewConfiguration.getLongPressTimeout(). Người dùng có thể thay đổi giá trị này trong mục Settings, nó sẽ có tác dụng đối với tất cả các ứng dụng trên thiết bị.
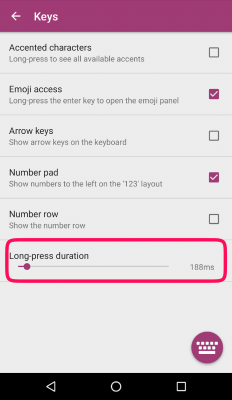
Bạn với tư cách là một nhà phát triển ứng dụng, bạn không thể thiết lập một giá trị khác cho "khoảng thời gian của một cú nhấn dài", nhưng bạn có thể sử dụng một vài thủ thuật để mô phỏng một cú nhấn dài (long press) với khoảng thời gian tùy biến và xử lý các hành động liên quan. (Xem thêm trong phần phụ lục phía cuối bài viết).
Khi một View được đăng ký với sự kiện Long-Press, hệ thống sẽ gọi phương thức onCreateContextMenu() để tạo và hiển thị Context Menu.
@Override
protected void onCreate(Bundle savedInstanceState) {
    super.onCreate(savedInstanceState);
    setContentView(R.layout.activity_main);

    this.button = (Button) this.findViewById(R.id.button_test);

    this.registerForContextMenu(this.button);
}

@Override
public void onCreateContextMenu(ContextMenu menu, View view, ContextMenu.ContextMenuInfo menuInfo) {
    super.onCreateContextMenu(menu, view, menuInfo);

    menu.setHeaderTitle("Context Menu");

    MenuInflater inflater = getMenuInflater();
    inflater.inflate(R.menu.layout_context_menu, menu);
}

// You may not need "Android Resource File" to have a ContextMenu.
// Using Java to create Context Menu.
public void onCreateContextMenu_2(ContextMenu menu, View view, ContextMenu.ContextMenuInfo menuInfo) {
    super.onCreateContextMenu(menu, view, menuInfo);

    menu.setHeaderTitle("Context Menu");

    // groupId, itemId, order, title
    MenuItem menuItemUpload = menu.add(1, 1, 1, "Upload");
    MenuItem menuItemBookmark = menu.add(2, 2, 2, "Bookmark");

    // groupId, itemId, order, title
    SubMenu subMenuShare=  menu.addSubMenu(3, 3, 3, "Share");
    subMenuShare.add(4, 31, 1, "Google" );
    subMenuShare.add(5, 32, 2, "Instagram");
}
Khi người dùng click vào một Menu Item, phương thức onContextItemSelected() sẽ được gọi.
@Override
public boolean onContextItemSelected(MenuItem item) {

    switch (item.getItemId()) {
        case R.id.menuItem_bookmark:
            Toast.makeText(this, "Bookmark", Toast.LENGTH_SHORT).show();
            break;
        case R.id.menuItem_upload:
            Toast.makeText(this, "Upload", Toast.LENGTH_SHORT).show();
            break;
        case R.id.menuItem_facebook:
            Toast.makeText(this, "Share Facebook", Toast.LENGTH_SHORT).show();
            break;
        case R.id.menuItem_instagram:
            Toast.makeText(this, "Share Instagram", Toast.LENGTH_SHORT).show();
            break;
        default:
            Toast.makeText(this, item.getTitle(), Toast.LENGTH_SHORT).show();
            break;
    }
    return true;
}
Bạn có thể sử dụng XML Android Resource File để thiết kế giao diện của một Context Menu. Tuy nhiên Context Menu của một ứng dụng thường khá đơn giản, vì vậy tạo ra một Context Menu hoàn toàn từ mã Java cũng là lựa chọn tốt (Xem thêm trong ví dụ bên dưới).
Chú ý: Một vài thuộc tính (attribute) của <item> (Menu Item) không có tác dụng khi nó được đặt trong một Context Menu, chẳng hạn:
- app:showAsAction
- android:icon (Not work in Android 3.0+/API 11+)
2. Ví dụ Context Menu
OK, bây giờ chúng ta sẽ làm một ví dụ Context Menu, hãy xem trước ví dụ:
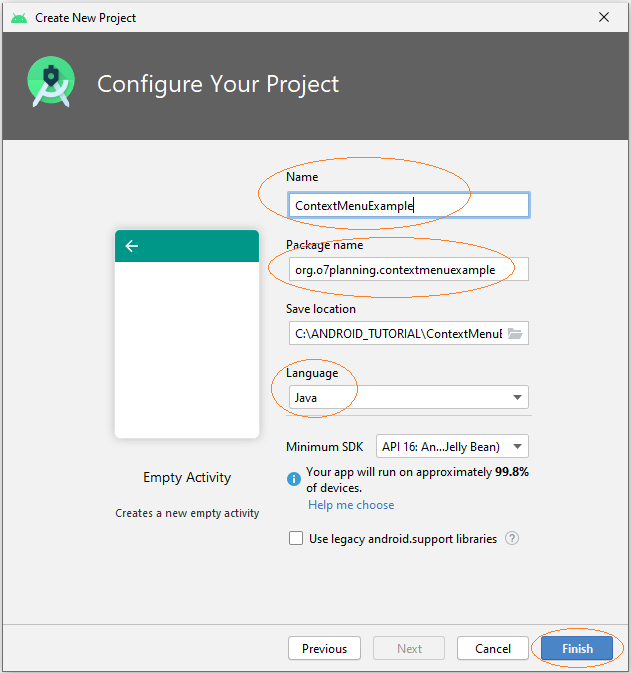
Trên Android Studio tạo mới một project.
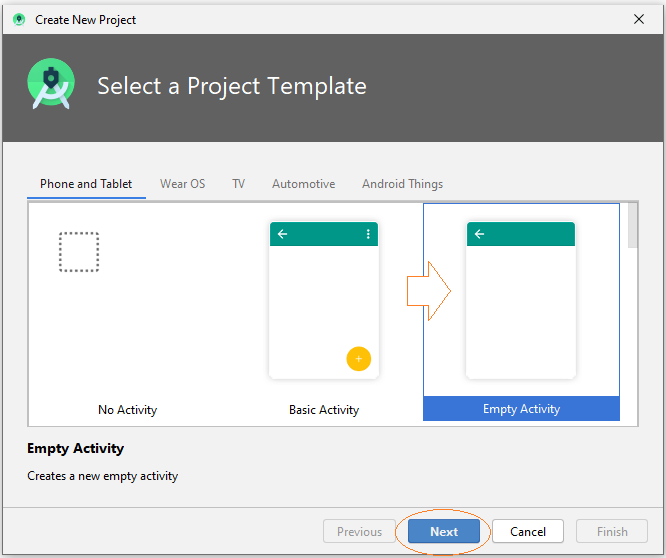
- Name: ContextMenuExample
- Package name: org.o7planning.contextmenuexample
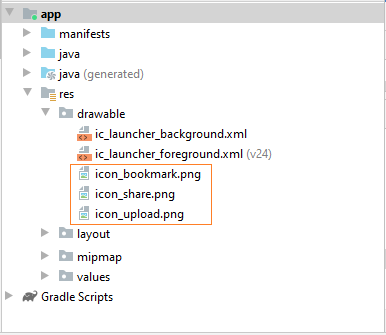
Chú ý: Bắt đầu từ Android 3.0 (API 11), ContextMenu không hỗ trợ các Icon, tuy nhiên bạn có thể copy các Icon dưới đây vào thư mục drawable để hỗ trợ các thiết bị Android cũ, hoặc bỏ qua bước này.
 |  |  |
icon_upload.png | icon_bookmark.png | icon_share.png |
Giao diện chính của ứng dụng rất đơn giản, chỉ có một Button, khi người dùng nhấn dài (Long press) trên Button một Context Menu sẽ hiển thị.
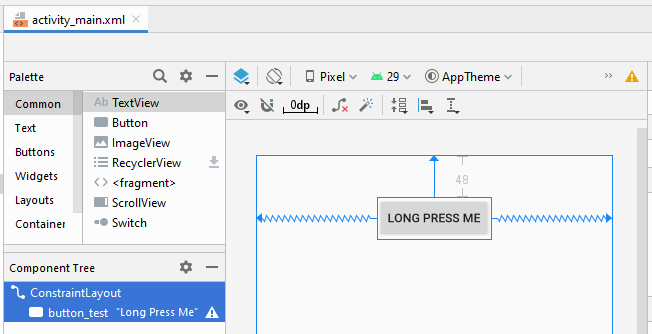
activity_main.xml
<?xml version="1.0" encoding="utf-8"?>
<androidx.constraintlayout.widget.ConstraintLayout
    xmlns:android="http://schemas.android.com/apk/res/android"
    xmlns:app="http://schemas.android.com/apk/res-auto"
    xmlns:tools="http://schemas.android.com/tools"
    android:layout_width="match_parent"
    android:layout_height="match_parent"
    tools:context=".MainActivity">

    <Button
        android:id="@+id/button_test"
        android:layout_width="wrap_content"
        android:layout_height="wrap_content"
        android:layout_marginTop="48dp"
        android:text="Long Press Me"
        app:layout_constraintEnd_toEndOf="parent"
        app:layout_constraintStart_toStartOf="parent"
        app:layout_constraintTop_toTopOf="parent" />

</androidx.constraintlayout.widget.ConstraintLayout>
Trên Android Studio chọn:
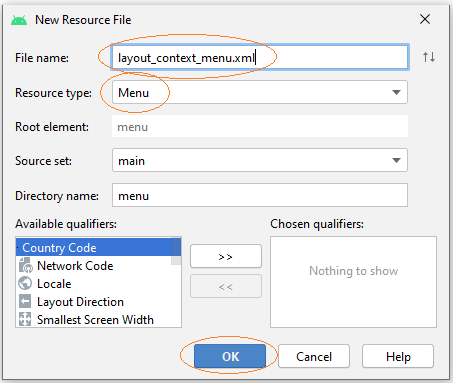
- File > New > Android Resource File
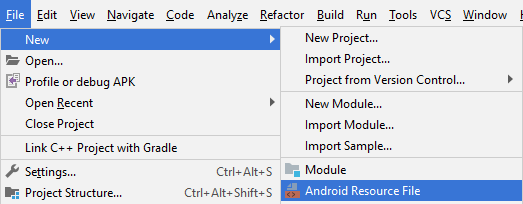
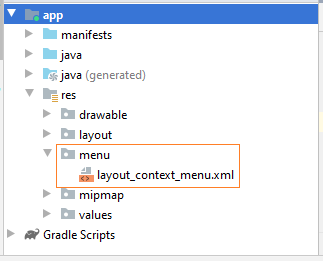
- File name: layout_context_menu.xml
- Resource type: Menu
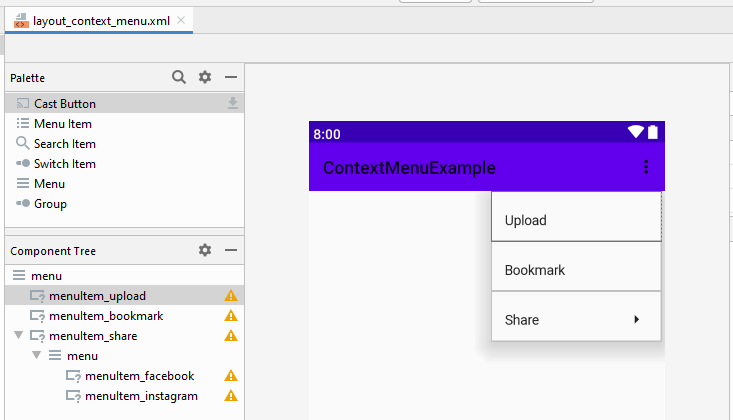
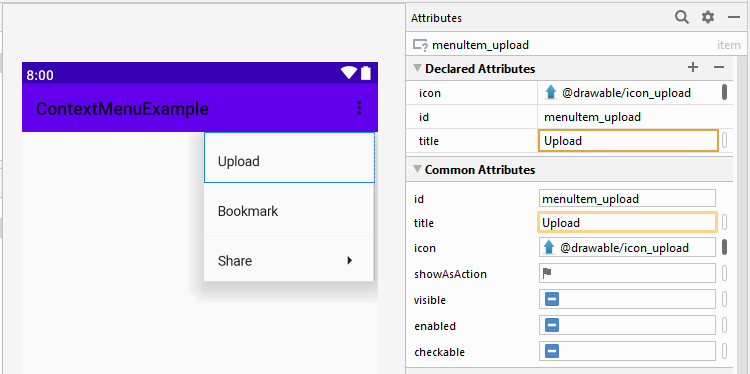
Trên Android Studio thiết kế giao diện cho Context Menu:
Sét đặt ID, Title, Icon cho các Menu Item:
layout_context_menu.xml
<?xml version="1.0" encoding="utf-8"?>
<menu xmlns:app="http://schemas.android.com/apk/res-auto"
    xmlns:android="http://schemas.android.com/apk/res/android">
    <item
        android:id="@+id/menuItem_upload"
        android:icon="@drawable/icon_upload"
        android:title="Upload" />
    <item
        android:id="@+id/menuItem_bookmark"
        android:icon="@drawable/icon_bookmark"
        android:title="Bookmark" />
    <item
        android:id="@+id/menuItem_share"
        android:icon="@drawable/icon_share"
        android:title="Share">
        <menu>
            <item
                android:id="@+id/menuItem_facebook"
                android:title="Facebook" />
            <item
                android:id="@+id/menuItem_instagram"
                android:title="Instagram" />
        </menu>
    </item>
</menu>
MainActivity.java
package org.o7planning.contextmenuexample;

import androidx.appcompat.app.AppCompatActivity;

import android.annotation.SuppressLint;
import android.os.Bundle;
import android.util.Log;
import android.view.ContextMenu;
import android.view.MenuInflater;
import android.view.MenuItem;
import android.view.SubMenu;
import android.view.View;
import android.widget.Button;
import android.widget.Toast;

public class MainActivity extends AppCompatActivity {

    private static final String LOG_TAG = "ContextMenuExample";

    private Button button;

    @Override
    protected void onCreate(Bundle savedInstanceState) {
        super.onCreate(savedInstanceState);
        setContentView(R.layout.activity_main);

        this.button = (Button) this.findViewById(R.id.button_test);

        this.registerForContextMenu(this.button);
    }

    @SuppressLint("RestrictedApi")
    @Override
    public void onCreateContextMenu(ContextMenu menu, View view, ContextMenu.ContextMenuInfo menuInfo) {
        super.onCreateContextMenu(menu, view, menuInfo);

        menu.setHeaderTitle("Context Menu");

        MenuInflater inflater = getMenuInflater();
        inflater.inflate(R.menu.layout_context_menu, menu);

        // com.android.internal.view.menu.ContextMenuBuilder
        Log.i(LOG_TAG, ">>>>> Menu class: " + menu.getClass().getName());
        // com.android.internal.view.menu.MenuBuilder
        Log.i(LOG_TAG, ">>>>> Menu superclass: " + menu.getClass().getSuperclass().getName());
    }

    // You may not need "Android Resource File" to have a ContextMenu.
    // Using Java to create Context Menu.
    @SuppressLint("RestrictedApi")
    public void onCreateContextMenu_2(ContextMenu menu, View view, ContextMenu.ContextMenuInfo menuInfo) {
        super.onCreateContextMenu(menu, view, menuInfo);

        menu.setHeaderTitle("Context Menu");

        // groupId, itemId, order, title
        MenuItem menuItemUpload = menu.add(1, 1, 1, "Upload");
        MenuItem menuItemBookmark = menu.add(2, 2, 2, "Bookmark");
        menuItemUpload.setIcon(R.drawable.icon_upload);
        menuItemBookmark.setIcon(R.drawable.icon_bookmark);


        // groupId, itemId, order, title
        SubMenu subMenuShare=  menu.addSubMenu(3, 3, 3, "Share");
        subMenuShare.setIcon(R.drawable.icon_share);

        subMenuShare.add(4, 31, 1, "Google" );
        subMenuShare.add(5, 32, 2, "Instagram");
    }

    @Override
    public boolean onContextItemSelected(MenuItem item) {

        switch (item.getItemId()) {
            case R.id.menuItem_bookmark:
                Toast.makeText(this, "Bookmark", Toast.LENGTH_SHORT).show();
                break;
            case R.id.menuItem_upload:
                Toast.makeText(this, "Upload", Toast.LENGTH_SHORT).show();
                break;
            case R.id.menuItem_facebook:
                Toast.makeText(this, "Share Facebook", Toast.LENGTH_SHORT).show();
                break;
            case R.id.menuItem_instagram:
                Toast.makeText(this, "Share Instagram", Toast.LENGTH_SHORT).show();
                break;
            default:
                Toast.makeText(this, item.getTitle(), Toast.LENGTH_SHORT).show();
                break;
        }
        return true;
    }
}Các hướng dẫn lập trình Android
- Cấu hình Android Emulator trong Android Studio
- Hướng dẫn và ví dụ Android ToggleButton
- Tạo một File Finder Dialog đơn giản trong Android
- Hướng dẫn và ví dụ Android TimePickerDialog
- Hướng dẫn và ví dụ Android DatePickerDialog
- Bắt đầu với Android cần những gì?
- Cài đặt Android Studio trên Windows
- Cài đặt Intel® HAXM cho Android Studio
- Hướng dẫn và ví dụ Android AsyncTask
- Hướng dẫn và ví dụ Android AsyncTaskLoader
- Hướng dẫn lập trình Android cho người mới bắt đầu - Các ví dụ cơ bản
- Làm sao biết số số điện thoại của Android Emulator và thay đổi nó
- Hướng dẫn và ví dụ Android TextInputLayout
- Hướng dẫn và ví dụ Android CardView
- Hướng dẫn và ví dụ Android ViewPager2
- Lấy số điện thoại trong Android sử dụng TelephonyManager
- Hướng dẫn và ví dụ Android Phone Call
- Hướng dẫn và ví dụ Android Wifi Scanning
- Hướng dẫn lập trình Android Game 2D cho người mới bắt đầu
- Hướng dẫn và ví dụ Android DialogFragment
- Hướng dẫn và ví dụ Android CharacterPickerDialog
- Hướng dẫn lập trình Android cho người mới bắt đầu - Hello Android
- Hướng dẫn sử dụng Android Device File Explorer
- Bật tính năng USB Debugging trên thiết bị Android
- Hướng dẫn và ví dụ Android UI Layouts
- Hướng dẫn và ví dụ Android SMS
- Hướng dẫn lập trình Android với Database SQLite
- Hướng dẫn và ví dụ Google Maps Android API
- Hướng dẫn chuyển văn bản thành lời nói trong Android
- Hướng dẫn và ví dụ Android Space
- Hướng dẫn và ví dụ Android Toast
- Tạo một Android Toast tùy biến
- Hướng dẫn và ví dụ Android SnackBar
- Hướng dẫn và ví dụ Android TextView
- Hướng dẫn và ví dụ Android TextClock
- Hướng dẫn và ví dụ Android EditText
- Hướng dẫn và ví dụ Android TextWatcher
- Định dạng số thẻ tín dụng với Android TextWatcher
- Hướng dẫn và ví dụ Android Clipboard
- Tạo một File Chooser đơn giản trong Android
- Hướng dẫn và ví dụ Android AutoCompleteTextView và MultiAutoCompleteTextView
- Hướng dẫn và ví dụ Android ImageView
- Hướng dẫn và ví dụ Android ImageSwitcher
- Hướng dẫn và ví dụ Android ScrollView và HorizontalScrollView
- Hướng dẫn và ví dụ Android WebView
- Hướng dẫn và ví dụ Android SeekBar
- Hướng dẫn và ví dụ Android Dialog
- Hướng dẫn và ví dụ Android AlertDialog
- Hướng dẫn và ví dụ Android RatingBar
- Hướng dẫn và ví dụ Android ProgressBar
- Hướng dẫn và ví dụ Android Spinner
- Hướng dẫn và ví dụ Android Button
- Hướng dẫn và ví dụ Android Switch
- Hướng dẫn và ví dụ Android ImageButton
- Hướng dẫn và ví dụ Android FloatingActionButton
- Hướng dẫn và ví dụ Android CheckBox
- Hướng dẫn và ví dụ Android RadioGroup và RadioButton
- Hướng dẫn và ví dụ Android Chip và ChipGroup
- Sử dụng các tài sản ảnh và biểu tượng của Android Studio
- Thiết lập SD Card cho Android Emulator
- Ví dụ với ChipGroup và các Chip Entry
- Làm sao thêm thư viện bên ngoài vào dự án Android trong Android Studio?
- Làm sao loại bỏ các quyền đã cho phép trên ứng dụng Android
- Làm sao loại bỏ các ứng dụng ra khỏi Android Emulator?
- Hướng dẫn và ví dụ Android LinearLayout
- Hướng dẫn và ví dụ Android TableLayout
- Hướng dẫn và ví dụ Android FrameLayout
- Hướng dẫn và ví dụ Android QuickContactBadge
- Hướng dẫn và ví dụ Android StackView
- Hướng dẫn và ví dụ Android Camera
- Hướng dẫn và ví dụ Android MediaPlayer
- Hướng dẫn và ví dụ Android VideoView
- Phát hiệu ứng âm thanh trong Android với SoundPool
- Hướng dẫn lập trình mạng trong Android - Android Networking
- Hướng dẫn xử lý JSON trong Android
- Lưu trữ dữ liệu trên thiết bị với Android SharedPreferences
- Hướng dẫn lập trình Android với bộ lưu trữ trong (Internal Storage)
- Hướng dẫn lập trình Android với bộ lưu trữ ngoài (External Storage)
- Hướng dẫn sử dụng Intent trong Android
- Ví dụ về một Android Intent tường minh, gọi một Intent khác
- Ví dụ về Android Intent không tường minh, mở một URL, gửi một email
- Hướng dẫn sử dụng Service trong Android
- Hướng dẫn sử dụng thông báo trong Android - Android Notification
- Hướng dẫn và ví dụ Android DatePicker
- Hướng dẫn và ví dụ Android TimePicker
- Hướng dẫn và ví dụ Android Chronometer
- Hướng dẫn và ví dụ Android OptionMenu
- Hướng dẫn và ví dụ Android ContextMenu
- Hướng dẫn và ví dụ Android PopupMenu
- Hướng dẫn và ví dụ Android Fragment
- Hướng dẫn và ví dụ Android ListView
- Android ListView với Checkbox sử dụng ArrayAdapter
- Hướng dẫn và ví dụ Android GridView
Show More
