Hướng dẫn và ví dụ Android Button
1. Android Button
Trong Android, Button là một "điều khiển giao diện người dùng" (user interface control), được sử dụng để thực hiện một hành động khi người dùng nhấp (click) vào nó.
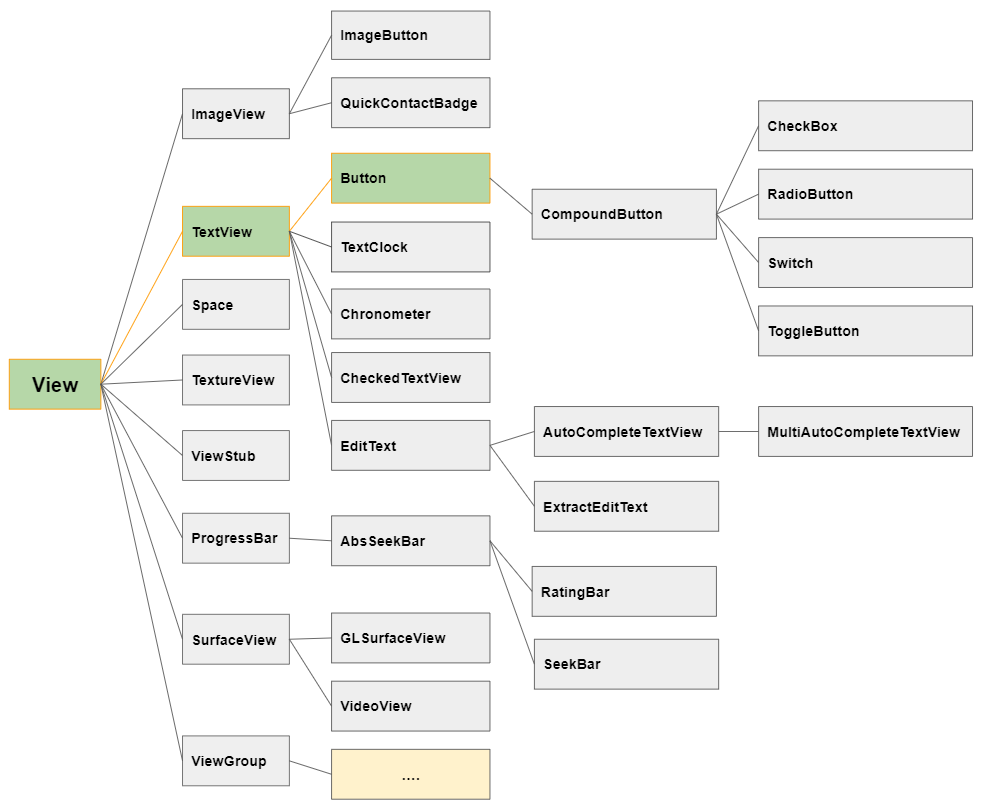
Trên hệ thống phân cấp các lớp, Button là một lớp con của TextView, vì vậy nó thừa kế tất cả các tính năng của một TextView.
android:textAllCaps
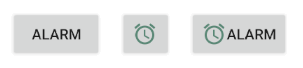
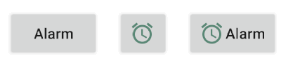
Theo mặc định, khi hiển thị nội dung, văn bản của Button sẽ bị biến thành chữ hoa (uppercase), bạn nên sét đặt android:textAllCaps="false" để đảm bảo nội dung văn bản sẽ hiển thị đúng với nguyên bản.
<Button
    android:id="@+id/button3"
    android:text="Alarm"
    android:drawableLeft="@drawable/icon_alarm"
    android:textAllCaps="false"
    ... />
android:gravity
Thuộc tính android:gravity được sử dụng để sét đặt vị trí hiển thị văn bản của một Button. Giá trị của nó là kết hợp của các giá trị sau:
Constant in Java | Value | Description |
Gravity.LEFT | left | |
Gravity.CENTER_HORIZONTAL | center_horizontal | |
Gravity.RIGHT | right | |
Gravity.TOP | top | |
Gravity.CENTER_VERTICAL | center_vertical | |
Gravity.BOTTOM | bottom | |
Gravity.START | start | |
Gravity.END | end | |
Gravity.CENTER | center | |
<Button
    android:id="@+id/button"
    android:gravity="center_horizontal|top"
    android:text="Text"
    ... />
Icon - android:drawableLef, android:drawableTop,..
Android cho phép bạn thêm 4 icon vào một Button thông qua các thuộc tính android:drawableLef, android:drawableTop, android:drawableRight, android:drawableBottom, android:drawableStart, android:drawableEnd.
<Button
    android:id="@+id/button"
    android:drawableLeft="@drawable/icon_bus"
    android:drawableTop="@drawable/icon_railway"
    android:drawableRight="@drawable/icon_car"
    android:drawableBottom="@drawable/icon_boat"
    android:text="Text"
    ...  />
Android 4.1 bắt đầu hỗ trợ sự khác biệt về bố cục văn bản giữa các ngôn ngữ khác nhau. Cụ thể với tiếng Anh, văn bản có hướng từ trái sang phải, trong khi với các ngôn ngữ Ả Rập văn bản có hướng từ phải sang trái.
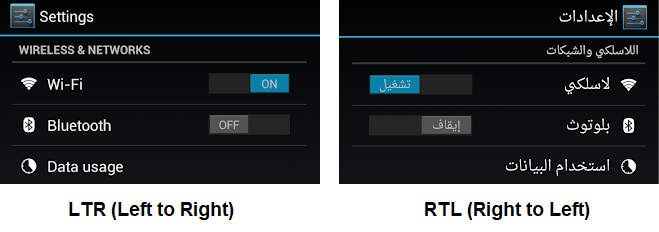
LTR (Left to Right)
Trong chế độ bố cục LTR (Left to Right): Thuộc tính android:drawableStart sẽ làm việc giống với android:drawableLeft, và android:drawableEnd sẽ làm việc giống với android:drawableRight.
RTL (Right to Left)
Trong chế độ bố cục RTL (Right to Left): Thuộc tính android:drawableStart sẽ làm việc giống với android:drawableRight, và android:drawableEnd sẽ làm việc giống với android:drawableStart.
- Android LTR, RTL Support
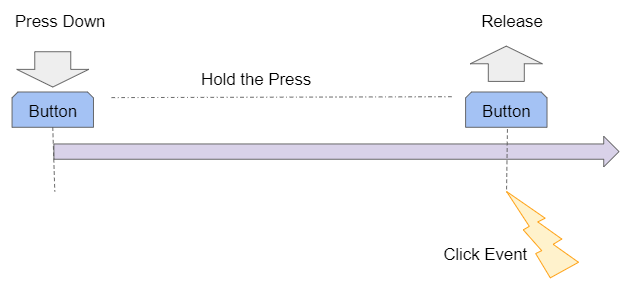
2. Button Click Event
Sự kiện Click (Nhấp) xẩy ra sau khi người dùng nhấn xuống (Press down) và nhả (Release) ra khỏi Button.
Bạn có thể định nghĩa tên của phương thức sẽ được gọi khi người dùng nhấp (click) vào Button bằng cách sử dụng thuộc tính android.onClick.
<Button
    android:id="@+id/button_clickMe"
    android:onClick="onClickHandler"
    android:text="Click Me"
    ... />
Đồng thời tạo phương thức này trong lớp MainActivity.
// MainActivity

public void onClickHandler(View view)  {
    Toast.makeText(this, "You click on 'Click Me' button!", Toast.LENGTH_SHORT).show();
}
Bạn cũng có thể định nghĩa phương thức sẽ được gọi khi người dùng nhấp vào Button, hoàn toàn với mã Java:
this.buttonClickMe = (Button) this.findViewById(R.id.button_clickMe);

this.buttonClickMe.setOnClickListener(new View.OnClickListener() {
    @Override
    public void onClick(View v) {
        Toast.makeText(MainActivity.this, "You click on 'Click Me' button!", Toast.LENGTH_SHORT).show();
    }
});
3. Button Long Click Event
Sự kiện Long Click (Nhấp dài) trong Android xẩy ra khi người dùng nhấn xuống (Press down) View và giữ như vậy trong khoảng thời gian dài. Cụ thể, sự kiện sẽ xẩy ra tại thời điểm LONG_PRESS_TIMEOUT mili giây kể từ khi người dùng nhấn xuống (Press down). Bạn có thể có được giá trị của LONG_PRESS_TIMEOUT từ phương thức ViewConfiguration.getLongPressTimeout().
Khoảng thời gian mặc định của một cú nhấp dài (Long-Click) trong Android là DEFAULT_LONG_PRESS_TIMEOUT mili giây. Người dùng có thể thay đổi thời gian cho một cú nhấp dài (Long-Click) trong mục Settings của thiết bị, nó sẽ có tác dụng với tất cả các ứng dụng trọng hệ thống. Các nhà phát triển ứng dụng không thể thay đổi giá trị này.
Constant (private) | Method | Value (Milliseconds) |
DEFAULT_LONG_PRESS_TIMEOUT | 500 | |
ViewConfiguration.getLongPressTimeout() | 500 (default) |
Ví dụ: Xử lý sự kiện khi người dùng Long Click (Nhấp dài) vào một Button bằng mã Java (Chú ý bạn không thể thực hiện điều này với XML).
this.buttonClickMe = (Button) this.findViewById(R.id.button_clickMe);


this.buttonClickMe.setOnLongClickListener(new View.OnLongClickListener() {
    @Override
    public boolean onLongClick(View v) {
        Toast.makeText(MainActivity.this, "You long click on 'Click Me' button!", Toast.LENGTH_SHORT).show();
        return true;
    }
});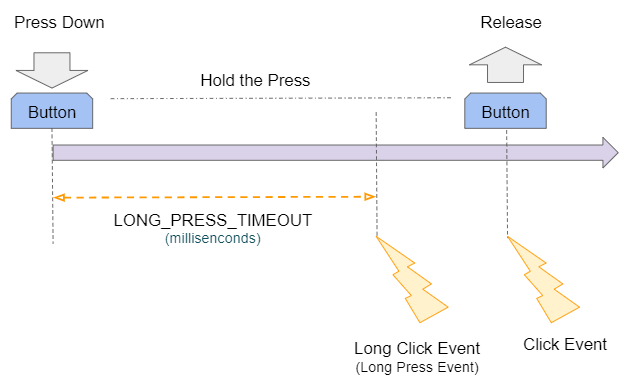
Nếu người dùng nhấp (click) vào View trong một khoảng thời gian dài (Lớn hơn LONG_PRESS_TIMEOUT mili giây), nó có thể tạo ra 2 sự kiện liên tiếp là Long-Click và Click.
Phương thức onLongClick(View) trả về một giá trị boolean. Nếu trả về true nghĩa là bạn đã tiêu thụ sự kiện Long-Click, và sự kiện Click xẩy ra sau đó sẽ bị bỏ qua. Ngược lại nếu phương thức onLongClick(View) trả về giá trị false, điều đó có nghĩa là sự kiện Click xẩy ra sau đó sẽ được thực thi.
4. Ví dụ Android Button
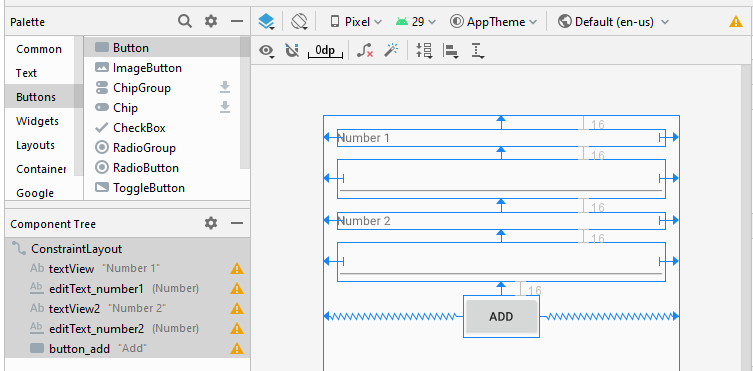
Đây là một ví dụ đơn giản, người dùng sẽ nhập vào 2 số, và nhấn Button để tính tổng 2 số này.
Thiết kế giao diện của ví dụ:

Căn chỉnh vị trí các thành phần trên giao diện:
Sét đặt ID, Text cho các thành phần trên giao diện:
activity_main.xml
<?xml version="1.0" encoding="utf-8"?>
<androidx.constraintlayout.widget.ConstraintLayout
    xmlns:android="http://schemas.android.com/apk/res/android"
    xmlns:app="http://schemas.android.com/apk/res-auto"
    xmlns:tools="http://schemas.android.com/tools"
    android:layout_width="match_parent"
    android:layout_height="match_parent"
    tools:context=".MainActivity">

    <TextView
        android:id="@+id/textView"
        android:layout_width="0dp"
        android:layout_height="wrap_content"
        android:layout_marginStart="16dp"
        android:layout_marginLeft="16dp"
        android:layout_marginTop="16dp"
        android:layout_marginEnd="16dp"
        android:layout_marginRight="16dp"
        android:text="Number 1"
        app:layout_constraintEnd_toEndOf="parent"
        app:layout_constraintStart_toStartOf="parent"
        app:layout_constraintTop_toTopOf="parent" />

    <EditText
        android:id="@+id/editText_number1"
        android:layout_width="0dp"
        android:layout_height="wrap_content"
        android:layout_marginStart="16dp"
        android:layout_marginLeft="16dp"
        android:layout_marginTop="16dp"
        android:layout_marginEnd="16dp"
        android:layout_marginRight="16dp"
        android:ems="10"
        android:inputType="number"
        app:layout_constraintEnd_toEndOf="parent"
        app:layout_constraintStart_toStartOf="parent"
        app:layout_constraintTop_toBottomOf="@+id/textView" />

    <TextView
        android:id="@+id/textView2"
        android:layout_width="0dp"
        android:layout_height="wrap_content"
        android:layout_marginStart="16dp"
        android:layout_marginLeft="16dp"
        android:layout_marginTop="16dp"
        android:layout_marginEnd="16dp"
        android:layout_marginRight="16dp"
        android:text="Number 2"
        app:layout_constraintEnd_toEndOf="parent"
        app:layout_constraintStart_toStartOf="parent"
        app:layout_constraintTop_toBottomOf="@+id/editText_number1" />

    <EditText
        android:id="@+id/editText_number2"
        android:layout_width="0dp"
        android:layout_height="wrap_content"
        android:layout_marginStart="16dp"
        android:layout_marginLeft="16dp"
        android:layout_marginTop="16dp"
        android:layout_marginEnd="16dp"
        android:layout_marginRight="16dp"
        android:ems="10"
        android:inputType="number"
        app:layout_constraintEnd_toEndOf="parent"
        app:layout_constraintStart_toStartOf="parent"
        app:layout_constraintTop_toBottomOf="@+id/textView2" />

    <Button
        android:id="@+id/button_add"
        android:layout_width="wrap_content"
        android:layout_height="wrap_content"
        android:layout_marginTop="16dp"
        android:text="Add"
        app:layout_constraintEnd_toEndOf="parent"
        app:layout_constraintStart_toStartOf="parent"
        app:layout_constraintTop_toBottomOf="@+id/editText_number2" />
</androidx.constraintlayout.widget.ConstraintLayout>
MainActivity.java
package org.o7planning.buttonexample;

import androidx.appcompat.app.AppCompatActivity;

import android.os.Bundle;
import android.view.View;
import android.view.ViewConfiguration;
import android.widget.Button;
import android.widget.EditText;
import android.widget.Toast;

public class MainActivity extends AppCompatActivity {

    private EditText editTextNumber1;
    private EditText editTextNumber2;
    private Button buttonAdd;

    @Override
    protected void onCreate(Bundle savedInstanceState) {
        super.onCreate(savedInstanceState);
        setContentView(R.layout.activity_main);

        this.editTextNumber1 = (EditText) this.findViewById(R.id.editText_number1);
        this.editTextNumber2 = (EditText) this.findViewById(R.id.editText_number2);

        this.buttonAdd = (Button) this.findViewById(R.id.button_add);

        this.buttonAdd.setOnClickListener(new View.OnClickListener() {
            @Override
            public void onClick(View v) {
                add2Number();
            }
        });
    }


    private void add2Number()  {
        String str1 = this.editTextNumber1.getText().toString();
        String str2 = this.editTextNumber2.getText().toString();
        try {
            double value1 = Double.parseDouble(str1);
            double value2 = Double.parseDouble(str2);

            double result = value1 + value2;

            Toast.makeText(this, "Result: " + result, Toast.LENGTH_SHORT).show();
        } catch(Exception e)  {
            Toast.makeText(this, "Error: "+ e, Toast.LENGTH_SHORT).show();
        }
    }

}
Các hướng dẫn lập trình Android
- Cấu hình Android Emulator trong Android Studio
- Hướng dẫn và ví dụ Android ToggleButton
- Tạo một File Finder Dialog đơn giản trong Android
- Hướng dẫn và ví dụ Android TimePickerDialog
- Hướng dẫn và ví dụ Android DatePickerDialog
- Bắt đầu với Android cần những gì?
- Cài đặt Android Studio trên Windows
- Cài đặt Intel® HAXM cho Android Studio
- Hướng dẫn và ví dụ Android AsyncTask
- Hướng dẫn và ví dụ Android AsyncTaskLoader
- Hướng dẫn lập trình Android cho người mới bắt đầu - Các ví dụ cơ bản
- Làm sao biết số số điện thoại của Android Emulator và thay đổi nó
- Hướng dẫn và ví dụ Android TextInputLayout
- Hướng dẫn và ví dụ Android CardView
- Hướng dẫn và ví dụ Android ViewPager2
- Lấy số điện thoại trong Android sử dụng TelephonyManager
- Hướng dẫn và ví dụ Android Phone Call
- Hướng dẫn và ví dụ Android Wifi Scanning
- Hướng dẫn lập trình Android Game 2D cho người mới bắt đầu
- Hướng dẫn và ví dụ Android DialogFragment
- Hướng dẫn và ví dụ Android CharacterPickerDialog
- Hướng dẫn lập trình Android cho người mới bắt đầu - Hello Android
- Hướng dẫn sử dụng Android Device File Explorer
- Bật tính năng USB Debugging trên thiết bị Android
- Hướng dẫn và ví dụ Android UI Layouts
- Hướng dẫn và ví dụ Android SMS
- Hướng dẫn lập trình Android với Database SQLite
- Hướng dẫn và ví dụ Google Maps Android API
- Hướng dẫn chuyển văn bản thành lời nói trong Android
- Hướng dẫn và ví dụ Android Space
- Hướng dẫn và ví dụ Android Toast
- Tạo một Android Toast tùy biến
- Hướng dẫn và ví dụ Android SnackBar
- Hướng dẫn và ví dụ Android TextView
- Hướng dẫn và ví dụ Android TextClock
- Hướng dẫn và ví dụ Android EditText
- Hướng dẫn và ví dụ Android TextWatcher
- Định dạng số thẻ tín dụng với Android TextWatcher
- Hướng dẫn và ví dụ Android Clipboard
- Tạo một File Chooser đơn giản trong Android
- Hướng dẫn và ví dụ Android AutoCompleteTextView và MultiAutoCompleteTextView
- Hướng dẫn và ví dụ Android ImageView
- Hướng dẫn và ví dụ Android ImageSwitcher
- Hướng dẫn và ví dụ Android ScrollView và HorizontalScrollView
- Hướng dẫn và ví dụ Android WebView
- Hướng dẫn và ví dụ Android SeekBar
- Hướng dẫn và ví dụ Android Dialog
- Hướng dẫn và ví dụ Android AlertDialog
- Hướng dẫn và ví dụ Android RatingBar
- Hướng dẫn và ví dụ Android ProgressBar
- Hướng dẫn và ví dụ Android Spinner
- Hướng dẫn và ví dụ Android Button
- Hướng dẫn và ví dụ Android Switch
- Hướng dẫn và ví dụ Android ImageButton
- Hướng dẫn và ví dụ Android FloatingActionButton
- Hướng dẫn và ví dụ Android CheckBox
- Hướng dẫn và ví dụ Android RadioGroup và RadioButton
- Hướng dẫn và ví dụ Android Chip và ChipGroup
- Sử dụng các tài sản ảnh và biểu tượng của Android Studio
- Thiết lập SD Card cho Android Emulator
- Ví dụ với ChipGroup và các Chip Entry
- Làm sao thêm thư viện bên ngoài vào dự án Android trong Android Studio?
- Làm sao loại bỏ các quyền đã cho phép trên ứng dụng Android
- Làm sao loại bỏ các ứng dụng ra khỏi Android Emulator?
- Hướng dẫn và ví dụ Android LinearLayout
- Hướng dẫn và ví dụ Android TableLayout
- Hướng dẫn và ví dụ Android FrameLayout
- Hướng dẫn và ví dụ Android QuickContactBadge
- Hướng dẫn và ví dụ Android StackView
- Hướng dẫn và ví dụ Android Camera
- Hướng dẫn và ví dụ Android MediaPlayer
- Hướng dẫn và ví dụ Android VideoView
- Phát hiệu ứng âm thanh trong Android với SoundPool
- Hướng dẫn lập trình mạng trong Android - Android Networking
- Hướng dẫn xử lý JSON trong Android
- Lưu trữ dữ liệu trên thiết bị với Android SharedPreferences
- Hướng dẫn lập trình Android với bộ lưu trữ trong (Internal Storage)
- Hướng dẫn lập trình Android với bộ lưu trữ ngoài (External Storage)
- Hướng dẫn sử dụng Intent trong Android
- Ví dụ về một Android Intent tường minh, gọi một Intent khác
- Ví dụ về Android Intent không tường minh, mở một URL, gửi một email
- Hướng dẫn sử dụng Service trong Android
- Hướng dẫn sử dụng thông báo trong Android - Android Notification
- Hướng dẫn và ví dụ Android DatePicker
- Hướng dẫn và ví dụ Android TimePicker
- Hướng dẫn và ví dụ Android Chronometer
- Hướng dẫn và ví dụ Android OptionMenu
- Hướng dẫn và ví dụ Android ContextMenu
- Hướng dẫn và ví dụ Android PopupMenu
- Hướng dẫn và ví dụ Android Fragment
- Hướng dẫn và ví dụ Android ListView
- Android ListView với Checkbox sử dụng ArrayAdapter
- Hướng dẫn và ví dụ Android GridView
Show More
