Hướng dẫn và ví dụ Android ListView
1. ListView là gì?
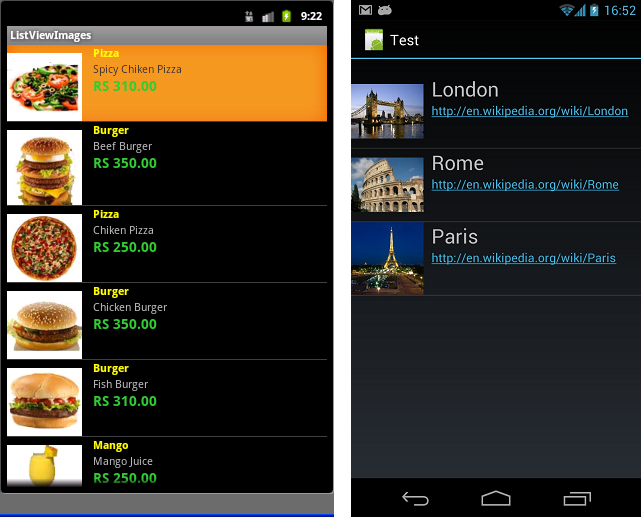
ListView là một view group, hiển thị các thành phần (elements) theo một danh sách, có thể cuộn được theo chiều thẳng đứng. ListView là một view quan trọng, nó được sử dụng rộng rãi trong các ứng dụng Android. Một ví dụ đơn giản của ListView là danh bạ liên lạc của bạn, nơi bạn có một danh sách các địa chỉ liên lạc của bạn hiển thị trong một ListView.
Ngoài ListView, Android cũng cung cấp cho bạn một view tương tự khác là ExpandableListView.
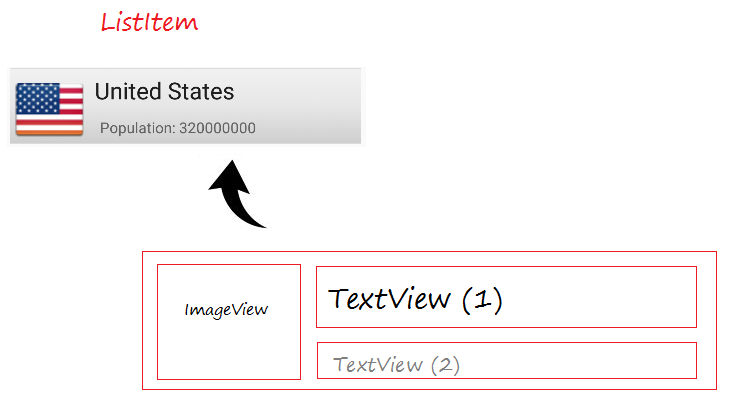
ListItem
Một ListView được tạo từ một danh sách các ListItem. ListItem là một dòng (row) riêng lẻ trong listview nơi mà dữ liệu sẽ được hiển thị. Bất kỳ dữ liệu nào trong listview chỉ được hiển thị thông qua listItem. Có thể coi listview như là một nhóm cuộn của các ListItem.
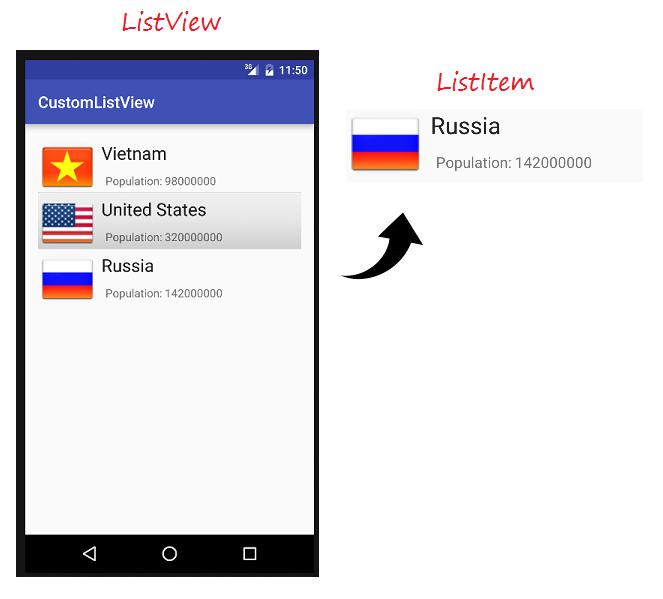
Một ListItem là một mảnh giao diện, nó có thể được làm bởi một số View.
Android xây dựng sẵn một số mẫu ListItem khác nhau, chúng được gọi là các Layout định nghĩa sẵn, sẽ được tôi đề cập trong các ví dụ của tài liệu này.
Adapter (Bộ tiếp nối)
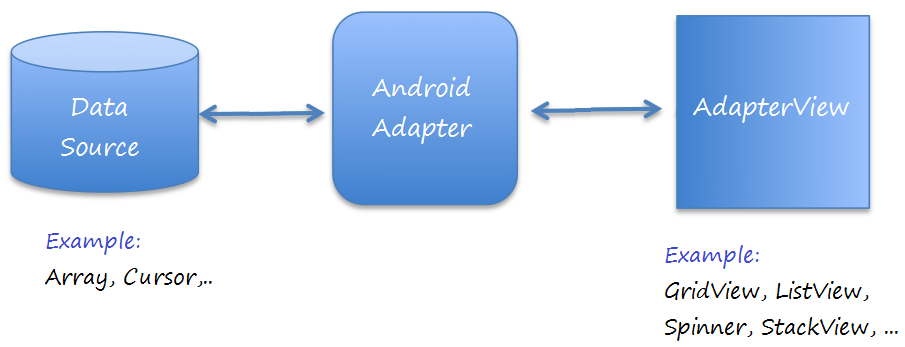
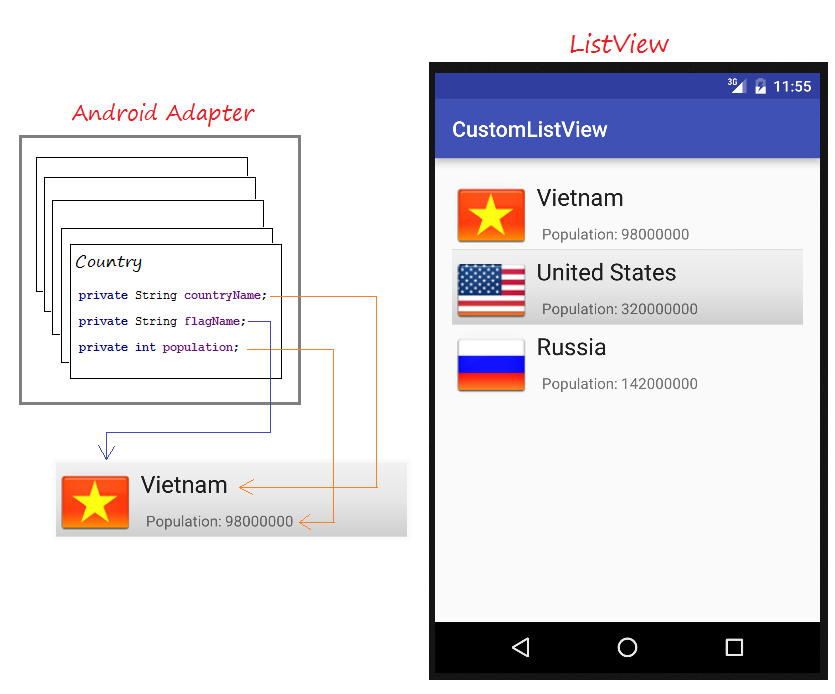
Android Adapter (Tạm dịch là bộ tiếp nối) là một cầu nối giữa các View (ví dụ như ListView) và các dữ liệu cơ bản cho View đó. Một Adapter quản lý dữ liệu và ghép nối với các dòng riêng lẻ (ListItem) của view.
Chúng ta ràng buộc các Adapter với Android ListView thông qua phương thức setAdapter. Bây giờ, Chúng ta hãy xem làm thế nào Adapter làm việc với sự giúp đỡ của hình ảnh sau đây.
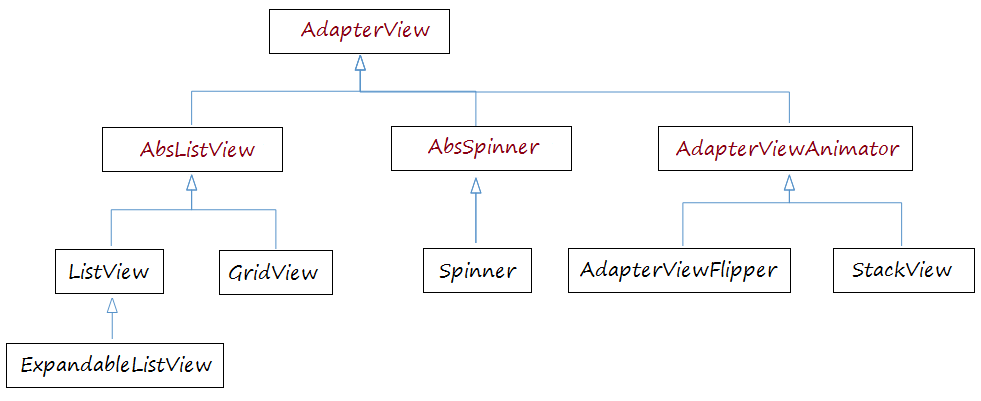
AdapterView
Có nhiều View cần tới Android Adapter để quản lý dữ liệu hiển thị, các View này là con của lớp AdapterView, bạn có thể xem ở hình minh họa dưới đây:
Android Adapter
ListView Selector
Để ListView hiển thị đẹp hơn, bạn cần phải tùy biến các hiệu ứng, chẳng hạn khi đổi mầu nền của ListItem khi con trỏ di chuyển trên nó hoặc đổi mầu nền khi ListItem nó được chọn. Bạn có thể xem ví dụ tùy biến ListView Selector ở cuối tài liệu này.
2. ListView cơ bản sử dụng ArrayAdapter
ArrayAdapter
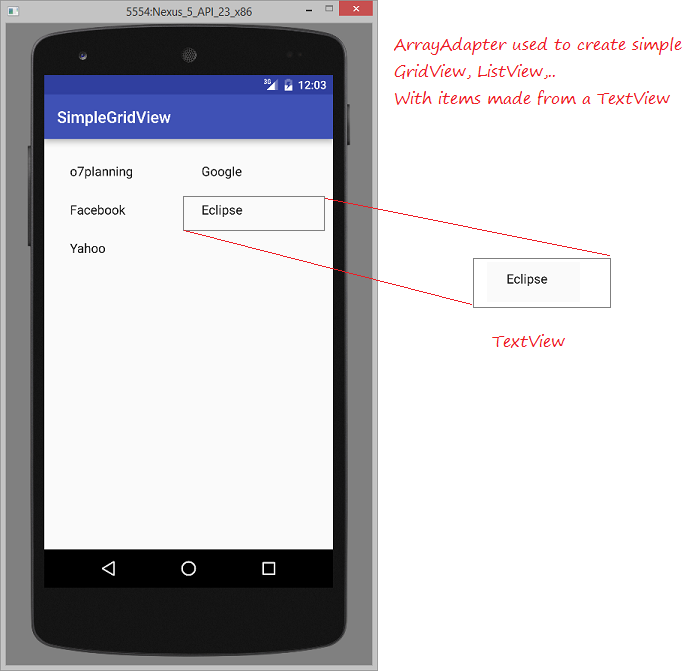
ArrayAdapter sử dụng để hiển thị các ListView với các ListItem đơn giản, ListItem có thể làm từ duy nhất một TextView, CheckedTextView, EditText,...
Trong trường hợp bạn muốn có một ListView với ListItem phức tạp hơn, bạn có thể tự tạo ra một Adapter tùy biến.
Trong trường hợp bạn muốn có một ListView với ListItem phức tạp hơn, bạn có thể tự tạo ra một Adapter tùy biến.
Ví dụ ListView với ArrayAdapter
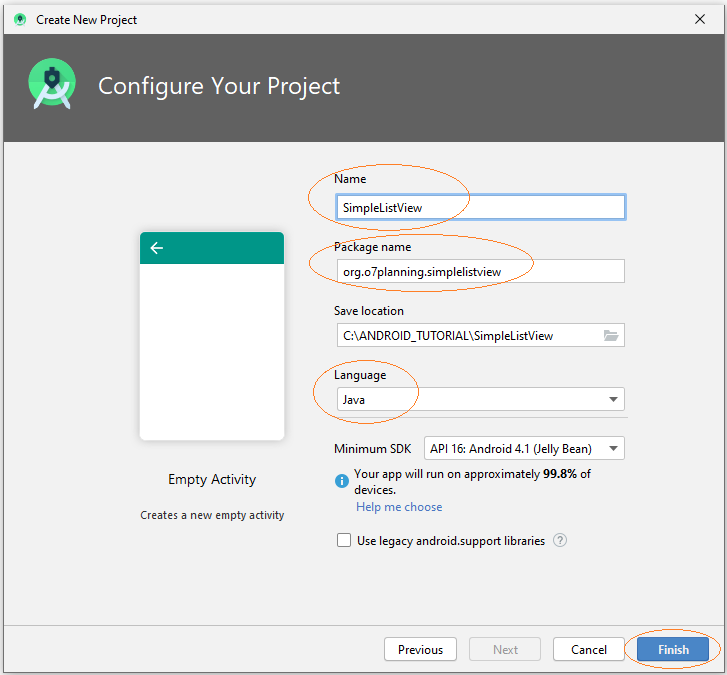
Tạo mới Project với tên SimpleListView.
Giao diện của ứng dụng:
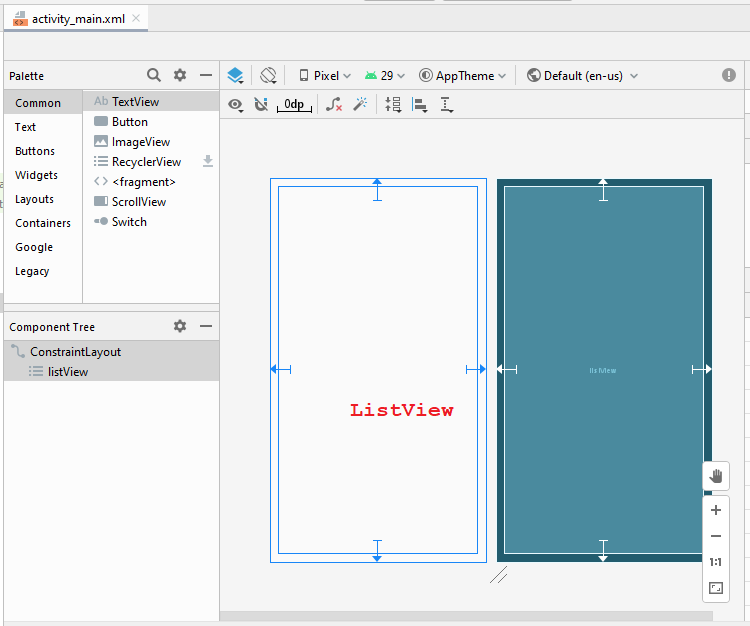
activity_main.xml
<?xml version="1.0" encoding="utf-8"?>
<androidx.constraintlayout.widget.ConstraintLayout
    xmlns:android="http://schemas.android.com/apk/res/android"
    xmlns:app="http://schemas.android.com/apk/res-auto"
    xmlns:tools="http://schemas.android.com/tools"
    android:layout_width="match_parent"
    android:layout_height="match_parent"
    tools:context=".MainActivity">

    <ListView
        android:id="@+id/listView"
        android:layout_width="0dp"
        android:layout_height="0dp"
        android:layout_marginStart="16dp"
        android:layout_marginLeft="16dp"
        android:layout_marginTop="16dp"
        android:layout_marginEnd="16dp"
        android:layout_marginRight="16dp"
        android:layout_marginBottom="16dp"
        app:layout_constraintBottom_toBottomOf="parent"
        app:layout_constraintEnd_toEndOf="parent"
        app:layout_constraintStart_toStartOf="parent"
        app:layout_constraintTop_toTopOf="parent" />
</androidx.constraintlayout.widget.ConstraintLayout>
UserAccount.java
package org.o7planning.simplelistview;

import java.io.Serializable;

public class UserAccount implements Serializable {

    private String userName;
    private String userType;

    private boolean active;

    public UserAccount(String userName, String userType)  {
        this.userName= userName;
        this.userType = userType;
        this.active= true;
    }

    public UserAccount(String userName, String userType, boolean active)  {
        this.userName= userName;
        this.userType = userType;
        this.active= active;
    }

    public String getUserType() {
        return userType;
    }

    public void setUserType(String userType) {
        this.userType = userType;
    }

    public String getUserName() {
        return userName;
    }

    public void setUserName(String userName) {
        this.userName = userName;
    }

    public boolean isActive() {
        return active;
    }

    public void setActive(boolean active) {
        this.active = active;
    }

    @Override
    public String toString() {
        return this.userName +" ("+ this.userType+")";
    }

}
MainActivity.java
package org.o7planning.simplelistview;

import androidx.appcompat.app.AppCompatActivity;

import android.os.Bundle;
import android.widget.ArrayAdapter;
import android.widget.ListView;

public class MainActivity extends AppCompatActivity {

    @Override
    protected void onCreate(Bundle savedInstanceState) {
        super.onCreate(savedInstanceState);
        setContentView(R.layout.activity_main);

        ListView listView = (ListView)findViewById(R.id.listView);

        //

        UserAccount tom = new UserAccount("Tom","admin");
        UserAccount jerry = new UserAccount("Jerry","user");
        UserAccount donald = new UserAccount("Donald","guest", false);

        UserAccount[] users = new UserAccount[]{tom,jerry, donald};


        // android.R.layout.simple_list_item_1 is a constant predefined layout of Android.
        // used to create a ListView with simple ListItem (Only one TextView).

        ArrayAdapter<UserAccount> arrayAdapter
                = new ArrayAdapter<UserAccount>(this, android.R.layout.simple_list_item_1 , users);

        listView.setAdapter(arrayAdapter);
    }


}
Chạy ví dụ:

Các Layout có sẵn để làm việc với ArrayAdapter
Android xây dựng sẵn một số Layout (cho ListItem) có thể làm việc với ArrayAdapter.
android.R.layout.simple_list_item_1
- Đây là Layout đơn giản của ListItem, được tạo bởi duy nhất một TextView (Bạn có thể xem ví dụ ở trên).
android.R.layout.simple_list_item_checked & android.R.layout.simple_list_item_multiple_choice
- 2 Layout trên là layout đơn giản để tạo ra một ListView với ListItem có một checkbox.
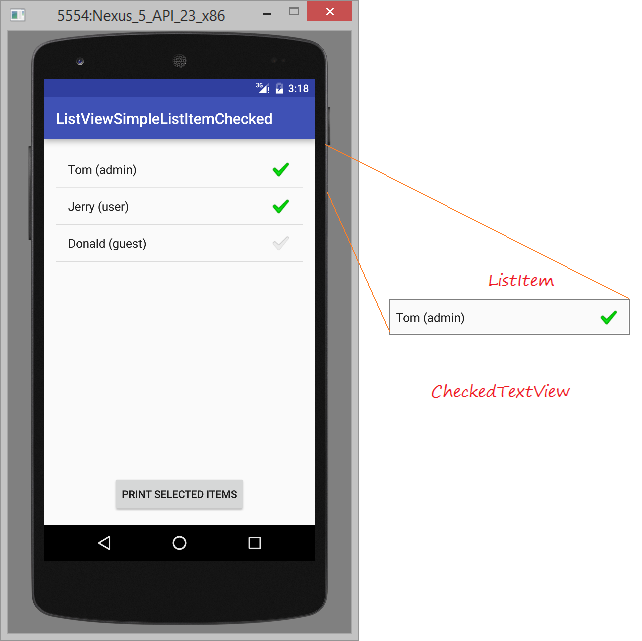
Bạn có thể xem ví dụ này tại đây:
3. Tùy biến ListView sử dụng BaseAdapter
Bạn có thể xây dựng tùy biến một ListViewer. Adapter của bạn nên mở rộng từ lớp BaseAdapter.
Ví dụ ListView tùy biến
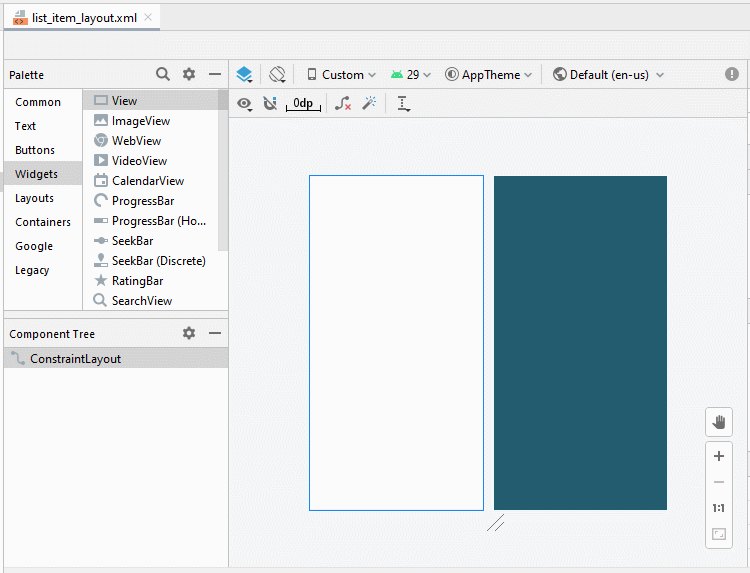
Tạo một "Empty Activity" project có tên CustomListView.


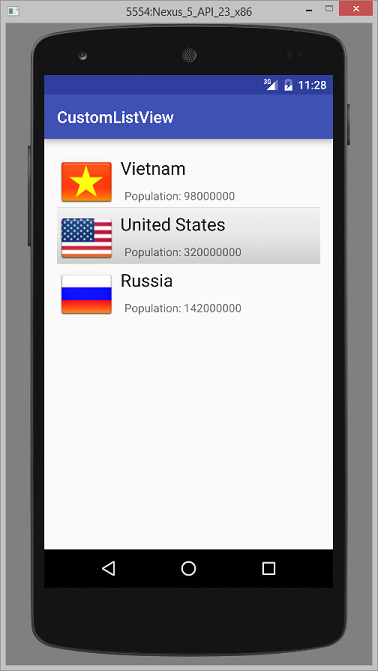
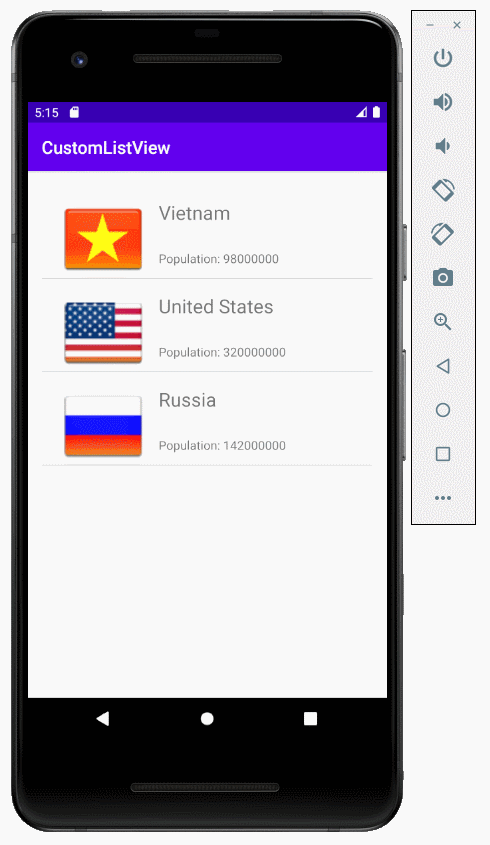
Đây là hình ảnh ứng dụng sẽ làm:
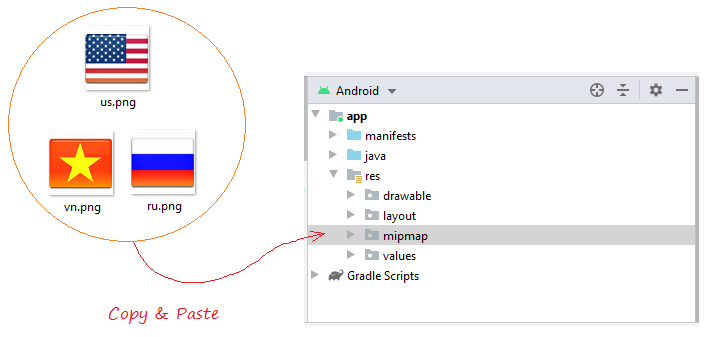
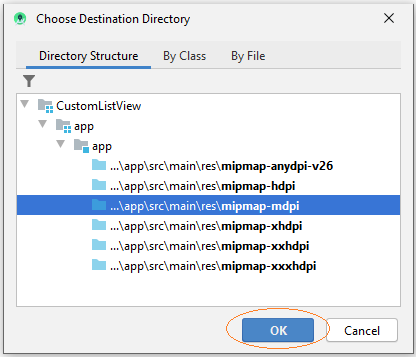
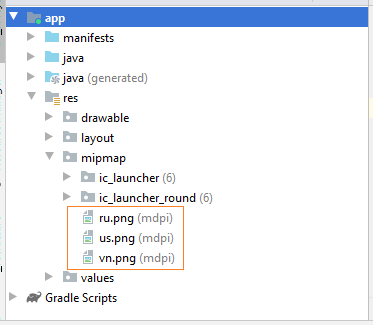
Trước hết bạn cần chuẩn bị một vài file ảnh:
Copy và paste các file ảnh này vào thư mục mipmap:
 |  |  |
vn.png | us.png | ru.png |
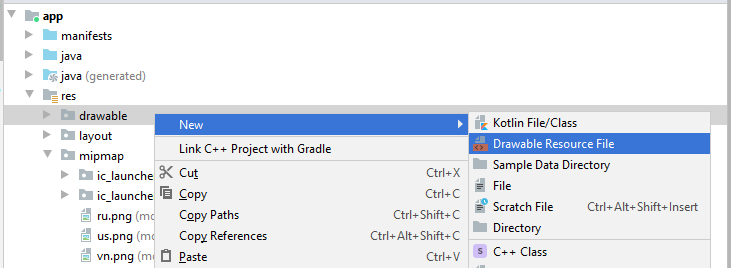
Bạn cần tạo List item layouts. Trên Android Studio nhấn phải chuột vào res/layout chọn:
- New/Layout resource file
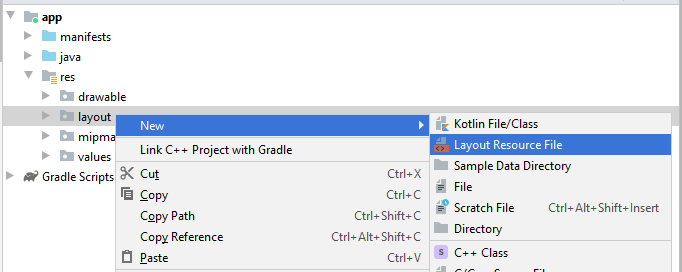
Nhập vào:
- File name: list_item_layout.xml
- Root element: androidx.constraintlayout.widget.ConstraintLayout

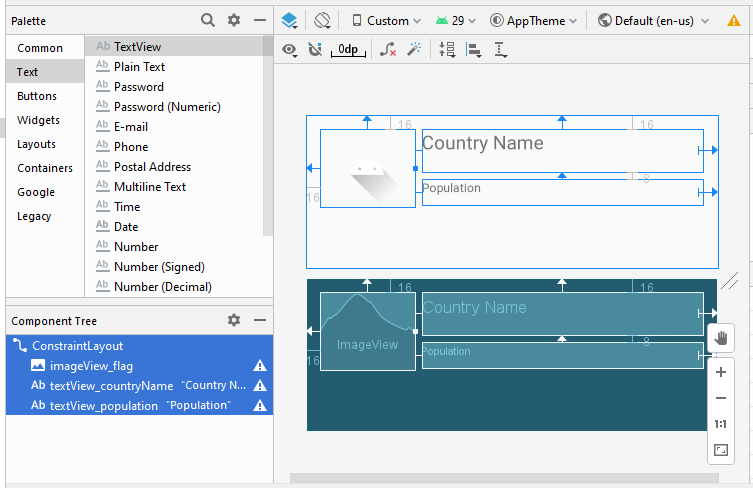
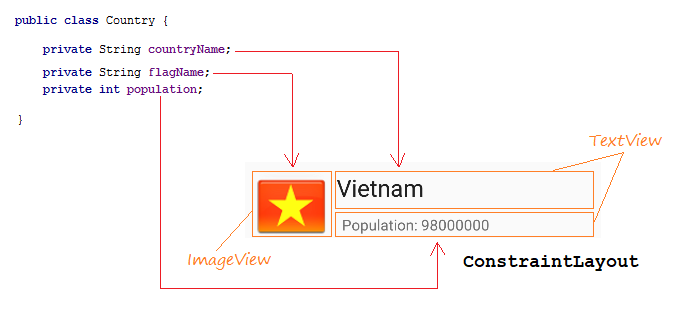
Thiết kế giao diện của List Item.

Thiết kế giao diện:
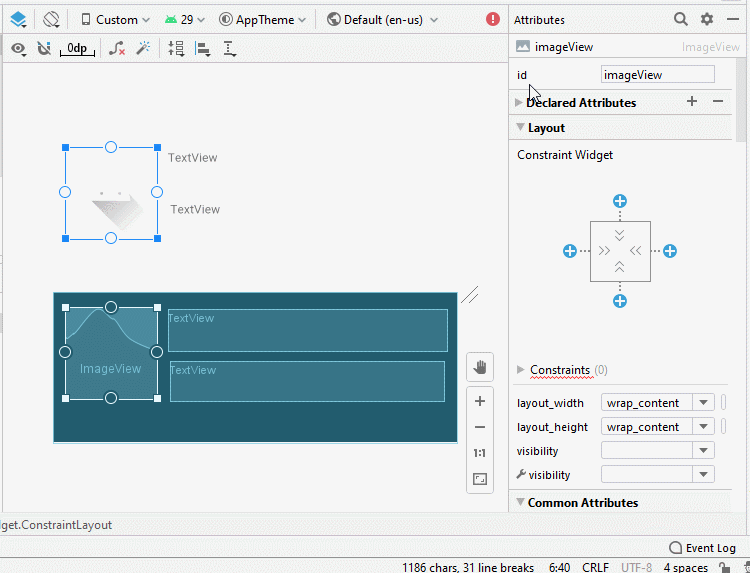
Sét đặt ID, Text cho các thành phần trên giao diện.
ImageView
TextView 1:
TextView 2:
- ID: imageView_flag
TextView 1:
- ID: textView_countryName
- Text: Country Name
TextView 2:
- ID: textView_population
- Text: Population ....
list_item_layout.xml
<?xml version="1.0" encoding="utf-8"?>
<androidx.constraintlayout.widget.ConstraintLayout
    xmlns:android="http://schemas.android.com/apk/res/android"
    xmlns:app="http://schemas.android.com/apk/res-auto"
    xmlns:tools="http://schemas.android.com/tools"
    android:layout_width="match_parent"
    android:layout_height="match_parent">

    <ImageView
        android:id="@+id/imageView_flag"
        android:layout_width="110sp"
        android:layout_height="90sp"
        android:layout_marginStart="16dp"
        android:layout_marginLeft="16dp"
        android:layout_marginTop="16dp"
        app:layout_constraintStart_toStartOf="parent"
        app:layout_constraintTop_toTopOf="parent"
        app:srcCompat="@drawable/ic_launcher_foreground"
        tools:ignore="VectorDrawableCompat" />

    <TextView
        android:id="@+id/textView_countryName"
        android:layout_width="0dp"
        android:layout_height="50dp"
        android:layout_marginStart="8dp"
        android:layout_marginLeft="8dp"
        android:layout_marginTop="16dp"
        android:layout_marginEnd="16dp"
        android:layout_marginRight="16dp"
        android:text="Country Name"
        android:textSize="22sp"
        app:layout_constraintEnd_toEndOf="parent"
        app:layout_constraintStart_toEndOf="@+id/imageView_flag"
        app:layout_constraintTop_toTopOf="parent" />

    <TextView
        android:id="@+id/textView_population"
        android:layout_width="0dp"
        android:layout_height="30dp"
        android:layout_marginStart="8dp"
        android:layout_marginLeft="8dp"
        android:layout_marginTop="8dp"
        android:layout_marginEnd="16dp"
        android:layout_marginRight="16dp"
        android:text="Population"
        app:layout_constraintEnd_toEndOf="parent"
        app:layout_constraintStart_toEndOf="@+id/imageView_flag"
        app:layout_constraintTop_toBottomOf="@+id/textView_countryName" />
</androidx.constraintlayout.widget.ConstraintLayout>
Country.java
package org.o7planning.customlistview;

public class Country {

    private String countryName;

    // Image name (Without extension)
    private String flagName;
    private int population;

    public Country(String countryName, String flagName, int population) {
        this.countryName= countryName;
        this.flagName= flagName;
        this.population= population;
    }

    public int getPopulation() {
        return population;
    }

    public void setPopulation(int population) {
        this.population = population;
    }

    public String getCountryName() {
        return countryName;
    }

    public void setCountryName(String countryName) {
        this.countryName = countryName;
    }

    public String getFlagName() {
        return flagName;
    }

    public void setFlagName(String flagName) {
        this.flagName = flagName;
    }

    @Override
    public String toString()  {
        return this.countryName+" (Population: "+ this.population+")";
    }
}- activity_main.xml
activity_main.xml
<?xml version="1.0" encoding="utf-8"?>
<androidx.constraintlayout.widget.ConstraintLayout
    xmlns:android="http://schemas.android.com/apk/res/android"
    xmlns:app="http://schemas.android.com/apk/res-auto"
    xmlns:tools="http://schemas.android.com/tools"
    android:layout_width="match_parent"
    android:layout_height="match_parent"
    tools:context=".MainActivity">

    <ListView
        android:id="@+id/listView"
        android:layout_width="0dp"
        android:layout_height="0dp"
        android:layout_marginStart="16dp"
        android:layout_marginLeft="16dp"
        android:layout_marginTop="16dp"
        android:layout_marginEnd="16dp"
        android:layout_marginRight="16dp"
        android:layout_marginBottom="16dp"
        app:layout_constraintBottom_toBottomOf="parent"
        app:layout_constraintEnd_toEndOf="parent"
        app:layout_constraintStart_toStartOf="parent"
        app:layout_constraintTop_toTopOf="parent" />
</androidx.constraintlayout.widget.ConstraintLayout>
CustomListAdapter là lớp mở rộng từ BaseAdapter, nó làm nhiệm vụ hiển thị dữ liệu lên các List Item.
CustomListAdapter.java
package org.o7planning.customlistview;

import android.content.Context;
import android.util.Log;
import android.view.LayoutInflater;
import android.view.View;
import android.view.ViewGroup;
import android.widget.BaseAdapter;
import android.widget.ImageView;
import android.widget.TextView;
import java.util.List;

public class CustomListAdapter  extends BaseAdapter {

    private List<Country> listData;
    private LayoutInflater layoutInflater;
    private Context context;

    public CustomListAdapter(Context aContext,  List<Country> listData) {
        this.context = aContext;
        this.listData = listData;
        layoutInflater = LayoutInflater.from(aContext);
    }

    @Override
    public int getCount() {
        return listData.size();
    }

    @Override
    public Object getItem(int position) {
        return listData.get(position);
    }

    @Override
    public long getItemId(int position) {
        return position;
    }

    public View getView(int position, View convertView, ViewGroup parent) {
        ViewHolder holder;
        if (convertView == null) {
            convertView = layoutInflater.inflate(R.layout.list_item_layout, null);
            holder = new ViewHolder();
            holder.flagView = (ImageView) convertView.findViewById(R.id.imageView_flag);
            holder.countryNameView = (TextView) convertView.findViewById(R.id.textView_countryName);
            holder.populationView = (TextView) convertView.findViewById(R.id.textView_population);
            convertView.setTag(holder);
        } else {
            holder = (ViewHolder) convertView.getTag();
        }

        Country country = this.listData.get(position);
        holder.countryNameView.setText(country.getCountryName());
        holder.populationView.setText("Population: " + country.getPopulation());

        int imageId = this.getMipmapResIdByName(country.getFlagName());

        holder.flagView.setImageResource(imageId);

        return convertView;
    }

    // Find Image ID corresponding to the name of the image (in the directory mipmap).
    public int getMipmapResIdByName(String resName)  {
        String pkgName = context.getPackageName();
        // Return 0 if not found.
        int resID = context.getResources().getIdentifier(resName , "mipmap", pkgName);
        Log.i("CustomListView", "Res Name: "+ resName+"==> Res ID = "+ resID);
        return resID;
    }

    static class ViewHolder {
        ImageView flagView;
        TextView countryNameView;
        TextView populationView;
    }

}
ActivityMain.java
package org.o7planning.customlistview;

import androidx.appcompat.app.AppCompatActivity;

import android.os.Bundle;
import android.view.View;
import android.widget.AdapterView;
import android.widget.ListView;
import android.widget.Toast;
import java.util.ArrayList;
import java.util.List;

public class MainActivity extends AppCompatActivity {

    @Override
    protected void onCreate(Bundle savedInstanceState) {
        super.onCreate(savedInstanceState);
        setContentView(R.layout.activity_main);


        List<Country> image_details = getListData();
        final ListView listView = (ListView) findViewById(R.id.listView);
        listView.setAdapter(new CustomListAdapter(this, image_details));

        // When the user clicks on the ListItem
        listView.setOnItemClickListener(new AdapterView.OnItemClickListener() {

            @Override
            public void onItemClick(AdapterView<?> a, View v, int position, long id) {
                Object o = listView.getItemAtPosition(position);
                Country country = (Country) o;
                Toast.makeText(MainActivity.this, "Selected :" + " " + country, Toast.LENGTH_LONG).show();
            }
        });
    }

    private  List<Country> getListData() {
        List<Country> list = new ArrayList<Country>();
        Country vietnam = new Country("Vietnam", "vn", 98000000);
        Country usa = new Country("United States", "us", 320000000);
        Country russia = new Country("Russia", "ru", 142000000);


        list.add(vietnam);
        list.add(usa);
        list.add(russia);

        return list;
    }

}
Chạy ứng dụng:
Ví dụ Tùy biến Selector
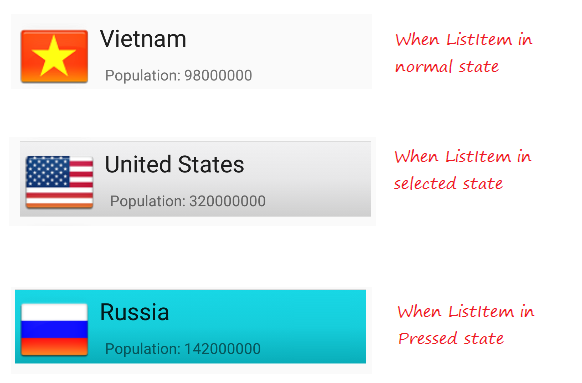
Để ListView hiển thị đẹp hơn, bạn cần phải tùy biến các hiệu ứng, chẳng hạn khi đổi mầu nền của ListItem khi con trỏ di chuyển trên nó hoặc đổi mầu nền khi ListItem nó được chọn. Chúng ta tiếp tục với ví dụ ở trên.
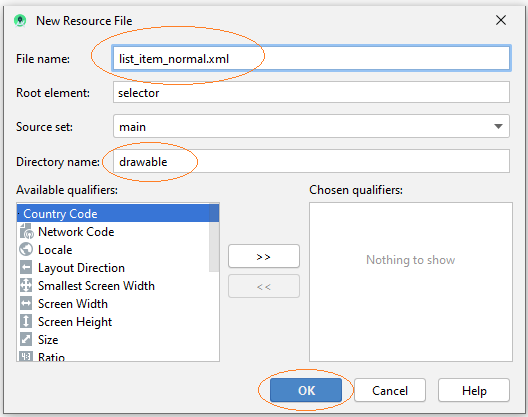
Tạo các file cấu hình:
- File name: item_state_normal.xml
- Directory: drawable
item_state_normal.xml
<?xml version="1.0" encoding="utf-8"?>
<shape xmlns:android="http://schemas.android.com/apk/res/android"
android:shape="rectangle">
<gradient
android:startColor="#f1f1f2"
android:centerColor="#e7e7e8"
android:endColor="#cfcfcf"
android:angle="270" />
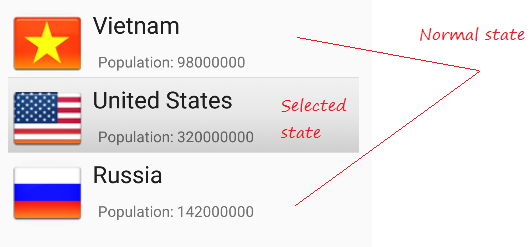
</shape>Khi List Item ở trạng thái bình thường các style sét đặt trong item_state_normal.xml sẽ được áp dụng cho ListItem.
Tương tự tạo mới 3 file khác:
- item_state_pressed.xml
- item_state_selected.xml
- list_selector.xml
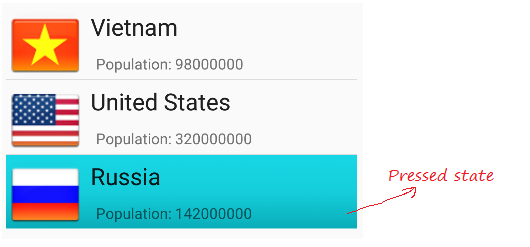
Khi List Item bị nhấn các style sét đặt trong item_state_pressed.xml sẽ được áp dụng cho ListItem
item_state_pressed.xml
<?xml version="1.0" encoding="utf-8"?>

<shape xmlns:android="http://schemas.android.com/apk/res/android"
  android:shape="rectangle">

  <gradient
      android:startColor="#18d7e5"
      android:centerColor="#16cedb"
      android:endColor="#09adb9"
      android:angle="270" />

</shape>
Khi List Item được chọn các style sét đặt trong item_state_selected.xml sẽ được áp dụng cho ListItem
item_state_selected.xml
<?xml version="1.0" encoding="utf-8"?>

<shape xmlns:android="http://schemas.android.com/apk/res/android"
  android:shape="rectangle">

  <gradient
      android:startColor="#18d7e5"
      android:centerColor="#16cedb"
      android:endColor="#09adb9"
      android:angle="270" />

</shape>
Gắn các trạng thái cụ thể của List Item với các file xml.
list_selector.xml
<?xml version="1.0" encoding="utf-8"?>

<selector xmlns:android="http://schemas.android.com/apk/res/android">

       <item
           android:state_selected="false"
           android:state_pressed="false"
           android:drawable="@drawable/item_state_normal" />

       <item android:state_pressed="true"
           android:drawable="@drawable/item_state_pressed" />

       <item android:state_selected="true"
           android:state_pressed="false"
           android:drawable="@drawable/item_state_selected" />


</selector>
Sét đặt ListSelector cho ListView:
<ListView
     ...
     android:listSelector="@drawable/list_selector"/>
activity_main.xml
<?xml version="1.0" encoding="utf-8"?>
<androidx.constraintlayout.widget.ConstraintLayout
    xmlns:android="http://schemas.android.com/apk/res/android"
    xmlns:app="http://schemas.android.com/apk/res-auto"
    xmlns:tools="http://schemas.android.com/tools"
    android:layout_width="match_parent"
    android:layout_height="match_parent"
    tools:context=".MainActivity">

    <ListView
        android:id="@+id/listView"
        android:layout_width="0dp"
        android:layout_height="0dp"
        android:layout_marginStart="16dp"
        android:layout_marginLeft="16dp"
        android:layout_marginTop="16dp"
        android:layout_marginEnd="16dp"
        android:layout_marginRight="16dp"
        android:layout_marginBottom="16dp"
        app:layout_constraintBottom_toBottomOf="parent"
        app:layout_constraintEnd_toEndOf="parent"
        app:layout_constraintStart_toStartOf="parent"
        app:layout_constraintTop_toTopOf="parent"
        android:listSelector="@drawable/list_selector"/>

</androidx.constraintlayout.widget.ConstraintLayout>
Chạy lại ứng dụng của bạn.
Các hướng dẫn lập trình Android
- Cấu hình Android Emulator trong Android Studio
- Hướng dẫn và ví dụ Android ToggleButton
- Tạo một File Finder Dialog đơn giản trong Android
- Hướng dẫn và ví dụ Android TimePickerDialog
- Hướng dẫn và ví dụ Android DatePickerDialog
- Bắt đầu với Android cần những gì?
- Cài đặt Android Studio trên Windows
- Cài đặt Intel® HAXM cho Android Studio
- Hướng dẫn và ví dụ Android AsyncTask
- Hướng dẫn và ví dụ Android AsyncTaskLoader
- Hướng dẫn lập trình Android cho người mới bắt đầu - Các ví dụ cơ bản
- Làm sao biết số số điện thoại của Android Emulator và thay đổi nó
- Hướng dẫn và ví dụ Android TextInputLayout
- Hướng dẫn và ví dụ Android CardView
- Hướng dẫn và ví dụ Android ViewPager2
- Lấy số điện thoại trong Android sử dụng TelephonyManager
- Hướng dẫn và ví dụ Android Phone Call
- Hướng dẫn và ví dụ Android Wifi Scanning
- Hướng dẫn lập trình Android Game 2D cho người mới bắt đầu
- Hướng dẫn và ví dụ Android DialogFragment
- Hướng dẫn và ví dụ Android CharacterPickerDialog
- Hướng dẫn lập trình Android cho người mới bắt đầu - Hello Android
- Hướng dẫn sử dụng Android Device File Explorer
- Bật tính năng USB Debugging trên thiết bị Android
- Hướng dẫn và ví dụ Android UI Layouts
- Hướng dẫn và ví dụ Android SMS
- Hướng dẫn lập trình Android với Database SQLite
- Hướng dẫn và ví dụ Google Maps Android API
- Hướng dẫn chuyển văn bản thành lời nói trong Android
- Hướng dẫn và ví dụ Android Space
- Hướng dẫn và ví dụ Android Toast
- Tạo một Android Toast tùy biến
- Hướng dẫn và ví dụ Android SnackBar
- Hướng dẫn và ví dụ Android TextView
- Hướng dẫn và ví dụ Android TextClock
- Hướng dẫn và ví dụ Android EditText
- Hướng dẫn và ví dụ Android TextWatcher
- Định dạng số thẻ tín dụng với Android TextWatcher
- Hướng dẫn và ví dụ Android Clipboard
- Tạo một File Chooser đơn giản trong Android
- Hướng dẫn và ví dụ Android AutoCompleteTextView và MultiAutoCompleteTextView
- Hướng dẫn và ví dụ Android ImageView
- Hướng dẫn và ví dụ Android ImageSwitcher
- Hướng dẫn và ví dụ Android ScrollView và HorizontalScrollView
- Hướng dẫn và ví dụ Android WebView
- Hướng dẫn và ví dụ Android SeekBar
- Hướng dẫn và ví dụ Android Dialog
- Hướng dẫn và ví dụ Android AlertDialog
- Hướng dẫn và ví dụ Android RatingBar
- Hướng dẫn và ví dụ Android ProgressBar
- Hướng dẫn và ví dụ Android Spinner
- Hướng dẫn và ví dụ Android Button
- Hướng dẫn và ví dụ Android Switch
- Hướng dẫn và ví dụ Android ImageButton
- Hướng dẫn và ví dụ Android FloatingActionButton
- Hướng dẫn và ví dụ Android CheckBox
- Hướng dẫn và ví dụ Android RadioGroup và RadioButton
- Hướng dẫn và ví dụ Android Chip và ChipGroup
- Sử dụng các tài sản ảnh và biểu tượng của Android Studio
- Thiết lập SD Card cho Android Emulator
- Ví dụ với ChipGroup và các Chip Entry
- Làm sao thêm thư viện bên ngoài vào dự án Android trong Android Studio?
- Làm sao loại bỏ các quyền đã cho phép trên ứng dụng Android
- Làm sao loại bỏ các ứng dụng ra khỏi Android Emulator?
- Hướng dẫn và ví dụ Android LinearLayout
- Hướng dẫn và ví dụ Android TableLayout
- Hướng dẫn và ví dụ Android FrameLayout
- Hướng dẫn và ví dụ Android QuickContactBadge
- Hướng dẫn và ví dụ Android StackView
- Hướng dẫn và ví dụ Android Camera
- Hướng dẫn và ví dụ Android MediaPlayer
- Hướng dẫn và ví dụ Android VideoView
- Phát hiệu ứng âm thanh trong Android với SoundPool
- Hướng dẫn lập trình mạng trong Android - Android Networking
- Hướng dẫn xử lý JSON trong Android
- Lưu trữ dữ liệu trên thiết bị với Android SharedPreferences
- Hướng dẫn lập trình Android với bộ lưu trữ trong (Internal Storage)
- Hướng dẫn lập trình Android với bộ lưu trữ ngoài (External Storage)
- Hướng dẫn sử dụng Intent trong Android
- Ví dụ về một Android Intent tường minh, gọi một Intent khác
- Ví dụ về Android Intent không tường minh, mở một URL, gửi một email
- Hướng dẫn sử dụng Service trong Android
- Hướng dẫn sử dụng thông báo trong Android - Android Notification
- Hướng dẫn và ví dụ Android DatePicker
- Hướng dẫn và ví dụ Android TimePicker
- Hướng dẫn và ví dụ Android Chronometer
- Hướng dẫn và ví dụ Android OptionMenu
- Hướng dẫn và ví dụ Android ContextMenu
- Hướng dẫn và ví dụ Android PopupMenu
- Hướng dẫn và ví dụ Android Fragment
- Hướng dẫn và ví dụ Android ListView
- Android ListView với Checkbox sử dụng ArrayAdapter
- Hướng dẫn và ví dụ Android GridView
Show More
