Hướng dẫn và ví dụ Android Chronometer
1. Android Chronometer
Trong Android, Chronometer (Đồng hồ bấm giờ) là một thành phần giao diện mô phỏng một thiết bị đo thời gian (timer) đơn giản.
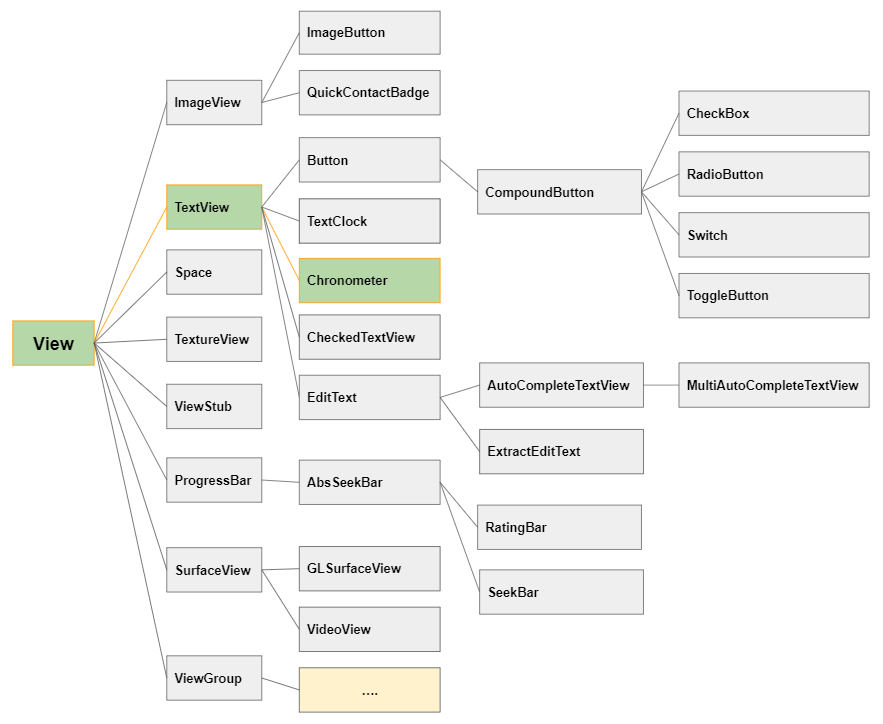
Chú ý: Thành phần Chronometer không sẵn có trên Palette của cửa sổ thiết kế, vì vậy bạn cần sử dụng đoạn XML dưới đây để thêm nó vào trong giao diện.
<Chronometer
   android:id="@+id/simpleChronometer"
   android:countDown="false"
   android:layout_width="wrap_content"
   android:layout_height="wrap_content" />

<Chronometer
   android:id="@+id/simpleChronometer"
   android:countDown="true"
   android:layout_width="wrap_content"
   android:layout_height="wrap_content" />
android:countDown
Thuộc tính này chỉ định rằng Chronometer này là đếm lùi (counts down) hay đếm xuôi (counts up), giá trị của nó là true/false.
<!-- Counts Up -->
<Chronometer
   android:id="@+id/simpleChronometer"
   android:countDown="false"
   android:layout_width="wrap_content"
   android:layout_height="wrap_content" />

<!-- Counts Down -->
<Chronometer
   android:id="@+id/simpleChronometer"
   android:countDown="true"
   android:layout_width="wrap_content"
   android:layout_height="wrap_content" />
android:format
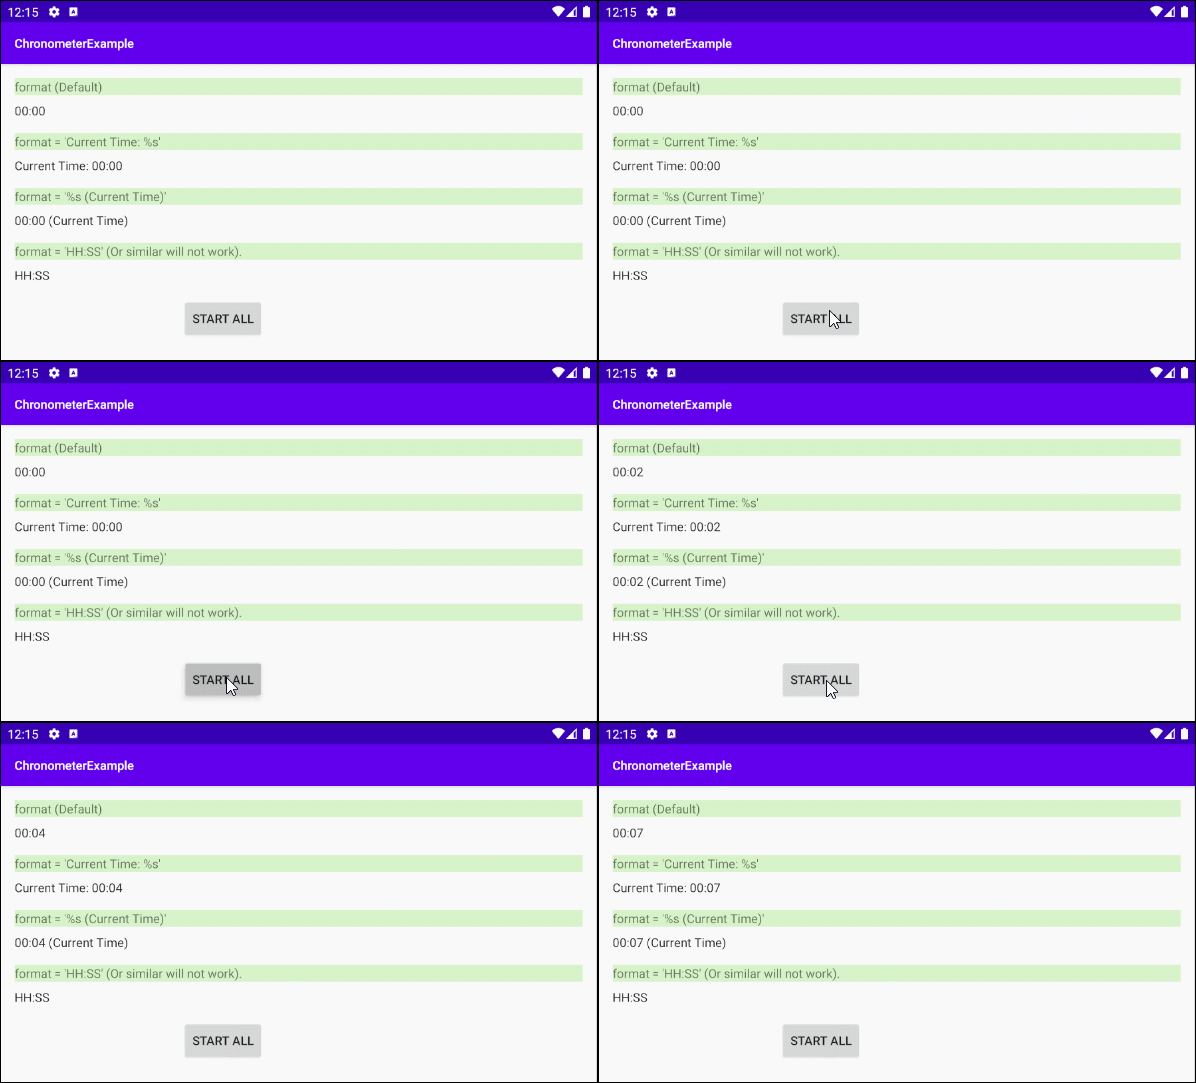
Thuộc tính này chỉ định một chuỗi định dạng thời gian (time format string) cho Chronometer.
Theo mặc định, Chronometer sẽ hiển thị thời gian theo định dạng "MM:SS" khi thời gian nhỏ hơn 1 giờ, hoặc "H:MM:SS" nếu thời gian lớn hơn 1 giờ. Giá trị của thuộc tính android:format phải có dạng "Text1 %s Text2", và khi Chronometer hiển thị thời gian bạn sẽ nhận được chuỗi có định dạng "Text1 MM:SS Text2" hoặc "Text1 H:MM:SS Text2".
2. Chronometer Methods
Chronometer Methods
long getBase()

void setBase(long base)

String getFormat()

void setFormat(String format)

boolean isCountDown()

void setCountDown(boolean countDown)

boolean isTheFinalCountDown()

void start()

void stop()
setBase(long base)
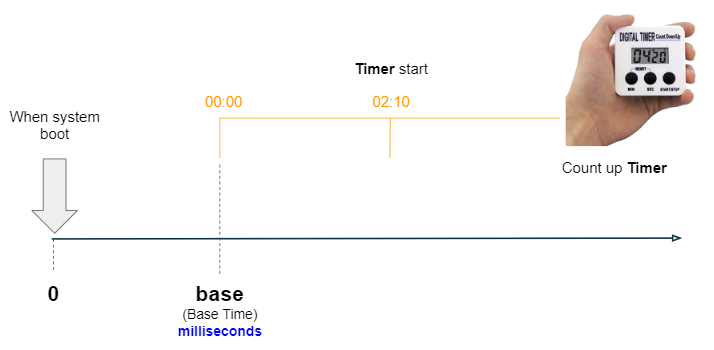
Phương thức này chỉ có ích đối với các Chronometer đếm xuôi (count up), được sử dụng để sét đặt thời điểm mà Chronometer tham chiếu đến (Tương ứng với giá trị 00:00).
Tham số base là số mili giây kể từ khi hệ thống được khởi động, bao gồm cả thời gian ngủ của thiết bị. Nếu bạn sử dụng Android Emulator (Trình giả lập của Android) thời điểm máy tính khởi động sẽ được coi là gốc của tọa độ.
// Returns milliseconds since system boot, including time spent in sleep.
long elapsedRealtime = SystemClock.elapsedRealtime();

// Set the time that the count-up timer is in reference to.
this.chronometer.setBase(elapsedRealtime);

this.chronometer.start();
setFormat(String format)
Theo mặc định, Chronometer sẽ hiển thị thời gian theo định dạng "MM:SS" khi thời gian nhỏ hơn 1 giờ, hoặc "H:MM:SS" nếu thời gian lớn hơn 1 giờ. Giá trị của tham số format phải có dạng "Text1 %s Text2", và khi Chronometer hiển thị thời gian bạn sẽ nhận được chuỗi có định dạng "Text1 MM:SS Text2" hoặc "Text1 H:MM:SS Text2".
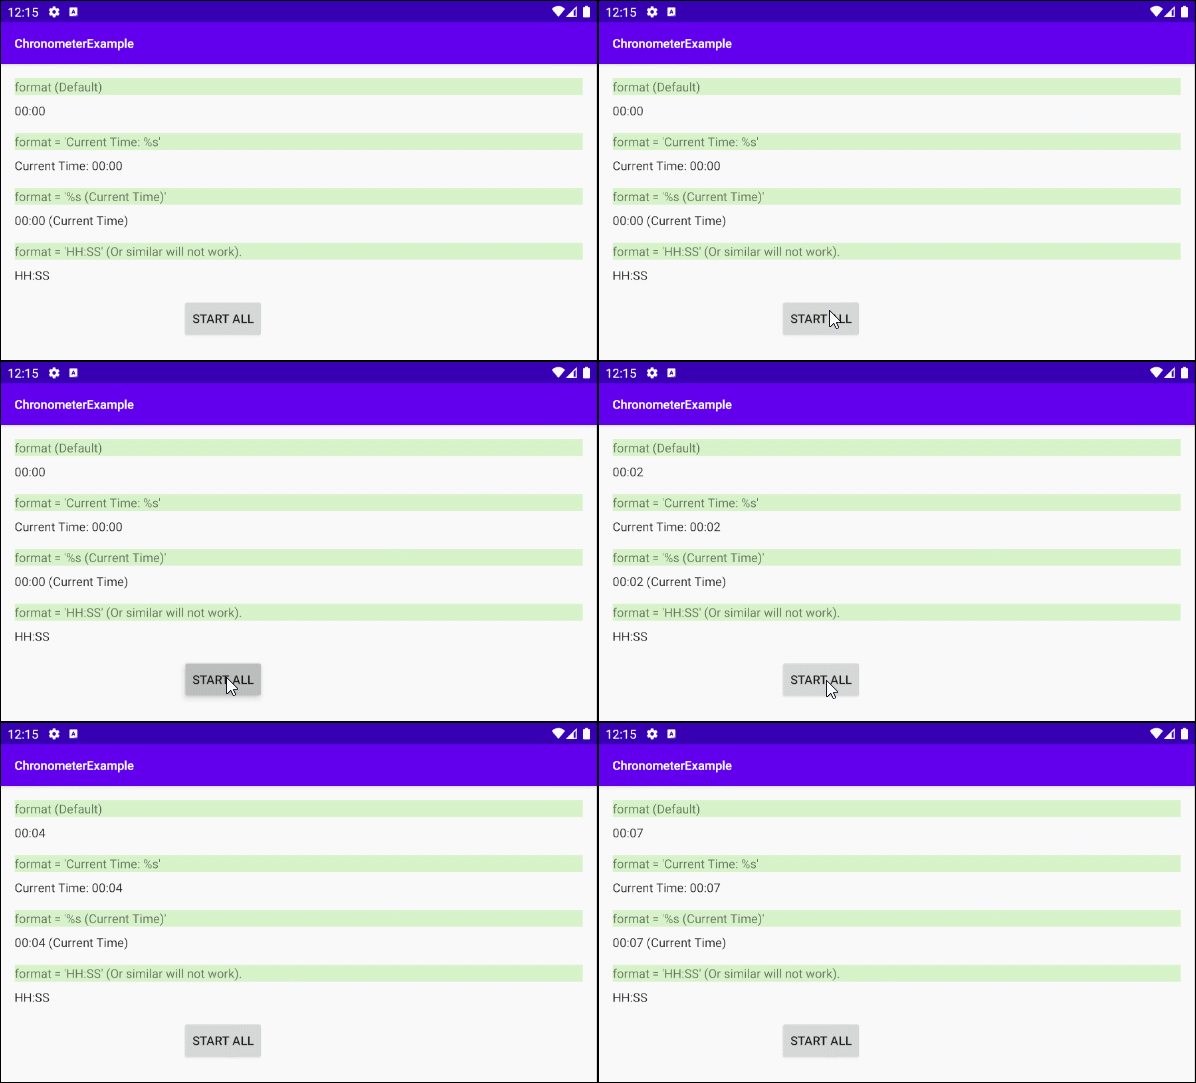
Nếu bạn muốn có một tùy biến sâu hơn về định dạng hiển thị thời gian của Chronometer bạn có thể xem một ví dụ ở phía cuối bài viết này.
4. Example: Chronometer (Count up)
Chúng ta bắt đầu với một với một Chronometer đếm xuôi (count up) đơn giản, ứng dụng này có thể sử dụng để đo thời gian chạy của một vận động viên.
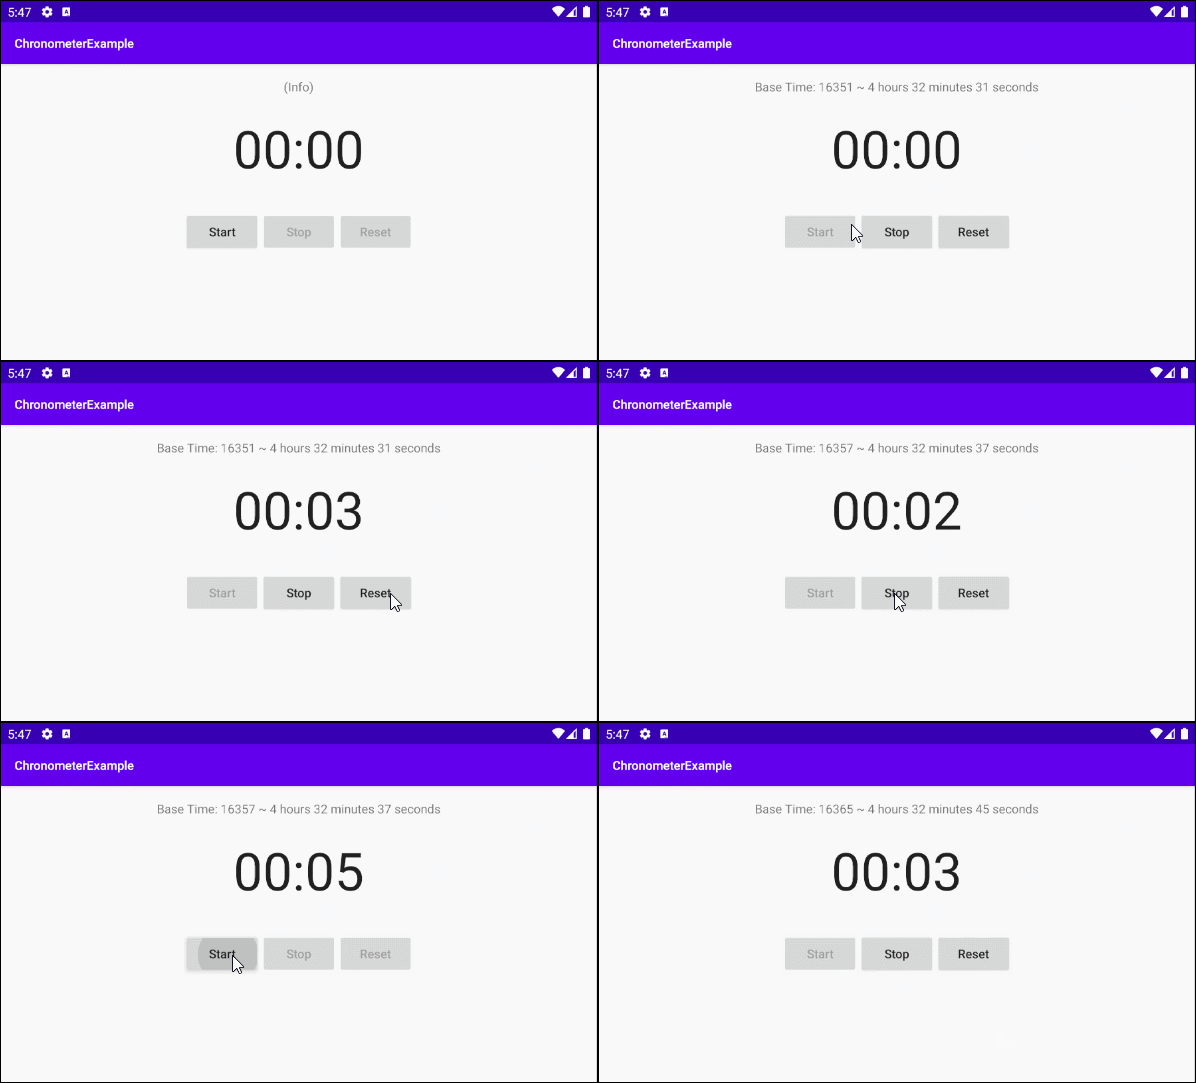
OK, Trên Android Studio tạo mới project:
- File > New > New Project > Empty Activity
- Name: ChronometerExample
- Package name: org.o7planning.chronometerexample
- Language: Java
Giao diện của ví dụ:
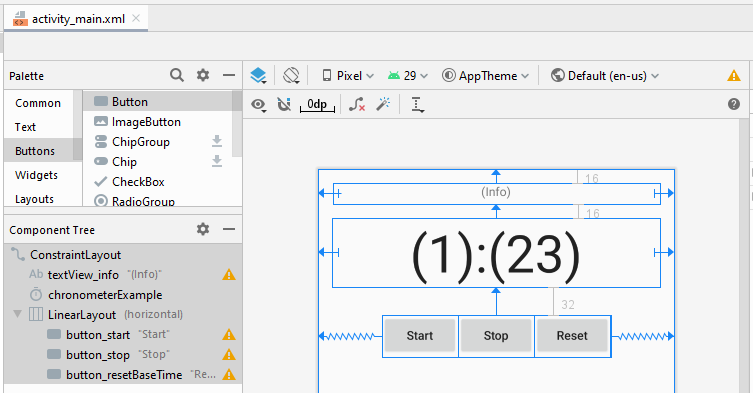
activity_main.xml
<?xml version="1.0" encoding="utf-8"?>
<androidx.constraintlayout.widget.ConstraintLayout
    xmlns:android="http://schemas.android.com/apk/res/android"
    xmlns:app="http://schemas.android.com/apk/res-auto"
    xmlns:tools="http://schemas.android.com/tools"
    android:layout_width="match_parent"
    android:layout_height="match_parent"
    tools:context=".MainActivity">


    <TextView
        android:id="@+id/textView_info"
        android:layout_width="378dp"
        android:layout_height="24dp"
        android:layout_marginStart="16dp"
        android:layout_marginLeft="16dp"
        android:layout_marginTop="16dp"
        android:layout_marginEnd="16dp"
        android:layout_marginRight="16dp"
        android:gravity="center_horizontal"
        android:text="(Info)"
        app:layout_constraintEnd_toEndOf="parent"
        app:layout_constraintStart_toStartOf="parent"
        app:layout_constraintTop_toTopOf="parent" />

    <Chronometer
        android:id="@+id/chronometerExample"
        android:layout_width="match_parent"
        android:layout_height="wrap_content"
        android:layout_marginStart="16dp"
        android:layout_marginLeft="16dp"
        android:layout_marginTop="16dp"
        android:layout_marginEnd="16dp"
        android:layout_marginRight="16dp"
        android:layout_weight="1"
        android:gravity="center_horizontal"
        android:textSize="60sp"
        app:layout_constraintEnd_toEndOf="parent"
        app:layout_constraintHorizontal_bias="0.0"
        app:layout_constraintStart_toStartOf="parent"
        app:layout_constraintTop_toBottomOf="@+id/textView_info" />

    <LinearLayout
        android:layout_width="wrap_content"
        android:layout_height="wrap_content"
        android:layout_marginTop="32dp"
        android:orientation="horizontal"
        app:layout_constraintEnd_toEndOf="parent"
        app:layout_constraintStart_toStartOf="parent"
        app:layout_constraintTop_toBottomOf="@+id/chronometerExample">

        <Button
            android:id="@+id/button_start"
            android:layout_width="wrap_content"
            android:layout_height="match_parent"
            android:layout_gravity="fill_vertical"
            android:layout_weight="1"
            android:text="Start"
            android:textAllCaps="false" />

        <Button
            android:id="@+id/button_stop"
            android:layout_width="wrap_content"
            android:layout_height="match_parent"
            android:layout_gravity="fill_vertical"
            android:layout_weight="1"
            android:text="Stop"
            android:textAllCaps="false" />

        <Button
            android:id="@+id/button_resetBaseTime"
            android:layout_width="wrap_content"
            android:layout_height="match_parent"
            android:layout_gravity="fill_vertical"
            android:layout_weight="1"
            android:text="Reset"
            android:textAllCaps="false" />

    </LinearLayout>

</androidx.constraintlayout.widget.ConstraintLayout>
MainActivity.java
package com.example.chronometerexample;

import androidx.appcompat.app.AppCompatActivity;

import android.os.Bundle;
import android.os.SystemClock;
import android.view.View;
import android.widget.Button;
import android.widget.Chronometer;
import android.widget.TextView;

import java.text.DateFormat;
import java.text.SimpleDateFormat;
import java.util.Date;

public class MainActivity extends AppCompatActivity {

    private TextView textViewInfo;
    private Chronometer chronometer;
    private Button buttonStart;
    private Button buttonStop;
    private Button buttonResetBaseTime;

    @Override
    protected void onCreate(Bundle savedInstanceState) {
        super.onCreate(savedInstanceState);
        setContentView(R.layout.activity_main);

        this.textViewInfo = (TextView) findViewById(R.id.textView_info);
        this.chronometer = (Chronometer)findViewById(R.id.chronometerExample);

        this.buttonStart = (Button)findViewById(R.id.button_start);
        this.buttonStop = (Button)findViewById(R.id.button_stop);
        this.buttonResetBaseTime = (Button)findViewById(R.id.button_resetBaseTime);

        this.buttonStop.setEnabled(false);
        this.buttonResetBaseTime.setEnabled(false);

        this.buttonStart.setOnClickListener(new View.OnClickListener() {
            @Override
            public void onClick(View view) {
                doStart();
            }
        });

        this.buttonStop.setOnClickListener(new View.OnClickListener() {
            @Override
            public void onClick(View view) {
                doStop();
            }
        });


        this.buttonResetBaseTime.setOnClickListener(new View.OnClickListener() {
            @Override
            public void onClick(View view) {
                doResetBaseTime();
            }
        });
    }

    // @totalMilliseconds: milliseconds since system boot, including time spent in sleep.
    private void showInfo(long totalMilliseconds)  {
        // Seconds
        long totalSecs = totalMilliseconds / 1000;
        // Show Info
        long hours = totalSecs / 3600;
        long minutes = (totalSecs % 3600) / 60;
        long seconds = totalSecs % 60;

        this.textViewInfo.setText("Base Time: " + totalSecs +" ~ " + hours + " hours " + minutes+" minutes " + seconds + " seconds");
    }

    private void doStart()  {
        // Returns milliseconds since system boot, including time spent in sleep.
        long elapsedRealtime = SystemClock.elapsedRealtime();
        // Set the time that the count-up timer is in reference to.
        this.chronometer.setBase(elapsedRealtime);
        this.chronometer.start();
        this.showInfo(elapsedRealtime);
        //
        this.buttonStart.setEnabled(false);
        this.buttonStop.setEnabled(true);
        this.buttonResetBaseTime.setEnabled(true);
    }

    private void doStop()  {
        this.chronometer.stop();
        //
        this.buttonStart.setEnabled(true);
        this.buttonStop.setEnabled(false);
        this.buttonResetBaseTime.setEnabled(false);
    }

    private void doResetBaseTime()  {
        // Returns milliseconds since system boot, including time spent in sleep.
        long elapsedRealtime = SystemClock.elapsedRealtime();
        // Set the time that the count-up timer is in reference to.
        this.chronometer.setBase(elapsedRealtime);
        this.showInfo(elapsedRealtime);
    }

}
5. Example: Chronometer (Count down)
Ví dụ về một Chronometer đếm ngược (Count down).
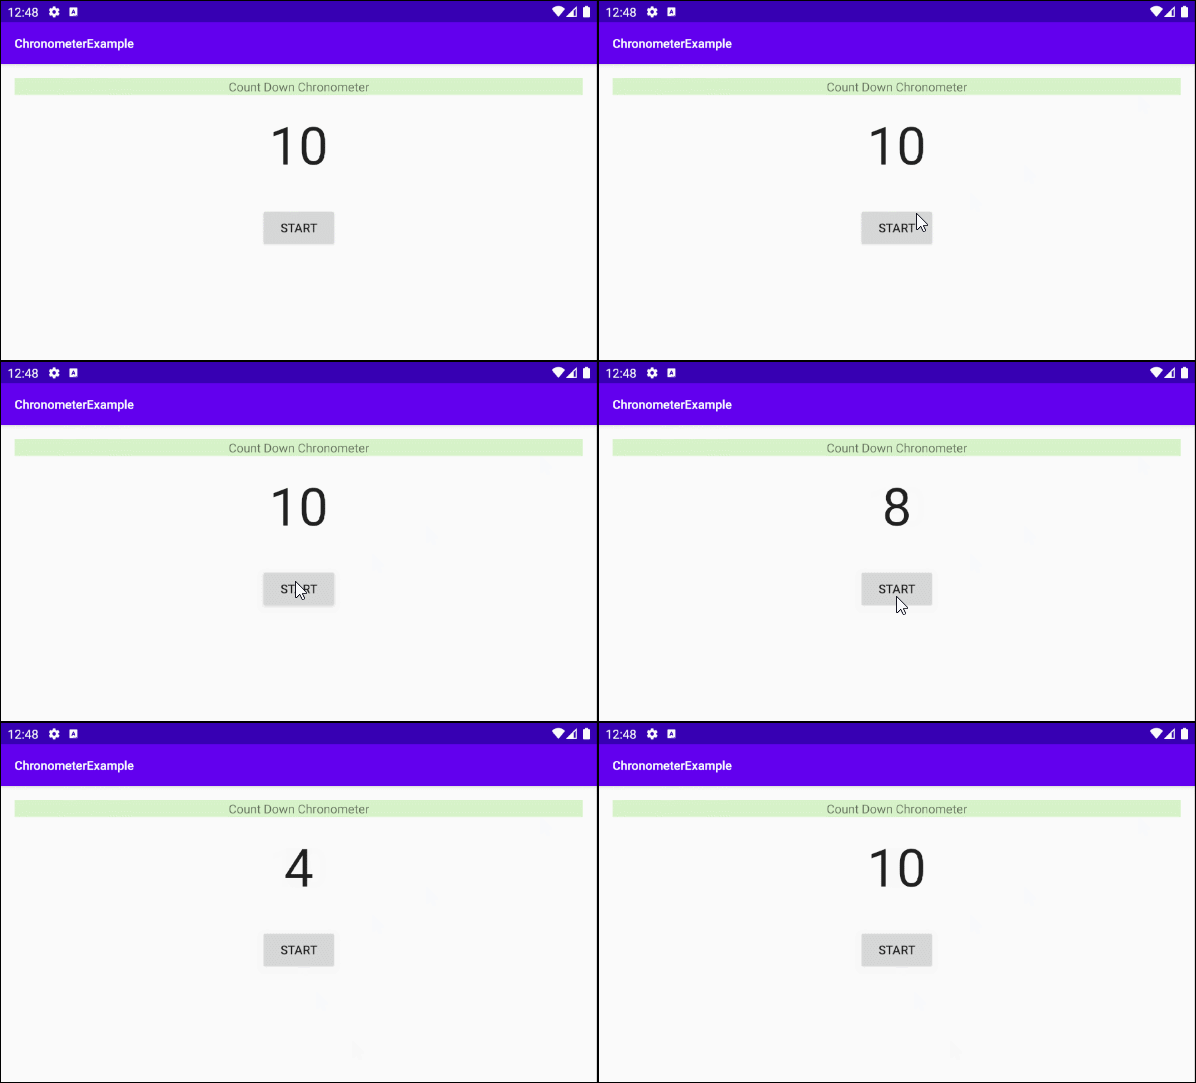
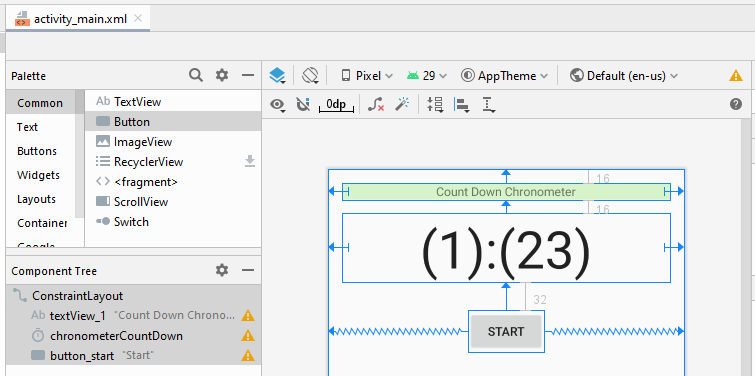
activity_main.xml
<?xml version="1.0" encoding="utf-8"?>
<androidx.constraintlayout.widget.ConstraintLayout
    xmlns:android="http://schemas.android.com/apk/res/android"
    xmlns:app="http://schemas.android.com/apk/res-auto"
    xmlns:tools="http://schemas.android.com/tools"
    android:layout_width="match_parent"
    android:layout_height="match_parent"
    tools:context=".MainActivity">


    <TextView
        android:id="@+id/textView_1"
        android:layout_width="0dp"
        android:layout_height="wrap_content"
        android:layout_marginLeft="16dp"
        android:layout_marginTop="16dp"
        android:layout_marginRight="16dp"
        android:background="#D7F3C9"
        android:gravity="center_horizontal"
        android:text="Count Down Chronometer"
        app:layout_constraintHorizontal_bias="0.047"
        app:layout_constraintLeft_toLeftOf="parent"
        app:layout_constraintRight_toRightOf="parent"
        app:layout_constraintTop_toTopOf="parent" />

    <Chronometer
        android:id="@+id/chronometerCountDown"
        android:countDown="true"
        android:layout_width="match_parent"
        android:layout_height="wrap_content"
        android:layout_marginStart="16dp"
        android:layout_marginLeft="16dp"
        android:layout_marginTop="16dp"
        android:layout_marginEnd="16dp"
        android:layout_marginRight="16dp"
        android:layout_weight="1"
        android:gravity="center_horizontal"
        android:textSize="60sp"
        app:layout_constraintEnd_toEndOf="parent"
        app:layout_constraintHorizontal_bias="0.0"
        app:layout_constraintStart_toStartOf="parent"
        app:layout_constraintTop_toBottomOf="@+id/textView_1" />

    <Button
        android:id="@+id/button_start"
        android:layout_width="wrap_content"
        android:layout_height="wrap_content"
        android:layout_marginTop="32dp"
        android:text="Start"
        app:layout_constraintEnd_toEndOf="parent"
        app:layout_constraintStart_toStartOf="parent"
        app:layout_constraintTop_toBottomOf="@+id/chronometerCountDown" />


</androidx.constraintlayout.widget.ConstraintLayout>
MainActivity.java
package com.example.chronometerexample;

import androidx.appcompat.app.AppCompatActivity;

import android.os.Bundle;
import android.view.View;
import android.widget.Button;
import android.widget.Chronometer;

public class MainActivity extends AppCompatActivity {

    private Button buttonStart;
    private Chronometer chronometerCountDown;

    private int counter = 10;

    @Override
    protected void onCreate(Bundle savedInstanceState) {
        super.onCreate(savedInstanceState);
        setContentView(R.layout.activity_main);

        this.chronometerCountDown = (Chronometer) findViewById(R.id.chronometerCountDown);
        this.buttonStart = (Button) findViewById(R.id.button_start);

        this.chronometerCountDown.setText(counter + "");

        this.buttonStart.setOnClickListener(new View.OnClickListener() {
            @Override
            public void onClick(View view) {
                doStart();
            }
        });

        // This listener will customize the chronometer text content.
        // It will show number from 10 to 0 repeatedly.
        this.chronometerCountDown.setOnChronometerTickListener(new Chronometer.OnChronometerTickListener() {
            @Override
            public void onChronometerTick(Chronometer chronometer) {
                onChronometerTickHandler();
            }
        });
    }


    private void onChronometerTickHandler()  {
        if(this.counter < 0) {
            this.counter = 10;
        }
        this.chronometerCountDown.setText(counter + "");
        this.counter--;
    }


    private void doStart()  {
        this.chronometerCountDown.start();
    }

}
6. Example: Custom Format
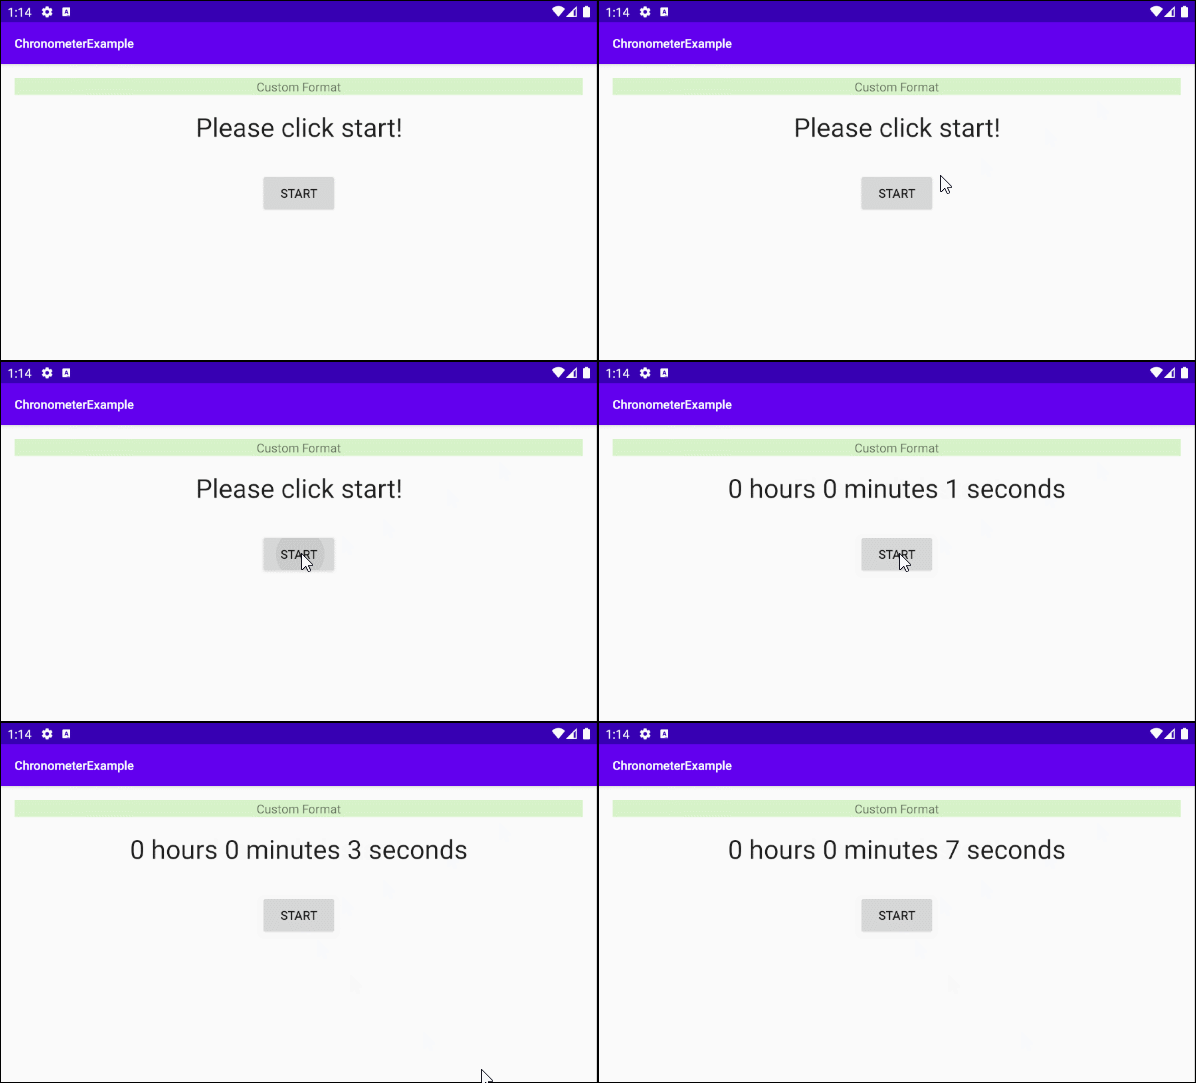
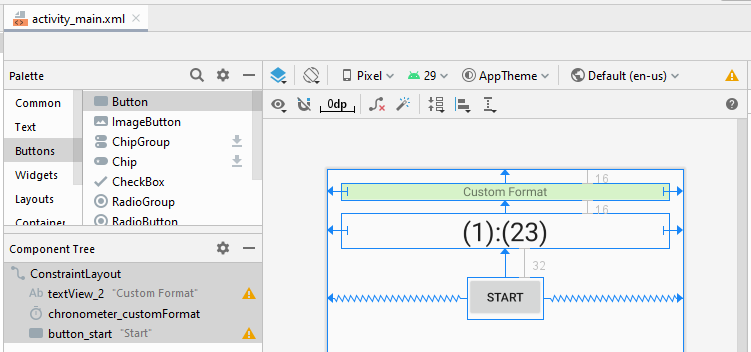
Ví dụ dưới đây cho phép bạn tùy biến văn bản hiển thị trên Chronometer:
main_activity.xml
<?xml version="1.0" encoding="utf-8"?>
<androidx.constraintlayout.widget.ConstraintLayout
    xmlns:android="http://schemas.android.com/apk/res/android"
    xmlns:app="http://schemas.android.com/apk/res-auto"
    xmlns:tools="http://schemas.android.com/tools"
    android:layout_width="match_parent"
    android:layout_height="match_parent"
    tools:context=".MainActivity">


    <TextView
        android:id="@+id/textView_2"
        android:layout_width="0dp"
        android:layout_height="wrap_content"
        android:layout_marginLeft="16dp"
        android:layout_marginTop="16dp"
        android:layout_marginRight="16dp"
        android:background="#D7F3C9"
        android:gravity="center_horizontal"
        android:text="Custom Format"
        app:layout_constraintHorizontal_bias="0.047"
        app:layout_constraintLeft_toLeftOf="parent"
        app:layout_constraintRight_toRightOf="parent"
        app:layout_constraintTop_toTopOf="parent" />

    <Chronometer
        android:id="@+id/chronometer_customFormat"
        android:layout_width="match_parent"
        android:layout_height="wrap_content"
        android:layout_marginStart="16dp"
        android:layout_marginLeft="16dp"
        android:layout_marginTop="16dp"
        android:layout_marginEnd="16dp"
        android:layout_marginRight="16dp"
        android:layout_weight="1"
        android:gravity="center_horizontal"
        android:textSize="30sp"
        app:layout_constraintEnd_toEndOf="parent"
        app:layout_constraintHorizontal_bias="0.0"
        app:layout_constraintStart_toStartOf="parent"
        app:layout_constraintTop_toBottomOf="@+id/textView_2" />

    <Button
        android:id="@+id/button_start"
        android:layout_width="wrap_content"
        android:layout_height="wrap_content"
        android:layout_marginTop="32dp"
        android:text="Start"
        app:layout_constraintEnd_toEndOf="parent"
        app:layout_constraintStart_toStartOf="parent"
        app:layout_constraintTop_toBottomOf="@+id/chronometer_customFormat" />


</androidx.constraintlayout.widget.ConstraintLayout>
MainActivity.java
package com.example.chronometerexample;

import androidx.appcompat.app.AppCompatActivity;

import android.os.Bundle;
import android.os.SystemClock;
import android.view.View;
import android.widget.Button;
import android.widget.Chronometer;

public class MainActivity extends AppCompatActivity {

    private Button buttonStart;
    private Chronometer chronometerCustomFormat;

    private int counter = 10;

    @Override
    protected void onCreate(Bundle savedInstanceState) {
        super.onCreate(savedInstanceState);
        setContentView(R.layout.activity_main);

        this.chronometerCustomFormat = (Chronometer) findViewById(R.id.chronometer_customFormat);
        this.chronometerCustomFormat.setText("Please click start!");
        this.buttonStart = (Button) findViewById(R.id.button_start);


        this.buttonStart.setOnClickListener(new View.OnClickListener() {
            @Override
            public void onClick(View view) {
                doStart();
            }
        });


        this.chronometerCustomFormat.setOnChronometerTickListener(new Chronometer.OnChronometerTickListener() {
            @Override
            public void onChronometerTick(Chronometer chronometer) {
                onChronometerTickHandler();
            }
        });
    }


    private void onChronometerTickHandler()  {
        long delta = SystemClock.elapsedRealtime() - this.chronometerCustomFormat.getBase();

        int h = (int) ((delta / 1000) / 3600);
        int m = (int) (((delta / 1000) / 60) % 60);
        int s = (int) ((delta / 1000) % 60);

        String customText = h +" hours " + m +" minutes " + s +" seconds";

        this.chronometerCustomFormat.setText(customText);
    }


    private void doStart()  {
        long base = SystemClock.elapsedRealtime();
        this.chronometerCustomFormat.setBase(base);
        this.chronometerCustomFormat.start();
    }

}
Các hướng dẫn lập trình Android
- Cấu hình Android Emulator trong Android Studio
- Hướng dẫn và ví dụ Android ToggleButton
- Tạo một File Finder Dialog đơn giản trong Android
- Hướng dẫn và ví dụ Android TimePickerDialog
- Hướng dẫn và ví dụ Android DatePickerDialog
- Bắt đầu với Android cần những gì?
- Cài đặt Android Studio trên Windows
- Cài đặt Intel® HAXM cho Android Studio
- Hướng dẫn và ví dụ Android AsyncTask
- Hướng dẫn và ví dụ Android AsyncTaskLoader
- Hướng dẫn lập trình Android cho người mới bắt đầu - Các ví dụ cơ bản
- Làm sao biết số số điện thoại của Android Emulator và thay đổi nó
- Hướng dẫn và ví dụ Android TextInputLayout
- Hướng dẫn và ví dụ Android CardView
- Hướng dẫn và ví dụ Android ViewPager2
- Lấy số điện thoại trong Android sử dụng TelephonyManager
- Hướng dẫn và ví dụ Android Phone Call
- Hướng dẫn và ví dụ Android Wifi Scanning
- Hướng dẫn lập trình Android Game 2D cho người mới bắt đầu
- Hướng dẫn và ví dụ Android DialogFragment
- Hướng dẫn và ví dụ Android CharacterPickerDialog
- Hướng dẫn lập trình Android cho người mới bắt đầu - Hello Android
- Hướng dẫn sử dụng Android Device File Explorer
- Bật tính năng USB Debugging trên thiết bị Android
- Hướng dẫn và ví dụ Android UI Layouts
- Hướng dẫn và ví dụ Android SMS
- Hướng dẫn lập trình Android với Database SQLite
- Hướng dẫn và ví dụ Google Maps Android API
- Hướng dẫn chuyển văn bản thành lời nói trong Android
- Hướng dẫn và ví dụ Android Space
- Hướng dẫn và ví dụ Android Toast
- Tạo một Android Toast tùy biến
- Hướng dẫn và ví dụ Android SnackBar
- Hướng dẫn và ví dụ Android TextView
- Hướng dẫn và ví dụ Android TextClock
- Hướng dẫn và ví dụ Android EditText
- Hướng dẫn và ví dụ Android TextWatcher
- Định dạng số thẻ tín dụng với Android TextWatcher
- Hướng dẫn và ví dụ Android Clipboard
- Tạo một File Chooser đơn giản trong Android
- Hướng dẫn và ví dụ Android AutoCompleteTextView và MultiAutoCompleteTextView
- Hướng dẫn và ví dụ Android ImageView
- Hướng dẫn và ví dụ Android ImageSwitcher
- Hướng dẫn và ví dụ Android ScrollView và HorizontalScrollView
- Hướng dẫn và ví dụ Android WebView
- Hướng dẫn và ví dụ Android SeekBar
- Hướng dẫn và ví dụ Android Dialog
- Hướng dẫn và ví dụ Android AlertDialog
- Hướng dẫn và ví dụ Android RatingBar
- Hướng dẫn và ví dụ Android ProgressBar
- Hướng dẫn và ví dụ Android Spinner
- Hướng dẫn và ví dụ Android Button
- Hướng dẫn và ví dụ Android Switch
- Hướng dẫn và ví dụ Android ImageButton
- Hướng dẫn và ví dụ Android FloatingActionButton
- Hướng dẫn và ví dụ Android CheckBox
- Hướng dẫn và ví dụ Android RadioGroup và RadioButton
- Hướng dẫn và ví dụ Android Chip và ChipGroup
- Sử dụng các tài sản ảnh và biểu tượng của Android Studio
- Thiết lập SD Card cho Android Emulator
- Ví dụ với ChipGroup và các Chip Entry
- Làm sao thêm thư viện bên ngoài vào dự án Android trong Android Studio?
- Làm sao loại bỏ các quyền đã cho phép trên ứng dụng Android
- Làm sao loại bỏ các ứng dụng ra khỏi Android Emulator?
- Hướng dẫn và ví dụ Android LinearLayout
- Hướng dẫn và ví dụ Android TableLayout
- Hướng dẫn và ví dụ Android FrameLayout
- Hướng dẫn và ví dụ Android QuickContactBadge
- Hướng dẫn và ví dụ Android StackView
- Hướng dẫn và ví dụ Android Camera
- Hướng dẫn và ví dụ Android MediaPlayer
- Hướng dẫn và ví dụ Android VideoView
- Phát hiệu ứng âm thanh trong Android với SoundPool
- Hướng dẫn lập trình mạng trong Android - Android Networking
- Hướng dẫn xử lý JSON trong Android
- Lưu trữ dữ liệu trên thiết bị với Android SharedPreferences
- Hướng dẫn lập trình Android với bộ lưu trữ trong (Internal Storage)
- Hướng dẫn lập trình Android với bộ lưu trữ ngoài (External Storage)
- Hướng dẫn sử dụng Intent trong Android
- Ví dụ về một Android Intent tường minh, gọi một Intent khác
- Ví dụ về Android Intent không tường minh, mở một URL, gửi một email
- Hướng dẫn sử dụng Service trong Android
- Hướng dẫn sử dụng thông báo trong Android - Android Notification
- Hướng dẫn và ví dụ Android DatePicker
- Hướng dẫn và ví dụ Android TimePicker
- Hướng dẫn và ví dụ Android Chronometer
- Hướng dẫn và ví dụ Android OptionMenu
- Hướng dẫn và ví dụ Android ContextMenu
- Hướng dẫn và ví dụ Android PopupMenu
- Hướng dẫn và ví dụ Android Fragment
- Hướng dẫn và ví dụ Android ListView
- Android ListView với Checkbox sử dụng ArrayAdapter
- Hướng dẫn và ví dụ Android GridView
Show More
