Hướng dẫn và ví dụ Android Dialog
1. Android Dialog
Trong Android, Dialog (Hộp thoại) là một cửa sổ nhỏ xuất hiện để nhắc người dùng đưa ra một quyết định hoặc nhập vào các thông tin bổ xung. Dialog không lấp kín toàn bộ màn hình, và nó thường hiển thị trong chế độ modal, điều đó nghĩa là người dùng phải đưa ra quyết định để đóng nó lại thì mới có thể tương tác với các phần khác của ứng dụng.
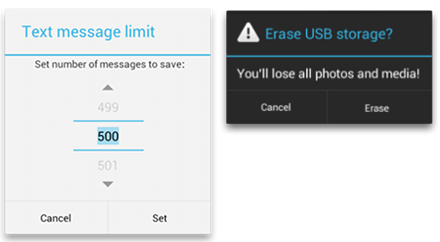
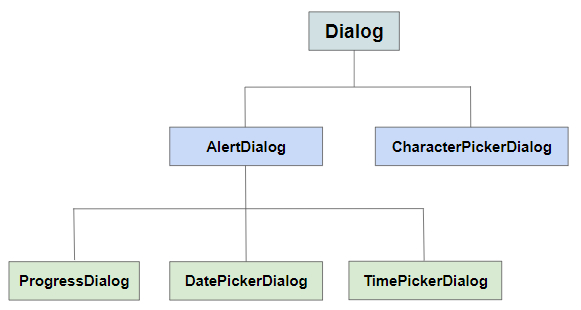
Nếu bạn muốn có một Dialog, hãy viết một lớp mở rộng từ lớp Dialog hoặc sử dụng các lớp con sẵn có của nó, tránh xa việc sử dụng trực tiếp lớp Dialog.
AlertDialog
AlertDialog là một lớp con trực tiếp của Dialog, nó có sẵn vùng tiêu đề, vùng nội dung và có 1, 2 hoặc 3 button. Nó giúp bạn dễ dàng có được một hộp thoại chỉ với một vài dòng mã.
CharacterPickerDialog
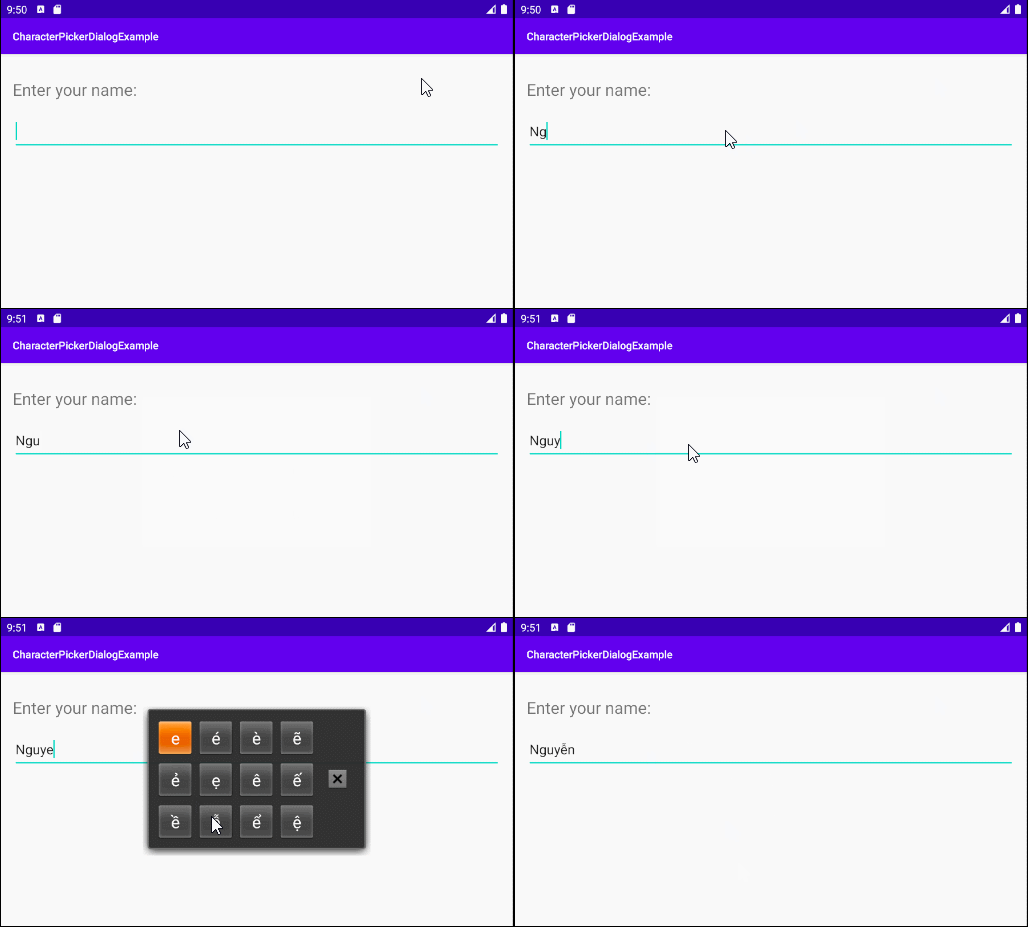
Android CharacterPickerDialog là một hộp thoại cho phép người dùng lựa chọn "các ký tự có dấu" (accented characters) của một ký tự cơ sở. Đôi khi CharacterPickerDialog rất có ích bởi vì không phải tất cả điện thoại của người dùng đều sẵn có một bố cục bàn phím (Keyboard Layout) phù hợp cho một ngôn ngữ cụ thể.
DatePickerDialog & TimePickerDialog
Cho phép người dùng lựa chọn ngày tháng (date) hoặc thời gian (time).
ProgressDialog
ProgressDialog là một hộp thoại hiển thị một tiến trình (progress), về cơ bản hộp thoại này rất nguy hiểm vì nó ngăn người dùng tương tác với ứng dụng khi dialog này hiển thị (Tiến trình chưa hoàn thành). Bạn nên cân nhắc sử dụng ProgressBar thay vì ProgressDialog.
DialogFragment vs Dialog
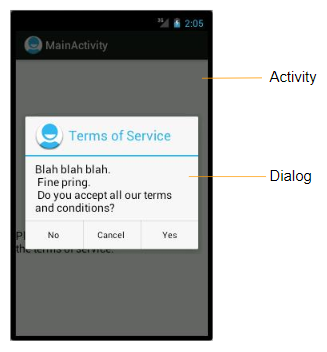
Các Dialog được tạo và hiển thị trong một Activity, chúng không có các phương thức callback để có thể nhận biết được các trạng thái trong vòng đời của Activity, vì vậy đôi khi Activity của bạn cần phải nói với Dialog cần phải làm gì trong các thời điểm khác nhau.
Để dễ hiểu tôi đưa ra một tình huống: Ứng dụng của bạn đang hiển thị một Dialog với dữ liệu, người dùng vì một lý do nào đó đã không tương tác với thiết bị trong một khoảng thời gian đủ dài, thiết bị sẽ rơi vào trạng thái ngủ, phương thức onPause() của Activity sẽ được gọi để tạm dừng (pause) ứng dụng. Khi người dùng quay trở lại và tương tác với thiết bị, phương thức onResume() của Activity sẽ được gọi để bắt đầu lại (Resume) ứng dụng. Bạn cần phải viết code trong onResume() để nói với Dialog rằng hãy refresh lại dữ liệu mà nó đang hiển thị, tất nhiên với các Dialog chỉ để hiển thị thông báo, hoặc hiển thị các dữ liệu cố định bạn không phải làm điều này.
DialogFragment là một Fragment chứa một Dialog, nó có các phương thức callback để tự nhận thức được các trạng thái khác nhau trong vòng đời của Activity, vì vậy DialogFragment có thể tự làm các việc thông minh thay vì phải làm theo sự chỉ dẫn của Activity. Thêm nữa, các Dialog sẽ bị đóng lại khi người dùng xoay (rotate) màn hình điện thoại, còn DialogFragment thì phản ứng thân thiện hơn, nó sẽ xoay theo định hướng (orientation) của màn hình.
Đó là lý do vì sao trong một số trường hợp ứng dụng phức tạp bạn nên sử dụng DialogFragment thay vì Dialog, nó giúp code của bạn trong sáng hơn. Tuy nhiên đừng lo lắng, sử dụng Dialog thực sự tiện lợi trong hầu hết các trường hợp thông thường.
2. Ví dụ tùy biến Dialog
Xem trước ví dụ:
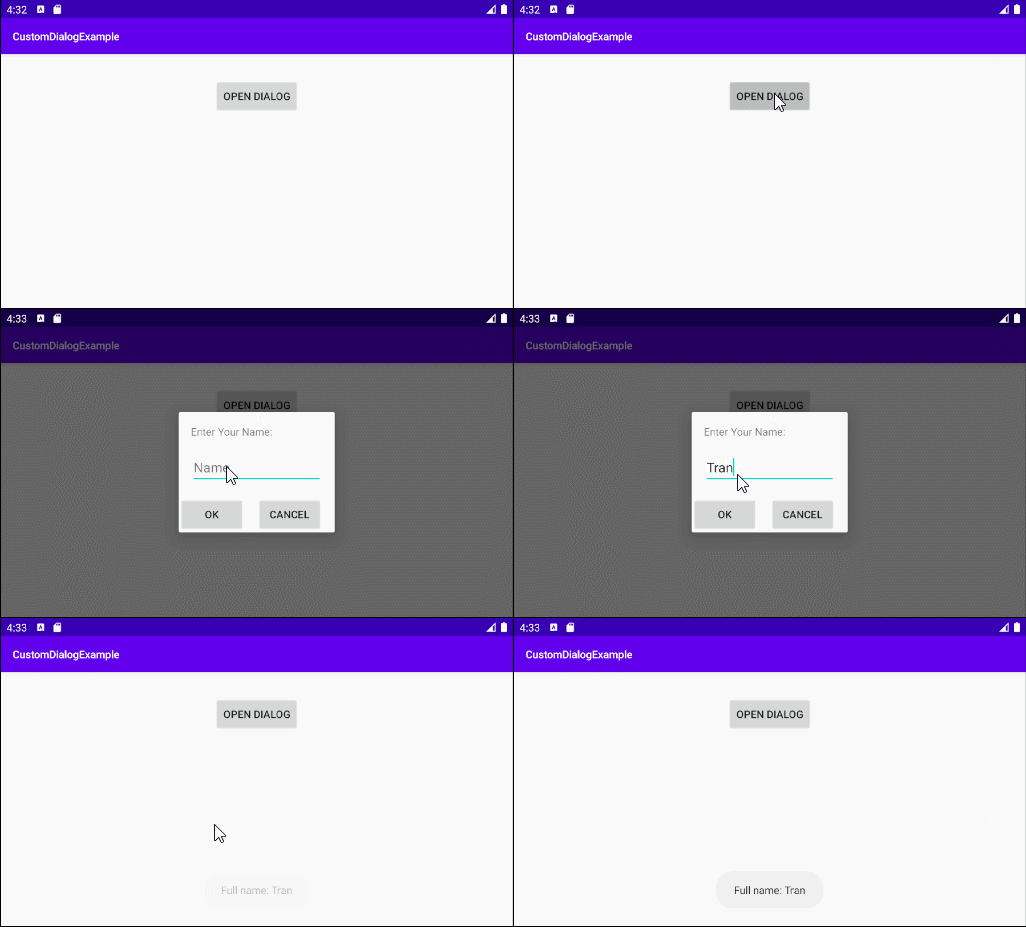
Trên Android Studio tạo mới một project:
- File > New > New Project > Empty Activity
- Name: CustomDialogExample
- Package name: org.o7planning.customdialogexample
- Language: Java
Đầu tiên chúng ta sẽ thiết kế giao diện cho dialog:
- File > New > Android Resource File
- File name: layout_custom_dialog.xml
- Resource type: Layout
- Root element: androidx.constraintlayout.widget.ConstraintLayout
- Directory name: layout
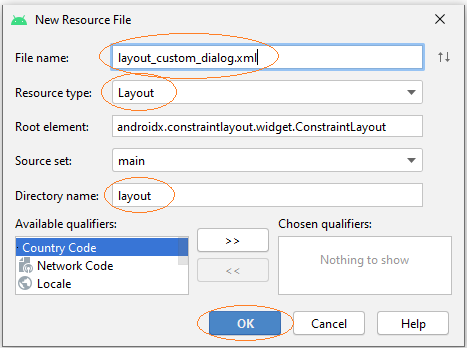
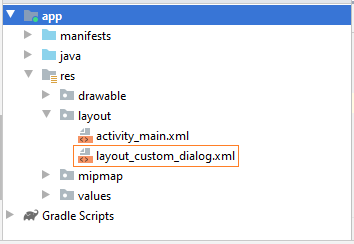
Thiết kế giao diện cho Dialog tùy biến:
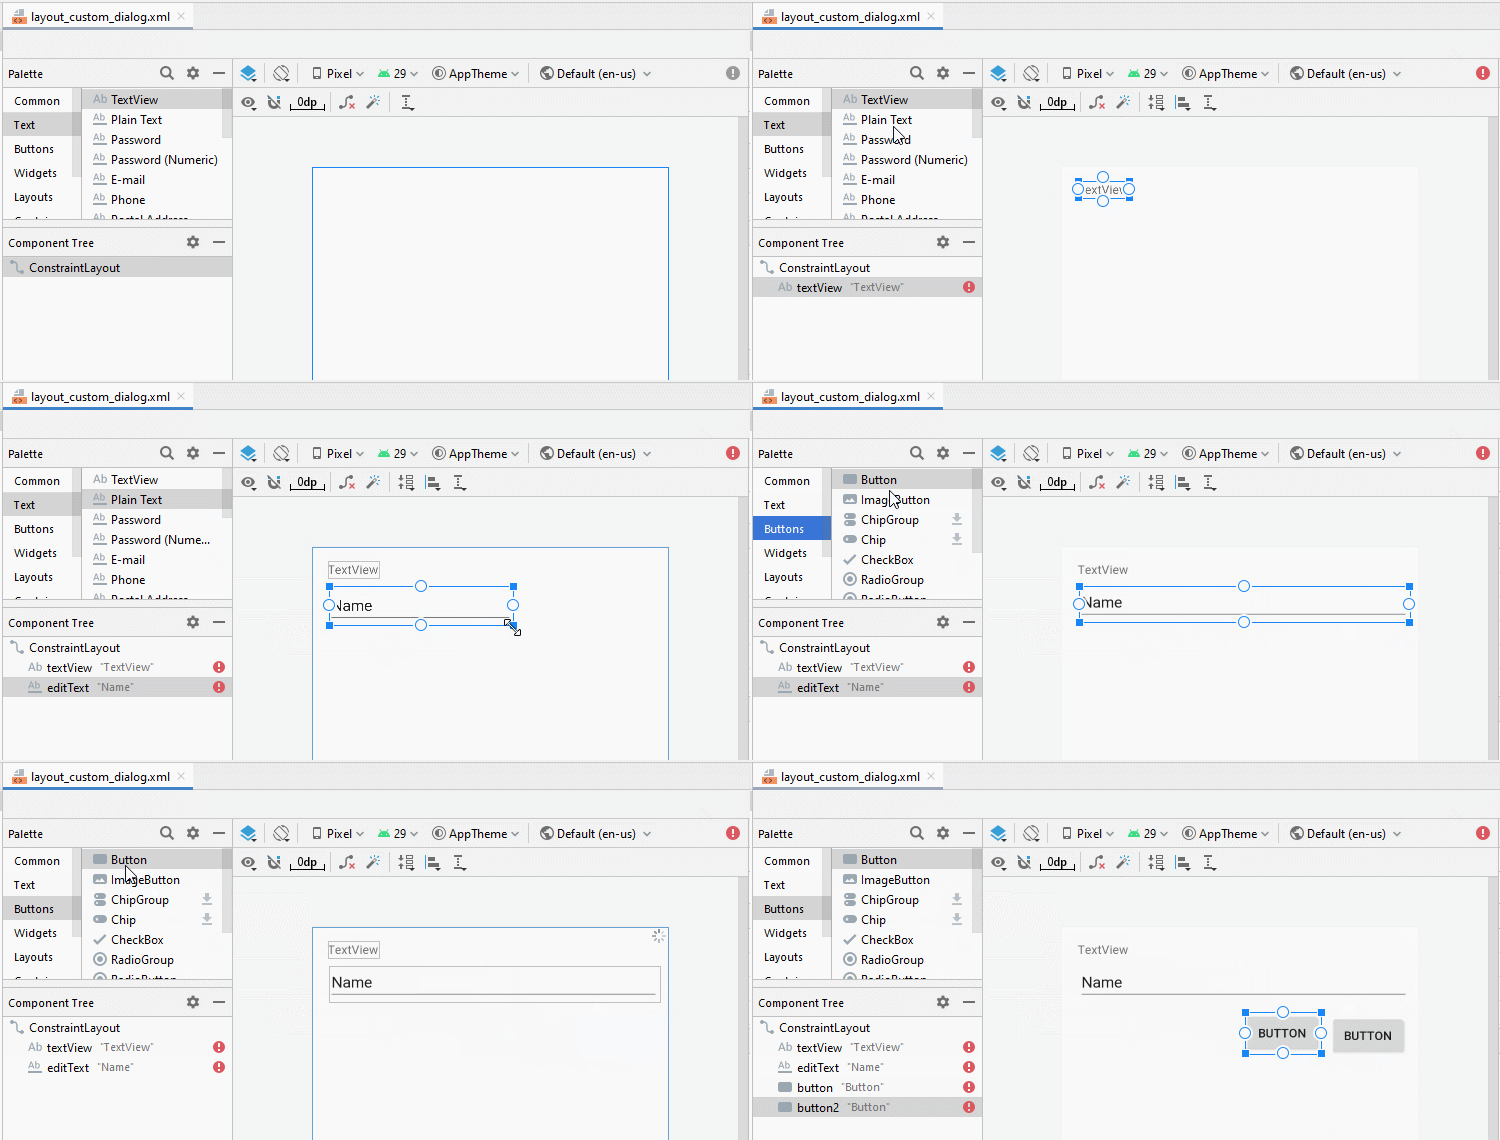
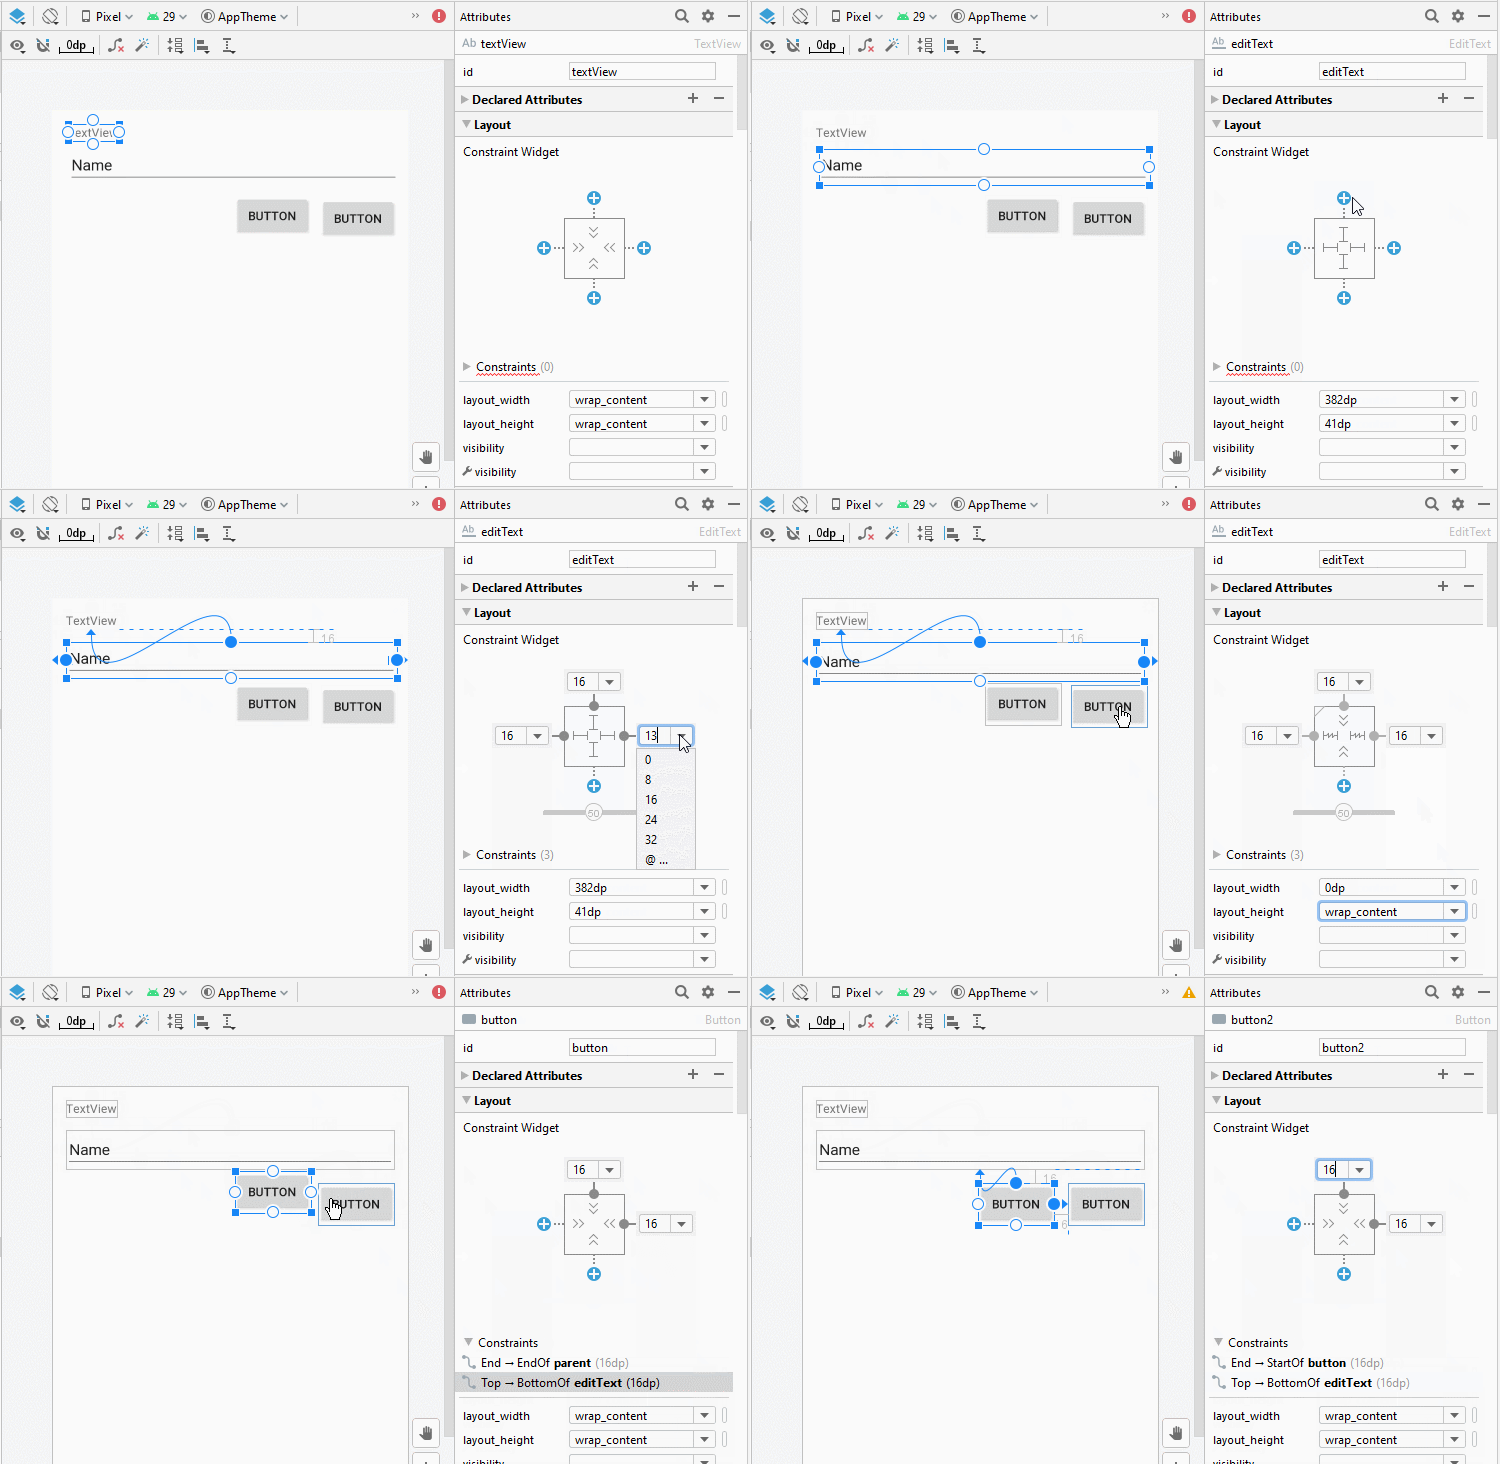
Sét đặt ID, Text cho các thành phần trên giao diện:
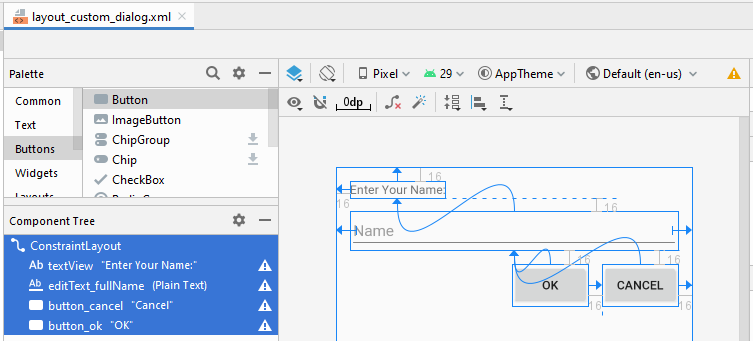
layout_custom_dialog.xml
<?xml version="1.0" encoding="utf-8"?>
<androidx.constraintlayout.widget.ConstraintLayout
    xmlns:android="http://schemas.android.com/apk/res/android"
    xmlns:app="http://schemas.android.com/apk/res-auto"
    xmlns:tools="http://schemas.android.com/tools"
    android:layout_width="match_parent"
    android:layout_height="match_parent">

    <TextView
        android:id="@+id/textView"
        android:layout_width="wrap_content"
        android:layout_height="wrap_content"
        android:layout_marginStart="16dp"
        android:layout_marginLeft="16dp"
        android:layout_marginTop="16dp"
        android:text="Enter Your Name:"
        app:layout_constraintStart_toStartOf="parent"
        app:layout_constraintTop_toTopOf="parent" />

    <EditText
        android:id="@+id/editText_fullName"
        android:layout_width="0dp"
        android:layout_height="wrap_content"
        android:layout_marginStart="16dp"
        android:layout_marginLeft="16dp"
        android:layout_marginTop="16dp"
        android:layout_marginEnd="16dp"
        android:layout_marginRight="16dp"
        android:ems="10"
        android:hint="Name"
        android:inputType="textPersonName"
        app:layout_constraintEnd_toEndOf="parent"
        app:layout_constraintStart_toStartOf="parent"
        app:layout_constraintTop_toBottomOf="@+id/textView" />

    <Button
        android:id="@+id/button_cancel"
        android:layout_width="wrap_content"
        android:layout_height="wrap_content"
        android:layout_marginTop="16dp"
        android:layout_marginEnd="16dp"
        android:layout_marginRight="16dp"
        android:text="Cancel"
        app:layout_constraintEnd_toEndOf="parent"
        app:layout_constraintTop_toBottomOf="@+id/editText_fullName" />

    <Button
        android:id="@+id/button_ok"
        android:layout_width="wrap_content"
        android:layout_height="wrap_content"
        android:layout_marginTop="16dp"
        android:layout_marginEnd="16dp"
        android:layout_marginRight="16dp"
        android:text="OK"
        app:layout_constraintEnd_toStartOf="@+id/button_cancel"
        app:layout_constraintTop_toBottomOf="@+id/editText_fullName" />
</androidx.constraintlayout.widget.ConstraintLayout>
Tạo lớp CustomDialog mở rộng từ lớp Dialog:
CustomDialog.java
package org.o7planning.customdialogexample;

import android.app.Activity;
import android.app.Dialog;
import android.content.Context;
import android.os.Bundle;
import android.view.View;
import android.view.Window;
import android.widget.Button;
import android.widget.EditText;
import android.widget.Toast;

public class CustomDialog extends Dialog {

    interface FullNameListener {
        public void fullNameEntered(String fullName);
    }

    public Context context;

    private EditText editTextFullName;
    private Button buttonOK;
    private Button buttonCancel;

    private CustomDialog.FullNameListener listener;

    public CustomDialog(Context context, CustomDialog.FullNameListener listener) {
        super(context);
        this.context = context;
        this.listener = listener;
    }

    @Override
    protected void onCreate(Bundle savedInstanceState) {
        super.onCreate(savedInstanceState);
        requestWindowFeature(Window.FEATURE_NO_TITLE);
        setContentView(R.layout.layout_custom_dialog);

        this.editTextFullName = (EditText) findViewById(R.id.editText_fullName);
        this.buttonOK = (Button) findViewById(R.id.button_ok);
        this.buttonCancel  = (Button) findViewById(R.id.button_cancel);

        this.buttonOK .setOnClickListener(new View.OnClickListener() {
            @Override
            public void onClick(View v) {
                 buttonOKClick();
            }
        });
        this.buttonCancel.setOnClickListener(new View.OnClickListener() {
            @Override
            public void onClick(View v) {
                 buttonCancelClick();
            }
        });
    }

    // User click "OK" button.
    private void buttonOKClick()  {
        String fullName = this.editTextFullName.getText().toString();

        if(fullName== null || fullName.isEmpty())  {
            Toast.makeText(this.context, "Please enter your name", Toast.LENGTH_LONG).show();
            return;
        }
        this.dismiss(); // Close Dialog

        if(this.listener!= null)  {
            this.listener.fullNameEntered(fullName);
        }
    }

    // User click "Cancel" button.
    private void buttonCancelClick()  {
        this.dismiss();
    }
}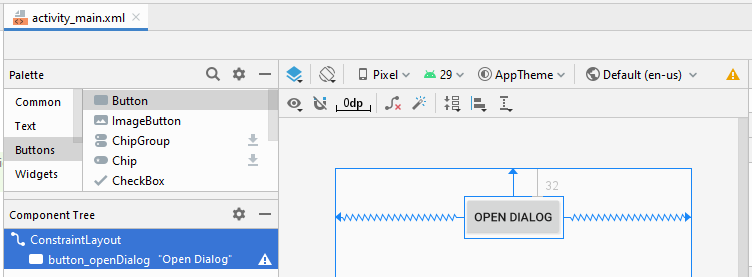
activity_main.xml
<?xml version="1.0" encoding="utf-8"?>
<androidx.constraintlayout.widget.ConstraintLayout
    xmlns:android="http://schemas.android.com/apk/res/android"
    xmlns:app="http://schemas.android.com/apk/res-auto"
    xmlns:tools="http://schemas.android.com/tools"
    android:layout_width="match_parent"
    android:layout_height="match_parent"
    tools:context=".MainActivity">

    <Button
        android:id="@+id/button_openDialog"
        android:layout_width="wrap_content"
        android:layout_height="wrap_content"
        android:layout_marginTop="32dp"
        android:text="Open Dialog"
        app:layout_constraintEnd_toEndOf="parent"
        app:layout_constraintStart_toStartOf="parent"
        app:layout_constraintTop_toTopOf="parent" />

</androidx.constraintlayout.widget.ConstraintLayout>
MainActivity.java
package org.o7planning.customdialogexample;

import androidx.appcompat.app.AppCompatActivity;

import android.os.Bundle;
import android.view.View;
import android.widget.Button;
import android.widget.Toast;

public class MainActivity extends AppCompatActivity {

    private Button buttonOpenDialog;

    @Override
    protected void onCreate(Bundle savedInstanceState) {
        super.onCreate(savedInstanceState);
        setContentView(R.layout.activity_main);

        this.buttonOpenDialog = (Button) this.findViewById(R.id.button_openDialog);

        this.buttonOpenDialog.setOnClickListener(new View.OnClickListener() {
            @Override
            public void onClick(View v) {
                buttonOpenDialogClicked();
            }
        });
    }

    private void buttonOpenDialogClicked()  {
        CustomDialog.FullNameListener listener = new CustomDialog.FullNameListener() {
            @Override
            public void fullNameEntered(String fullName) {
                Toast.makeText(MainActivity.this, "Full name: " + fullName, Toast.LENGTH_LONG).show();
            }
        };
        final CustomDialog dialog = new CustomDialog(this, listener);

        dialog.show();
    }
}
Các hướng dẫn lập trình Android
- Cấu hình Android Emulator trong Android Studio
- Hướng dẫn và ví dụ Android ToggleButton
- Tạo một File Finder Dialog đơn giản trong Android
- Hướng dẫn và ví dụ Android TimePickerDialog
- Hướng dẫn và ví dụ Android DatePickerDialog
- Bắt đầu với Android cần những gì?
- Cài đặt Android Studio trên Windows
- Cài đặt Intel® HAXM cho Android Studio
- Hướng dẫn và ví dụ Android AsyncTask
- Hướng dẫn và ví dụ Android AsyncTaskLoader
- Hướng dẫn lập trình Android cho người mới bắt đầu - Các ví dụ cơ bản
- Làm sao biết số số điện thoại của Android Emulator và thay đổi nó
- Hướng dẫn và ví dụ Android TextInputLayout
- Hướng dẫn và ví dụ Android CardView
- Hướng dẫn và ví dụ Android ViewPager2
- Lấy số điện thoại trong Android sử dụng TelephonyManager
- Hướng dẫn và ví dụ Android Phone Call
- Hướng dẫn và ví dụ Android Wifi Scanning
- Hướng dẫn lập trình Android Game 2D cho người mới bắt đầu
- Hướng dẫn và ví dụ Android DialogFragment
- Hướng dẫn và ví dụ Android CharacterPickerDialog
- Hướng dẫn lập trình Android cho người mới bắt đầu - Hello Android
- Hướng dẫn sử dụng Android Device File Explorer
- Bật tính năng USB Debugging trên thiết bị Android
- Hướng dẫn và ví dụ Android UI Layouts
- Hướng dẫn và ví dụ Android SMS
- Hướng dẫn lập trình Android với Database SQLite
- Hướng dẫn và ví dụ Google Maps Android API
- Hướng dẫn chuyển văn bản thành lời nói trong Android
- Hướng dẫn và ví dụ Android Space
- Hướng dẫn và ví dụ Android Toast
- Tạo một Android Toast tùy biến
- Hướng dẫn và ví dụ Android SnackBar
- Hướng dẫn và ví dụ Android TextView
- Hướng dẫn và ví dụ Android TextClock
- Hướng dẫn và ví dụ Android EditText
- Hướng dẫn và ví dụ Android TextWatcher
- Định dạng số thẻ tín dụng với Android TextWatcher
- Hướng dẫn và ví dụ Android Clipboard
- Tạo một File Chooser đơn giản trong Android
- Hướng dẫn và ví dụ Android AutoCompleteTextView và MultiAutoCompleteTextView
- Hướng dẫn và ví dụ Android ImageView
- Hướng dẫn và ví dụ Android ImageSwitcher
- Hướng dẫn và ví dụ Android ScrollView và HorizontalScrollView
- Hướng dẫn và ví dụ Android WebView
- Hướng dẫn và ví dụ Android SeekBar
- Hướng dẫn và ví dụ Android Dialog
- Hướng dẫn và ví dụ Android AlertDialog
- Hướng dẫn và ví dụ Android RatingBar
- Hướng dẫn và ví dụ Android ProgressBar
- Hướng dẫn và ví dụ Android Spinner
- Hướng dẫn và ví dụ Android Button
- Hướng dẫn và ví dụ Android Switch
- Hướng dẫn và ví dụ Android ImageButton
- Hướng dẫn và ví dụ Android FloatingActionButton
- Hướng dẫn và ví dụ Android CheckBox
- Hướng dẫn và ví dụ Android RadioGroup và RadioButton
- Hướng dẫn và ví dụ Android Chip và ChipGroup
- Sử dụng các tài sản ảnh và biểu tượng của Android Studio
- Thiết lập SD Card cho Android Emulator
- Ví dụ với ChipGroup và các Chip Entry
- Làm sao thêm thư viện bên ngoài vào dự án Android trong Android Studio?
- Làm sao loại bỏ các quyền đã cho phép trên ứng dụng Android
- Làm sao loại bỏ các ứng dụng ra khỏi Android Emulator?
- Hướng dẫn và ví dụ Android LinearLayout
- Hướng dẫn và ví dụ Android TableLayout
- Hướng dẫn và ví dụ Android FrameLayout
- Hướng dẫn và ví dụ Android QuickContactBadge
- Hướng dẫn và ví dụ Android StackView
- Hướng dẫn và ví dụ Android Camera
- Hướng dẫn và ví dụ Android MediaPlayer
- Hướng dẫn và ví dụ Android VideoView
- Phát hiệu ứng âm thanh trong Android với SoundPool
- Hướng dẫn lập trình mạng trong Android - Android Networking
- Hướng dẫn xử lý JSON trong Android
- Lưu trữ dữ liệu trên thiết bị với Android SharedPreferences
- Hướng dẫn lập trình Android với bộ lưu trữ trong (Internal Storage)
- Hướng dẫn lập trình Android với bộ lưu trữ ngoài (External Storage)
- Hướng dẫn sử dụng Intent trong Android
- Ví dụ về một Android Intent tường minh, gọi một Intent khác
- Ví dụ về Android Intent không tường minh, mở một URL, gửi một email
- Hướng dẫn sử dụng Service trong Android
- Hướng dẫn sử dụng thông báo trong Android - Android Notification
- Hướng dẫn và ví dụ Android DatePicker
- Hướng dẫn và ví dụ Android TimePicker
- Hướng dẫn và ví dụ Android Chronometer
- Hướng dẫn và ví dụ Android OptionMenu
- Hướng dẫn và ví dụ Android ContextMenu
- Hướng dẫn và ví dụ Android PopupMenu
- Hướng dẫn và ví dụ Android Fragment
- Hướng dẫn và ví dụ Android ListView
- Android ListView với Checkbox sử dụng ArrayAdapter
- Hướng dẫn và ví dụ Android GridView
Show More
