Hướng dẫn và ví dụ Android EditText
1. Android EditText
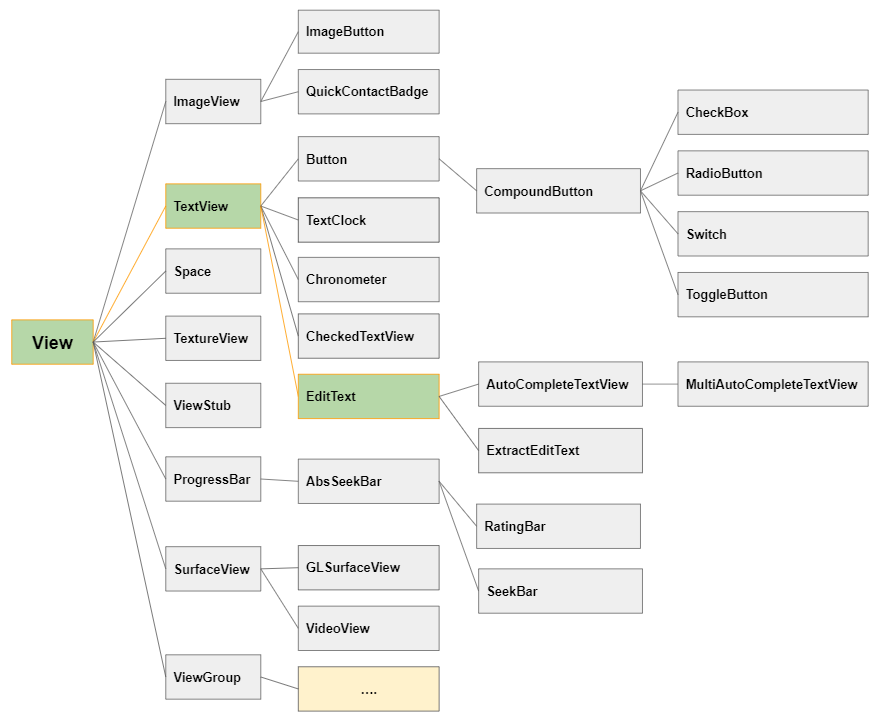
Trong Android, EditText là một class con của TextView nên nó thừa kế tất cả các tính năng của một TextView, ngoài ra nó có các tính năng mới cho phép người dùng nhập vào hoặc sửa đổi văn bản với nhiều mục đích khác nhau, vì vậy bạn cần phải chỉ định kiểu dữ liệu mà nó có thể chấp nhận thông qua thuộc tính android:inputType.
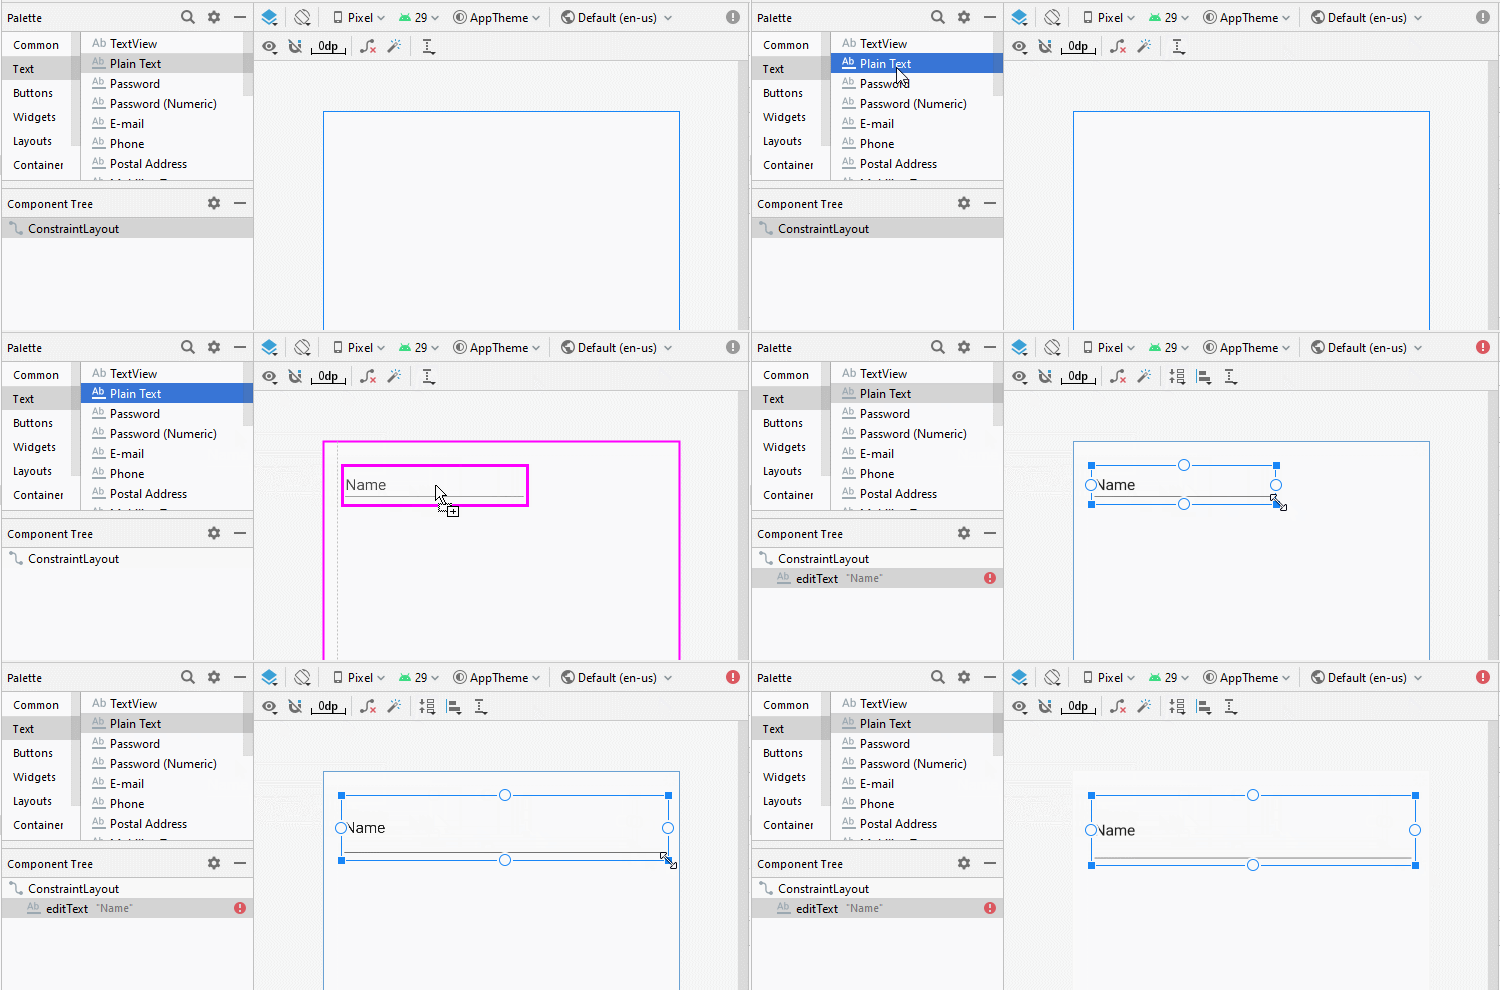
<EditText
     android:id="@+id/txtSub"
     android:layout_width="match_parent"
     android:layout_height="wrap_content"
     android:hint="Subject"
     android:inputType="text"
     ... />
EditText editText = (EditText) this.findViewById(R.id.editText1);
// Set Text:
editText.setText("New Text");
// Get Text
String text = editText.getText().toString();Tạo một EditText bằng mã Java:
public class MainActivity extends AppCompatActivity {

    @Override
    protected void onCreate(Bundle savedInstanceState) {
        super.onCreate(savedInstanceState);
        setContentView(R.layout.activity_main);

        LinearLayout linearLayout =  (LinearLayout) findViewById(R.id.linearlayout);

        // Create a EditText
        EditText editText = new EditText(this);
        editText.setHint("Subject");
        linearLayout.addView(editText);

        // Set Text
        editText.setText("Some Text");

        // Get Text
        String text = editText.getText().toString();
    }

}
2. android:inputType
Thuộc tính android:inputType chỉ định kiểu dữ liệu mà EditText có thể chấp nhận, đồng thời nó gợi ý cho Android hỗ trợ người dùng khi nhập dữ liệu, chẳng hạn hiển thị một bàn phím ảo phù hợp với kiểu dữ liệu của EditText. Tuy nhiên nó không đảm bảo rằng người dùng sẽ nhập đúng kiểu dữ liệu, vì vậy bạn vẫn cần có thêm một vài xử lý bổ sung.
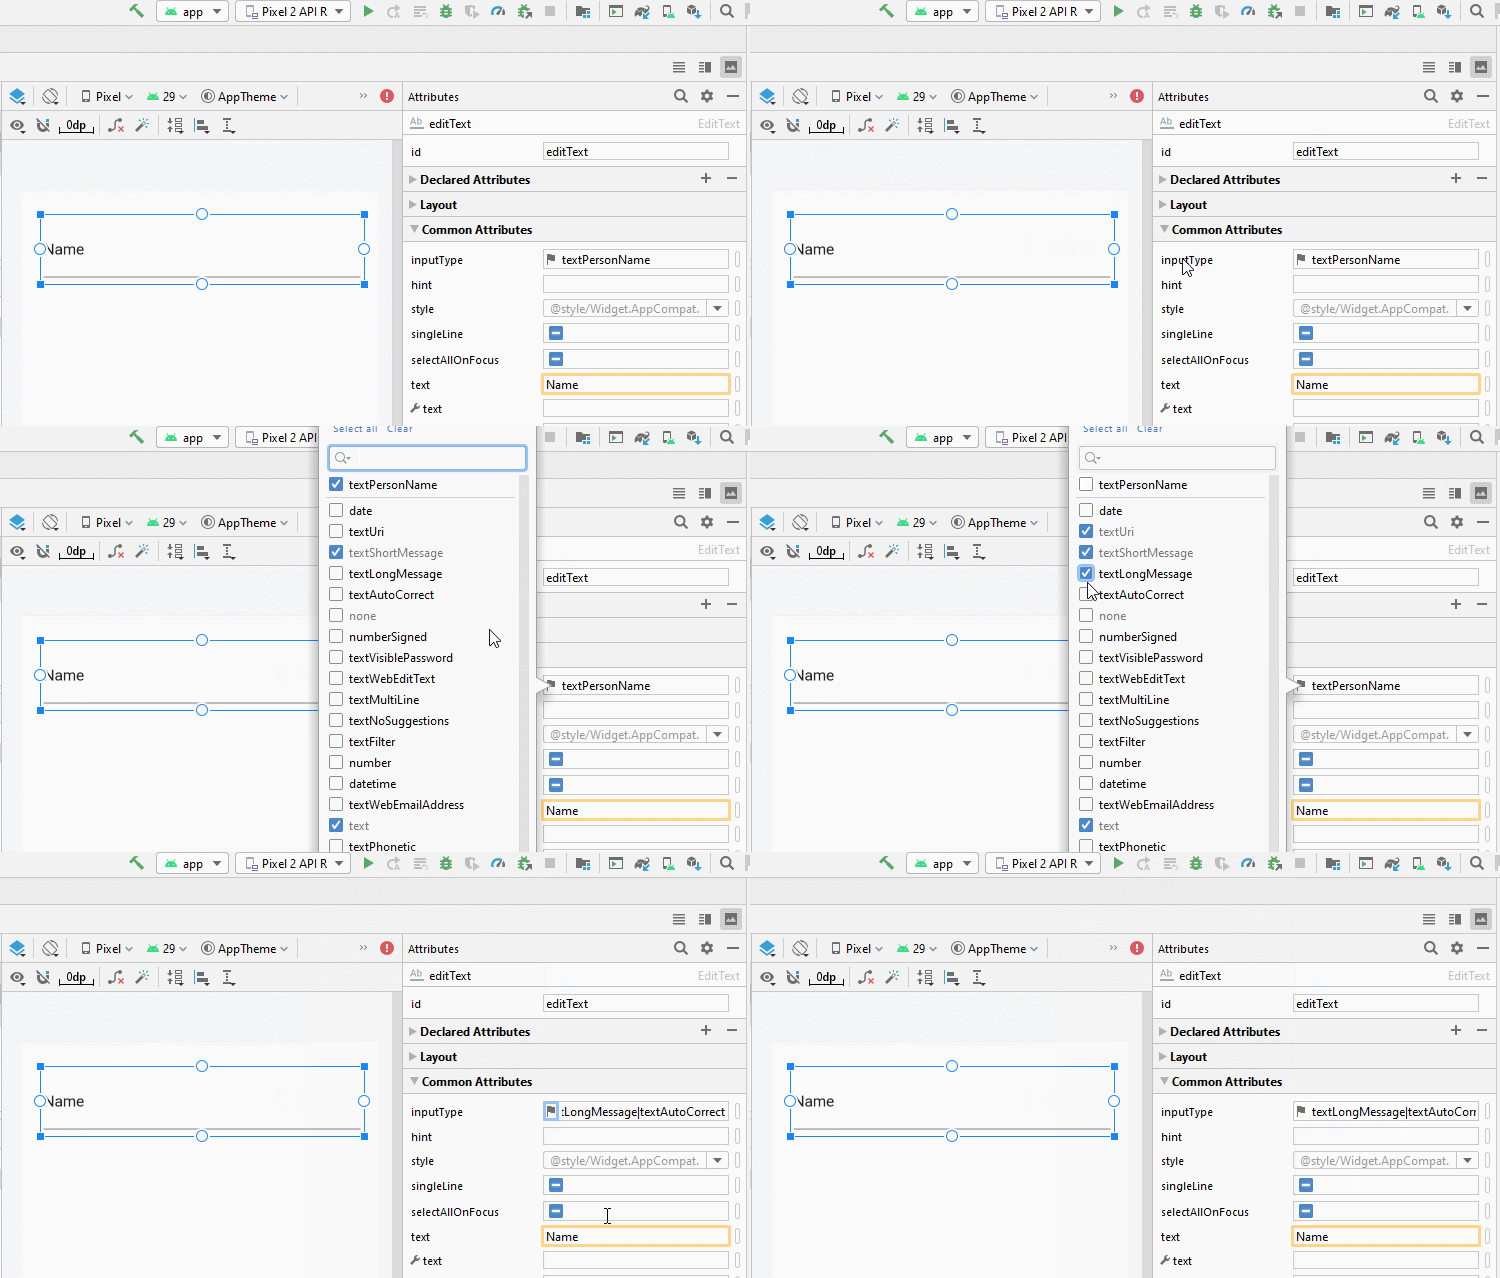
Các giá trị thông dụng của android:inputType:
textUri | Cho phép nhập vào một URI. |
textEmailAddress | Cho phép nhập vào địa chỉ email. |
textPersonName | Cho phép nhập vào tên của một người. |
textPassword | Cho phép nhập vào một mật khẩu, người dùng chỉ nhìn thấy các ký tự đấu hoa thị ( * ) (Hoặc tương tự). |
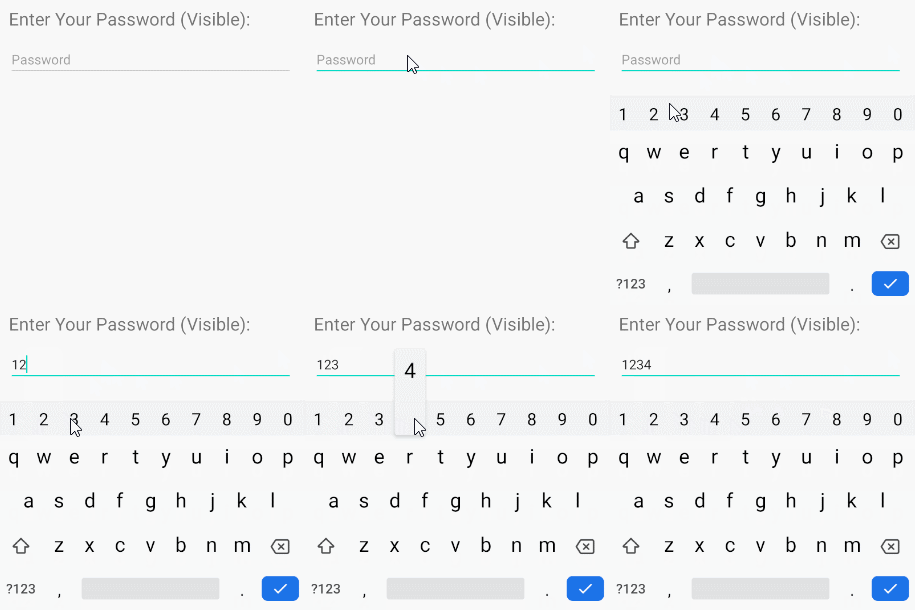
textVisiblePassword | Cho phép nhập vào một mật khẩu, và người dùng có thể đọc được nội dung của nó. |
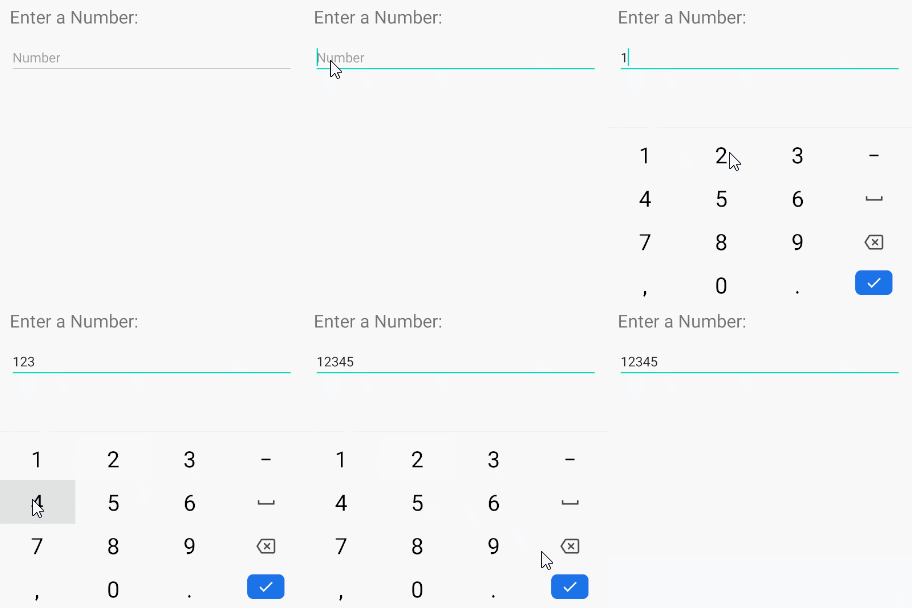
number | Để nhập vào dữ liệu số. |
phone | Để nhập vào một số điện thoại. |
date | Để nhập vào ngày tháng (Date). |
time | Để nhập vào thời gian (Time) |
textMultiLine | Cho phép nhập vào dữ liệu văn bản trên nhiều dòng. |
Bạn có thể kết hợp nhiều giá trị với nhau để tạo ra một giá trị mới cho android:inputType, các giá trị ngăn cách nhau bởi ( | ).
<EditText
  android:inputType="textCapSentences|textMultiLine"
/>
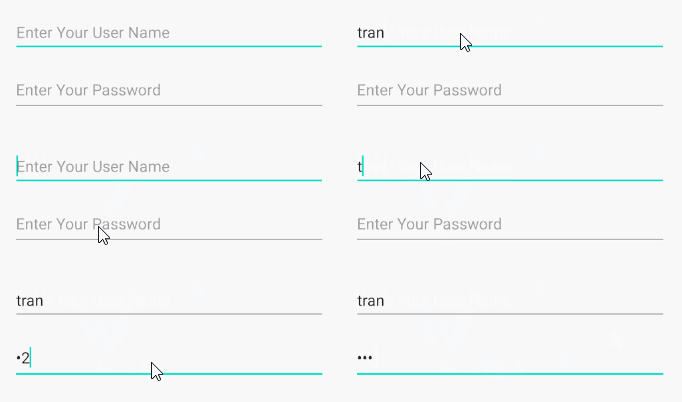
android:inputType="textPassword"
Cho phép nhập vào một mật khẩu, người dùng sẽ chỉ nhìn thấy các ký tự đấu hoa thị ( * ) (Hoặc tương tự).
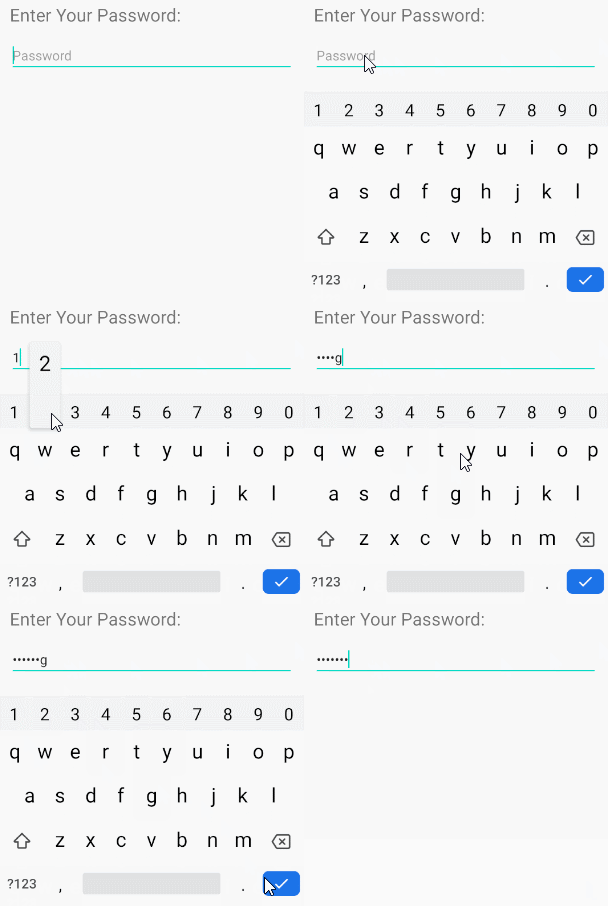
<!-- A Text Password -->
<EditText
    android:id="@+id/editText_password"
    android:hint="Password"
    android:inputType="textPassword" ...
/>
android:inputType="numberPassword"
Cho phép người dùng nhập vào một mật khẩu chỉ chứa các ký tự số.
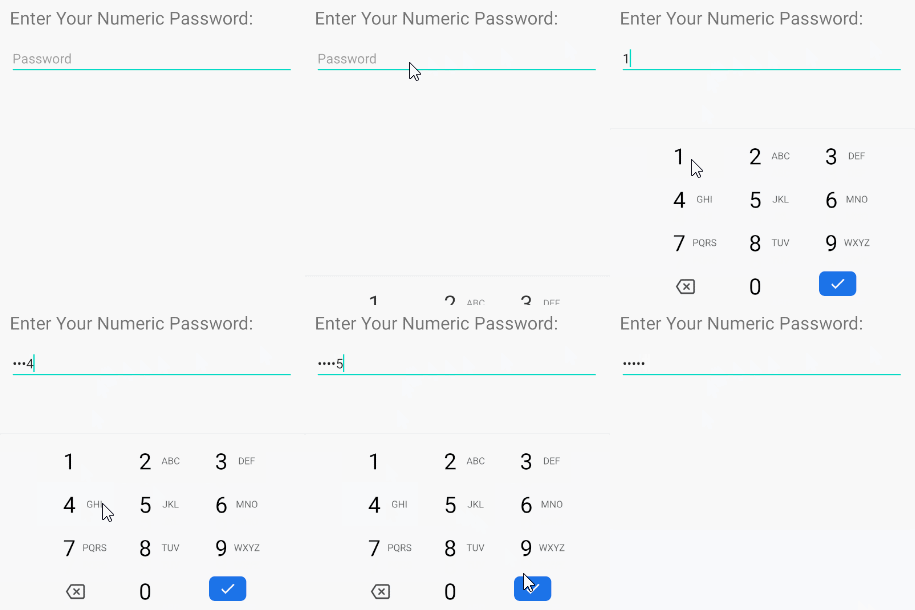
<!-- A Numeric Password -->
<EditText
    android:id="@+id/editText_password"
    android:hint="Numeric Password"
    android:inputType="numberPassword"  ...
/>
android:inputType="textVisiblePassword"
android:inputType="text"
EditText chấp nhận tất cả các loại dữ liệu văn bản thuần thúy (plain text).
android:inputType=" textMultiLine"
Thuộc tính android:inputType="textMultiLine" cho phép EditText hiển thị văn bản trên nhiều dòng, bạn cũng cần kết hợp với thuộc tính android.gravity="left|top" để thiết lập văn bản sẽ hiển thị ở góc trên bên trái.
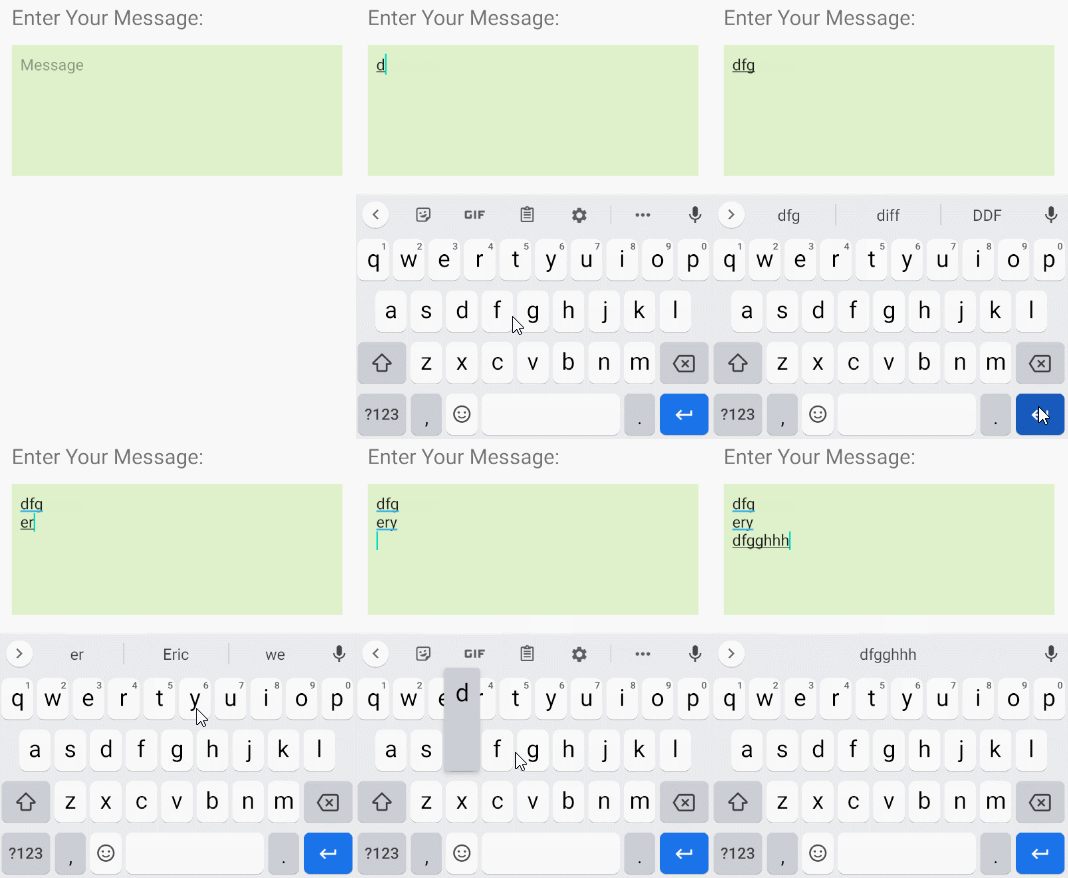
<EditText
    android:id="@+id/editText_test1"
    android:background="#F1FDDC"
    android:gravity="top|left"
    android:inputType="textMultiLine|text"
    android:padding="10dp"
    android:text="0123456789" ... />
android:inputType="number"
Cho phép người dùng nhập vào các dữ liệu số, đồng thời hỗ trợ bàn phím ảo dành cho các dữ liệu đầu vào dạng số.
android:inputType="textEmailAddress"
Bàn phím ảo hỗ trợ nhập Email đơn giản hơn so với bàn phím ảo thông thường, nó loại bỏ các ký tự không hợp lệ đối với một địa chỉ email.
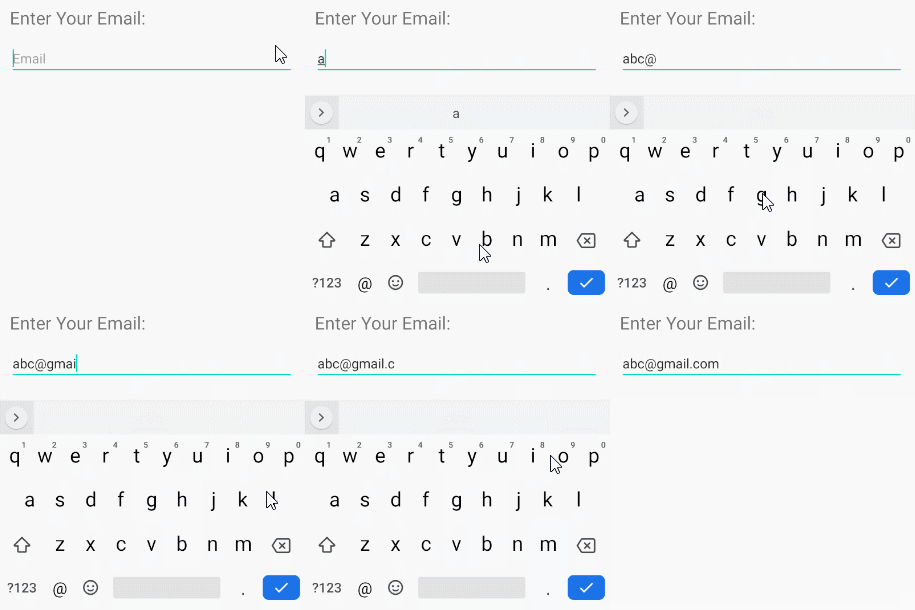
<EditText
    android:id="@+id/editText_email"
    android:hint="Email"
    android:inputType="textEmailAddress"
    ...
/>
Đoạn mã Java kiểm tra email người dùng nhập vào có hợp lệ hay không:
public boolean isEmailValid(CharSequence email) {
    return android.util.Patterns.EMAIL_ADDRESS.matcher(email).matches();
}
android:inputType="date"
Mục đích để người dùng nhập dữ liệu Date, bàn phím ảo có bố trí phù hợp với kiểu dữ liệu này.
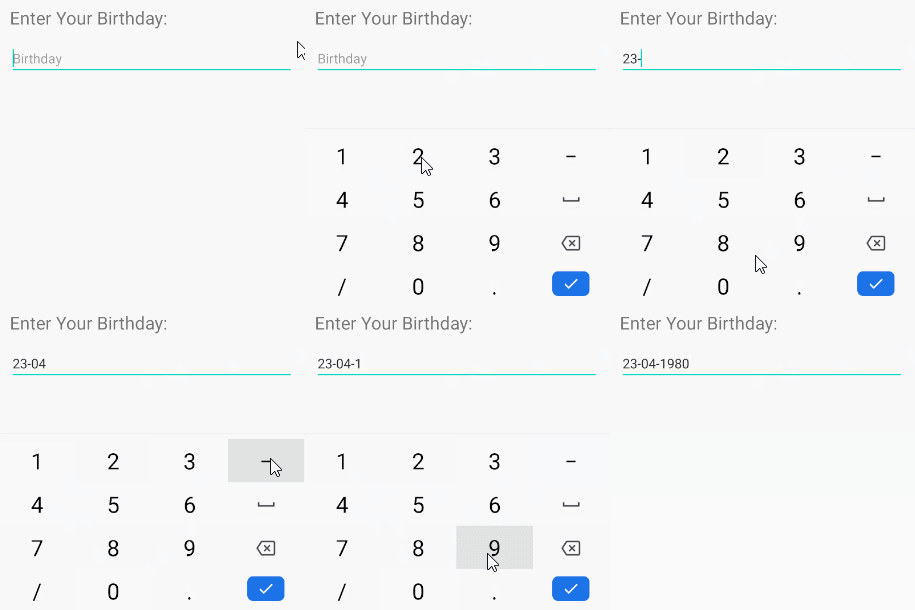
<EditText
    android:id="@+id/editText_birthday"
    android:hint="dd-MM-yyyy"
    android:inputType="date"
    ...
/>
Chú ý: Với android:inputType="date" người dùng vẫn có thể nhập một dữ liệu Date không phù hợp với gợi ý (hint) của bạn. Vì vậy, nếu muốn đảm bảo chắc chắn người dùng sẽ nhập vào một dữ liệu phù hợp với định dạng Date được chỉ định, chẳng hạn "dd-MM-yyyy" bạn phải kết hợp EditText và TextWatcher.
3. EditText Attributes
Về cơ bản, hầu hết các thuộc tính của EditText đều được thừa kế từ TextView:
android:gravity | It is used to specify how to align the text like left, right, center, top, etc. |
android:text | It is used to set the text. |
android:hint | It is used to display the hint text when text is empty |
android:textColor | It is used to change the color of the text. |
android:textColorHint | It is used to change the text color of hint text. |
android:textSize | It is used to specify the size of the text. |
android:textStyle | It is used to change the style (bold, italic, bolditalic) of text. |
android:background | It is used to set the background color for edit text control |
android:ems | It is used to make the textview be exactly this many ems wide. |
android:width | It makes the TextView be exactly this many pixels wide. |
android:height | It makes the TextView be exactly this many pixels tall. |
android:maxWidth | It is used to make the TextView be at most this many pixels wide. |
android:minWidth | It is used to make the TextView be at least this many pixels wide. |
android:textAllCaps | It is used to present the text in all CAPS |
android:typeface | It is used to specify the Typeface (normal, sans, serif, monospace) for the text. |
android:textColorHighlight | It is used to change the color of text selection highlight. |
android:inputType | It is used to specify the type of text being placed in text fields. |
android:fontFamily | It is used to specify the fontFamily for the text. |
android:editable | If we set false, EditText won't allow us to enter or modify the text |
android:textColorHint
Thuộc tính android:hint được sử dụng để hiển thị một văn bản gợi ý cho người dùng khi văn bản của EditText là rỗng.
android:textColorHighlight
Thiết lập mầu nền cho văn bản con được lựa chọn.

<EditText
    android:id="@+id/editText"
    android:inputType="text"
    android:text="I am an EditText"
    android:textColorHighlight="#24AC55" ... />
android: android:maxLength
Chỉ định số lượng ký tự tối đa của văn bản.
android:editable
Thuộc tính này không còn được sử dụng trong EditText. Nếu bạn không muốn người dùng thay đổi nội dung văn bản của EditText hãy sử dụng một trong các giải pháp dưới đây:
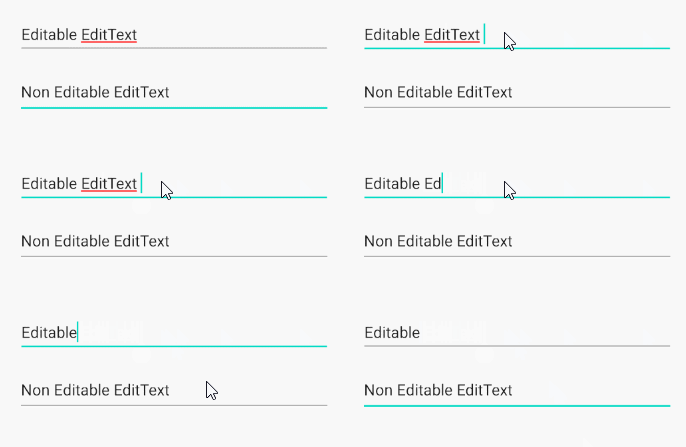
Giải pháp 1:
<EditText
    android:id="@+id/myEditText"
    android:layout_width="match_parent"
    android:layout_height="wrap_content"
    android:hint="Hint"
    android:focusable="false"
    android:clickable="false"
    android:cursorVisible="false"
    />
Bạn có thể nhận được kết quả tương tự với mã Java:
EditText editText = findViewById(R.id.myEditText);
editText.setFocusable(false);
editText.setClickable(false);
editText.setCursorVisible(false);
Giải pháp 2:
EditText editText = (EditText) findViewById(R.id.editText);
editText.setKeyListener(null);
Giải pháp 3:
private void setNonEditable(EditText editText) {
    // Need to disable displaying Virtual Keyboard.
    editText.setInputType(InputType.TYPE_NULL);

    // editText.setTextIsSelectable(false); // ?
    editText.setOnKeyListener(new View.OnKeyListener() {
        @Override
        public boolean onKey(View v, int keyCode, KeyEvent event) {
            // Blocks input from hardware keyboards.
            return true;
        }
    });
}
4. EditText Methods
Ngoài các phương thức được thừa kế từ TextView, EditText cũng có thêm một vài phương thức của chính nó:
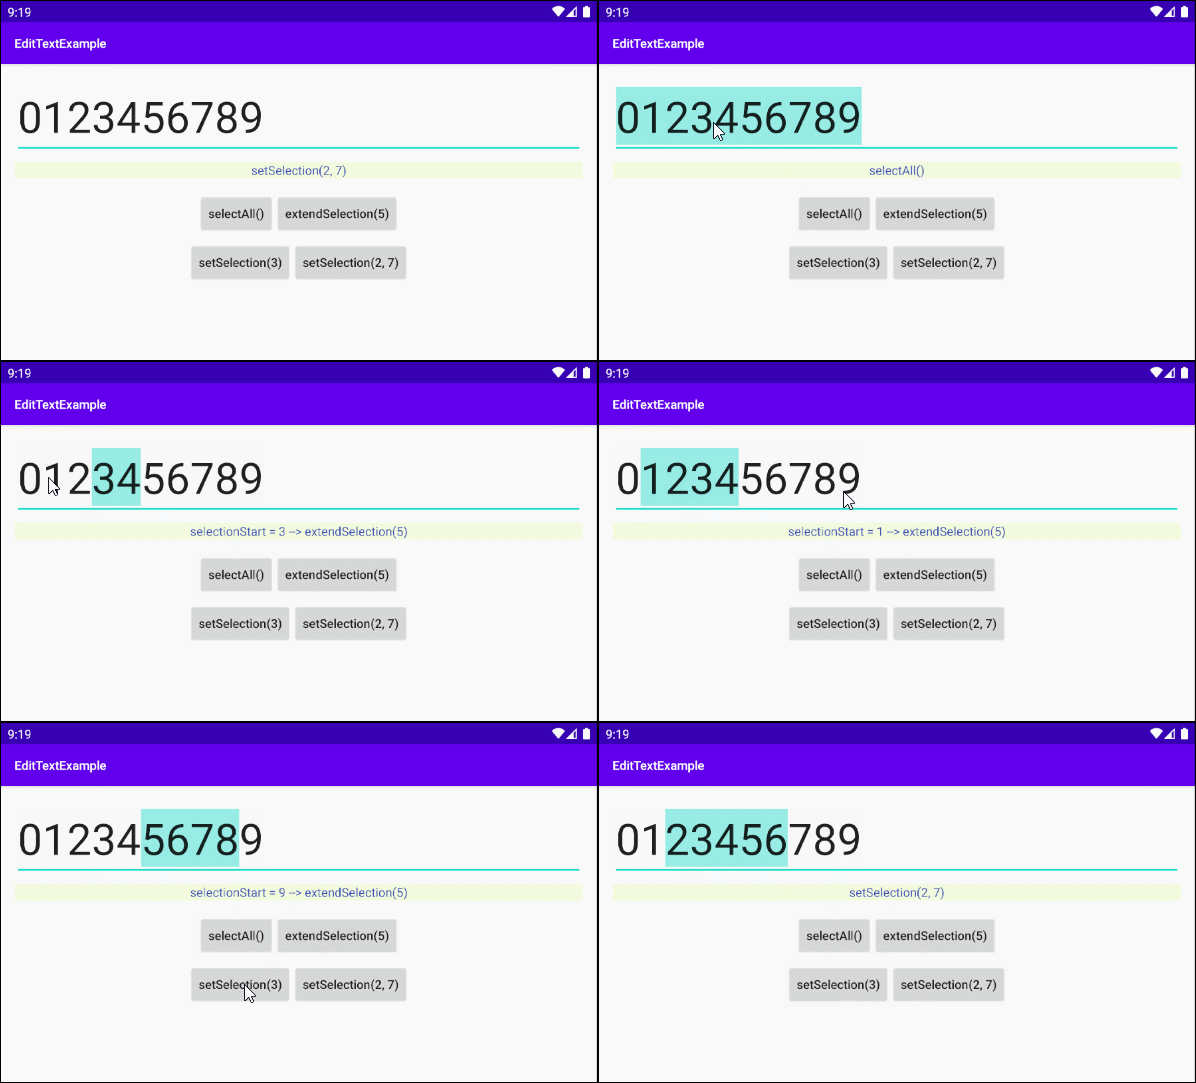
- void selectAll()
- void setSelection(int start, int stop) .
- void setSelection(int index)
- void extendSelection(int index)
selectAll()
Lựa chọn toàn bộ văn bản.
setSelection(int start, int stop)
Lựa chọn một đoạn văn bản con từ chỉ số start tới chỉ số stop. Chỉ số được bắt đầu từ 0, 1, 2...
setSelection(int index)
Di chuyển con trỏ (cursor) tới vị trí có chỉ số "index".
extendSelection(int index)
Lựa chọn một văn bản con từ vị trí hiện tại của con trỏ (cursor) tới vị trí có chỉ số "index".
Chú ý: Bạn có thể tham khảo ví dụ về cách sử dụng các phương thức này ở phía cuối bài viết.
5. Ví dụ EditText
Trong ví dụ này tôi sẽ hướng dẫn bạn cách sử dụng các phương thức selectAll(), extendSelection(), setSelection() của EditText. Và đây là hình ảnh xem trước của ví dụ:
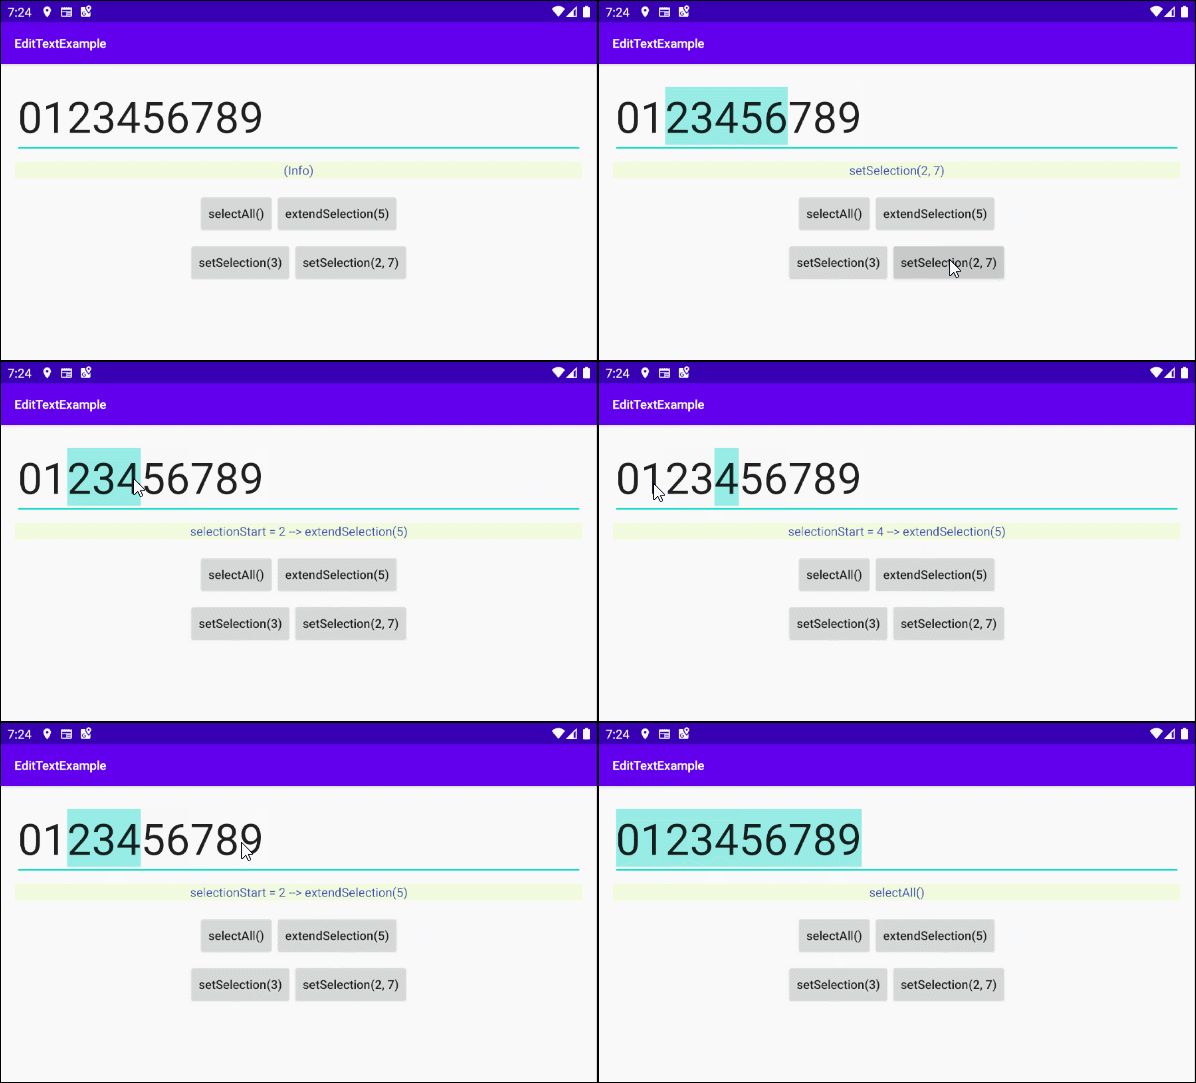
Giao diện của ứng dụng:
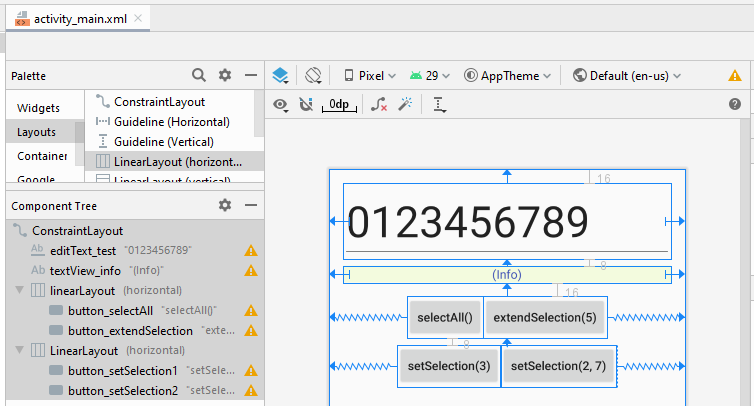
activity_main.xml
<?xml version="1.0" encoding="utf-8"?>
<androidx.constraintlayout.widget.ConstraintLayout
    xmlns:android="http://schemas.android.com/apk/res/android"
    xmlns:app="http://schemas.android.com/apk/res-auto"
    xmlns:tools="http://schemas.android.com/tools"
    android:layout_width="match_parent"
    android:layout_height="match_parent"
    tools:context=".MainActivity">

    <EditText
        android:id="@+id/editText_test"
        android:layout_width="0dp"
        android:layout_height="wrap_content"
        android:layout_marginStart="16dp"
        android:layout_marginLeft="16dp"
        android:layout_marginTop="16dp"
        android:layout_marginEnd="16dp"
        android:layout_marginRight="16dp"
        android:ems="10"
        android:inputType="text"
        android:text="0123456789"
        android:textSize="50sp"
        app:layout_constraintEnd_toEndOf="parent"
        app:layout_constraintStart_toStartOf="parent"
        app:layout_constraintTop_toTopOf="parent" />

    <TextView
        android:id="@+id/textView_info"
        android:layout_width="0dp"
        android:layout_height="wrap_content"
        android:layout_marginStart="16dp"
        android:layout_marginLeft="16dp"
        android:layout_marginTop="8dp"
        android:layout_marginEnd="16dp"
        android:layout_marginRight="16dp"
        android:background="#F3FBDE"
        android:gravity="center_horizontal"
        android:text="(Info)"
        android:textColor="#3F51B5"
        app:layout_constraintEnd_toEndOf="parent"
        app:layout_constraintStart_toStartOf="parent"
        app:layout_constraintTop_toBottomOf="@+id/editText_test" />

    <LinearLayout
        android:id="@+id/linearLayout"
        android:layout_width="wrap_content"
        android:layout_height="wrap_content"
        android:layout_marginTop="16dp"
        android:orientation="horizontal"
        app:layout_constraintEnd_toEndOf="parent"
        app:layout_constraintStart_toStartOf="parent"
        app:layout_constraintTop_toBottomOf="@+id/textView_info">

        <Button
            android:id="@+id/button_selectAll"
            android:layout_width="wrap_content"
            android:layout_height="wrap_content"
            android:text="selectAll()"
            android:textAllCaps="false" />

        <Button
            android:id="@+id/button_extendSelection"
            android:layout_width="wrap_content"
            android:layout_height="wrap_content"
            android:text="extendSelection(5)"
            android:textAllCaps="false" />
    </LinearLayout>

    <LinearLayout
        android:layout_width="wrap_content"
        android:layout_height="wrap_content"
        android:layout_marginTop="8dp"
        android:orientation="horizontal"
        app:layout_constraintEnd_toEndOf="parent"
        app:layout_constraintStart_toStartOf="parent"
        app:layout_constraintTop_toBottomOf="@+id/linearLayout">

        <Button
            android:id="@+id/button_setSelection1"
            android:layout_width="wrap_content"
            android:layout_height="wrap_content"
            android:text="setSelection(3)"
            android:textAllCaps="false" />

        <Button
            android:id="@+id/button_setSelection2"
            android:layout_width="wrap_content"
            android:layout_height="wrap_content"
            android:text="setSelection(2, 7)"
            android:textAllCaps="false" />
    </LinearLayout>

</androidx.constraintlayout.widget.ConstraintLayout>
MainActivity.java
package com.example.edittextexample;

import androidx.appcompat.app.AppCompatActivity;

import android.os.Bundle;
import android.text.TextWatcher;
import android.view.View;
import android.widget.Button;
import android.widget.EditText;
import android.widget.TextView;

public class MainActivity extends AppCompatActivity {

    private EditText editTextTest;
    private TextView textViewInfo;

    private Button button_selectAll;
    private Button button_setSelection1;
    private Button button_setSelection2;
    private Button button_extendSelection;

    @Override
    protected void onCreate(Bundle savedInstanceState) {
        super.onCreate(savedInstanceState);
        setContentView(R.layout.activity_main);

        this.editTextTest = (EditText) this.findViewById(R.id.editText_test);
        this.textViewInfo = (TextView) this.findViewById(R.id.textView_info);

        this.button_selectAll = (Button) this.findViewById(R.id.button_selectAll);
        this.button_setSelection1 = (Button) this.findViewById(R.id.button_setSelection1);
        this.button_setSelection2 = (Button) this.findViewById(R.id.button_setSelection2);
        this.button_extendSelection = (Button) this.findViewById(R.id.button_extendSelection);

        // Focus
        this.editTextTest.requestFocus();

        this.button_selectAll.setOnClickListener(new View.OnClickListener() {
            @Override
            public void onClick(View v) {
                selectAllHandler();
            }
        });

        this.button_setSelection1.setOnClickListener(new View.OnClickListener() {
            @Override
            public void onClick(View v) {
                setSelection1Handler();
            }
        });

        this.button_setSelection2.setOnClickListener(new View.OnClickListener() {
            @Override
            public void onClick(View v) {
                setSelection2Handler();
            }
        });

        this.button_extendSelection.setOnClickListener(new View.OnClickListener() {
            @Override
            public void onClick(View v) {
                extendSelectionHandler();
            }
        });
    }

    // Usage of: editText.selectALl()
    private void selectAllHandler() {
        this.editTextTest.selectAll();
        this.textViewInfo.setText("selectAll()");
    }

    // Usage of: editText.setSelection(int index)
    private void setSelection1Handler() {
        this.editTextTest.setSelection(3);
        this.textViewInfo.setText("setSelection(3)");
    }

    // Usage of: editText.setSelection(int start, int stop)
    private void setSelection2Handler() {
        this.editTextTest.setSelection(2, 7);
        this.textViewInfo.setText("setSelection(2, 7)");
    }

    // Usage of: editText.extendSelection(int index)
    private void extendSelectionHandler() {
        this.editTextTest.extendSelection(5);

        int selectionStart = this.editTextTest.getSelectionStart();
        this.textViewInfo.setText("selectionStart = " + selectionStart+ " --> extendSelection(5)");
    }

}Các hướng dẫn lập trình Android
- Cấu hình Android Emulator trong Android Studio
- Hướng dẫn và ví dụ Android ToggleButton
- Tạo một File Finder Dialog đơn giản trong Android
- Hướng dẫn và ví dụ Android TimePickerDialog
- Hướng dẫn và ví dụ Android DatePickerDialog
- Bắt đầu với Android cần những gì?
- Cài đặt Android Studio trên Windows
- Cài đặt Intel® HAXM cho Android Studio
- Hướng dẫn và ví dụ Android AsyncTask
- Hướng dẫn và ví dụ Android AsyncTaskLoader
- Hướng dẫn lập trình Android cho người mới bắt đầu - Các ví dụ cơ bản
- Làm sao biết số số điện thoại của Android Emulator và thay đổi nó
- Hướng dẫn và ví dụ Android TextInputLayout
- Hướng dẫn và ví dụ Android CardView
- Hướng dẫn và ví dụ Android ViewPager2
- Lấy số điện thoại trong Android sử dụng TelephonyManager
- Hướng dẫn và ví dụ Android Phone Call
- Hướng dẫn và ví dụ Android Wifi Scanning
- Hướng dẫn lập trình Android Game 2D cho người mới bắt đầu
- Hướng dẫn và ví dụ Android DialogFragment
- Hướng dẫn và ví dụ Android CharacterPickerDialog
- Hướng dẫn lập trình Android cho người mới bắt đầu - Hello Android
- Hướng dẫn sử dụng Android Device File Explorer
- Bật tính năng USB Debugging trên thiết bị Android
- Hướng dẫn và ví dụ Android UI Layouts
- Hướng dẫn và ví dụ Android SMS
- Hướng dẫn lập trình Android với Database SQLite
- Hướng dẫn và ví dụ Google Maps Android API
- Hướng dẫn chuyển văn bản thành lời nói trong Android
- Hướng dẫn và ví dụ Android Space
- Hướng dẫn và ví dụ Android Toast
- Tạo một Android Toast tùy biến
- Hướng dẫn và ví dụ Android SnackBar
- Hướng dẫn và ví dụ Android TextView
- Hướng dẫn và ví dụ Android TextClock
- Hướng dẫn và ví dụ Android EditText
- Hướng dẫn và ví dụ Android TextWatcher
- Định dạng số thẻ tín dụng với Android TextWatcher
- Hướng dẫn và ví dụ Android Clipboard
- Tạo một File Chooser đơn giản trong Android
- Hướng dẫn và ví dụ Android AutoCompleteTextView và MultiAutoCompleteTextView
- Hướng dẫn và ví dụ Android ImageView
- Hướng dẫn và ví dụ Android ImageSwitcher
- Hướng dẫn và ví dụ Android ScrollView và HorizontalScrollView
- Hướng dẫn và ví dụ Android WebView
- Hướng dẫn và ví dụ Android SeekBar
- Hướng dẫn và ví dụ Android Dialog
- Hướng dẫn và ví dụ Android AlertDialog
- Hướng dẫn và ví dụ Android RatingBar
- Hướng dẫn và ví dụ Android ProgressBar
- Hướng dẫn và ví dụ Android Spinner
- Hướng dẫn và ví dụ Android Button
- Hướng dẫn và ví dụ Android Switch
- Hướng dẫn và ví dụ Android ImageButton
- Hướng dẫn và ví dụ Android FloatingActionButton
- Hướng dẫn và ví dụ Android CheckBox
- Hướng dẫn và ví dụ Android RadioGroup và RadioButton
- Hướng dẫn và ví dụ Android Chip và ChipGroup
- Sử dụng các tài sản ảnh và biểu tượng của Android Studio
- Thiết lập SD Card cho Android Emulator
- Ví dụ với ChipGroup và các Chip Entry
- Làm sao thêm thư viện bên ngoài vào dự án Android trong Android Studio?
- Làm sao loại bỏ các quyền đã cho phép trên ứng dụng Android
- Làm sao loại bỏ các ứng dụng ra khỏi Android Emulator?
- Hướng dẫn và ví dụ Android LinearLayout
- Hướng dẫn và ví dụ Android TableLayout
- Hướng dẫn và ví dụ Android FrameLayout
- Hướng dẫn và ví dụ Android QuickContactBadge
- Hướng dẫn và ví dụ Android StackView
- Hướng dẫn và ví dụ Android Camera
- Hướng dẫn và ví dụ Android MediaPlayer
- Hướng dẫn và ví dụ Android VideoView
- Phát hiệu ứng âm thanh trong Android với SoundPool
- Hướng dẫn lập trình mạng trong Android - Android Networking
- Hướng dẫn xử lý JSON trong Android
- Lưu trữ dữ liệu trên thiết bị với Android SharedPreferences
- Hướng dẫn lập trình Android với bộ lưu trữ trong (Internal Storage)
- Hướng dẫn lập trình Android với bộ lưu trữ ngoài (External Storage)
- Hướng dẫn sử dụng Intent trong Android
- Ví dụ về một Android Intent tường minh, gọi một Intent khác
- Ví dụ về Android Intent không tường minh, mở một URL, gửi một email
- Hướng dẫn sử dụng Service trong Android
- Hướng dẫn sử dụng thông báo trong Android - Android Notification
- Hướng dẫn và ví dụ Android DatePicker
- Hướng dẫn và ví dụ Android TimePicker
- Hướng dẫn và ví dụ Android Chronometer
- Hướng dẫn và ví dụ Android OptionMenu
- Hướng dẫn và ví dụ Android ContextMenu
- Hướng dẫn và ví dụ Android PopupMenu
- Hướng dẫn và ví dụ Android Fragment
- Hướng dẫn và ví dụ Android ListView
- Android ListView với Checkbox sử dụng ArrayAdapter
- Hướng dẫn và ví dụ Android GridView
Show More


