Hướng dẫn và ví dụ Android LinearLayout
1. Android LinearLayout
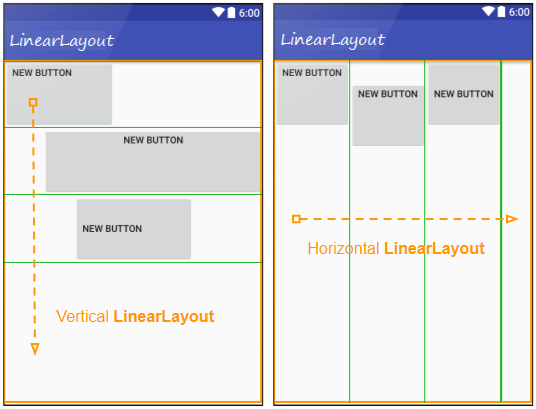
LinearLayout là một ViewGroup nó sắp xếp các View con theo một hướng duy nhất, theo chiều dọc hoặc chiều ngang. Bạn có thể chỉ định hướng (orientation) của nó bằng cách sử dụng thuộc tính: android:orientation.
<!-- Horizontal LinearLayout (Default) -->
<LinearLayout
    ...
    android:orientation="horizontal">

   ...
</LinearLayout>


<!-- Vertical LinearLayout -->
<LinearLayout
    ...
    android:orientation="vertical">

   ...
</LinearLayout>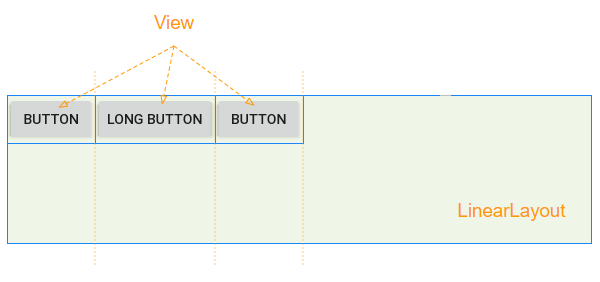
Ví dụ: Sử dụng mã Java để tạo LinearLayout, và thêm các View con vào LinearLayout:
// linearLayout = new LinearLayout(MainActivity.this);
// linearLayout.setOrientation(LinearLayout.HORIZONTAL);

LinearLayout.LayoutParams layoutParams
        = new LinearLayout.LayoutParams(LinearLayout.LayoutParams.WRAP_CONTENT,
        LinearLayout.LayoutParams.WRAP_CONTENT, 0);

Button button1 = new Button(this);
button1.setText("Button");
linearLayout.addView(button1, layoutParams);

Button button2 = new Button(this);
button2.setText("Long Button");
button2.setLayoutParams(layoutParams);
linearLayout.addView(button2);
2. android:layout_weight
android:layout_weight là một thuộc tính quan trọng được sử dụng cho các View con của LinearLayout, nó chỉ định có bao nhiêu không gian mà View con sẽ chiếm trong View cha (LinearLayout) (Theo chiều ngang hoặc thẳng đứng). Một giá trị layout_weight lớn hơn 0 cho phép View con mở rộng để điền vào bất kỳ không gian còn lại trong View cha. Các View con có thể được chỉ định một giá trị layout_weight > 0, và sau đó bất kỳ không gian còn lại trong View cha sẽ được gán cho các View con theo tỷ lệ layout_weight của chúng.
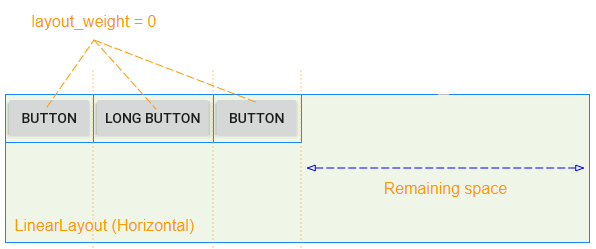
Khi tất cả các View con có android:layout_weight=0, bạn sẽ nhìn thấy một không gian trống trong View cha (LinearLayout):
Các View con có android:layout_weight>0 sẽ chiếm lấy vùng không gian trống của View cha (LinearLayout):

Vùng không gian trống của View cha (LinearLayout) sẽ được phân bổ cho các View con theo theo tỷ lệ layout_weight của chúng.

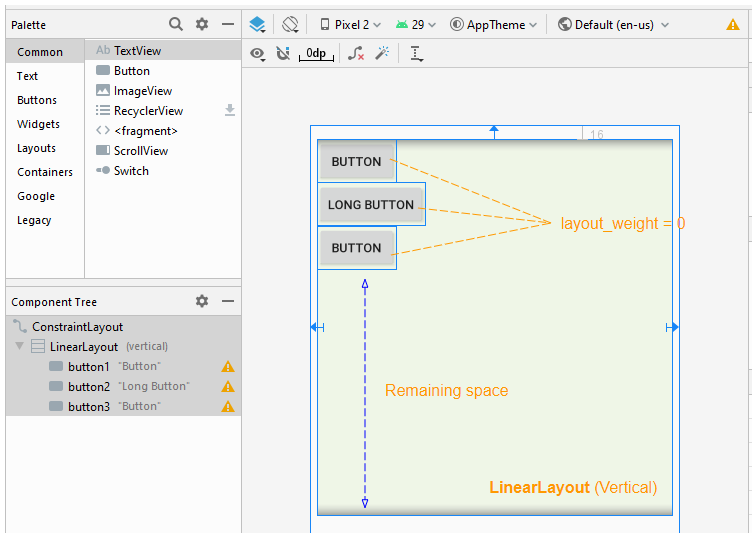
Thuộc tính android:layout_weight cũng có ý nghĩa tương tự trong một LinearLayout thẳng đứng:
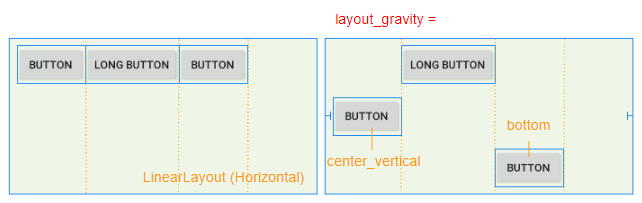
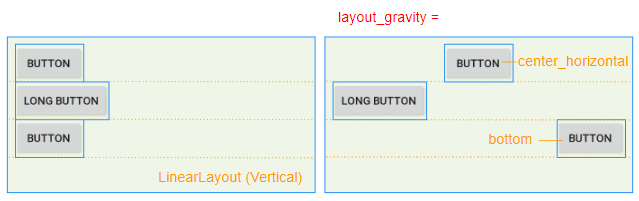
3. android:layout_gravity
Thuộc tính android:layout_gravity được áp dụng cho một View con để chỉ định vị trí tương đối của View con bên trong View cha (LinearLayout).
Constant in Java | Value | Description |
Gravity.LEFT | left | |
Gravity.CENTER_HORIZONTAL | center_horizontal | |
Gravity.RIGHT | right | |
Gravity.TOP | top | |
Gravity.CENTER_VERTICAL | center_vertical | |
Gravity.BOTTOM | bottom | |
Gravity.START | start | |
Gravity.END | end | |
Gravity.CENTER | center | |
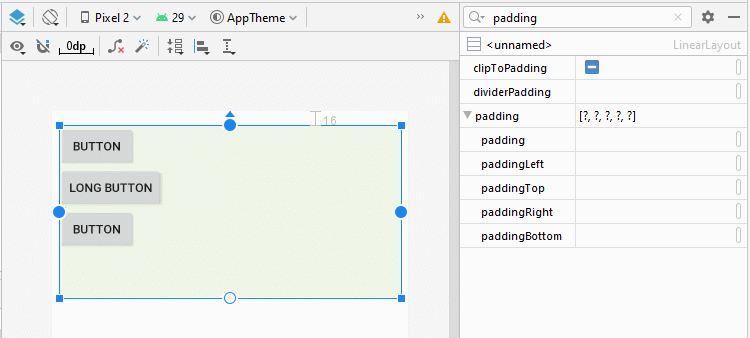
4. android:padding
Padding là khoảng không gian nằm trong LinearLayout (Nằm trong viền), và bao quanh 4 mặt của nội dung.
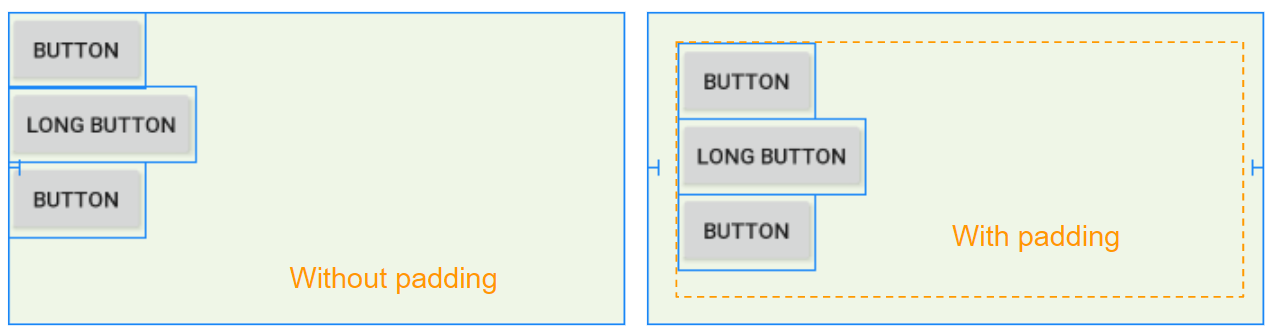
Bạn có thể sét đặt padding cho LinearLayout thông qua các thuộc tính sau:
- android:padding
- android:paddingTop
- android:paddingRight
- android:paddingBottom
- android:paddingLeft
<LinearLayout
    ...
    android:orientation="horizontal"
    android:paddingTop="20dp"
    android:paddingRight="30dp"
    android:paddingBottom="10dp"
    android:paddingLeft="20dp">

    <Button
        android:id="@+id/button1"
        android:layout_width="wrap_content"
        android:layout_height="wrap_content"
        android:layout_weight="0"
        android:text="Button" />

</LinearLayout>
5. LinearLayout spacing
Đôi khi bạn muốn thiết lập khoảng không gian giữa các View con của LinearLayout, có một vài cách để bạn thực hiện điều này:
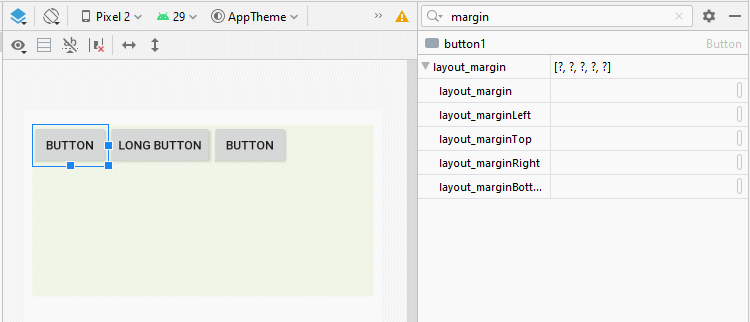
android:layout_margin
Áp dụng thuộc tính android:layout_margin cho tất cả các View con của LinearLayout sẽ giúp thiết lập khoảng cách giữa chúng.
* layout_margin (Java code) *
// linearLayout = new LinearLayout(MainActivity.this);
// linearLayout.setOrientation(LinearLayout.HORIZONTAL);

LinearLayout.LayoutParams layoutParams
        = new LinearLayout.LayoutParams(LinearLayout.LayoutParams.WRAP_CONTENT,
                          LinearLayout.LayoutParams.WRAP_CONTENT, 0);
layoutParams.setMargins(30, 20, 30, 0);

Button button1 = new Button(this);
button1.setText("Button");
linearLayout.addView(button1, layoutParams);

Button button2 = new Button(this);
button2.setText("Long Button");
button2.setLayoutParams(layoutParams);
linearLayout.addView(button2);
Space View
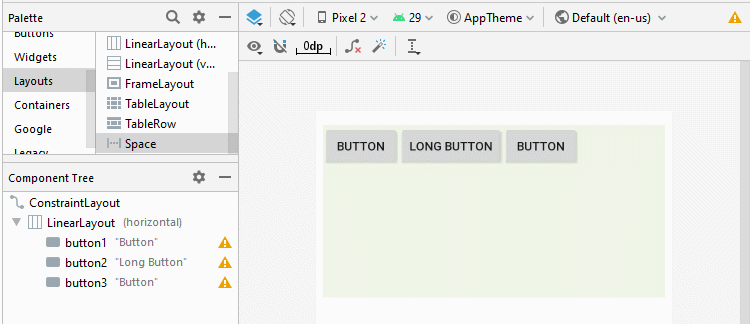
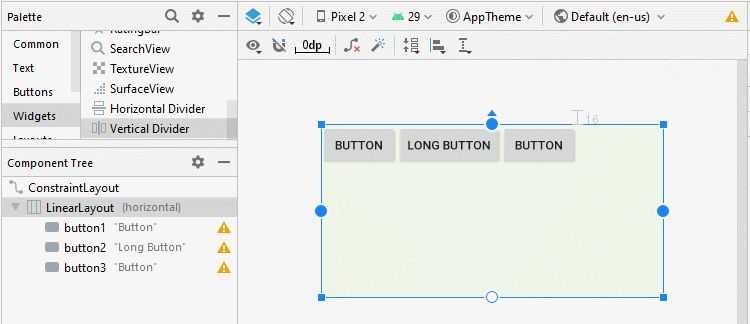
Android 4.0+ (API Level 14+) hỗ trợ một kiểu View mới đó là Space, nó giúp bạn thêm một không gian trống vào giao diện. Bạn có thể sử dụng Space để ngăn cách giữa các View con bên trong LinearLayout.
<LinearLayout
    ...
    android:layout_width="0dp"
    android:layout_height="200dp"
    android:background="#EFF6E7"
    android:orientation="horizontal">

    <Button
        android:id="@+id/button1"
        android:layout_width="wrap_content"
        android:layout_height="wrap_content"
        android:layout_weight="0"
        android:text="Button" />

    <Space
        android:layout_width="10dp"
        android:layout_height="wrap_content"
        android:layout_weight="0" />

    <Button
        android:id="@+id/button2"
        android:layout_width="wrap_content"
        android:layout_height="wrap_content"
        android:layout_weight="0"
        android:text="Long Button" />

    <Button
        android:id="@+id/button3"
        android:layout_width="wrap_content"
        android:layout_height="wrap_content"
        android:layout_weight="0"
        android:text="Button" />
</LinearLayout>
* Add Space (Java code) *
// linearLayout = new LinearLayout(MainActivity.this);
// linearLayout.setOrientation(LinearLayout.HORIZONTAL);

LinearLayout.LayoutParams layoutParams
        = new LinearLayout.LayoutParams(LinearLayout.LayoutParams.WRAP_CONTENT,
        LinearLayout.LayoutParams.WRAP_CONTENT, 0);

LinearLayout.LayoutParams layoutParams2
        = new LinearLayout.LayoutParams(15,
        LinearLayout.LayoutParams.WRAP_CONTENT, 0);

Button button1 = new Button(this);
button1.setText("Button");
linearLayout.addView(button1, layoutParams);

// Create a Space View.
Space space = new Space(this);
space.setLayoutParams(layoutParams2);
linearLayout.addView(space);

Button button2 = new Button(this);
button2.setText("Long Button");
button2.setLayoutParams(layoutParams);
linearLayout.addView(button2);
android:divider
Android 3.0+ (API Level 11+) cho phép bạn thêm một Divider (Giải phân cách) vào giữa 2 View con trong LinearLayout, thậm chí bạn có thể chỉ định kiểu dáng, mầu sắc cho Divider.
* Divider *
<LinearLayout
    ...
    android:orientation="horizontal">

    <Button
        android:id="@+id/button1"
        android:layout_width="wrap_content"
        android:layout_height="wrap_content"
        android:layout_weight="0"
        android:text="Button" />

     <!-- Divider -->
    <View
        android:id="@+id/divider"
        android:layout_width="15dp"
        android:layout_height="match_parent"
        android:layout_weight="0"
        android:background="?android:attr/listDivider" />

    <Button
        android:id="@+id/button2"
        android:layout_width="wrap_content"
        android:layout_height="wrap_content"
        android:layout_weight="0"
        android:text="Long Button" />

    <Button
        android:id="@+id/button3"
        android:layout_width="wrap_content"
        android:layout_height="wrap_content"
        android:layout_weight="0"
        android:text="Button" />
</LinearLayout>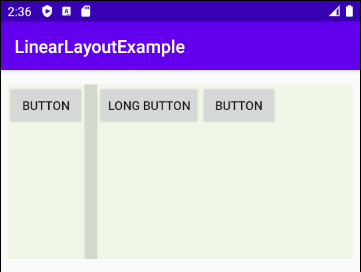
* Add Divider (Java code) *
// linearLayout = new LinearLayout(MainActivity.this);
// linearLayout.setOrientation(LinearLayout.HORIZONTAL);

LinearLayout.LayoutParams layoutParams
        = new LinearLayout.LayoutParams(LinearLayout.LayoutParams.WRAP_CONTENT,
        LinearLayout.LayoutParams.WRAP_CONTENT, 0);

LinearLayout.LayoutParams layoutParams2
        = new LinearLayout.LayoutParams(15,
        LinearLayout.LayoutParams.MATCH_PARENT, 0);

Button button1 = new Button(this);
button1.setText("Button");
linearLayout.addView(button1, layoutParams);

// Create a Divider.
View divider = new View(this);
// android:background="?android:attr/listDivider"
divider.setBackgroundResource(android.R.drawable.divider_horizontal_bright);
linearLayout.addView(divider, layoutParams2);

Button button2 = new Button(this);
button2.setText("Long Button");
button2.setLayoutParams(layoutParams);
linearLayout.addView(button2);
Xem thêm bài viết chi tiết về Divider, nó giúp bạn tùy biến Divider phù hợp với ứng dụng của bạn:
- Hướng dẫn và ví dụ Android Divider
Các hướng dẫn lập trình Android
- Cấu hình Android Emulator trong Android Studio
- Hướng dẫn và ví dụ Android ToggleButton
- Tạo một File Finder Dialog đơn giản trong Android
- Hướng dẫn và ví dụ Android TimePickerDialog
- Hướng dẫn và ví dụ Android DatePickerDialog
- Bắt đầu với Android cần những gì?
- Cài đặt Android Studio trên Windows
- Cài đặt Intel® HAXM cho Android Studio
- Hướng dẫn và ví dụ Android AsyncTask
- Hướng dẫn và ví dụ Android AsyncTaskLoader
- Hướng dẫn lập trình Android cho người mới bắt đầu - Các ví dụ cơ bản
- Làm sao biết số số điện thoại của Android Emulator và thay đổi nó
- Hướng dẫn và ví dụ Android TextInputLayout
- Hướng dẫn và ví dụ Android CardView
- Hướng dẫn và ví dụ Android ViewPager2
- Lấy số điện thoại trong Android sử dụng TelephonyManager
- Hướng dẫn và ví dụ Android Phone Call
- Hướng dẫn và ví dụ Android Wifi Scanning
- Hướng dẫn lập trình Android Game 2D cho người mới bắt đầu
- Hướng dẫn và ví dụ Android DialogFragment
- Hướng dẫn và ví dụ Android CharacterPickerDialog
- Hướng dẫn lập trình Android cho người mới bắt đầu - Hello Android
- Hướng dẫn sử dụng Android Device File Explorer
- Bật tính năng USB Debugging trên thiết bị Android
- Hướng dẫn và ví dụ Android UI Layouts
- Hướng dẫn và ví dụ Android SMS
- Hướng dẫn lập trình Android với Database SQLite
- Hướng dẫn và ví dụ Google Maps Android API
- Hướng dẫn chuyển văn bản thành lời nói trong Android
- Hướng dẫn và ví dụ Android Space
- Hướng dẫn và ví dụ Android Toast
- Tạo một Android Toast tùy biến
- Hướng dẫn và ví dụ Android SnackBar
- Hướng dẫn và ví dụ Android TextView
- Hướng dẫn và ví dụ Android TextClock
- Hướng dẫn và ví dụ Android EditText
- Hướng dẫn và ví dụ Android TextWatcher
- Định dạng số thẻ tín dụng với Android TextWatcher
- Hướng dẫn và ví dụ Android Clipboard
- Tạo một File Chooser đơn giản trong Android
- Hướng dẫn và ví dụ Android AutoCompleteTextView và MultiAutoCompleteTextView
- Hướng dẫn và ví dụ Android ImageView
- Hướng dẫn và ví dụ Android ImageSwitcher
- Hướng dẫn và ví dụ Android ScrollView và HorizontalScrollView
- Hướng dẫn và ví dụ Android WebView
- Hướng dẫn và ví dụ Android SeekBar
- Hướng dẫn và ví dụ Android Dialog
- Hướng dẫn và ví dụ Android AlertDialog
- Hướng dẫn và ví dụ Android RatingBar
- Hướng dẫn và ví dụ Android ProgressBar
- Hướng dẫn và ví dụ Android Spinner
- Hướng dẫn và ví dụ Android Button
- Hướng dẫn và ví dụ Android Switch
- Hướng dẫn và ví dụ Android ImageButton
- Hướng dẫn và ví dụ Android FloatingActionButton
- Hướng dẫn và ví dụ Android CheckBox
- Hướng dẫn và ví dụ Android RadioGroup và RadioButton
- Hướng dẫn và ví dụ Android Chip và ChipGroup
- Sử dụng các tài sản ảnh và biểu tượng của Android Studio
- Thiết lập SD Card cho Android Emulator
- Ví dụ với ChipGroup và các Chip Entry
- Làm sao thêm thư viện bên ngoài vào dự án Android trong Android Studio?
- Làm sao loại bỏ các quyền đã cho phép trên ứng dụng Android
- Làm sao loại bỏ các ứng dụng ra khỏi Android Emulator?
- Hướng dẫn và ví dụ Android LinearLayout
- Hướng dẫn và ví dụ Android TableLayout
- Hướng dẫn và ví dụ Android FrameLayout
- Hướng dẫn và ví dụ Android QuickContactBadge
- Hướng dẫn và ví dụ Android StackView
- Hướng dẫn và ví dụ Android Camera
- Hướng dẫn và ví dụ Android MediaPlayer
- Hướng dẫn và ví dụ Android VideoView
- Phát hiệu ứng âm thanh trong Android với SoundPool
- Hướng dẫn lập trình mạng trong Android - Android Networking
- Hướng dẫn xử lý JSON trong Android
- Lưu trữ dữ liệu trên thiết bị với Android SharedPreferences
- Hướng dẫn lập trình Android với bộ lưu trữ trong (Internal Storage)
- Hướng dẫn lập trình Android với bộ lưu trữ ngoài (External Storage)
- Hướng dẫn sử dụng Intent trong Android
- Ví dụ về một Android Intent tường minh, gọi một Intent khác
- Ví dụ về Android Intent không tường minh, mở một URL, gửi một email
- Hướng dẫn sử dụng Service trong Android
- Hướng dẫn sử dụng thông báo trong Android - Android Notification
- Hướng dẫn và ví dụ Android DatePicker
- Hướng dẫn và ví dụ Android TimePicker
- Hướng dẫn và ví dụ Android Chronometer
- Hướng dẫn và ví dụ Android OptionMenu
- Hướng dẫn và ví dụ Android ContextMenu
- Hướng dẫn và ví dụ Android PopupMenu
- Hướng dẫn và ví dụ Android Fragment
- Hướng dẫn và ví dụ Android ListView
- Android ListView với Checkbox sử dụng ArrayAdapter
- Hướng dẫn và ví dụ Android GridView
Show More
